
Knitting is a wonderful hobby that allows you to create beautiful and cozy items for yourself and your loved ones. One of the most popular projects for knitters of all skill levels is a basic knit sweater. This versatile garment can be customized to fit your personal style and can be worn year-round.
Whether you’re a beginner or an experienced knitter, this basic knit sweater pattern is a great project for you. The pattern is simple and easy to follow, making it perfect for those who are new to sweater knitting. With just a few basic stitches and techniques, you’ll be able to create a timeless and stylish sweater that will keep you warm and fashionable.
This pattern calls for a medium-weight yarn and size 8 knitting needles, but you can easily adjust the size by using smaller or larger needles and changing the number of stitches. The sweater is knit in pieces, starting with the front and back panels and then sewing them together at the shoulders and sides. The sleeves are then picked up and knit from the armholes, and the neckline is finished with ribbing.
What Is a Basic Knit Sweater Pattern?
Knitting a sweater can be a rewarding and fulfilling project, whether you’re a beginner or an experienced knitter. A basic knit sweater pattern is a blueprint or set of instructions that guides you through the process of creating a simple, classic sweater design. It provides step-by-step directions for each section of the sweater, including the body, sleeves, and neckline, as well as any additional details such as ribbing or cable stitches.
A basic knit sweater pattern typically includes information on the recommended yarn type and weight, as well as the corresponding needle size and gauge. It may also specify the required amount of yarn in terms of yardage or weight. The pattern will outline the necessary measurements for each size, allowing you to choose the appropriate size based on your measurements or the desired fit of the sweater.
Once you have gathered all the necessary materials and chosen your size, you can begin following the pattern instructions. The pattern will typically start with casting on stitches and establishing the ribbing or stitch pattern for the hem or cuffs. From there, it will guide you through the main body of the sweater, including any shaping for the waist or bust. The sleeves are usually knit separately and then attached to the body, and the neckline is usually finished with ribbing or a decorative collar.
A basic knit sweater pattern serves as a foundation for countless variations and customization options. Once you have mastered the basic pattern, you can experiment with different yarns, stitch patterns, colorwork, or even add embellishments like buttons or pockets. Whether you prefer a traditional crewneck, a cozy turtleneck, or a trendy oversized sweater, a basic knit sweater pattern can be adapted to suit your personal style and preferences.
Overall, a basic knit sweater pattern is an invaluable resource for knitters who want to create their own wearable, handmade garments. It provides the structure and guidance needed to confidently tackle a sweater project, while allowing for individual creativity and customization. With a basic knit sweater pattern in hand, you can embark on a rewarding knitting journey and create a timeless wardrobe staple that is uniquely yours.
Why Knitting a Sweater Is a Great DIY Project
Knitting a sweater can be a rewarding and fulfilling DIY project for anyone who enjoys working with their hands and creating something unique. Not only does knitting allow you to express your creativity, but it also offers a sense of accomplishment as you see your project come to life stitch by stitch.
Personalization and Customization: When you knit a sweater, you have complete control over the design, color, and fit. You can choose the type of yarn, stitch pattern, and even add personalized details such as buttons or pockets. This level of customization ensures that your sweater will be one-of-a-kind and perfectly tailored to your preferences.
Therapeutic and Relaxing: Knitting has been proven to have therapeutic benefits, such as reducing stress and promoting relaxation. The repetitive motion of knitting can help calm the mind and provide a sense of focus and mindfulness. Knitting a sweater allows you to take a break from the hustle and bustle of daily life and immerse yourself in a calming and enjoyable activity.
Cost-Effective: Purchasing a high-quality sweater can be expensive, but knitting your own allows you to save money while still achieving the same level of quality. With just a few skeins of yarn and a set of knitting needles, you can create a sweater that would typically cost much more if bought from a store. Additionally, you have the option to choose more affordable yarn options or use up leftover yarn from previous projects to further reduce costs.
A Sense of Accomplishment: Completing a knitting project, especially a sweater, gives you a sense of accomplishment and pride in your work. Witnessing the transformation of a ball of yarn into a wearable garment can be incredibly satisfying. Knowing that you created something with your own hands that can be worn and enjoyed brings a sense of pride and joy.
Learn new skills: Knitting a sweater can be a great opportunity to learn new knitting techniques and expand your knitting skills. From mastering complicated stitch patterns to learning how to shape the garment for a perfect fit, each sweater project allows you to challenge yourself and grow as a knitter. The satisfaction of acquiring new skills and improving your craft is an added bonus to the enjoyment of knitting a sweater.
Overall, knitting a sweater is a fantastic DIY project that offers artistic expression, relaxation, cost savings, and a sense of achievement. Whether you are an experienced knitter or a beginner looking for a new challenge, knitting a sweater can provide hours of enjoyment and a beautiful, handmade garment that you can proudly wear.
Choosing the Right Yarn for Your Sweater

When knitting a sweater, one of the most important decisions you will make is choosing the right yarn. The yarn you select will greatly affect the final look, feel, and fit of your garment. It’s crucial to consider various factors such as fiber content, yarn weight, and color options to ensure a successful knitting project.
Fiber Content: The type of fiber used in the yarn will determine the overall characteristics of your sweater. Common options include wool, cotton, acrylic, alpaca, and blends. Wool is a popular choice for its warmth and elasticity, while cotton is favored for its breathability and softness. Acrylic yarns are often affordable and easy to care for. Alpaca offers luxurious softness and warmth, making it ideal for cozy winter sweaters. Consider your climate, personal preferences, and the intended use of the sweater when selecting the fiber content.
Yarn Weight: The weight of the yarn refers to its thickness and can range from super fine to super bulky. For a basic knit sweater, a medium weight yarn, such as DK or worsted, is commonly used. These weights provide a good balance between warmth and drape. However, you can experiment with different weights to achieve different effects. Thicker yarns will create a chunkier look, while lighter yarns will result in a more delicate finish.
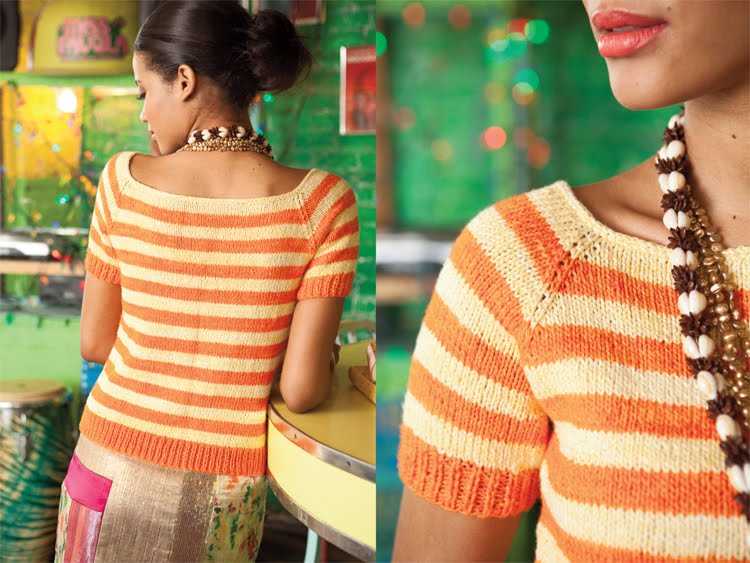
Color Options: The color of your yarn is a personal choice and can greatly impact the appearance of your sweater. Solid colors are classic and versatile, allowing the texture of your stitches to shine. On the other hand, variegated and self-striping yarns can add visual interest and create unique patterns without the need for complicated knitting techniques. Consider your style, the intended purpose of the sweater, and any pattern or stitch details when selecting the color of your yarn.
To help you make an informed decision, consult the pattern you will be using for your sweater. It may provide specific yarn recommendations based on the desired fit and design. Additionally, visiting a local yarn store and feeling the different yarn options in person can help you determine the right yarn for your sweater project. Remember to consider your preferences, budget, and desired outcome when making your final choice.
How to Select the Perfect Needles for Knitting a Sweater
When it comes to knitting a sweater, selecting the right needles plays a crucial role in achieving the desired results. The type and size of needles you choose can greatly impact the overall look and fit of your sweater. Here are some key factors to consider when selecting the perfect needles for your knitting project:
1. Needle Material
The material of the needles can affect your knitting experience and the final outcome of your sweater. Common options include metal, wood, and plastic. Metal needles are known for their durability and smoothness, which allows the stitches to glide effortlessly. Wood needles provide a warmer feel and are great for working with slippery or delicate yarns. Plastic needles, on the other hand, are lightweight and often less expensive.
2. Needle Size
The needle size you choose will depend on the gauge of your pattern and the type of yarn you’re using. The pattern should specify the recommended needle size to achieve the correct gauge. If you’re unsure, it’s best to make a gauge swatch to ensure your stitches match the pattern. Keep in mind that using larger needles will result in a looser and more open fabric, while smaller needles will create a tighter and denser fabric.
3. Needle Length
The length of the needles can influence your knitting technique and comfort. For knitting a sweater, circular needles are often the most versatile option. They come in various lengths, with the most common being 16 to 32 inches. Longer circular needles are useful for working on larger sweater bodies or for magic loop knitting. Shorter circular needles can be used for knitting sleeves or smaller parts of the sweater. If you prefer knitting with straight needles, choose a length that comfortably accommodates the width of your sweater.
4. Specialized Needles

Depending on the sweater pattern you’re working on, you may need specialized needles. This could include double-pointed needles (DPNs) for knitting in the round or cable needles for creating textured stitches. Make sure to check the pattern instructions to determine if any specialized needles are required and have them ready before starting your project.
By considering these factors, you can select the perfect needles for knitting your sweater. Remember to follow the pattern instructions and make any necessary adjustments to achieve the desired fit and finish.
Understanding Basic Knitting Techniques for a Sweater
Knitting a sweater is a fun and rewarding project that allows you to create a cozy and stylish garment. To successfully knit a sweater, it is important to understand some basic knitting techniques. These techniques include casting on, knitting, purling, increasing, decreasing, and binding off.
Casting on: Casting on is the first step in starting a knitting project. It creates the foundation row of stitches on the knitting needle. There are various methods of casting on, such as the long-tail cast-on, the knitted cast-on, and the cable cast-on. The type of cast-on method you choose will depend on your preference and the desired outcome of your sweater.
Knitting and purling: Knitting and purling are the two basic stitches used in knitting. Knitting creates a stitch by pulling the working yarn through an existing stitch on the needle, while purling creates a stitch by pulling the working yarn in front of the needle and through an existing stitch. These two stitches are often combined to create different patterns and textures in a knitted fabric.
Increasing and decreasing: Increasing and decreasing are techniques used to add or remove stitches in a knitted fabric. Increasing is done by adding a stitch to the fabric, typically by knitting or purling into the front and back of a stitch. Decreasing is done by removing a stitch from the fabric, typically by knitting or purling two stitches together. These techniques are used to shape the sweater and create a better fit.
Binding off: Binding off, also known as casting off, is the final step in completing a knitted project. It is done by knitting two stitches, passing the first stitch over the second, and repeating this process until only one stitch remains on the needle. Binding off creates a finished edge and prevents the stitches from unraveling.
By understanding these basic knitting techniques, you will be able to confidently knit a sweater and create a beautiful and cozy garment to wear. Take your time to practice and familiarize yourself with these techniques before starting your sweater project. Happy knitting!
Calculating the Gauge for Your Sweater
Before you start knitting your sweater, it is important to calculate the gauge to ensure that your finished product will fit properly. The gauge refers to the number of stitches and rows per inch that you are able to achieve with your chosen yarn and needle size. By calculating the gauge, you can adjust your knitting tension or needle size if necessary to achieve the desired measurements for your sweater.
To calculate the gauge, start by casting on a sample piece using the same yarn and needles that you plan to use for your sweater. It is recommended to cast on at least 20 stitches and work for a few inches to get an accurate measurement. Once you have your sample piece, measure the number of stitches and rows within a 1-inch area. This will give you the stitch and row count for your gauge.
For example:
- If you have 20 stitches and 26 rows within a 1-inch area, your gauge would be 20 stitches and 26 rows per inch.
- If you have 18 stitches and 24 rows within a 1-inch area, your gauge would be 18 stitches and 24 rows per inch.
Once you have calculated your gauge, compare it to the gauge specified in the pattern for your chosen sweater size. If your gauge matches the pattern gauge, you can proceed with confidence knowing that your finished sweater should have the expected measurements. However, if your gauge is different from the pattern, you may need to make adjustments.
Note: If your gauge is too loose (fewer stitches and rows per inch), you will need to use smaller needles to achieve the desired measurements. Conversely, if your gauge is too tight (more stitches and rows per inch), you will need to use larger needles.
Calculating the gauge is an important step in knitting a sweater. It ensures that your effort and time will result in a well-fitting garment. By taking the time to measure and adjust your gauge if needed, you can confidently begin knitting your sweater knowing that it will turn out just the way you want it to.
Starting Your Sweater: Casting On

Before you begin knitting your basic knit sweater, you will need to cast on your stitches. Casting on is the process of creating the initial row of stitches on your knitting needles. There are several different methods for casting on, but for this pattern, we will use the long-tail cast-on method.
To start the long-tail cast-on, you will need to leave a long tail of yarn. The length of this tail will depend on how many stitches you need to cast on, so make sure to leave enough yarn. Hold the tail in your right hand and the working end of the yarn in your left hand.
With the tail end of the yarn, make a slipknot by crossing the tail over the working end, creating a loop. Insert your knitting needle through the loop and tighten the slipknot. This slipknot will serve as your first stitch and will be counted as such when you count your total number of cast-on stitches.
Next, hold the knitting needle with the slipknot in your right hand, and use your left hand to position the working yarn and the tail over your thumb and index finger. This creates a “V” shape with the working yarn on top and the tail yarn on the bottom.
Now, bring the needle down and under the working yarn, then up and over the tail of the yarn. This will create a loop around the needle. Continue this motion, bringing the needle down and under the working yarn, then up and over the tail, until you have cast on the desired number of stitches.
Once you have cast on all your stitches, you are ready to begin knitting the first row of your basic knit sweater. Remember to count your stitches to ensure you have the correct number before moving on to the next step. Happy knitting!
Knitting the Body of Your Sweater
Once you have completed the ribbing for the bottom hem of your sweater, it’s time to move on to knitting the body. This is where you will begin to see your sweater take shape and grow. Follow these steps to knit the body of your sweater:
Step 1: Transition from the ribbing
Change to your main stitch pattern. If you have been knitting ribbing, switch to the stitch pattern specified in your pattern. This could be stockinette stitch, seed stitch, or any other pattern you choose. Make sure to follow the instructions for your specific pattern.
Step 2: Continue knitting in the round
Join your stitches in the round. If you are knitting a seamless sweater, join your stitches in the round using the magic loop method or by using double-pointed needles. If you are knitting a sweater with seams, continue knitting back and forth in rows.
Step 3: Knit the body to the desired length
Continue knitting the body of your sweater to the length specified in your pattern. This could be a cropped length, hip length, or longer depending on your preference. Make sure to measure your work frequently to ensure you are knitting to the correct length.
Step 4: Shape the armholes (if necessary)
If your sweater pattern includes armholes, it may be time to shape them. Follow the instructions for your pattern to decrease or bind off stitches at the appropriate points to create the armhole openings. This will vary depending on your pattern and size.
Step 5: Continue knitting the body
Once you have shaped the armholes, continue knitting the body of your sweater to the final length. Be sure to measure your work to ensure you are knitting to the correct measurements specified in your pattern.
Step 6: Bind off
When you have reached the desired length, bind off your stitches. This will vary depending on your pattern, but a basic bind off method can be used if no specific instructions are given. Bind off loosely to ensure your sweater has a comfortable fit.
Following these steps will help you knit the body of your sweater with confidence and ensure that it fits properly. Remember to refer to your pattern for specific instructions and measurements, and don’t hesitate to reach out for help if needed. Happy knitting!
Creating Sleeves and Shoulder Shaping
Once you have completed the body of the sweater, it’s time to move on to creating the sleeves. You will need to pick up stitches along the armholes and work in the round to create the sleeves. Make sure to count your stitches carefully to ensure that both sleeves are the same length.
To begin, insert your needle into the first stitch along the armhole and yarn over to create a new stitch. Continue to pick up stitches evenly along the armhole, making sure to maintain the correct stitch count. Once you have picked up all the stitches, join in the round by knitting the first stitch and placing a stitch marker to mark the beginning of the round.
Next, you will need to work the sleeve using your chosen stitch pattern. If you are following a basic stockinette stitch pattern, you will simply need to knit every round until the sleeve reaches the desired length. Remember to check your gauge and adjust your stitch count if necessary.
As you work the sleeve, you may want to incorporate shoulder shaping to create a better fit. This can be done by decreasing stitches at the top of the sleeve. To do this, work to the desired point of shaping and then begin decreasing by knitting two stitches together. Repeat this decrease every few rounds until you have reached the desired number of stitches for the shoulder.
Once you have completed both sleeves, you can bind off your stitches and sew any remaining seams. Remember to weave in any loose ends for a clean finish. With a little patience and attention to detail, you will have a beautifully finished knit sweater that you can be proud of.
Finishing Touches: Neckline and Hem
When it comes to finishing your basic knit sweater, the neckline and hem are two important areas that require careful attention. These elements can greatly affect the overall look and fit of your garment, so it’s crucial to get them just right.
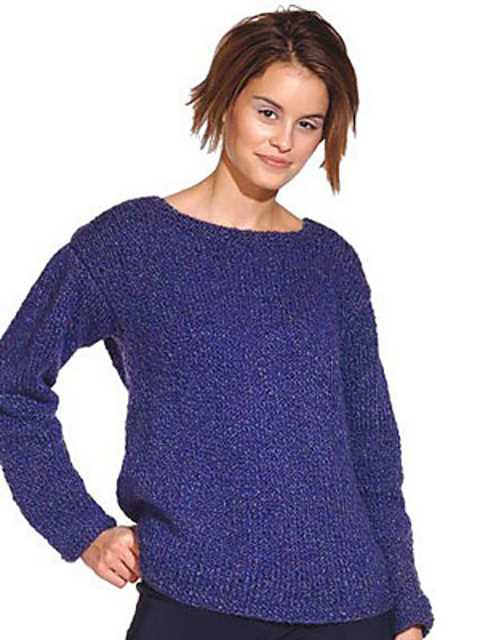
Neckline: The neckline of your sweater can be customized to suit your personal style and preference. You can choose from a variety of options, such as crew neck, V-neck, boat neck, or scoop neck. Additionally, you can add details like ribbing or contrasting colors to make the neckline stand out. It’s important to consider your body shape and proportions when selecting a neckline, as certain styles may be more flattering than others.
Hem: The hem of your sweater refers to the bottom edge, where it meets your waist or hips. This area can be finished in different ways, depending on the desired look and function. Common options include ribbing, seed stitch, garter stitch, or a simple rolled hem. The choice of hem style can impact the drape and stretch of your sweater, so it’s important to consider the type of yarn and the fit you’re aiming for.
Once you have decided on the neckline and hem style, it’s time to execute them. Depending on your knitting skills and preferences, you may choose to use circular needles, double-pointed needles, or straight needles to finish these areas. It’s important to follow the pattern instructions carefully and take your time to ensure a clean and polished finish.
Listed below are a few tips to keep in mind when working on the neckline and hem:
- Measurements are key: Before starting, it’s important to take accurate measurements of your body and make a gauge swatch to ensure the right fit.
- Pick up stitches: When finishing the neckline or hem, you may need to pick up stitches along the edge. Make sure to evenly distribute the stitches to ensure a smooth finish.
- Use stitch markers: If the instructions call for specific stitch counts or increases, it can be helpful to use stitch markers to keep track of your progress.
- Blocking: Once you’ve completed the neckline and hem, consider blocking your sweater to shape it and even out any inconsistencies. This can greatly enhance the finished look of your garment.
By paying attention to the details of the neckline and hem, you can elevate your basic knit sweater and create a garment that is both stylish and well-fitting. Whether you opt for a classic crew neck or a trendy V-neck, remember to have fun with the process and enjoy the satisfaction of completing your handmade creation.
Adding Personalized Details to Your Knit Sweater

Once you have mastered the basic knit sweater pattern, you can start adding personalized details to make your sweater truly unique. Here are some ideas to get you started:
1. Embroidery or Appliques

Embellish your sweater with beautiful embroidery or appliques. You can create intricate designs using colorful threads or add patches of fabric for a more textured look. Embroidery can be done by hand or with a sewing machine, and there are countless patterns and designs available to inspire you. Whether you choose to add flowers, animals, or geometric patterns, embroidery can take your sweater to the next level.
2. Button or Zipper Details

Consider adding unique button or zipper details to your knit sweater. This can be as simple as using colorful buttons that match your yarn or choosing buttons with intricate designs. You can also experiment with different types of closures, such as toggles or clasps, to add a touch of personality to your sweater. If you prefer a more modern look, consider adding a zipper instead of buttons for a sleek and contemporary finish.
3. Color Blocking
Create a bold fashion statement by incorporating color blocking into your knit sweater. This technique involves using different colors or shades of yarn to create distinct sections or patterns on your sweater. You can divide your sweater into blocks of different sizes or create horizontal or vertical stripes for a striking visual effect. Play around with different combinations of colors to find the perfect balance for your personalized design.
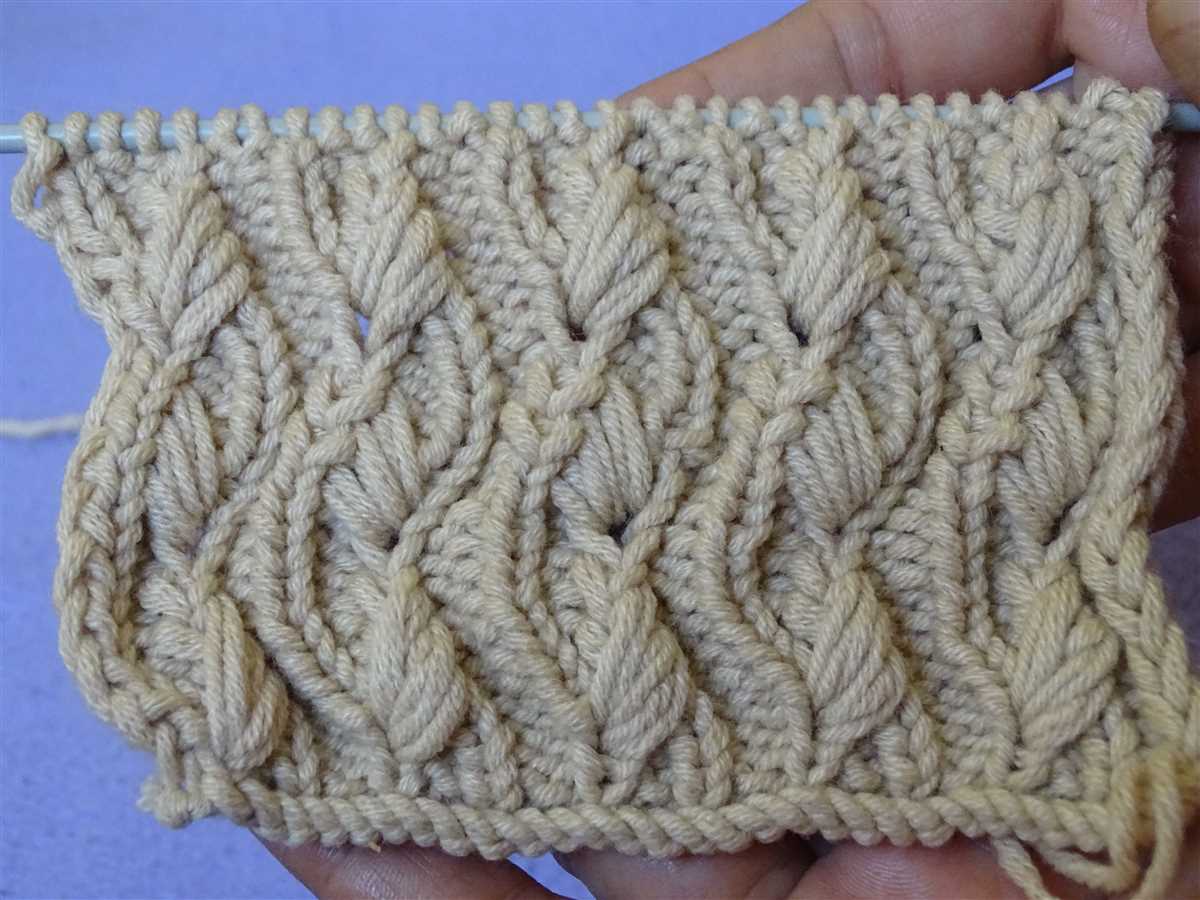
4. Cabled or Textural Details
Enhance the texture of your knit sweater by adding cabled or other textural details. Cables are created by knitting stitches out of order, resulting in a raised pattern that adds depth and interest to your sweater. You can also experiment with different stitch patterns, such as seed stitch or ribbing, to create unique textures. These details can be added to specific sections of your sweater, such as the cuffs or neckline, to showcase your knitting skills.
Remember, the possibilities for adding personalized details to your knit sweater are endless. Explore different techniques, experiment with colors and textures, and most importantly, have fun creating a sweater that is a true reflection of your style and creativity.