
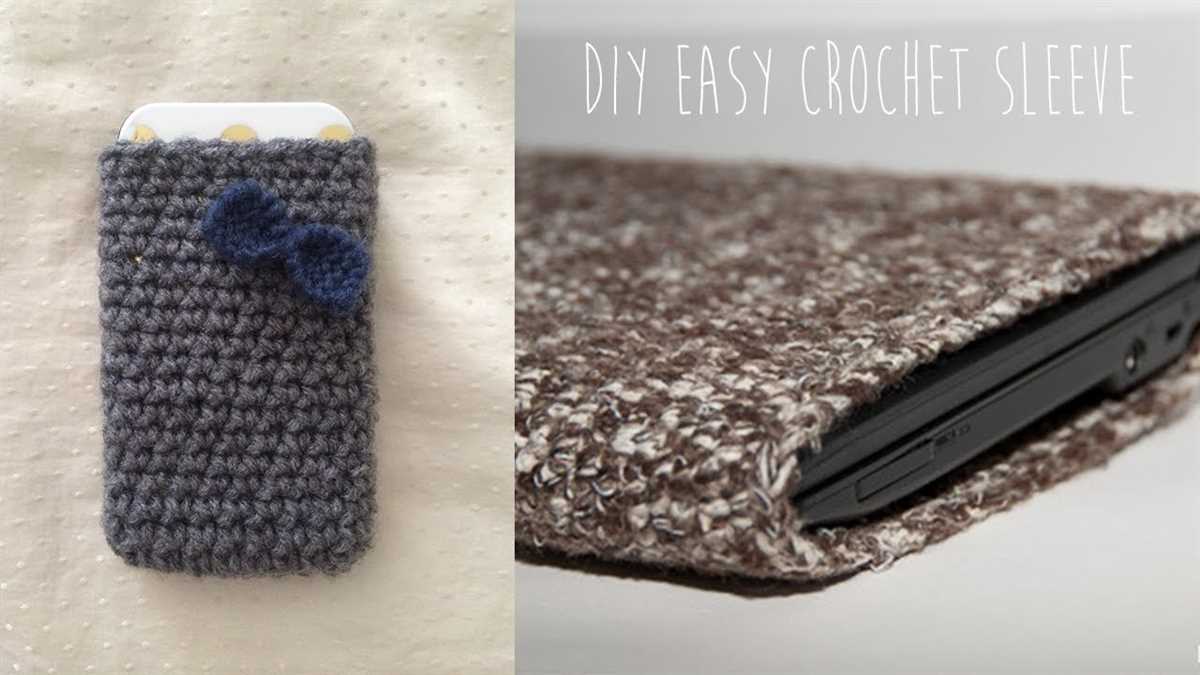
If you’re an avid knitter and enjoy creating your own accessories, then this iPad sleeve knitting pattern is perfect for you. Not only will it keep your iPad protected, but it will also add a touch of personal style to your device. Whether you’re a beginner or an experienced knitter, this pattern is simple enough to follow and can be customized to your liking.
One of the great things about this iPad sleeve knitting pattern is that it doesn’t require a lot of yarn. You can use leftover yarn from other projects or choose a new yarn that matches your personal style. The pattern itself is versatile and can be adjusted to fit any size of iPad or tablet.
With just a few basic knitting stitches, such as knit, purl, and decrease, you can create a beautiful and functional sleeve for your iPad. The pattern includes clear instructions and even offers tips for creating a snug fit or adding a button closure.
Once you’ve completed this knitting project, you’ll have a useful accessory that will protect your iPad from scratches and bumps. Plus, you’ll have the satisfaction of knowing that you’ve created it with your own two hands. So grab your knitting needles and get started on this iPad sleeve knitting pattern today!
How to Knit an iPad Sleeve: Step-by-Step Guide
If you are looking for a fun and practical knitting project, knitting an iPad sleeve can be a great option. Not only will you be able to protect your iPad from scratches and damage, but you will also have a unique and stylish accessory. In this step-by-step guide, we will walk you through the process of knitting an iPad sleeve.
Materials: To start knitting your iPad sleeve, you will need the following materials:
- Yarn (choose a soft and durable yarn)
- Knitting needles (size will depend on the yarn you choose)
- Tape measure
- Scissors
- Buttons or a zipper for closure
Step 1: Measure your iPad: Before you start knitting, you need to measure your iPad to determine the size of your sleeve. Measure the height, width, and depth of your iPad and write down the measurements.
Step 2: Swatch and gauge: Knit a small swatch using your chosen yarn and needles to determine the gauge. This will help you calculate the number of stitches you will need for your sleeve.
Step 3: Cast on stitches: Based on your gauge and measurements, calculate the number of stitches you need to cast on. Use the long-tail cast-on method to cast on the required number of stitches.
Step 4: Knit the body of the sleeve: Knit in the stitch pattern of your choice until the sleeve reaches the desired length. You can add ribbing or any other decorative stitch pattern to make your sleeve unique.
Step 5: Create the flap: Once the body of the sleeve is long enough, you will create a flap to cover the top of the iPad. This will ensure that your iPad stays securely in the sleeve. Follow your chosen stitch pattern and decrease the number of stitches gradually to create the flap.
Step 6: Finishing touches: Once you have finished the body and flap of the sleeve, bind off your stitches. Sew on the buttons or attach the zipper, depending on your preference. Trim any excess yarn and weave in any loose ends.
Now you have a beautiful knitted iPad sleeve that is both functional and stylish. Feel free to customize your sleeve by adding embellishments or using different colors of yarn. Enjoy using your handmade sleeve to protect your iPad!
Choosing the Right Yarn and Needles
When it comes to choosing the right yarn for your iPad sleeve knitting project, there are a few factors to consider. First and foremost, you’ll want to think about the weight or thickness of the yarn. A bulky or chunky weight yarn is often the best choice for a protective sleeve, as it will provide an extra layer of cushioning. Look for yarns that have good stitch definition and are soft to the touch.
Cotton yarn is a popular choice for iPad sleeves, as it is durable, breathable, and easy to care for. You can also consider using a blend of cotton and acrylic for added durability and stretch. If you prefer a more luxurious option, wool or alpaca yarn can provide warmth and a soft texture.
As for the needle size, it will depend on the yarn you choose and your personal knitting style. You’ll want to select needles that are appropriate for the weight of your yarn. Check the yarn label for recommended needle sizes, and adjust accordingly if you prefer a tighter or looser stitch. Circular needles are a great option for knitting in the round, which is often used for iPad sleeves. They allow for easy maneuverability and can accommodate a large number of stitches.
It’s always a good idea to make a gauge swatch before starting your project to ensure that your needle size and tension are correct. This will help ensure that your finished sleeve fits your iPad properly and provides the desired level of protection. Take the time to experiment with different yarns and needles to find the combination that works best for you.
Measuring Your iPad for the Perfect Fit
When it comes to knitting an iPad sleeve, getting the right fit is crucial. You want the sleeve to be snug enough to hold your iPad securely, but not so tight that it’s difficult to insert or remove the device. To ensure the perfect fit, it’s important to measure your iPad correctly before you start knitting.
Step 1: Start by measuring the height of your iPad. Place the device on a flat surface and use a ruler to measure from the bottom edge to the top edge. Make sure to include any protrusions, such as buttons or the home button, in your measurement.
Step 2: Next, measure the width of your iPad. Again, place the device on a flat surface and use a ruler to measure from one side to the other. Be sure to include any buttons or other features in your measurement.
Step 3: Finally, measure the thickness of your iPad. This will give you an idea of how much stretch your knitted fabric will need to have in order to accommodate the device. Use a ruler or a caliper to measure from the front of the iPad to the back.
Once you have these measurements, you can use them to select the right knitting pattern and adjust it as needed to create a custom-fit iPad sleeve. Don’t forget to also measure any additional accessories, such as a keyboard or a case, that you might want to fit inside the sleeve.
With the right measurements and a well-chosen knitting pattern, you’ll be able to create a stylish and functional sleeve that perfectly fits your iPad and protects it from scratches and bumps.
Casting On and Starting the Project
Before you begin knitting the iPad sleeve, it’s important to cast on the required number of stitches. To do this, you can use the long-tail cast-on method. Hold the yarn in your right hand and create a slipknot by making a loop with the yarn. Insert your knitting needle into the loop, then wrap the yarn around your thumb and forefinger. Cross the yarn over the needle from back to front and pull it through the loop on your thumb. Gently tighten the stitch on your needle. Repeat this process until you have the desired number of stitches on your needle.
Once you have cast on, it’s time to start the knitting project. You can begin by knitting the first row of stitches. Hold the needle with the cast-on stitches in your right hand and the empty needle in your left hand. Insert the tip of the left needle into the first stitch on the right needle. Wrap the yarn around the right needle from back to front, then pull the right needle through the stitch, creating a new stitch. Slide the stitch from the right needle onto the left needle. Repeat this process until you have completed the first row of knitting.
When knitting the iPad sleeve, you may choose to use a specific knitting pattern or stitch pattern. This could be a basic garter stitch, stockinette stitch, or a more complex pattern such as cables or lace. Follow the instructions for your chosen pattern to continue knitting the sleeve and creating the desired texture or design. Remember to keep track of your stitch count, especially if you’re using a pattern with multiple pattern repeats.
As you progress with your knitting project, you can use stitch markers to mark important sections or to keep track of pattern repeats. These can be helpful in ensuring that your stitches are correct and that you’re following the pattern correctly. Additionally, you can use a row counter to keep track of the number of rows you have knitted. This can be particularly useful if you need to make any adjustments or modifications to the sleeve’s length or size.
Creating the Ribbing for a Stretchy Opening
In order to create a stretchy opening for your iPad sleeve, you will need to create a ribbing. Ribbing is a knitting technique that involves alternating knit and purl stitches to create a flexible and elastic fabric. This ribbing will allow the opening of your sleeve to stretch and accommodate the iPad while still providing a snug fit.
To begin creating the ribbing, you will need to cast on an even number of stitches. This will ensure that you can work the knit and purl stitches in the correct pattern. A common cast-on method for ribbing is the long-tail cast-on, which provides a nice amount of stretch. You can use any size needles and yarn weight that you prefer for your sleeve.
To create the ribbing, you will work a knit stitch followed by a purl stitch, and repeat this pattern across the row. This will create a classic 1×1 ribbing, where each knit stitch is followed by a purl stitch and vice versa. The repetition of these two stitches creates the ribbing effect.
Note: If you prefer a wider ribbing, you can also work a 2×2 ribbing, which involves knitting two stitches and purling two stitches in a repeating pattern. This will create larger ribbing columns and can provide even more stretch to the opening of your sleeve.
Continue working the ribbing pattern until you have reached the desired length for the opening of your sleeve. This will depend on the size of your iPad and how snugly you want the sleeve to fit. Remember to carefully measure the width of your device and allow for some ease to ensure a proper fit.
Once you have completed the ribbing, you will be ready to continue knitting the body of your sleeve. The ribbing will create a nice stretchy opening that will allow you to easily slide your iPad in and out of the sleeve while keeping it securely protected. Happy knitting!
Knitting the Body of the Sleeve
Once you have finished knitting the cuff of the iPad sleeve, it’s time to move on to the body. This is where you will knit the main part of the sleeve, which will provide the protection and padding for your iPad.
To begin, you will need to cast on the required number of stitches for the width of your sleeve. Refer to the knitting pattern for the specific measurements. Make sure to use the appropriate size knitting needles to achieve the desired gauge.
Once you have cast on, you can start working in the chosen stitch pattern. This can be a simple stockinette stitch, or you can get creative and incorporate different textures or patterns if desired.
As you knit the body of the sleeve, make sure to periodically measure it against your iPad to ensure that it will fit properly. You want the sleeve to be snug enough to hold the iPad securely, but not too tight that it’s difficult to slide the device in and out.
Continue knitting until you reach the desired length for the body of the sleeve. Again, refer to the knitting pattern for the specific measurements. At this point, you can choose to add any extra design elements such as stripes, colorwork, or decorative stitch patterns.
Once you have completed the body of the sleeve, it’s time to bind off your stitches. Make sure to bind off loosely to allow for stretch and ease of inserting the iPad. Weave in any loose ends and your knitted iPad sleeve is ready to use or gift to someone special!
Adding a Decorative Pattern or Design
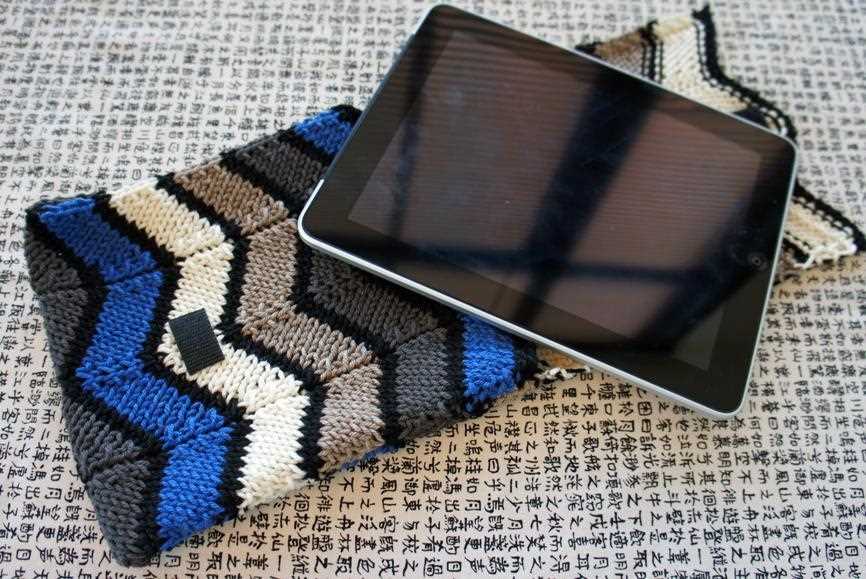
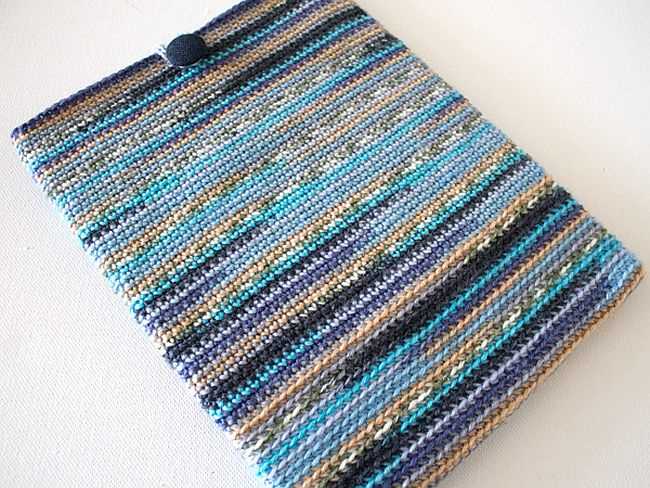
If you want to add a decorative pattern or design to your knitted iPad sleeve, there are several options you can consider. One popular choice is to incorporate colorwork or stranded knitting techniques. This involves working with multiple colors of yarn to create a pattern or design on the fabric.
You can use a chart or graph to guide you in creating the design, or you can create your own pattern by experimenting with different color combinations and stitch patterns. Fair Isle knitting, for example, is a traditional colorwork technique that creates intricate patterns by alternating colors in each row. Another option is intarsia knitting, which allows you to create larger, blocky designs by knitting separate sections of color.
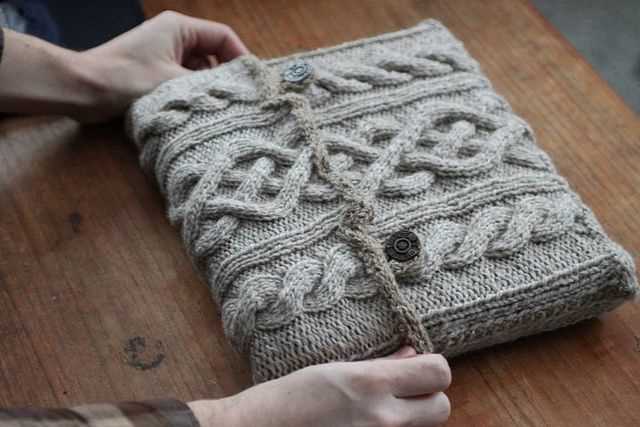
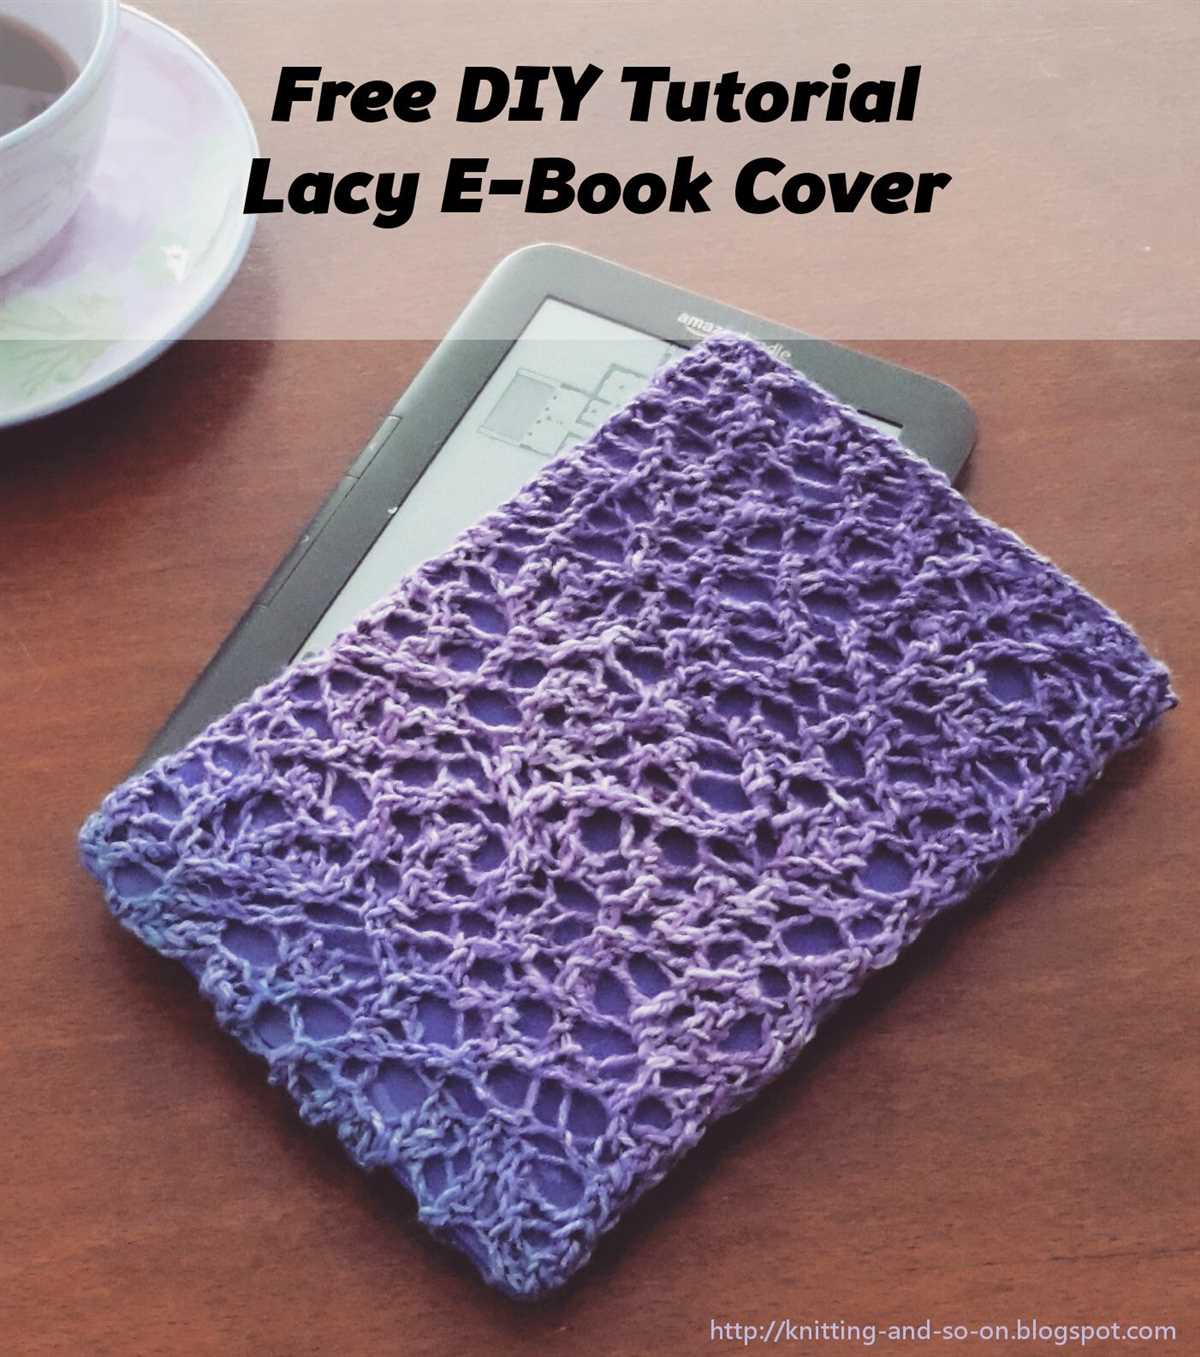
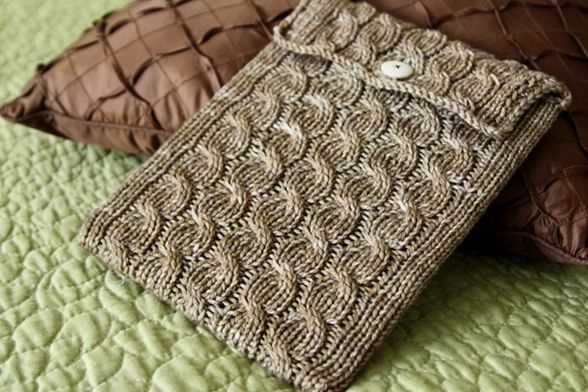
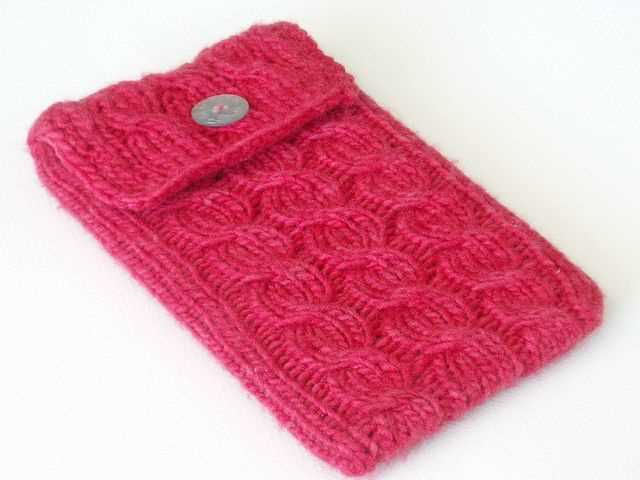
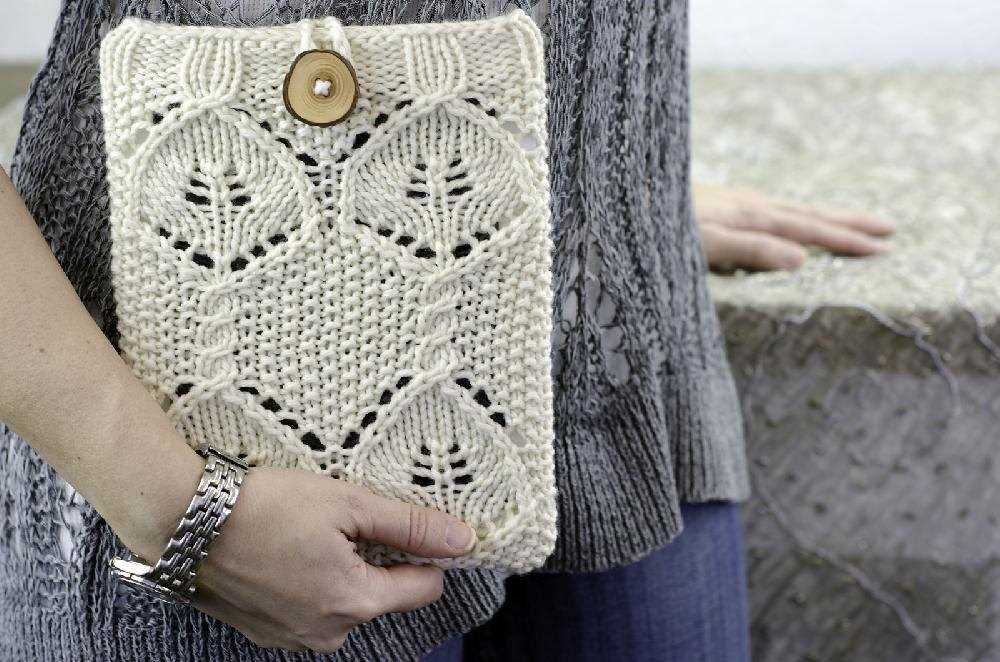
In addition to colorwork, you can also add texture to your iPad sleeve with different stitch patterns. For example, you could incorporate cables, lace, or bobbles into your design to create visual interest and dimension. Knitting a pattern with a textured stitch can also provide extra protection for your iPad, as the bumps and ridges can help cushion the device.
When working with colorwork or textured stitches, it’s important to keep in mind the gauge of your knitting and the size of your iPad. You want to make sure the fabric is stretchy enough to fit the device comfortably, but also snug enough to hold it securely. Experimenting with different stitch patterns and swatching before starting your project can help you achieve the right fit and look for your iPad sleeve.
Shaping the Sleeve for Better Protection
When creating an iPad sleeve, it is important to consider the shape and design of the sleeve to ensure better protection for your device. A well-shaped sleeve can provide a snug fit, preventing any accidental slips or bumps that may damage the iPad.
1. Measuring the iPad:
Before starting the knitting pattern, it is crucial to measure the dimensions of your iPad accurately. This includes measuring the length, width, and thickness of the device. It is recommended to add a few extra centimeters to these measurements to allow for ease of insertion and removal.
2. Creating a Snug Fit:
The key to a well-shaped sleeve is creating a snug fit that holds the iPad securely inside. To achieve this, it is important to choose a knitting pattern that offers stretch and flexibility. This will allow the sleeve to conform to the shape of the iPad and prevent it from sliding out or moving around inside.
3. Adding Padding:
In addition to a snug fit, adding padding to the sleeve can provide extra protection for your iPad. You can achieve this by incorporating a layer of foam or quilted fabric into the knitting pattern. This padding will act as a cushion, absorbing any impact and reducing the risk of damage to the device.
4. Fastening Mechanism:
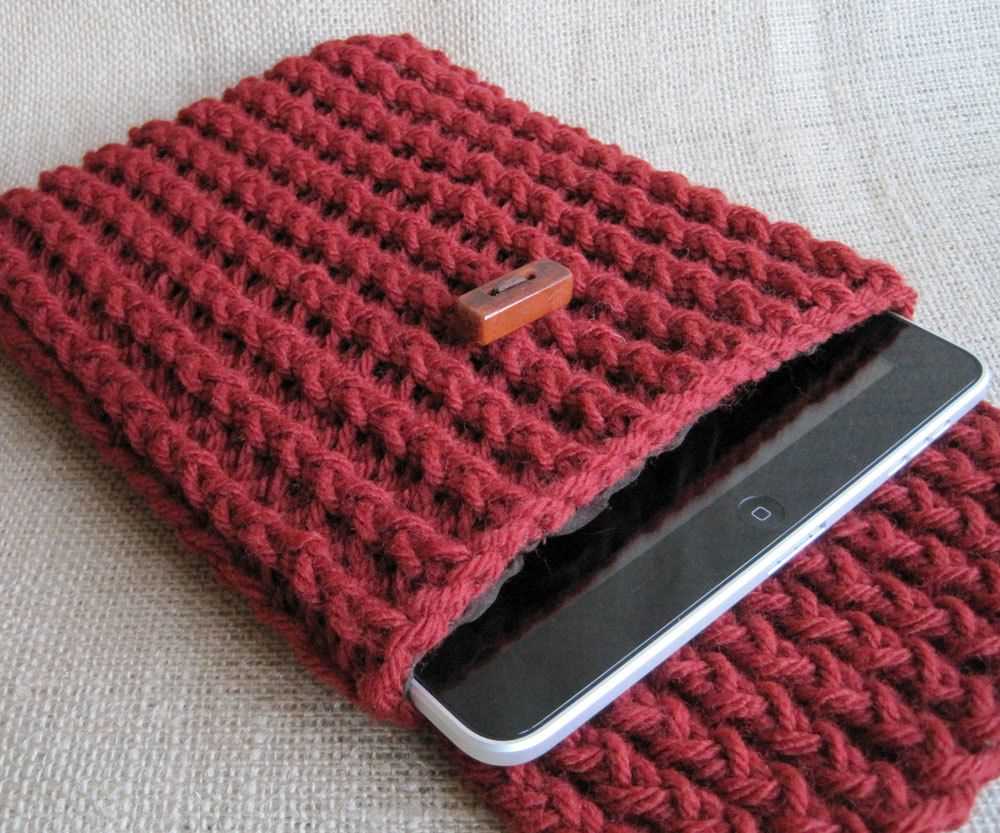
To ensure the iPad stays securely inside the sleeve, incorporating a fastening mechanism is essential. This could be in the form of a button, zipper, or elastic closure. The chosen fastening mechanism should be easy to use and reliable, keeping the iPad in place even when the sleeve is being transported or carried around.
By considering these factors and shaping the sleeve accordingly, you can create a knitting pattern that not only looks stylish but also provides optimal protection for your iPad. So, get your knitting needles ready and start crafting a sleeve that will keep your iPad safe and secure!
Adding Buttonholes or a Closure
If you want to add buttonholes or a closure to your iPad sleeve knitting pattern, here are a few options to consider:
Buttonholes: To add buttonholes, you can work them into the pattern as you go. Start by deciding how many buttons you want to use and the spacing between them. Once you have determined this, you can mark the placement for the buttonholes on one of the sides of the sleeve. To create a buttonhole, bind off a few stitches in the desired location and then cast them back on in the next row. Repeat this process for each buttonhole.
Closure: If you prefer a closure that is not a button, you can add a loop or a strap instead. To add a loop, you can create a small chain of stitches and attach it to one side of the sleeve. Make sure the loop is large enough to fit over the button you choose. Alternatively, you can knit a strap separately and sew it onto the sleeve. This gives you the opportunity to choose a different yarn or stitch pattern for the strap, adding a touch of customization to your sleeve.
Remember to consider the functionality and aesthetics of the closure option you choose. Buttonholes provide a secure closure, while loops and straps offer a different look. Experiment with different closure methods to find the one that suits your style and preferences best.
Joining the Seams and Finishing the Edges
Once you have completed knitting the main body of your iPad sleeve, it’s time to join the seams and finish the edges. This will give your sleeve a polished and professional look while also ensuring that it securely holds your iPad. Here are the steps to follow:
1. Sew the Side Seams
The first step is to sew the side seams of the sleeve. Lay your knitting flat on a table or surface with the right side facing up. Align the edges of the front and back panels, making sure that the pattern aligns as well. Use a yarn needle and the same color yarn as your project to carefully sew the side seams together. Make sure to stitch through both layers of knitting to create a strong seam. Repeat this step for the other side of the sleeve.
2. Create the Buttonhole
If you choose to add a button closure to your iPad sleeve, this is the time to create the buttonhole. Determine the desired placement of the button and mark it on the front panel of the sleeve. Use a smaller needle to carefully bind off a few stitches in the marked area, creating a buttonhole. Make sure the buttonhole is large enough to accommodate your chosen button.
3. Finish the Edges
To give your sleeve a neat and finished look, it’s important to finish the edges. You can choose to do this by either sewing a row of single crochet along the top and bottom edges or by knitting a few rows of ribbing. If you opt for the single crochet method, use a crochet hook that matches your yarn weight and work evenly-spaced single crochet stitches along the edges. If knitting ribbing, switch to a smaller needle size and work the desired number of rows in a rib stitch pattern such as k1, p1.
Once you have finished the edges, weave in any loose ends and trim excess yarn. Your iPad sleeve is now complete and ready to use!
Blocking and Pressing the Finished Sleeve
Once you have completed knitting your iPad sleeve, it is important to block and press it to give it a professional and finished look. Blocking helps to even out the stitches and dimensions of your sleeve, while pressing helps to smooth out any wrinkles or uneven areas.
First, you will need to gather your blocking materials. You will need a clean towel or blocking mat, rust-proof blocking pins, and a spray bottle filled with water. Lay your towel or blocking mat on a flat surface, making sure it is clean and free from any debris.
Next, you will need to wet your iPad sleeve. Fill the spray bottle with water and lightly mist the entire sleeve. Make sure the sleeve is evenly damp, but not soaking wet. Allow it to sit for a few minutes to absorb the water.
Once your sleeve is damp, gently stretch it out to the desired dimensions using the blocking pins. Start by pinning the corners first, and then work your way along the edges, spacing the pins evenly. This will help to even out the stitches and ensure your sleeve dries in the correct shape.
After you have pinned your sleeve, leave it to dry completely. This can take anywhere from a few hours to overnight, depending on the thickness of your yarn. Avoid moving or disturbing the sleeve while it is drying to maintain the shape.
Once your sleeve is dry, you can remove the blocking pins and give it a final press. Set your iron to the appropriate heat setting for your yarn type, and gently press the sleeve using an up and down motion. Be careful not to drag the iron across the surface, as this can stretch or distort the fabric.
Once you have finished pressing, your iPad sleeve is now ready to use or gift! The blocking and pressing process helps to give your sleeve a polished and professional finish, ensuring that it will look great for years to come.
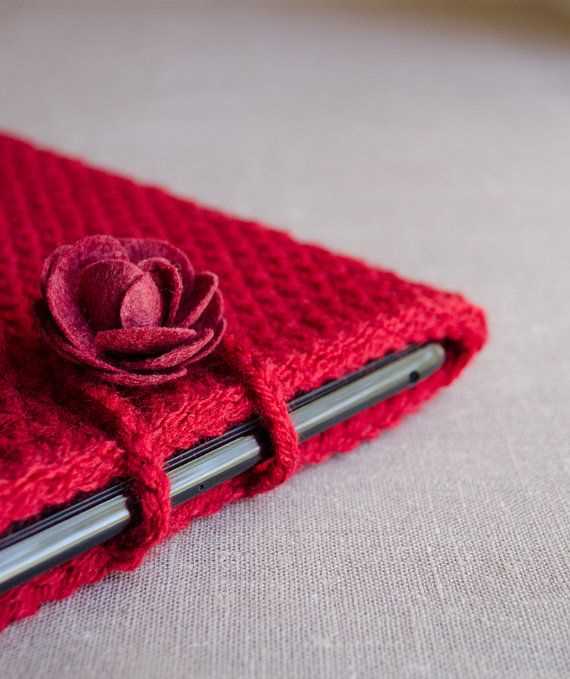
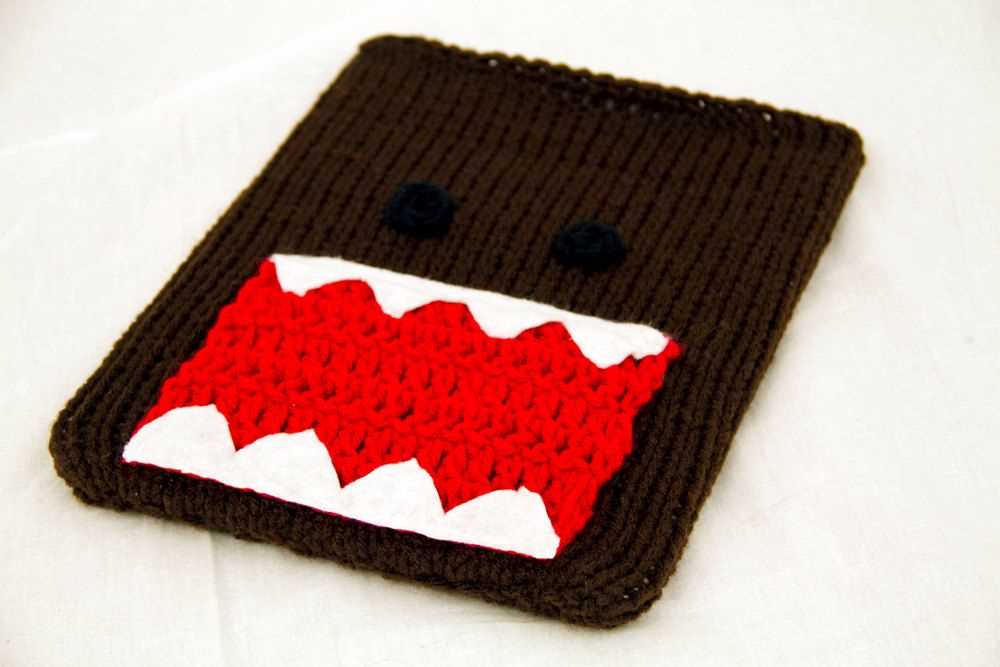
Embellishing the Sleeve with Embroidery or Appliqué
Adding embroidery or appliqué to your knitted iPad sleeve can give it a unique and personalized touch. There are endless possibilities when it comes to embellishing your sleeve, and it all depends on your creativity and skill level.
If you are skilled in embroidery, you can add intricate designs to the sleeve using colorful yarn or thread. You can choose to embroider patterns, flowers, or even write a personalized message. Embroidery allows you to add texture and dimension to your sleeve, making it truly one-of-a-kind.
If you prefer a simpler approach, appliqué can be a great option. Appliqué involves attaching pieces of fabric to the knitted sleeve to create a design. You can use different fabrics, such as felt or patterned cotton, to create visually appealing motifs. For example, you could create a cute animal or a geometric pattern by cutting out shapes from fabric and sewing them onto the sleeve.
Before adding embroidery or appliqué, it’s a good idea to plan out your design first. You can sketch your ideas on paper or use a digital design software to visualize how the final product will look. Once you have a design in mind, you can start stitching or sewing the embellishments onto the sleeve.
Embellishing your knitted iPad sleeve with embroidery or appliqué can transform it from a simple accessory to a work of art. It allows you to showcase your creativity and personal style, making your sleeve truly unique and special. Whether you choose embroidery or appliqué, the possibilities are endless, and the result will be a sleeve that stands out and reflects your individuality.
Tips and Tricks for a Professional-Looking Sleeve
Creating a professional-looking sleeve for your iPad can take your knitting skills to the next level. Here are some tips and tricks to help you achieve a polished and finished result:
1. Gauge is key: It’s important to check your gauge before starting the project. This will ensure that your sleeve fits the iPad perfectly and has a professional appearance. Use the recommended needle size and yarn weight to achieve the correct gauge.
2. Pay attention to finishing details: Take the time to neatly sew in any loose ends, weave in your yarn tails, and block your sleeve if necessary. These finishing details can make a big difference in the overall appearance of your sleeve.
3. Utilize stitch markers: Using stitch markers can help you keep track of your progress and ensure that your stitch count remains consistent throughout the project. This will result in a more polished and professional-looking sleeve.
4. Choose the right yarn: Opt for a yarn that is suitable for the purpose of a protective sleeve. Consider using a yarn that is sturdy, durable, and machine washable. This will ensure that your sleeve maintains its professional look even after regular use.
5. Experiment with different stitch patterns: While a simple stockinette or ribbing pattern can create a classic and professional look, don’t be afraid to incorporate different stitch patterns to add some visual interest to your sleeve. Just make sure the pattern doesn’t obscure the functionality of the sleeve.
6. Customize with embellishments: Adding buttons, bows, or other embellishments can elevate the look of your sleeve and give it a personal touch. However, be mindful not to overdo it and keep the overall design sleek and professional.
Summary:
- Check your gauge to ensure a perfect fit.
- Pay attention to finishing details like weaving in ends and blocking.
- Use stitch markers to maintain stitch count consistency.
- Select a suitable yarn for durability and machine washability.
- Experiment with stitch patterns while keeping functionality in mind.
- Customize with tasteful embellishments for a personal touch.
By following these tips and tricks, you can create a professional-looking sleeve that not only protects your iPad but also showcases your knitting skills. Enjoy the process and have fun creating a unique and stylish accessory!