
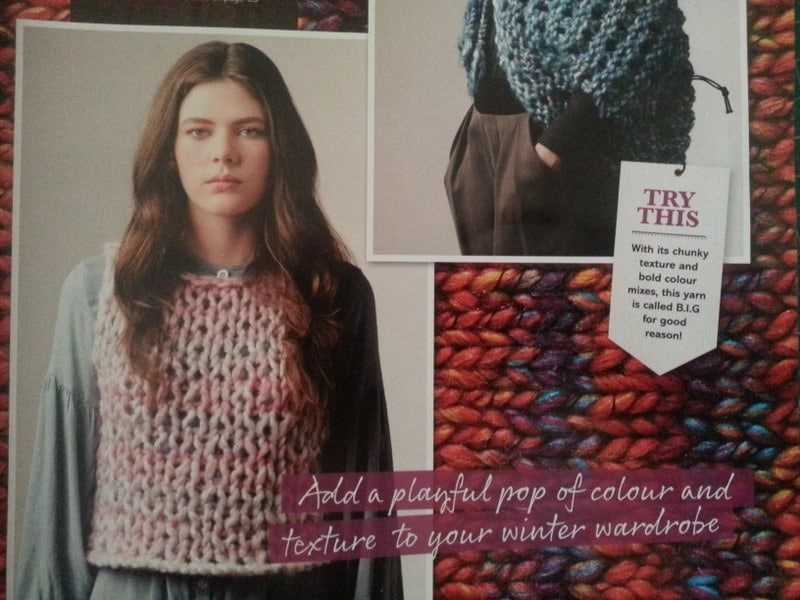
When the weather starts to turn colder, it’s time to break out the cozy knits. One of the trendiest items for the fall and winter seasons is the chunky knit vest. This versatile piece can be dressed up or down and adds a touch of warmth and style to any outfit. Whether you’re a beginner or an experienced knitter, you’ll love this free pattern that will have you creating your own chunky knit vest in no time.
Made with chunky yarn and large needles, this pattern is perfect for those looking for a quick and satisfying project. The oversized stitches create a beautiful texture that is both eye-catching and cozy. You can choose from a wide range of colors to suit your personal style and wardrobe, making this vest a truly customizable piece.
Not only is this vest a fashionable addition to your winter wardrobe, but it’s also a practical one. Made from a thick and warm yarn, it will keep you toasty on even the chilliest of days. Layer it over a long sleeve shirt or sweater for extra insulation, or wear it as a standalone piece for a stylish twist. Pair it with jeans or leggings for an effortless and comfortable look.
Whether you’re new to knitting or a seasoned pro, this chunky knit vest pattern is perfect for all skill levels. The clear instructions and simple stitches make it an ideal project for beginners, while more experienced knitters can add their own personal touches to make it truly unique. So grab your needles and get ready to create a stylish and cozy chunky knit vest that will keep you warm all winter long.
Chunky Knit Vest Pattern Free
Chunky knit vests are a popular fashion trend, and creating your own stylish and cozy vest is easier than you might think. If you’re looking for a free pattern to get started, you’re in luck. Here’s a chunky knit vest pattern that you can follow to make your own fashionable garment.
Materials
- Super bulky yarn (approximately 600-800 grams)
- Size 15 (10 mm) knitting needles
- Circular knitting needles (optional)
- Tapestry needle
- Scissors
Pattern
Step 1: Cast on 70 stitches (or adjust the number of stitches to fit your desired size) using the size 15 knitting needles.
Step 2: Knit in garter stitch (knit every stitch on every row) until the vest measures approximately 20 inches in length, or your desired length for the vest.
Step 3: Bind off all stitches.
Step 4: Fold the knitted piece in half lengthwise to create the front and back of the vest.
Step 5: Seam the sides of the vest using a tapestry needle and the mattress stitch.
Step 6: Optional: If you prefer a ribbed collar, pick up stitches along the neck opening using the circular knitting needles and knit in 2×2 ribbing (knit 2 stitches, purl 2 stitches) for a few inches. Bind off all stitches.
This chunky knit vest pattern is a great way to create a stylish and warm piece for your wardrobe. Feel free to experiment with different colors and yarn textures to make it unique to your style. Happy knitting!
Why You Need a Chunky Knit Vest in Your Wardrobe
A chunky knit vest is a versatile and stylish addition to any wardrobe. With its cozy and warm design, it is perfect for layering during the colder months. Whether you’re heading out for a casual outing or want to add a touch of warmth to your office attire, a chunky knit vest is the perfect choice.
One of the great things about a chunky knit vest is its versatility. It can be paired with a variety of outfits to create different looks. You can wear it over a simple t-shirt and jeans for a casual and effortless look, or layer it over a dress for a more put-together and chic ensemble. The chunky knit adds texture and visual interest to any outfit, making it a statement piece that can elevate your style.
A chunky knit vest is not only fashionable, but it also provides practical benefits. The thick yarn and knit construction make it incredibly warm and cozy, providing insulation and comfort during the colder months. It can be a great alternative to a heavy coat or jacket, allowing you to stay warm without feeling restricted. Additionally, the sleeveless design allows for greater freedom of movement, making it perfect for outdoor activities or layering under a coat when the weather gets really chilly.
When choosing a chunky knit vest, opt for a pattern that suits your personal style and body shape. There are various patterns available, from classic cable knits to more intricate designs. Choose a length that flatters your figure, whether it’s a cropped vest that accentuates your waist or a longer style that provides more coverage. With the right fit and design, a chunky knit vest can become a wardrobe staple that you reach for again and again.
In conclusion, a chunky knit vest is a must-have in any wardrobe. Its versatility, warmth, and stylish design make it the perfect layering piece for the colder months. Whether you’re dressing up or down, a chunky knit vest can elevate your style and keep you cozy. So why not add this fashionable and functional item to your wardrobe today?
The Benefits of Knitting Your Own Chunky Knit Vest

Knitting your own chunky knit vest can be a rewarding and enjoyable experience. Not only does it allow you to express your creativity and style, but it also offers several benefits that cannot be achieved by purchasing a ready-made vest.
1. Customization: When you knit your own chunky knit vest, you have complete control over the design, size, and color. You can choose the type of yarn, the stitch pattern, and even add personalized details like buttons or pockets. This level of customization ensures that your vest perfectly suits your individual taste and style.
2. Quality: Hand-knit garments are often known for their superior quality compared to mass-produced items. By knitting your own chunky knit vest, you can use high-quality yarns and carefully select your materials to ensure durability and comfort. You can also pay attention to details like finishing techniques, which can enhance the overall quality of your vest.
3. Creativity and Relaxation: Knitting is a creative outlet that allows you to relax and unwind. As you work on your chunky knit vest, you can enjoy the meditative rhythm of knitting and let your mind wander. Choosing the colors, stitches, and patterns to create your vest can be a fun and fulfilling process that lets your imagination soar.
4. Sustainable and Eco-Friendly: By knitting your own vest, you can make a conscious choice to reduce your environmental impact. Instead of supporting fast fashion and its negative consequences for the environment, you can opt for sustainable and ethically-sourced yarns. Additionally, knitting your own vest means you are more likely to cherish and take care of it, reducing the overall waste in the fashion industry.
5. Sense of Accomplishment: Completing a knitting project, such as a chunky knit vest, can be incredibly satisfying. It gives you a sense of accomplishment and pride in your own skills. You can showcase your handmade garment to friends and family, and even receive compliments and requests for custom pieces. The process of knitting and completing a project can boost your self-esteem and build confidence in your abilities.
In conclusion, knitting your own chunky knit vest offers many benefits, from customization and quality to creativity and sustainability. It is a rewarding hobby that allows you to create unique and beautiful garments while also enjoying the therapeutic benefits of knitting. So pick up your knitting needles and start crafting your own cozy and stylish vest today!
Choosing the Right Yarn for Your Chunky Knit Vest

When it comes to knitting a chunky knit vest, selecting the right yarn is essential to achieve the desired look and fit. The type of yarn you choose will determine the overall texture, thickness, and warmth of your vest. Here are some factors to consider when choosing yarn for your project.
1. Weight and Thickness
The weight and thickness of the yarn will determine the chunkiness of your vest. If you want a super chunky look, opt for a bulky or super bulky yarn. These yarns are thicker and will create a more substantial and cozy vest. On the other hand, if you prefer a less bulky look, choose a worsted weight or aran weight yarn.
2. Fiber Content

The fiber content of the yarn will affect the drape and warmth of your vest. If you want a warmer vest, consider using wool or a wool blend yarn. Wool is known for its excellent insulation qualities and can keep you cozy in colder weather. If you prefer a lighter and more breathable fabric, opt for cotton or bamboo yarn, which are great choices for warmer climates.
3. Color and Texture

The color and texture of the yarn can greatly impact the overall appearance of your vest. Solid-colored yarns can create a classic and timeless look, while variegated or self-striping yarns can add visual interest and highlight different stitch patterns. Textured yarns, such as boucle or mohair, can also add depth and dimension to your vest, enhancing its overall aesthetic appeal.
4. Gauge and Pattern Requirements
Before choosing your yarn, it’s essential to check the gauge requirements of your pattern. The pattern will specify the recommended gauge and needle size to achieve the desired fit and size. Make sure to choose a yarn that matches the gauge stated in the pattern to ensure your vest turns out correctly. Swatching with your chosen yarn is always a good idea to check if your gauge matches the pattern.
Overall, choosing the right yarn for your chunky knit vest is crucial for achieving the desired look and feel of your garment. Consider the weight and thickness, fiber content, color and texture, as well as the pattern requirements when selecting your yarn. With the right yarn, you can create a cozy and stylish vest that you’ll love to wear.
Essential Tools and Materials for Knitting a Chunky Knit Vest
When it comes to knitting a chunky knit vest, having the right tools and materials is essential for a successful project. From the right type of yarn to the right needles, here are some key items you’ll need to get started.
Yarn:
Choosing the right yarn is important when knitting a chunky knit vest. Opt for a bulky or super bulky weight yarn to achieve that cozy and chunky look. Look for yarns that are soft and warm, such as wool or a wool blend, to ensure comfort and durability.
Knitting Needles:
Using the right knitting needles is crucial for achieving the desired gauge and stitch definition. For a chunky knit vest, you’ll want to use larger-sized needles, typically in the range of US size 10-15 (6-10 mm). This will allow you to create the thick and textured fabric that is characteristic of chunky knits.
Tapestry Needle:

A tapestry needle is an essential tool for weaving in loose ends and seaming your garment. Look for a needle with a large eye to accommodate the bulky yarn and a blunt tip to prevent snagging the fibers. This will make finishing your vest a breeze.
Stitch Markers:
Stitch markers are helpful for keeping track of stitch patterns, increases, and decreases. They can be particularly useful in chunky knit projects where the stitches can be more difficult to see. Choose stitch markers that can easily clip onto your needles and come in a contrasting color to the yarn for easy visibility.
Measuring Tape:
A measuring tape is crucial for ensuring that your vest fits properly. Use it to measure your body and compare it to the pattern’s sizing to determine the appropriate size to knit. It’s always better to be precise with your measurements to ensure a well-fitting and flattering garment.
- Yarn: Bulky or super bulky weight yarn
- Knitting Needles: US size 10-15 (6-10 mm)
- Tapestry Needle: With a large eye and blunt tip
- Stitch Markers: Easily clip onto needles and in a contrasting color
- Measuring Tape: For accurate measurements
With these essential tools and materials at hand, you’ll be ready to take on the challenge of knitting a chunky knit vest. So grab your needles and yarn, and get ready to create a cozy and stylish addition to your wardrobe.
Understanding Gauge and Sizing for Your Chunky Knit Vest

When it comes to knitting a chunky knit vest, it’s important to understand gauge and sizing to ensure that your finished project fits just right. Gauge refers to the number of stitches and rows per inch in your knitting, and it plays a crucial role in determining the size of your vest. Different yarns and knitting techniques can result in variations in gauge, so it’s important to swatch and measure to achieve the desired fit.
To start, you’ll need to choose the appropriate yarn for your chunky knit vest. Look for yarns that are labeled as chunky or bulky weight, as they will provide the thickness and texture needed for this type of project. Pay attention to the recommended needle size on the yarn label, as this will give you an indication of the gauge that the yarn is designed to achieve. You can also experiment with different needle sizes to adjust your gauge if needed.
Once you have your yarn and needles ready, it’s time to swatch. Cast on a few stitches and work a small sample piece in the stitch pattern you plan to use for your vest. Make sure to use the same needles and tension that you will use for the actual project. Measure your swatch using a ruler or gauge tool, and count the number of stitches and rows within a 4-inch square. This will give you an accurate gauge measurement.
For example: If your swatch measures 14 stitches and 18 rows per 4 inches, your gauge would be 14 stitches and 18 rows = 4 inches.
Now that you have your gauge, you can move on to sizing. Take your own measurements or refer to a sizing chart to determine the desired width and length of your vest. Keep in mind that chunky knits tend to have a looser fit, so you may want to factor in a bit of ease when choosing your size.
For example: If you want your vest to have a finished bust measurement of 40 inches, and your gauge is 14 stitches = 4 inches, you would need to cast on approximately 56 stitches (40 inches divided by 4 inches equals 10 times 14 stitches).
Remember to always check your gauge and adjust as needed throughout your knitting project. This will ensure that your chunky knit vest turns out the perfect size and fits you just the way you want. Happy knitting!
Getting Started: Cast On and Knitting the Ribbing

When starting a chunky knit vest project, the first step is to cast on the required number of stitches. Casting on is the process of creating the foundation row of stitches on the knitting needle. For the chunky knit vest pattern, it is common to use a long-tail cast on method, which provides a neat and flexible edge.
To cast on using the long-tail method: Hold the yarn in your right hand and make a slipknot approximately 6 inches from the end of the yarn. Insert the right knitting needle into the slipknot, and with your left thumb, bring the working yarn (the longer tail) over your left index finger. Place the needle on your left thumb and hold both strands of yarn with the remaining fingers of your left hand.
Using your right hand, bring the needle over the back strand of yarn on your left thumb, under the front strand, and back over the top of the front strand. Drop the slipknot from your thumb and tighten the loop around the needle. This is your first cast-on stitch. Repeat this process for the required number of stitches, ensuring the stitches are snug but not too tight.
Once the cast-on stitches are complete, it’s time to start knitting the ribbing. The ribbing is the border or band of a knitted garment that provides elasticity and keeps the edges from curling. In the chunky knit vest pattern, the ribbing is typically worked in a 1×1 rib stitch, which alternates knit stitches (K) and purl stitches (P) across each row.
To knit the ribbing in a 1×1 rib stitch: Start with the first stitch on the left needle. Insert the right needle into the front of the stitch as if to knit, wrap the yarn around the right needle counterclockwise, and pull it through the stitch, slipping the old stitch off the left needle. This is a knit stitch. For the next stitch, insert the right needle into the front of the stitch as if to purl, wrap the yarn counterclockwise, and pull it through the stitch, slipping the old stitch off the left needle. This is a purl stitch. Continue alternating between knit and purl stitches until the row is complete.
Repeat the row of 1×1 rib stitch for the desired length of ribbing as specified in the pattern. The ribbing provides a stretchy and attractive border for the chunky knit vest. Once the ribbing is complete, you can move on to the next section of the pattern and continue knitting the vest.
Creating the Body of Your Chunky Knit Vest
Once you have gathered all the necessary materials for your chunky knit vest, it’s time to start creating the body of your vest. This is where you will begin seeing your project take shape and become a wearable piece of clothing. There are a few key steps involved in this process that will guide you through successfully completing your vest.
1. Casting on: To begin, you will need to cast on the required number of stitches for your specific size. This will determine the width of your vest. Make sure to use large knitting needles to achieve the chunky knit look. You can refer to the pattern instructions to determine the appropriate number of stitches to cast on for your size.
2. Working the stitches: Once you have cast on the necessary stitches, you will begin working the body of your vest using the specified stitch pattern. This could be a simple stockinette stitch or a more complex pattern, depending on the design. It’s important to keep track of your rows to ensure an even and consistent knitting throughout.
3. Shaping the vest: As you progress in knitting the body of your vest, you may need to shape it to create armholes or adjust the length. This is typically done through decreasing or increasing stitches at specific points in the pattern. Make sure to follow the instructions carefully and use stitch markers, if needed, to keep track of your shaping.
4. Finishing touches: Once you have completed the required number of rows or reached the desired length for your vest, it’s time to add the finishing touches. This includes binding off the stitches at the neckline, armholes, and hem, as specified in the pattern. You can also choose to add any desired embellishments, such as buttons or pockets, to personalize your vest.
By following these steps, you will be able to create the body of your chunky knit vest with ease. Remember to take your time and follow the pattern instructions carefully to ensure a successful and beautiful outcome.
Shaping the Armholes and Neckline of Your Chunky Knit Vest
When knitting a chunky knit vest, one of the crucial steps is shaping the armholes and neckline. These are the areas that require careful attention to ensure a comfortable fit and a stylish finish. Here are some tips and techniques to help you through this process.
Armhole Shaping: To shape the armholes, you will need to start decreasing stitches on each side of the work. This can be done by working decreases at the beginning and end of the row or by using a technique called short rows. Short rows involve knitting a partial row, turning the work, and knitting back to create a gradual slope. The number of stitches to decrease will depend on your gauge and desired fit. Be sure to follow the pattern instructions or consult a knitting reference guide to determine the appropriate number of stitches to decrease.
Neckline Shaping: The neckline of a chunky knit vest can be shaped in various ways, such as creating a V-neck, a scoop neck, or a boat neck. The shaping techniques will differ depending on the type of neckline you want to achieve. For example, to create a V-neck, you will need to gradually decrease stitches at the center front of the work. This can be done by working decreases every other row or using short rows as mentioned earlier. If you prefer a scoop neck or boat neck, you may need to work short rows to create a gentle curve that fits the desired neckline shape.
It is important to note that when shaping the armholes and neckline, you should always keep track of your stitch counts and follow the pattern instructions closely. Taking precise measurements and making gauge swatches beforehand will also help ensure that your vest turns out as intended. By carefully shaping the armholes and neckline, you will achieve a professional-looking finish and a vest that fits comfortably and flatteringly.
Knitting the Shoulders and Finishing Touches

Once you have completed knitting the body of the chunky knit vest, it’s time to move on to the shoulders. This is an important step in ensuring that the vest fits well and sits comfortably on your shoulders. Start by folding the vest in half along the center back and line up the stitches at each shoulder. You will then use the three-needle bind-off method to join the stitches together. This creates a neat and strong seam that adds structure to the vest. Simply insert a fourth needle into the first stitch of each shoulder, knit them together, and then bind off as usual. Repeat this process for the remaining stitches on each shoulder.
Once the shoulders are joined, you can move on to the finishing touches of the vest. This includes adding ribbing to the armholes and neckline to give the vest a polished look. To do this, pick up stitches along the edges of the armholes and neckline. Use a smaller needle size for the ribbing to ensure a snug fit. Knit in a rib stitch pattern, such as K2, P2, for several rows to create the desired ribbing effect. This will help the armholes and neckline to retain their shape and prevent them from stretching out over time. Finally, bind off the ribbing stitches and weave in any loose ends to complete the vest.
Overall, knitting the shoulders and finishing touches of the chunky knit vest is a crucial step in the construction process. It not only ensures that the vest fits well and sits nicely on the shoulders, but it also adds a professional and polished look to the garment. By following these steps, you can create a cozy and stylish vest that is perfect for layering in colder months or adding a fashionable touch to your outfit.
Blocking and Seaming Your Chunky Knit Vest
After completing the knitting of your chunky knit vest, the next important step is blocking it. Blocking helps to shape and even out the stitches, giving your vest a more polished and professional look. To block your vest, you will need a flat surface, rust-proof pins, and a spray bottle filled with water.
To start blocking, lay your vest flat on the surface, making sure that all the edges are straight and there are no wrinkles. Gently pin the edges of the vest, stretching it slightly if needed to ensure the desired measurements. Make sure to pin the shoulder seams as well, to help them stay in place.
Once your vest is pinned, use the spray bottle to mist it with water. Be careful not to soak the vest, as this can affect the fiber and shape of the stitches. Leave the vest to dry completely before removing the pins. This process can take anywhere from a few hours to overnight, depending on the humidity and air circulation.
Once your vest is dry and un-pinned, it’s time to seam the sides together. Using a tapestry needle and the same yarn that was used for knitting, join the front and back of the vest along the sides. Start from the bottom hem and work your way up, using a mattress stitch or a whip stitch for a clean and invisible seam.
When seaming, make sure to align the stitches and follow the stitch pattern of the vest for a seamless appearance. Take your time and work carefully to ensure a neat and durable seam. Once the sides are seamed, weave in any loose ends and your chunky knit vest is ready to wear!
Styling and Layering Your Chunky Knit Vest
If you’ve recently acquired a chunky knit vest and are wondering how to style and layer it, we’ve got you covered. This versatile and cozy wardrobe staple can be worn in numerous ways, allowing you to create different looks for various occasions.
1. Casual Chic: For a laid-back yet stylish look, pair your chunky knit vest with a basic white t-shirt, distressed jeans, and ankle boots. Add a statement belt to cinch the waist and accessorize with a long pendant necklace. This effortless combination is perfect for running errands or grabbing coffee with friends.
2. Office Ready: To add a touch of sophistication to your work attire, layer your vest over a tailored blouse and pair it with wide-leg trousers. Opt for neutral colors like black or gray to keep the overall look polished. Complete the ensemble with classic pumps and a structured tote bag for a professional and stylish outfit.
3. Cozy Layers: When the temperatures drop, layer your chunky knit vest over a cozy sweater or turtleneck. Choose complementary colors and textures to create a stylish contrast. Pair this combination with leggings or skinny jeans and finish the look with knee-high boots and a chunky scarf. This layered outfit will keep you warm and fashionable during the colder months.
4. Boho Vibes: Embrace your inner bohemian by layering your vest over a flowing maxi dress or a floral blouse and skirt combination. Add a wide-brimmed hat and ankle boots for a boho-inspired look that’s perfect for music festivals or outdoor events. Accessorize with statement earrings and a fringe bag to complete the free-spirited ensemble.
With these styling ideas, you can confidently rock your chunky knit vest and create a variety of stylish outfits for any occasion. Experiment with different layers, textures, and accessories to personalize each look and make a fashion statement.
Share Your Chunky Knit Vest Creations with the World!
If you’ve followed this free chunky knit vest pattern and created your own beautiful vest, it’s time to show off your hard work! Sharing your creations can inspire and help others who are looking for new knitting projects. Plus, who doesn’t love praise and admiration for their crafting skills?
One of the easiest and most popular ways to share your chunky knit vest creations is through social media. Platforms like Instagram, Facebook, and Pinterest are perfect for showcasing your work. Simply snap a few high-quality photos of your vest, write a caption telling your audience about the pattern and your knitting journey, and use popular knitting-related hashtags to reach a wider audience.
If you’re a member of online knitting communities or forums, you can also share your vest there. Post photos, share your experience of knitting the vest, and encourage others to try the pattern. You can even ask for feedback or suggestions to improve your knitting skills.
Another way to share your chunky knit vest creations is by creating a blog or website. You can document the entire process of knitting the vest, provide helpful tips and tricks, and showcase your finished projects. This not only allows you to share your work but also helps you build a community of fellow knitters who can learn and grow together.
If you’re feeling extra generous, consider sharing the pattern you used for your chunky knit vest. Posting the pattern can help beginner knitters who are looking for free patterns to practice their skills. You can either write the pattern in a blog post or create a PDF file that people can download. Don’t forget to credit the original designer and include any modifications you made to the pattern!
Lastly, don’t forget to participate in knitting contests and challenges. Many knitting communities and websites organize competitions where you can submit your chunky knit vest for a chance to win prizes or be featured. This is a fantastic opportunity to gain recognition for your knitting skills and connect with other talented knitters.
Conclusion
Now that you’ve finished your chunky knit vest, it’s time to share your creation with the world! Whether it’s through social media, online communities, blogging, or participating in contests, sharing your work can inspire others and foster a sense of community among fellow knitters. So grab your camera, write a captivating caption, and show off your beautiful chunky knit vest to the world!