
If you’re new to knitting or looking for simple patterns to work on, there are plenty of easy knit and purl patterns to choose from. Knitting is a wonderful craft that allows you to create beautiful and functional items, and learning the basic knit and purl stitches is the first step in mastering this art. Once you have these stitches down, you can start creating a variety of textures and patterns, even with just the simple knit and purl stitches.
One of the simplest patterns you can try is the stockinette stitch, which is created by alternating rows of knit and purl stitches. This pattern creates a smooth and even fabric with a distinct right side and wrong side. It’s a great pattern for making simple scarves, blankets, or even sweaters. The stockinette stitch is versatile and can be worked on any project, whether you’re knitting flat or in the round.
Another easy pattern is the rib stitch, which is created by alternating rows of knit and purl stitches, but with a specific pattern. The most common rib stitch is the 1×1 rib, where you knit 1 stitch and then purl 1 stitch, repeating this pattern across the row. The rib stitch creates a stretchy and elastic fabric, making it perfect for cuffs, collars, and edges of garments.
Easy Knit and Purl Patterns

Knitting is a versatile craft that allows you to create a wide range of patterns and designs using just two basic stitches: knit and purl. Whether you’re a beginner or an experienced knitter, there are plenty of easy knit and purl patterns that you can try to create beautiful and functional items.
One of the simplest knit and purl patterns is the garter stitch. This pattern is created by knitting every stitch on every row, resulting in a textured fabric with no visible purl bumps. The garter stitch is perfect for beginners as it helps them practice their knitting skills and creates a cozy and squishy fabric that can be used for scarves, blankets, and washcloths.
Another easy pattern that combines both knit and purl stitches is the stockinette stitch. This pattern is created by alternating knit rows with purl rows, resulting in smooth and flat fabric with distinct knit and purl sides. The stockinette stitch is commonly used in a variety of projects, including sweaters, hats, and socks, and it allows for endless possibilities for adding texture and color through other knitting techniques.
If you want to add a bit of variation and texture to your knitting, you can try the seed stitch pattern. This pattern is created by alternating knit and purl stitches within the same row, and then alternating them again in the following rows. The seed stitch creates a bumpy and textured fabric that looks great in scarves, cowls, and even on the border of sweaters. It’s an easy pattern to memorize and adds a unique twist to your knitting projects.
In conclusion, with just the knit and purl stitches, you can create a wide variety of patterns and textures in your knitting projects. Whether you’re a beginner or an experienced knitter, the garter stitch, stockinette stitch, and seed stitch are all easy and versatile patterns that you can use to create beautiful and functional items. So grab your needles and yarn and start exploring the endless possibilities of knit and purl patterns!
Benefits of Knitting

Knitting is not only a popular hobby, but it also offers several benefits for both physical and mental health. Whether you are a beginner or an experienced knitter, the act of knitting can have a positive impact on your overall well-being.
1. Stress relief: Knitting allows you to focus on a repetitive and soothing task, which can help reduce stress and anxiety. The rhythmic motions of knitting can induce a state of relaxation and calmness, similar to meditation.
2. Improved dexterity: Knitting involves using both hands simultaneously, which can improve hand-eye coordination and fine motor skills. Regular knitting can help keep your fingers nimble and increase your overall dexterity.
3. Mindfulness and mindfulness: Knitting requires your full attention and concentration, making it a great way to practice mindfulness. As you knit, you become more aware of the present moment and can let go of any racing thoughts or worries.
4. Creative expression: Knitting allows you to unleash your creativity and create beautiful, personalized items. Whether you choose to follow a pattern or create your own design, knitting provides a creative outlet that can boost self-esteem and satisfaction.
5. Social connection: Knitting can be a social activity, as it often brings people together in knitting circles or groups. Participating in knitting communities can provide a sense of belonging and offer opportunities to connect with others who share the same interest.
6. Cognitive stimulation: Knitting involves following patterns, counting stitches, and making various decisions. These cognitive challenges can help keep your mind sharp and improve cognitive function, especially as you tackle more complex knitting projects.
Overall, knitting offers a wide range of benefits, from stress relief and improved dexterity to creative expression and social connection. So why not pick up those knitting needles and start reaping the rewards?
Getting Started with Knit and Purl Patterns
Knitting is a versatile and enjoyable craft that allows you to create beautiful and cozy items. One of the basic techniques in knitting is the knit and purl stitch. These two stitches form the foundation for many different patterns, allowing you to create a variety of textures and designs in your knitting projects.
The knit stitch is the most fundamental stitch in knitting. It creates a smooth and even fabric, and is often used as the basis for other stitch patterns. The purl stitch, on the other hand, creates a raised texture, adding depth and visual interest to your knitting. By combining these two stitches in different ways, you can create a wide range of patterns and designs.
To get started with knit and purl patterns, you’ll need some basic knitting supplies. These include knitting needles, yarn, and a knitting pattern. Knitting needles come in different sizes and materials, so choose ones that are appropriate for the yarn you’re using. You’ll also need to select a yarn that is suitable for your project and desired outcome.
Once you have your supplies, it’s time to practice the knit and purl stitches. Start by casting on, which is the process of creating the initial row of stitches on your knitting needle. Then, follow the pattern instructions to alternate between knit and purl stitches. As you gain more experience, you can try more complex patterns that combine these stitches in different ways.
When working on knit and purl patterns, it’s important to maintain an even tension. This means that you should try to keep your stitches the same size and not too tight or too loose. Practice is key to achieving the right tension, so don’t get discouraged if your first few projects don’t turn out perfect. With time and practice, you’ll become more comfortable with these stitches and be able to create a wide variety of beautiful knit and purl patterns.
Basic Knit Stitch

The basic knit stitch is one of the fundamental techniques in knitting. It is a simple and versatile stitch that creates a smooth fabric. Knitting involves pulling a loop of yarn through an existing loop to create a new stitch, and the knit stitch is the most common stitch used in this process.
To create a knit stitch, you need to insert the right needle into the front of the loop on the left needle, from left to right. Then, wrap the yarn around the right needle in a counterclockwise direction. Finally, pull the right needle back through the loop, bringing the new stitch onto the right needle.
The basic knit stitch is often abbreviated as “k” in knitting patterns. It is the opposite of the purl stitch, with the knit stitch creating a smooth, raised pattern on the right side of the fabric, and the purl stitch creating a bumpy pattern on the wrong side.
Once you have mastered the basic knit stitch, you can experiment with different stitch patterns and combinations to create various textures and designs. Knitting can be a relaxing and enjoyable hobby, and mastering the basic knit stitch is the first step towards creating beautiful and unique handmade items.
Basic Purl Stitch

The purl stitch is one of the fundamental stitches used in knitting. It is a simple technique that creates a raised, textured pattern on the fabric. To purl, you will need knitting needles and yarn of your choice.
Here are the step-by-step instructions on how to do a basic purl stitch:
- Holding the knitting needle: Hold the knitting needle with the cast-on stitches in your left hand. Make sure that the working yarn is in the front of the needle, hanging towards you.
- Inserting the right needle: Insert the right needle from right to left into the first stitch on the left needle, going from back to front.
- Wrapping the yarn: Take the working yarn and wrap it around the right needle from left to right, going under the left needle.
- Pulling through: Carefully pull the right needle and the wrapped yarn through the first stitch, sliding it off the left needle.
- Finishing the stitch: Slide the new stitch onto the right needle, transferring it from the left needle. The purl stitch is now complete.
- Continuing the pattern: Repeat steps 2 to 5 for each stitch on the left needle, creating a row of purl stitches.
The basic purl stitch creates a reverse side to the traditional knit side, giving your knitting project an interesting texture. Practice this stitch to improve your knitting skills and explore different patterns and textures.
Garter Stitch Pattern
The garter stitch pattern is one of the simplest knitting patterns and is perfect for beginners. It is created by knitting every row, resulting in a fabric that has a textured, ridged appearance. The garter stitch is versatile and can be used to create a variety of projects, from scarves and blankets to sweaters and accessories.
To create the garter stitch, you will need basic knitting skills, including how to cast on, knit, and bind off. The pattern is worked by knitting every stitch on every row, so there is no need to worry about keeping track of different stitch patterns or techniques.
Materials:
- Yarn of your choice
- Knitting needles appropriate for your yarn
- Tapestry needle for weaving in ends
Instructions:
- Cast on the desired number of stitches.
- Knit every stitch on the first row.
- Repeat step 2 for every row until your project reaches the desired length.
- Bind off all stitches.
- Weave in any loose ends using a tapestry needle.
The garter stitch pattern is a great starting point for beginners, as it allows you to practice your basic knitting skills while creating a beautiful and functional project. It is also a good choice for projects that require a reversible fabric, as the garter stitch looks the same on both sides.
Once you are comfortable with the garter stitch, you can experiment with different variations, such as adding stripes or combining it with other stitch patterns. The simplicity of the garter stitch makes it a versatile and timeless pattern that you can use in a wide range of knitting projects.
Stockinette Stitch Pattern

The stockinette stitch pattern is one of the most basic and popular knitting patterns. It is created by alternating knit and purl stitches in consecutive rows. This pattern produces smooth and uniform fabric with a “V” pattern on one side and a smooth surface on the other side. It is commonly used in various projects such as sweaters, scarves, and blankets.
To create the stockinette stitch pattern, you can start with a row of knit stitches followed by a row of purl stitches. Repeat these two rows until you reach the desired length. Alternatively, you can start with a row of purl stitches followed by a row of knit stitches. The choice of starting row depends on your preference and the specific pattern you are working on.
When working in the round, you can create the stockinette stitch pattern by knitting all the stitches in one round and purling all the stitches in the next round. This eliminates the need to alternate between knit and purl stitches in consecutive rows.
The stockinette stitch pattern is versatile and works well with various yarns and knitting needle sizes. It is important to note that the edges of stockinette stitch fabric tend to curl, so adding a border or using a different stitch pattern for the edges may be necessary.
Overall, the stockinette stitch pattern is a great choice for beginners as it is simple to create and produces a classic and polished look. With practice, you can experiment with different variations and incorporate it into your own designs.
Ribbing Stitch Pattern

Ribbing stitch pattern is a versatile and popular knitting technique that creates a stretchy and textured fabric. It is often used for cuffs, collars, and hems, as well as entire garments like sweaters and hats. The ribbing stitch pattern is made up of alternating knit and purl stitches, creating columns of raised ribs that run vertically along the fabric.
To create ribbing, you will typically start with a ribbing stitch pattern consisting of a certain number of knit stitches followed by a certain number of purl stitches. The most common ribbing stitch patterns are 1×1 ribbing, where one knit stitch is followed by one purl stitch, and 2×2 ribbing, where two knit stitches are followed by two purl stitches. However, you can also experiment with different combinations, such as 2×1 or 3×2 ribbing, to achieve different effects.
Ribbing stitch patterns are not only aesthetically pleasing but also functional. The stretchiness of the ribbing makes it ideal for areas that need to fit snugly, such as cuffs and waistbands. Additionally, the raised ribs created by the alternating knit and purl stitches add extra insulation and warmth to the fabric. This makes ribbed garments particularly suitable for colder climates or periods of chilly weather.
While ribbing stitch patterns are relatively easy to learn, they require some attention to detail to get the desired result. It’s important to maintain an even tension throughout the knitting process to ensure a consistent and professional-looking fabric. Additionally, when switching between knit and purl stitches, it’s important to pay attention to the pattern instructions and keep track of your stitch count to avoid mistakes.
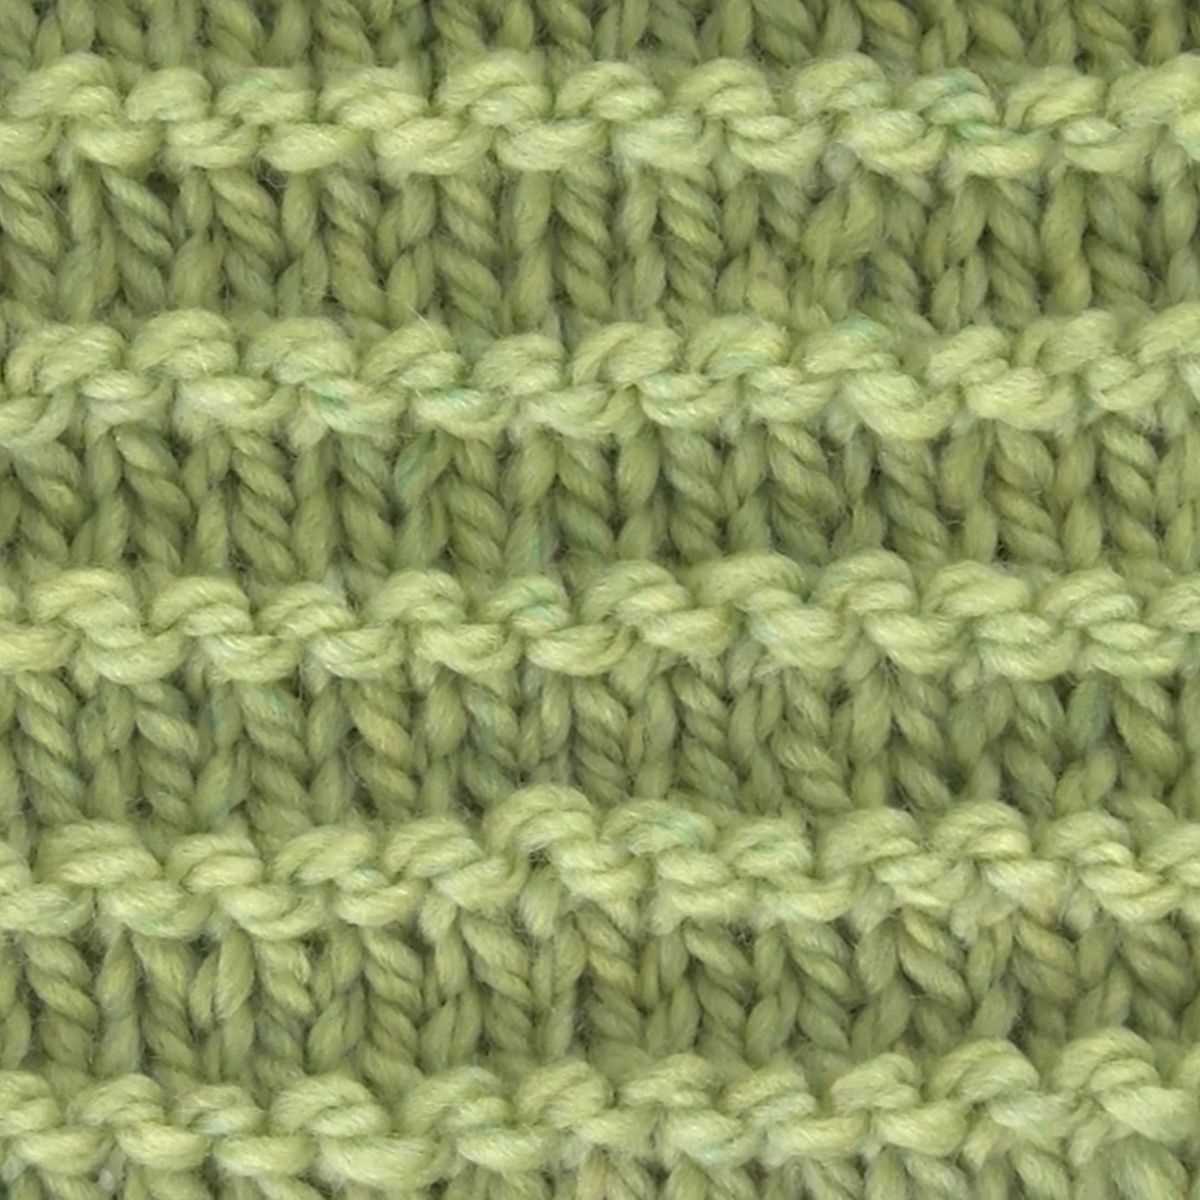
Seed Stitch Pattern

The seed stitch pattern is a simple combination of knits and purls, resulting in a textured fabric. It is commonly used for borders, edgings, and all-over patterns. The seed stitch creates a bumpy surface that resembles little seeds, hence its name.
To knit the seed stitch pattern, you need to alternate between knit and purl stitches. The basic repeat for the seed stitch is: knit 1, purl 1. This means you knit one stitch, then purl one stitch, and continue this pattern across the row. On the next row, you will knit the purl stitches and purl the knit stitches, essentially reversing the pattern. This creates a checkerboard-like texture.
When working the seed stitch pattern, it is important to pay attention to your tension. Inconsistent tension can result in an uneven fabric and affect the overall appearance of the pattern. Make sure to keep your tension consistent, especially when transitioning between knit and purl stitches.
The seed stitch pattern is versatile and can be easily adapted to different projects. It works well for scarves, hats, blankets, and various accessories. You can also combine the seed stitch with other stitch patterns to create unique designs. Experiment with different yarns and needle sizes to achieve different textures and densities in your seed stitch fabric.
- Simple combination of knits and purls
- Creates a textured fabric
- Commonly used for borders and edgings
- Alternating knit and purl stitches
- Checkerboard-like texture
- Pay attention to tension
- Versatile and adaptable
- Combine with other stitch patterns for unique designs
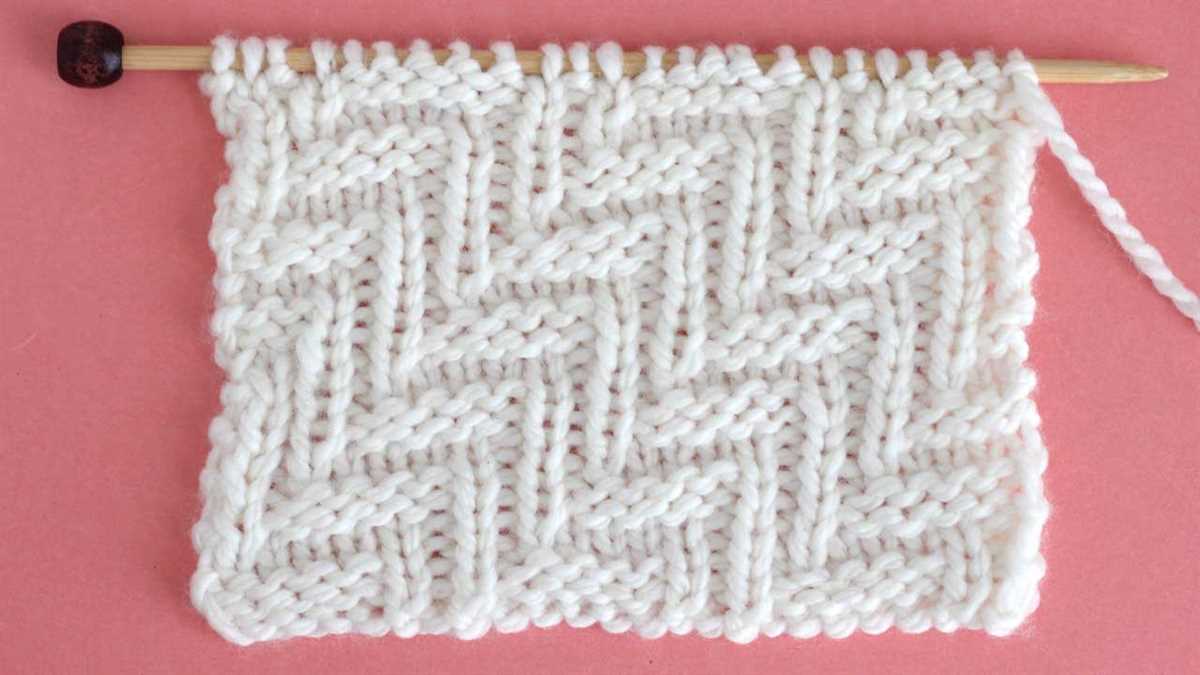
Basketweave Stitch Pattern
The basketweave stitch pattern is a classic knit and purl design that creates a textured fabric resembling the woven pattern of a basket. It’s a versatile pattern that can be used for a variety of knitting projects, including scarves, blankets, and dishcloths.
To create the basketweave stitch pattern, you’ll need to have a basic understanding of knitting and purling. The pattern is worked over a multiple of stitches and rows, and typically consists of alternating blocks of knit and purl stitches.
Materials:
- Worsted weight yarn
- Knitting needles
- Tapestry needle
Instructions:
- Cast on a multiple of 8 stitches.
- Row 1: *Knit 4, purl 4.* Repeat from * to * across the row.
- Row 2: *Purl 4, knit 4.* Repeat from * to * across the row.
- Repeat rows 1 and 2 until desired length is reached.
- Bind off in pattern.
The basketweave stitch pattern is a great way to add visual interest and texture to your knitting projects. It’s also an easy pattern to memorize, making it perfect for knitting on the go or while watching TV. Experiment with different yarns and needle sizes to create different effects with this versatile stitch pattern.
Tips for Successful Knitting

Knitting can be a fun and rewarding hobby, but it does require some practice and patience. Here are some tips to help you become a successful knitter:
1. Start with easy patterns: If you’re a beginner, it’s best to start with simple patterns that only require basic knit and purl stitches. This will help you practice the fundamentals and build your confidence before moving on to more complex projects.
2. Use the right needles and yarn: The type of needle and yarn you use can greatly impact your knitting experience. Make sure to choose the right size and material of needles for your yarn, as well as the appropriate weight and fiber content of yarn for your project. Test different combinations to find what works best for you.
3. Maintain consistent tension: Tension refers to the tightness or looseness of your stitches. Consistent tension is important for ensuring that your finished project has a uniform look. Practice knitting at a steady pace and try to keep your tension even throughout.
4. Count your stitches and rows: Keeping track of your stitches and rows is essential for following patterns and ensuring that your project turns out the right size. Use stitch markers or a row counter to help you stay organized and keep track of where you are in your knitting.
5. Take breaks and stretch: Knitting can be repetitive and lead to hand and wrist fatigue. Take breaks regularly to stretch your fingers, wrists, and arms to prevent strain and injury. This will help you maintain your knitting enjoyment for longer periods of time.
| Tips |
|---|
| Start with easy patterns |
| Use the right needles and yarn |
| Maintain consistent tension |
| Count your stitches and rows |
| Take breaks and stretch |
By following these tips, you’ll be well on your way to becoming a successful knitter. Remember to practice regularly and don’t be afraid to make mistakes – they’re part of the learning process. Happy knitting!