
If you’re an avid knitter looking for a new challenge, or a beginner wanting to try something more complex, then this free zig zag knitting pattern is perfect for you! Zig zag patterns are a fun and visually striking way to create texture and interest in your knitting projects.
This pattern utilizes a combination of knit and purl stitches to create a zig zag effect that runs diagonally across the fabric. The end result is a beautiful, geometric design that adds a modern touch to any project.
Whether you’re making a cozy blanket, a stylish scarf, or even a trendy sweater, this free zig zag knitting pattern can be easily customized to suit your needs. Simply choose your favorite yarn and needles, and get ready to create something truly unique!
Don’t worry if you’re new to knitting or haven’t tried working with a zig zag pattern before – this pattern is suitable for knitters of all skill levels. With detailed instructions and helpful tips, you’ll be able to master this technique in no time and create stunning pieces that will impress everyone!
Free Zig Zag Knitting Pattern: 10 Easy Steps to Create a Stunning Design
Are you looking for a free zig zag knitting pattern? Look no further! With just a few easy steps, you can create a stunning design that will impress your friends and family. Whether you’re a beginner or an experienced knitter, this pattern is perfect for anyone looking to add a unique touch to their next project.
To get started, gather the following materials:
- Size 8 knitting needles
- Worsted weight yarn in your desired colors
- Tapestry needle for weaving in ends
Once you have your materials ready, follow these 10 easy steps to create your zig zag design:
- Make a slipknot and cast on an even number of stitches.
- Knit the first row.
- Purl the second row.
- Repeat steps 2 and 3 until you have the desired length.
- Switch to your contrasting color yarn.
- Knit the next row.
- Purl the following row.
- Continue alternating knit and purl rows until you reach the end of your project.
- Bind off and weave in any loose ends.
- Block your finished project to shape and enhance the zig zag pattern.
With these 10 easy steps, you’ll have a stunning zig zag design that you can use for scarves, blankets, or any other knitting project you have in mind. Experiment with different color combinations to create a unique look that reflects your personal style. Happy knitting!
Find the Perfect Yarn for Your Zig Zag Knitting Project

Choosing the right yarn for your zig zag knitting project is essential to achieve the desired results. The yarn you choose will greatly affect the final look and feel of your project, so it’s important to consider a few key factors before making your selection.
One of the first things to consider when choosing yarn for a zig zag knitting project is the weight or thickness of the yarn. This will determine how delicate or sturdy your finished project will be. For a more delicate and lightweight result, opt for a fingering or lace-weight yarn. If you prefer a thicker and more substantial feel, consider using a worsted or bulky-weight yarn.
Colors and Patterns

Another important aspect to consider is the color and pattern of the yarn. Zig zag knitting patterns often look best with contrasting colors that highlight the interesting angles and shapes. Look for variegated or self-striping yarns with multiple colors to add visual interest to your project. If you prefer a more subtle look, solid colored yarns can also work well.
Yarn Fiber Content
The fiber content of the yarn can also greatly impact the final result. Natural fibers such as wool, alpaca, or cotton can add warmth and durability to your zig zag knitting project. They also have a lovely drape and texture that enhances the zig zag pattern. If you prefer a softer and more lightweight feel, synthetic or blended fibers like acrylic or nylon can be a good choice.
Considerations for Care and Maintenance
Lastly, consider the care and maintenance requirements of the yarn. Some yarns may require handwashing or special care, while others can be machine washed and dried. It’s important to choose a yarn that fits your lifestyle and preferences in terms of care and maintenance.
- Consider the weight or thickness of the yarn.
- Look for contrasting colors or variegated yarns.
- Choose a yarn fiber that suits your desired texture and drape.
- Consider the care and maintenance requirements of the yarn.
With these considerations in mind, you’re sure to find the perfect yarn for your zig zag knitting project that will bring your design to life and create a stunning finished piece. Experiment with different colors, textures, and fibers to make your creation truly unique.
Gather the Essential Knitting Tools: Needles, Scissors, and Measuring Tape
When it comes to knitting, having the right tools is essential for success. Whether you’re a beginner or experienced knitter, there are three basic tools that you should always have on hand: needles, scissors, and measuring tape.
First and foremost, needles are the most important tool for any knitter. There are different types of needles to choose from, such as straight needles, circular needles, or double-pointed needles, depending on the project you’re working on. It’s important to select the right needle size and material based on the yarn weight and your personal preference. Needles made from materials like bamboo, metal, or plastic offer different levels of flexibility and grip. Make sure to have a variety of sizes in your collection to accommodate different stitch patterns and yarn weights.
Next, a good pair of scissors is essential for cutting yarn and weaving in ends. It’s important to have a small and sharp pair of scissors specifically dedicated to your knitting projects. This will ensure clean and precise cuts, preventing any frayed ends or loose threads. Keeping your scissors handy will save you time and frustration when it’s time to trim your yarn during or after a project.
Lastly, don’t forget about measuring tape. This tool is crucial for checking gauge and measuring your knitted pieces. Gauge refers to the number of stitches and rows per inch, and it’s important to match the gauge specified in your pattern to achieve the desired size and fit. Measuring tape can also be used to measure lengths and widths of your finished projects or to determine the correct length for sleeves or collars. It’s a versatile tool that every knitter should have in their knitting bag.
In conclusion, having the right knitting tools is essential for a successful and enjoyable knitting experience. Needles, scissors, and measuring tape are the three essential tools that every knitter should have. By choosing the right needles, keeping a dedicated pair of scissors for your knitting, and always having measuring tape on hand, you’ll be well-equipped to tackle any knitting project with confidence.
Learn the Basic Knitting Stitches: Cast On, Knit, Purl, and Bind Off

If you’re new to knitting, it’s important to learn the basic stitches that form the foundation of most knitting projects. These stitches include the cast on, knit, purl, and bind off. Once you have mastered these stitches, you will be able to create a wide variety of patterns and designs.
Cast On: The cast on stitch is the first step in starting a knitting project. It is the foundation row of stitches that you will build upon. There are several different methods of casting on, including the long tail cast on, the knit cast on, and the cable cast on. Each method creates a slightly different edge and tension, so it’s a good idea to experiment with different techniques to find the one that works best for you.
Knit: The knit stitch is the most basic stitch in knitting. It is created by inserting the right needle into the first stitch on the left needle, wrapping the yarn around the right needle, and pulling the new loop of yarn through the stitch. This stitch is typically used to create a smooth, flat fabric with a “V” pattern on the right side.
Purl: The purl stitch is the reverse of the knit stitch. It is created by inserting the right needle into the first stitch on the left needle from right to left, wrapping the yarn counterclockwise around the right needle, and pulling the new loop of yarn through the stitch. This stitch creates a bumpy texture on the right side of the fabric, and is often used to create ribbing or other textured patterns.
Bind Off: The bind off stitch is used to finish a knitting project and secure the stitches in place. To bind off, you knit the first two stitches, then insert the left needle into the first stitch on the right needle and lift it over the second stitch and off the needle. Repeat this process until you have only one stitch left on the right needle, then cut the yarn and pull it through the last stitch to secure it. This creates a neat edge and prevents the stitches from unraveling.
By learning these basic knitting stitches, you will have the foundation you need to tackle more complex patterns and create beautiful knitted items. Practice these stitches until you feel comfortable with them, and soon you will be ready to take on more advanced knitting projects.
Get Familiar with the Zig Zag Knitting Technique: Increases, Decreases, and Yarn Overs

When it comes to knitting, there are various techniques that can be used to create eye-catching patterns and designs. One popular technique is the zig zag knitting pattern, which adds a touch of fun and uniqueness to any project. By incorporating increases, decreases, and yarn overs, you can create a striking zig zag pattern that will impress everyone.
Increases are a crucial part of the zig zag knitting technique as they allow you to add stitches to your work. One common increase used in this pattern is the knit front and back (kfb) increase, where you knit into the front and back of the same stitch to create two stitches in one. Another increase commonly used is the make one (M1) increase, which involves picking up the horizontal strand between two stitches and knitting into it. These increases are strategically placed to create the diagonal lines that characterize the zig zag pattern.
On the other hand, decreases are used to remove stitches from your work and play a significant role in creating the zig zag effect. The most commonly used decrease in this pattern is the knit two together (k2tog) decrease, where you knit two stitches together as one. This decrease pulls the stitches closer together, creating the distinctive V-shape that forms the zig zag lines. Another decrease often used is the slip, slip, knit (ssk) decrease, where you slip two stitches knitwise individually, then insert the left needle into the front loops of both slipped stitches and knit them together.
In addition to increases and decreases, yarn overs also play a vital role in the zig zag knitting technique. A yarn over involves wrapping the yarn around the right-hand needle as if to knit, but without inserting the needle into a stitch. This creates an extra loop that adds height and open spaces to the fabric, giving it a lacy appearance. Yarn overs are strategically placed in the zig zag pattern to create an airy and visually appealing effect.
By mastering increases, decreases, and yarn overs, you can confidently tackle the zig zag knitting technique and create stunning garments and accessories. Whether you’re knitting a scarf, sweater, or shawl, the zig zag pattern will add an interesting touch to your finished project. So give it a try and enjoy the process of creating eye-catching zig zag designs with your knitting needles!
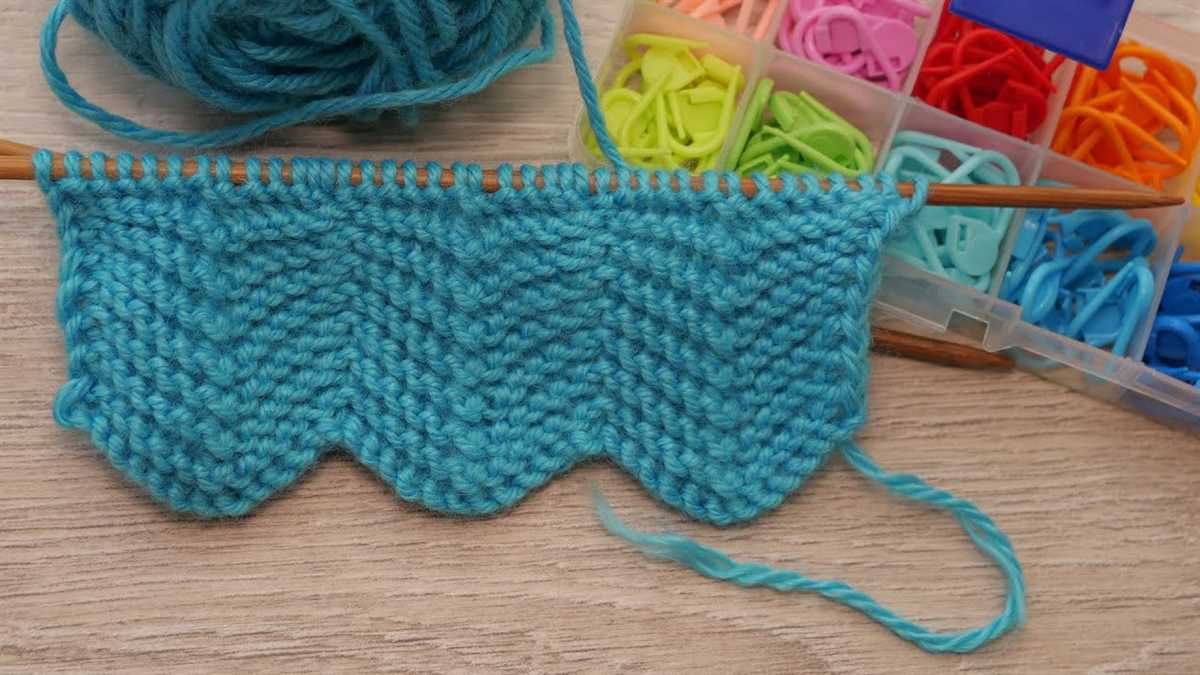
Start with a Test Swatch to Perfect Your Zig Zag Knitting Skills
Before diving into a full project using a zig zag knitting pattern, it’s always a good idea to start with a test swatch. This small piece of fabric allows you to practice the stitch pattern and make any necessary adjustments before committing to a larger project. Plus, it gives you a chance to familiarize yourself with the pattern and gain confidence in your knitting skills.
When creating your test swatch, be sure to use the same yarn and needles that you plan to use for your actual project. This will help you achieve an accurate gauge and ensure that your zig zag pattern turns out as intended. It’s also important to follow the instructions for the pattern carefully, paying attention to any specific stitch counts or pattern repeats.
Why Make a Test Swatch?
Making a test swatch allows you to see how your stitches look in the zig zag pattern and determine if any adjustments need to be made. For example, you may find that your tension is too tight, resulting in a fabric that is stiff and doesn’t drape well. Alternatively, you may discover that your tension is too loose, causing the zig zag pattern to appear stretched out and distorted.
A test swatch also gives you an opportunity to experiment with different needle sizes or yarn weights, if desired. By trying out these variations, you can see how they affect the overall appearance and feel of the fabric. Additionally, if you’re planning to customize the pattern in any way, such as adjusting the width or length of the zig zags, the test swatch allows you to test these modifications before implementing them in your project.
Overall, taking the time to create a test swatch before starting your zig zag knitting project can save you from potential frustration and disappointment later on. It allows you to fine-tune your skills, ensure a consistent gauge, and make any necessary adjustments to achieve the best results possible.
Choose a Zig Zag Knitting Pattern: Simple Chevron, Ribbed Zig Zag, or Lace Zig Zag
If you enjoy knitting and are looking for a new project to take on, why not try a zig zag knitting pattern? Zig zag patterns can add a fun and unique touch to any project, whether you’re knitting a scarf, blanket, or even a sweater. There are several different types of zig zag patterns to choose from, including simple chevron, ribbed zig zag, and lace zig zag. Each pattern has its own unique design, so you can pick the one that appeals to you the most.
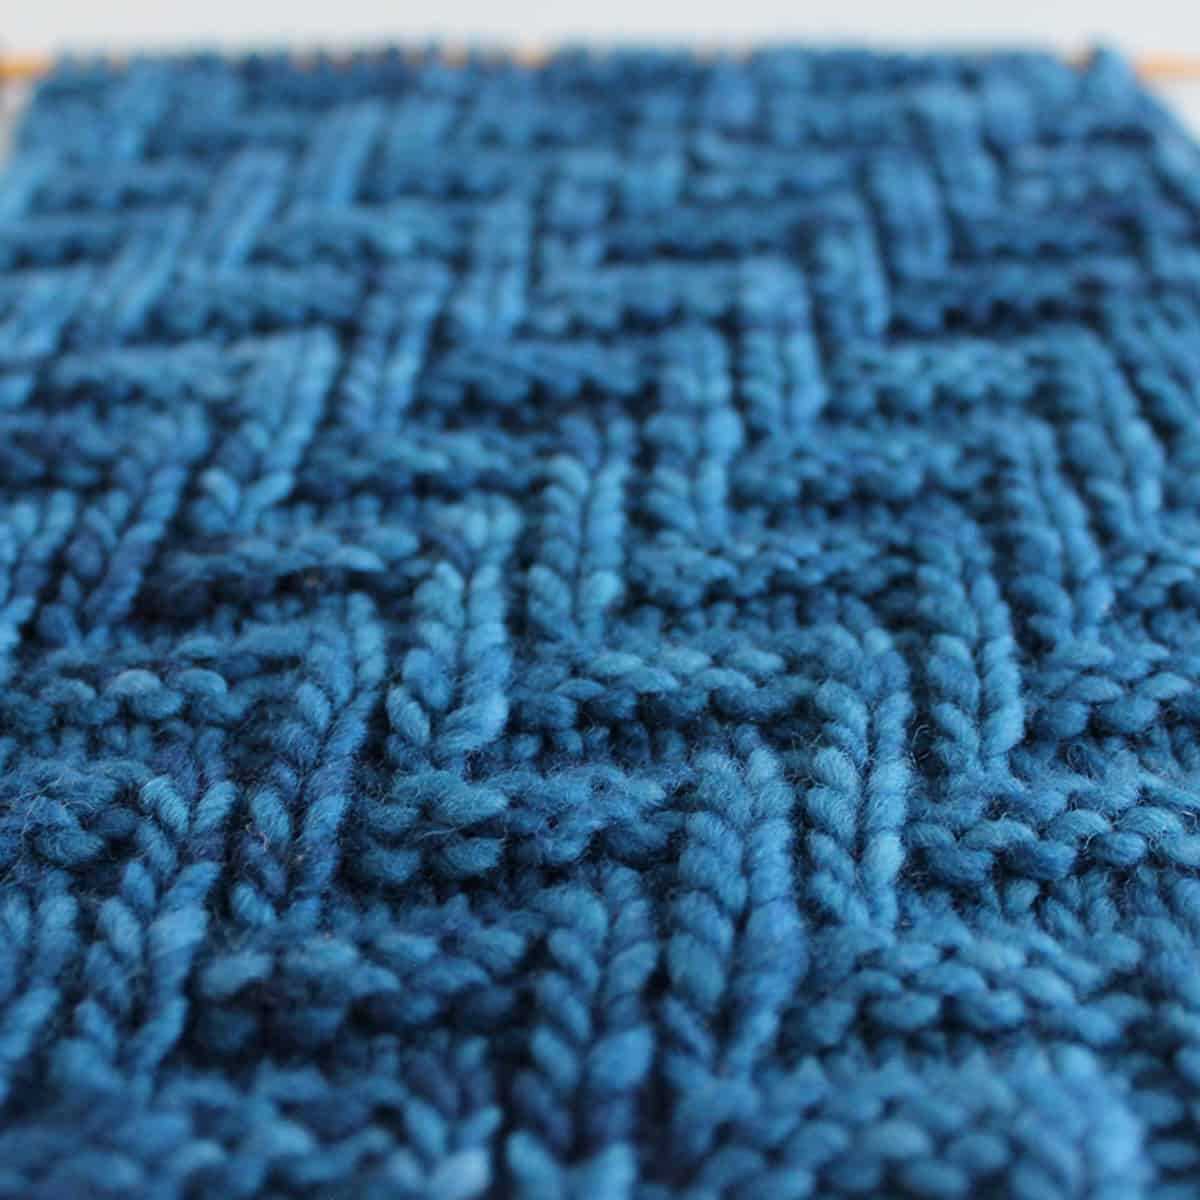
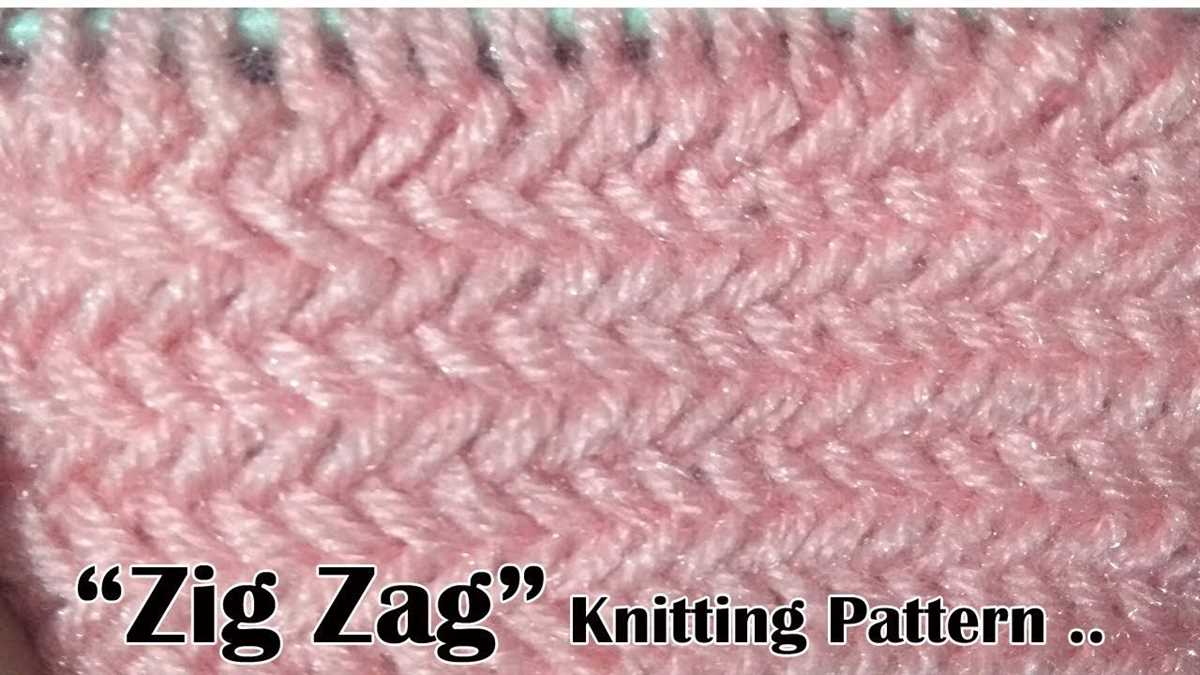
Simple Chevron: The simple chevron zig zag pattern is a classic option that provides a clean and elegant look. It consists of alternating rows of knit and purl stitches, creating a V-shaped zig zag effect. This pattern is great for beginners who are new to knitting, as it’s easy to follow and produces beautiful results. You can use this pattern to knit scarves, hats, or even blankets.
Ribbed Zig Zag: If you’re looking for a pattern with more texture, the ribbed zig zag is a great choice. This pattern combines knit and purl stitches with ribbing, creating a raised, textured zig zag design. The ribbed zig zag pattern is perfect for knitting sweaters, cardigans, or even socks. It adds depth and interest to your project while still maintaining a classic and timeless look.
Lace Zig Zag: For those who prefer a delicate and intricate design, the lace zig zag pattern is the way to go. This pattern incorporates lace stitches to create an open and airy zig zag pattern. Lace zig zag patterns are often used in shawls, wraps, or lightweight sweaters. They add a touch of femininity and elegance to any project and are perfect for more advanced knitters looking to challenge themselves.
No matter which zig zag knitting pattern you choose, you’re sure to create a unique and eye-catching project. Take the time to consider your skill level, the type of project you want to make, and the overall aesthetic you’re going for. Whether you opt for a simple chevron pattern, a textured ribbed zig zag, or a delicate lace zig zag, you’re bound to have fun and create something truly special.
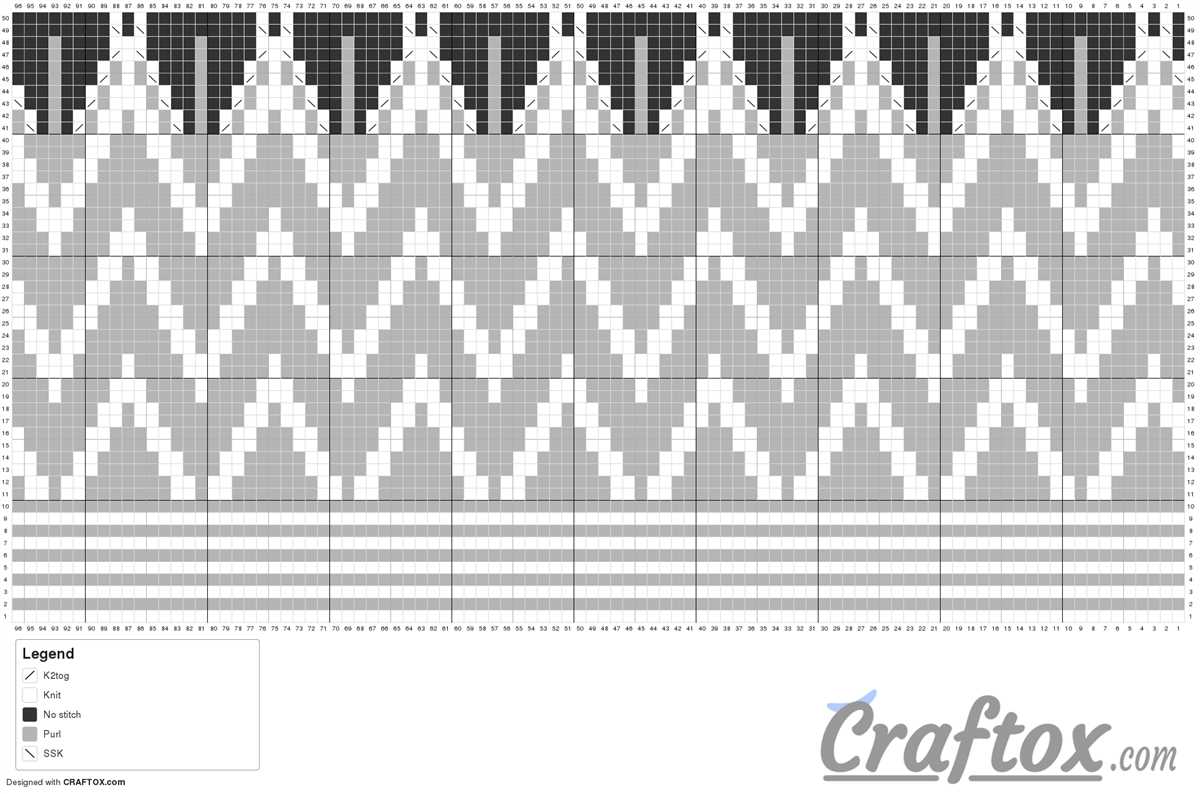
Read the Zig Zag Knitting Pattern Chart and Instructions Carefully

Before starting your project, it is essential to thoroughly read and understand the zig zag knitting pattern chart and instructions. This will ensure that you have a clear understanding of the techniques and stitches required to successfully complete the pattern.
The zig zag knitting pattern chart is a visual representation of the pattern and shows the different stitches and their placement. It consists of symbols and abbreviations that indicate specific actions to be taken, such as knitting, purling, increasing, and decreasing. Take the time to familiarize yourself with these symbols to avoid any confusion while working on your project.
The instructions accompanying the zig zag knitting pattern chart provide additional guidance and clarification. They often include written explanations of the symbols used in the chart, as well as detailed step-by-step instructions for each row or round of the pattern. It is important to carefully follow these instructions to ensure accuracy and maintain the integrity of the design.
When reading the zig zag knitting pattern chart and instructions, pay close attention to any special notes or cautions that may be included. These notes often provide helpful tips or information about specific techniques required for the pattern. They may also highlight important details or variations that can affect the outcome of your project.
In summary, taking the time to thoroughly read and understand the zig zag knitting pattern chart and instructions is crucial for successful project completion. By familiarizing yourself with the symbols, following the instructions accurately, and paying attention to any special notes, you can confidently create beautiful zig zag knitting projects.
Begin Knitting the Zig Zag Pattern: Repeat Rows for the Desired Length

Once you have cast on the desired number of stitches for your project, you are ready to begin knitting the zig zag pattern. This pattern consists of a series of rows that alternate between knitting and purling to create a zig zag design. To start, you will need to knit the first row following the pattern instructions.
Row 1: Knit all stitches.
Row 2: Purl all stitches.
After completing these two rows, you can start repeating them to continue the zig zag pattern. Simply knit all stitches for Row 1, and then purl all stitches for Row 2. Repeat these two rows until you have reached the desired length for your project.
For example, if you are knitting a scarf and want it to be 60 inches long, you would continue repeating Rows 1 and 2 until the scarf measures 60 inches from the cast on edge. It’s important to keep track of your rows and the length of your project as you go, especially if you are following a specific pattern or design.
Once you have knit the desired length, you can finish off your project by binding off the stitches and weaving in any loose ends. The zig zag pattern is a versatile and visually interesting design that can be used for a variety of knitting projects, from scarves and blankets to sweaters and hats.
Customize Your Zig Zag Knitting Project with Color Changes or Textured Stitches
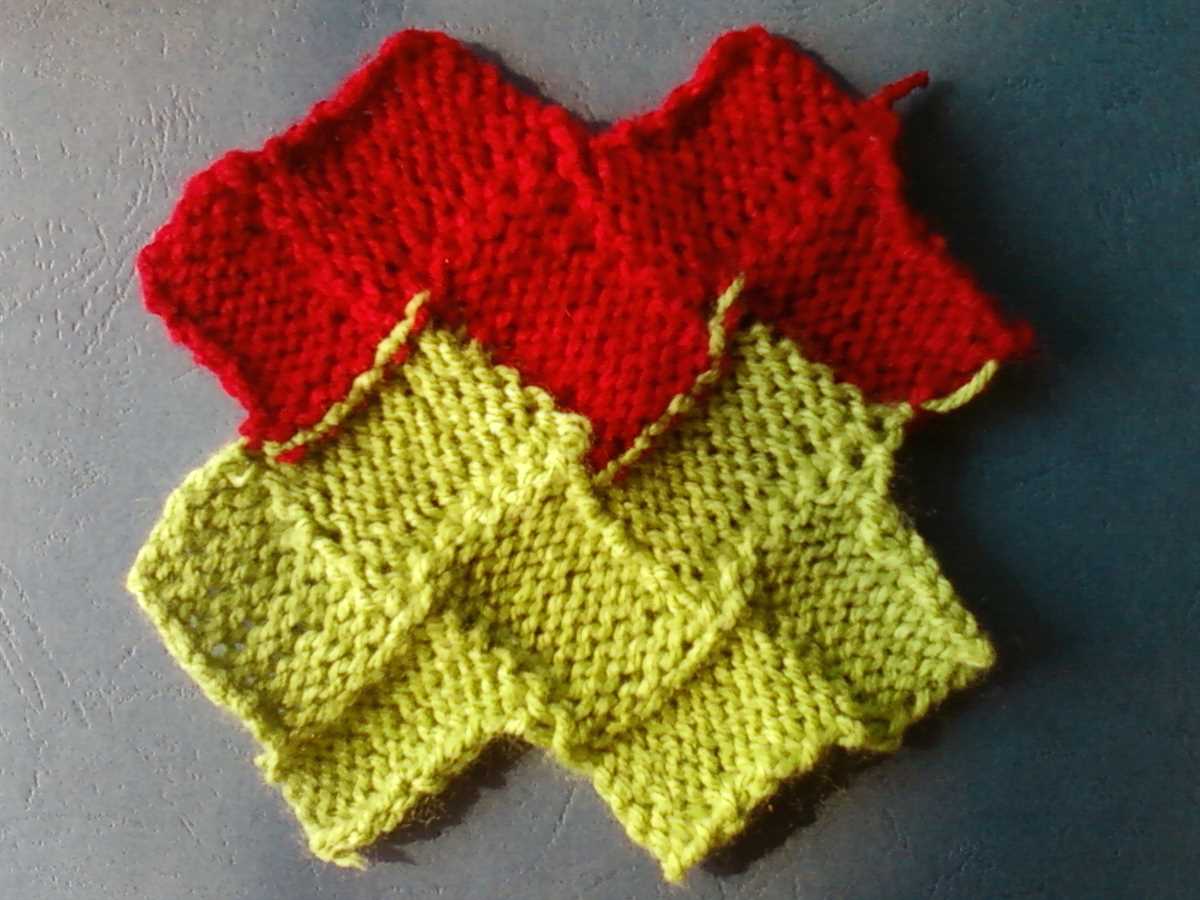
The beauty of knitting is that it allows you to get creative with your projects and make them truly unique. When it comes to a zig zag knitting pattern, there are endless possibilities for customization, whether you want to play with colors or add some texture to your project.
One way to customize your zig zag knitting project is by incorporating color changes. You can choose to use a single color for each zig zag section, or you can experiment with a color gradient, creating a stunning ombre effect. By simply changing yarn colors at specific intervals, you can create a visually striking design that adds depth and dimension to your project. To make your color changes more seamless, you can use the intarsia knitting technique or incorporate stranded colorwork using Fair Isle or stranded knitting techniques.
Another way to add some pizzazz to your zig zag knitting project is by incorporating textured stitches. You can experiment with different stitch patterns, such as cables or lace, to create a unique and eye-catching design. By alternating between textured sections and plain sections, you can create a visually interesting and dynamic pattern. You can also choose to incorporate different knitting techniques, such as bobbles or popcorn stitches, to give your project some extra texture and dimension.
Whether you choose to play with colors or add textured stitches, customizing your zig zag knitting project allows you to put your personal touch on the final product. Don’t be afraid to get creative and experiment with different ideas – the beauty of knitting is that the possibilities are endless!
Finish Off Your Knitting Project: Weave in Ends and Block for a Professional Look
After completing your zig zag knitting project, there are a few finishing touches you can add to give it a professional look. Weaving in ends and blocking are essential steps that will make your finished piece look polished and ready to wear or display.
Weaving in Ends:
Before you can consider your project truly finished, you’ll need to weave in any loose ends of yarn. This is important for two reasons: it ensures that your knitting won’t unravel and it creates a neat and tidy appearance. To weave in ends, thread a yarn needle with the loose end and sew it back and forth through the stitches on the wrong side of your knitting. Be sure to secure the end with a knot or two to prevent it from coming undone.
Blocking:
Blocking is the process of gently shaping your finished knitting to the correct dimensions. It can help even out stitches, open up lace patterns, and give your knitting a more professional look. There are several methods for blocking, but the most common are wet blocking and steam blocking.
In wet blocking, soak your knitting in lukewarm water and a mild detergent, squeeze out excess water, and then lay it flat on a clean towel. Gently stretch and shape the knitting to the desired dimensions, and pin it in place with rust-proof pins. Allow your project to dry completely before unpinning.
In steam blocking, hover a steam iron over your knitting without letting it touch the fabric. The steam will help relax the fibers and allow you to shape your knitting. Use rust-proof pins to secure the knitting in place, and leave it until it is completely dry.
Final Thoughts:
By taking the time to weave in ends and block your zig zag knitting project, you can achieve a professional finish that will make your work stand out. These finishing touches not only improve the appearance of your knitting but also ensure that it will maintain its shape and durability over time. So don’t skip these final steps; they are well worth the effort!