
Knitting is a versatile and enjoyable craft that allows you to create beautiful and practical items. However, for beginners, reading a knitting pattern can seem like a daunting task. With its unfamiliar abbreviations and symbols, it may appear like a foreign language.
But fear not! This article will guide you through the process of reading a knitting pattern, step by step. By understanding the key components of a pattern and familiarizing yourself with common knitting terms, you’ll be able to tackle any pattern with confidence.
The first thing you need to know is that a knitting pattern is like a set of instructions that tell you how to create a particular item. It includes information on the materials you’ll need, the stitches and techniques to use, and the size and measurements of the finished item. By following the pattern carefully, you’ll be able to recreate the designer’s vision.
This article will break down the different sections of a knitting pattern and explain what each part means. It will also provide tips and tricks for understanding abbreviations and symbols, and offer guidance on how to read charts, which are often used for complex stitch patterns.
How to Read a Knitting Pattern for Beginners
Reading a knitting pattern can be intimidating for beginners, but with a little practice and understanding of the key elements, it becomes much easier. Here are some tips on how to read a knitting pattern for beginners.
1. Familiarize Yourself with the Abbreviations
Knitting patterns often use abbreviations to save space and make the instructions concise. Take some time to familiarize yourself with common knitting abbreviations. The pattern should have a list of abbreviations at the beginning or end that you can refer to as you work.
2. Understand the Stitch Key

Before you start knitting, make sure you understand the stitch key or chart that is provided in the pattern. This will show you the symbols or codes used for different stitches. It’s important to understand these symbols as they will guide you through the pattern.
3. Read the Materials and Gauge section

Before you begin a knitting project, always read the materials and gauge section of the pattern. This will tell you what type of yarn to use, what size needles to use, and the recommended gauge. The gauge is crucial for ensuring that your finished piece will match the size specified in the pattern.
4. Follow the Instructions Step by Step
Once you have familiarized yourself with the abbreviations, stitch key, and materials needed, follow the instructions step by step. Take it one line or row at a time, checking off each step as you complete it. This will help you stay organized and ensure that you don’t miss any important details.
5. Take Your Time and Practice
Reading knitting patterns takes practice, so don’t get discouraged if you don’t understand everything right away. Take your time, ask for help if needed, and most importantly, practice. The more you practice reading patterns, the easier it will become.
Remember, knitting should be enjoyable, so don’t be afraid to experiment and make mistakes along the way. With time and practice, you’ll become more confident in your ability to read knitting patterns and create beautiful knitted pieces.
Understanding the Basics
Reading a knitting pattern can seem daunting at first, but once you understand the basic components, you’ll be able to tackle any pattern with confidence. Here are some key concepts to help you get started:
1. Abbreviations and Terms
Knitting patterns often use abbreviations to save space and make instructions more concise. It’s important to familiarize yourself with common knitting abbreviations, such as K (knit), P (purl), and RS (right side). You can find a list of these abbreviations in the pattern’s key or in a knitting reference book. Additionally, pay attention to any specific terms or techniques mentioned in the pattern, as they may require further explanation or research.
2. Gauge

Gauge refers to the number of stitches and rows per inch in a knitted fabric. It is crucial to match the gauge specified in the pattern in order to ensure that your finished project will have the correct measurements and fit. To determine your gauge, knit a swatch using the recommended yarn and needle size, and measure the number of stitches and rows in a 4×4 inch square. Adjust your needle size as needed to achieve the correct gauge.
3. Sizing and Measurements

Knitting patterns often provide instructions for multiple sizes. These sizes are typically indicated as small (S), medium (M), large (L), and so on. To determine which size to knit, you’ll need to know your own measurements. Take accurate measurements of your bust, waist, hips, and any other relevant body parts. Compare your measurements to the size chart provided in the pattern, and select the size that is closest to your own measurements.
4. Pattern Repeats
Many knitting patterns include pattern repeats, which are a series of stitches and/or rows that are repeated to create the desired pattern. These repeats can range from simple to complex, so it’s important to carefully read and understand the instructions for the pattern repeat. Pay attention to any special stitch counts or instructions within the repeat, as they may differ from the rest of the pattern.
By familiarizing yourself with these basic components of a knitting pattern, you’ll be well-equipped to understand and follow any knitting pattern that comes your way.
Gathering the Materials

Before starting to read a knitting pattern, it’s important to gather all the necessary materials. This includes the yarn, knitting needles, and any additional tools or supplies mentioned in the pattern.
Yarn: The pattern will specify the type and weight of yarn needed, as well as the recommended brand or color. Make sure to choose a yarn that matches the specifications provided in the pattern. It’s also helpful to have extra yarn on hand in case you need to make any adjustments or repairs.
Knitting Needles: The pattern will indicate the size and type of knitting needles required. Common types of needles include straight, circular, or double-pointed needles. Check the pattern for specific needle sizes and make sure you have the correct ones before starting.
Additional Tools: Some patterns may require additional tools or supplies, such as stitch markers, a tapestry needle for weaving in ends, or a cable needle for creating cable stitches. Take note of any additional tools mentioned in the pattern and gather them before you begin.
By gathering all the necessary materials before starting to read the knitting pattern, you’ll be well-prepared to follow along and create your project. It’s always a good idea to double-check that you have everything you need to avoid any disruptions once you start knitting.
Decoding the Abbreviations

When you first start reading a knitting pattern, you might feel overwhelmed by all the abbreviations and symbols. But don’t worry, it’s actually quite easy once you understand the basic terms. Knitting patterns usually use abbreviations to save space and make the instructions easier to read. Here are some common abbreviations you’ll come across:
- K: Knit
- P: Purl
- YO: Yarn over
- K2tog: Knit two stitches together
- SSK: Slip, slip, knit (slip two stitches, then knit them together)
- PSSO: Pass slipped stitch over
- PM: Place marker
- SM: Slip marker
These are just a few examples, but each knitting pattern will have its own unique set of abbreviations. It’s important to read through the pattern’s key before you start knitting to make sure you understand what each abbreviation means. You may also come across symbols, such as arrows or asterisks, which indicate repeated stitches or sections.
If you ever forget what an abbreviation means, you can always refer back to the pattern’s key or do a quick Google search. There are many knitting resources available online that can help you decipher any unfamiliar terms. And remember, practice makes perfect! The more you knit and read knitting patterns, the more familiar you’ll become with the abbreviations.
Interpreting the Instructions
When you first open a knitting pattern, it can seem like a confusing mix of abbreviations, symbols, and instructions. However, with a little practice and understanding of the structure, you’ll be able to confidently interpret the instructions and create beautiful projects.
Abbreviations: Knitting patterns often use abbreviations to condense instructions and make them easier to read. Familiarize yourself with common knitting abbreviations such as K (knit), P (purl), RS (right side), and WS (wrong side). Refer to the pattern’s abbreviation key if you come across an abbreviation you don’t recognize.
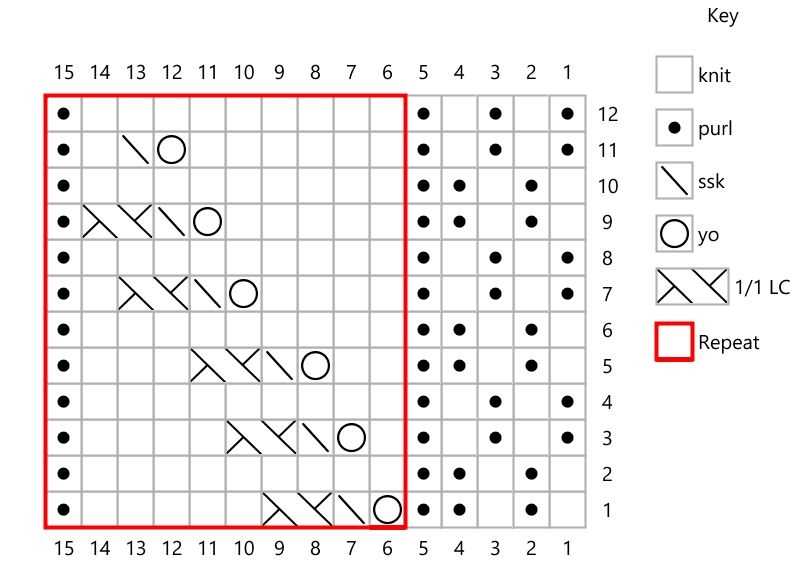
Symbols: Some knitting patterns include symbols to represent different stitches and techniques. These symbols can vary between patterns, so it’s important to review the pattern’s symbol key to understand what each symbol represents. For example, a filled-in dot might represent a knit stitch, while an empty dot might represent a purl stitch.
Instructions: The instructions in a knitting pattern are typically broken down into sections. Start by reading the pattern’s introduction, which will often provide important information about gauge, materials, and any special techniques used in the pattern. Then, work through each section, following the instructions step by step. Pay close attention to any repeats or asterisks, as these indicate a pattern repeat or variation.
Charts: Some knitting patterns include charts, which use symbols to represent stitches and show the pattern visually. When working with a chart, start from the bottom right corner and work your way from right to left on the RS rows, and from left to right on the WS rows. Use the symbol key to help decipher the chart and follow the charted pattern alongside the written instructions.
- Familiarize yourself with common knitting abbreviations.
- Refer to the pattern’s abbreviation key if you come across an abbreviation you don’t recognize.
- Review the pattern’s symbol key to understand what each symbol represents.
- Pay close attention to any repeats or asterisks in the instructions.
- Start working with a chart from the bottom right corner and follow the symbol key.
By understanding knitting abbreviations, symbols, instructions, and charts, you’ll be able to confidently interpret any knitting pattern and create beautiful projects.
Following the Stitch Chart
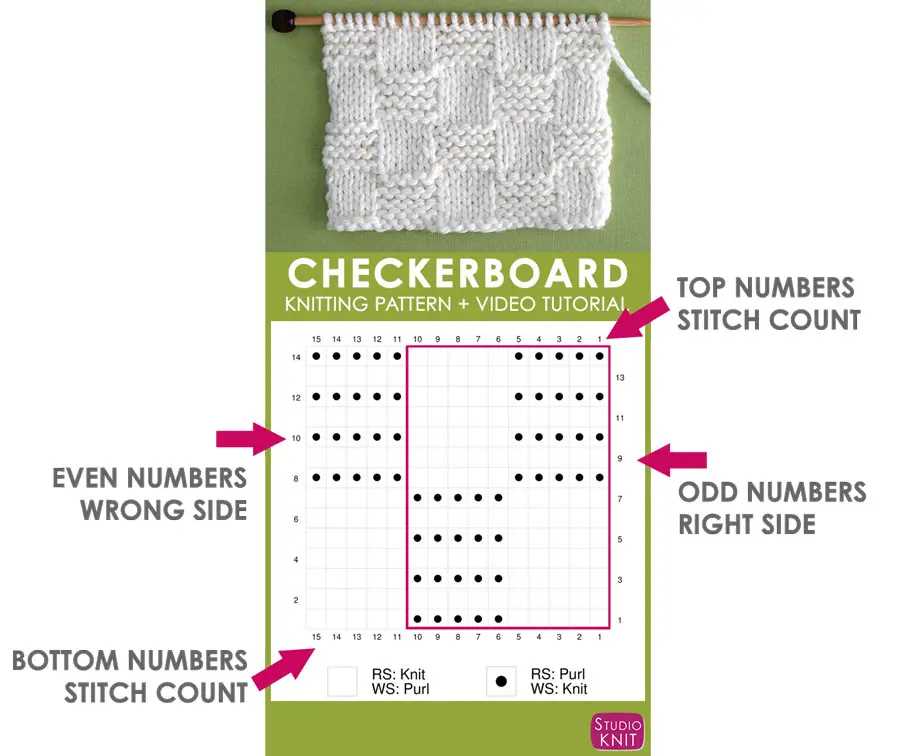
When reading a knitting pattern, one important element to understand is the stitch chart. A stitch chart is a visual representation of the pattern, showing each stitch and its placement. It is typically presented in a grid format, with each square representing a stitch or a group of stitches. The chart is read from right to left for right-handed knitters, and left to right for left-handed knitters.
Understanding the symbols:
Before you begin knitting from a stitch chart, it’s essential to understand the symbols used in the chart. Each symbol represents a specific knitting stitch or technique. Common symbols include squares, circles, triangles, and arrows. These symbols indicate different types of stitches, such as knit, purl, yarn over, decrease, or increase. The pattern usually includes a legend or key that explains the meaning of each symbol used in the chart. Make sure to refer to the legend to understand the instructions for each symbol before you start knitting.
Reading the rows:
Once you understand the symbols, you can start reading the stitch chart row by row. Each row of the chart represents one row of knitting. The numbers on the side of the chart indicate the row numbers. Start with the first row and work your way across the chart, following the symbols and instructions. Pay attention to any repeats indicated by brackets or asterisks, as they may indicate a portion of the chart that needs to be repeated multiple times. Keep track of your progress by checking off each row as you complete it, so you don’t get lost.
Using a stitch count:
In addition to the stitch chart, some patterns may include a stitch count for each row. The stitch count tells you how many stitches you should have at the end of each row. It can be helpful for keeping track of your stitch count and making sure you haven’t missed or added any stitches. Refer to the stitch count regularly as you work through the rows to ensure the accuracy of your knitting.
Following a stitch chart may seem overwhelming at first, but with practice, it becomes easier. Take your time to study the symbols, read the instructions carefully, and track your progress as you go. Don’t be afraid to make mistakes – they can be learning opportunities. Remember to enjoy the process and embrace the challenge of reading and following the stitch chart to create beautiful knitted projects.
Working with Multiple Sizes
When reading a knitting pattern, it is important to understand how to work with multiple sizes. Many patterns offer instructions for different sizes, such as small, medium, and large. To determine which size to follow, you will need to refer to the pattern’s sizing chart. This chart will typically provide measurements for each size, such as bust, waist, and hip circumference.
Once you have determined your size, you can then follow the specific instructions provided in the pattern for that size. These instructions may be indicated by different numbers or abbreviations, such as S, M, and L. It is important to pay attention to these size indicators to ensure you are following the correct instructions for your desired size.
If you need to make adjustments to the pattern to fit your specific measurements, it is important to understand how to modify the pattern accordingly. This may involve adding or subtracting stitches, or adjusting the length of certain sections. The pattern may provide guidance on how to make these modifications, or you may need to consult additional resources or seek assistance from an experienced knitter.
Remember, working with multiple sizes in a knitting pattern requires attention to detail and careful measurements. By understanding the sizing chart and following the appropriate instructions for your size, you can confidently knit garments that fit well and flatter your body. Happy knitting!
Managing Gauge and Tension
When reading a knitting pattern, it is essential to pay attention to the gauge and tension requirements. Gauge refers to the number of stitches and rows per inch that you need to achieve in order for your finished project to have the correct measurements. Tension, on the other hand, refers to how tightly you knit. Both gauge and tension play a crucial role in ensuring that your project turns out the way it is meant to.
How to measure gauge: To measure gauge, you will need a ruler or measuring tape and the recommended needle size specified in the pattern. Cast on the specified number of stitches and work a swatch in the recommended stitch pattern. Once you have completed the swatch, measure 4 inches across and count the number of stitches and rows. Compare these measurements to the gauge stated in the pattern. If your gauge is too loose, try knitting with a smaller needle size. If your gauge is too tight, try knitting with a larger needle size.
Importance of gauge: Achieving the correct gauge is crucial for ensuring that your finished project fits properly. If your gauge is too tight, your finished project will be smaller than expected. Conversely, if your gauge is too loose, your finished project will be larger than expected. This is especially important for projects like garments and accessories, where fit is important. By carefully measuring and adjusting your gauge, you can ensure that your project turns out the way it is intended.
Handling tension: Tension refers to how tightly or loosely you knit. It can vary from person to person, and even from project to project. When reading a knitting pattern, it is important to pay attention to any instructions regarding tension. Some patterns may specify a particular tension that you need to achieve, while others may provide more general guidance. By practicing and experimenting with your tension, you can develop a consistent knitting style that suits your needs and produces the desired results.
Tips for managing tension:
- Relax your hands and wrists while knitting to avoid knitting too tightly.
- Experiment with different needle materials and sizes to find what works best for you.
- Take breaks and stretch your hands and wrists to prevent tension build-up.
- Practice knitting with different yarn weights to get a feel for how your tension may need to be adjusted.
By understanding and managing both gauge and tension, you can confidently read knitting patterns and successfully create beautiful knitted projects.
Reading Pattern Repeats
One important skill to develop when reading knitting patterns is understanding pattern repeats. Pattern repeats are sections of the pattern that are repeated multiple times to create the desired design. These repeats can be made up of individual stitches or groups of stitches.
When looking at a pattern, you will often see a line that indicates the repeat. This line may include specific instructions for the repeat, such as “Repeat from * to *.” This means that you will repeat the stitches or group of stitches between the asterisks as many times as indicated in the pattern.
It is important to pay attention to the number of stitches in the repeat and any special instructions within the repeat. Some patterns may have a specific number of stitches that need to be worked before beginning the repeat, while others may have a special stitch or technique within the repeat. These instructions will help you create the correct pattern and achieve the desired result.
When working with pattern repeats, it can be helpful to use stitch markers to mark the beginning and end of each repeat. This can make it easier to keep track of where you are in the pattern and ensure that you don’t miss or repeat any stitches.
Overall, understanding pattern repeats is an essential skill for reading knitting patterns. By carefully reading and following the instructions for each repeat, you can create beautiful and intricate designs in your knitting projects.
Adding Pattern Variations
Once you have mastered reading and understanding basic knitting patterns, you may want to try adding some variations to make your project unique. There are many ways to modify a pattern, whether it’s changing the stitch pattern, altering the sizing, or adding decorative elements.
1. Stitch Pattern Variations: One way to add interest to a knitting pattern is to change the stitch pattern. You can easily substitute one stitch for another or create your own unique combination. There are countless stitch patterns available online or in stitch pattern books that you can use as a starting point for your modifications.
2. Sizing Variations: If you want to adjust the sizing of a pattern, you can either add or subtract stitches or rows. Keep in mind that changing the stitch count will affect the overall gauge, so make sure to check your gauge before adjusting the pattern. You may also need to modify the shaping of the garment to maintain the correct proportions.
3. Adding Decorative Elements: Another way to personalize a knitting pattern is to add decorative elements such as cables, lace, or colorwork. These techniques can be incorporated into your project to create intricate designs and textures. Just make sure to follow the instructions for these elements carefully, as they may require additional stitches or techniques.
Remember, when adding pattern variations, it’s important to understand the original pattern and how the modifications will affect the overall structure of the project. Always make a gauge swatch before starting any modifications to ensure that your finished project will turn out as desired.
Mastering the Finishing Techniques
Seaming

Seaming is the process of stitching together separate knitted pieces to create a finished garment. It’s essential to have neat and sturdy seams for a polished look. You can use either a sewing needle and yarn, or a crochet hook, depending on the type of seam you want to create. Take your time and make sure the edges are aligned correctly before stitching.
Weaving in Ends
Weaving in ends is the process of securing and hiding the loose yarn tails that are left after changing yarn or finishing a project. This step is crucial for preventing fraying and ensuring that your knitted item stays intact. Use a tapestry needle to weave the ends back and forth through the stitches in a inconspicuous way to create a clean finish.
Blocking

Blocking is the process of shaping and sizing your finished knitting project. It involves wetting or steaming the piece and then laying it flat to dry, allowing the fibers to relax and settle into the desired shape. This step can help even out stitches, open up lace patterns, and give your project a professional look and feel.
Adding Embellishments
To add some extra flair to your knitted piece, you can consider adding embellishments such as buttons, beads, or embroidery. These details can elevate the overall design and make your project truly unique. Just make sure to choose materials that complement the yarn and pattern, and sew them on securely to ensure they withstand wear and tear.
Blocking and Labeling

After completing all the finishing techniques, it’s important to take care of your knitted project for its longevity. Properly blocking and labeling your piece can help maintain its shape and ensure that the care instructions are readily available. Consider including a small label with your name and date on the inside of the garment for a personal touch.
By mastering these finishing techniques, you can take your knitting projects to the next level and create professional-looking pieces that you’ll be proud to wear or gift to others.
Troubleshooting Common Mistakes
As a beginner, it is common to make mistakes when reading and following knitting patterns. Understanding how to identify and fix these mistakes is an important part of becoming a successful knitter. Here are some common mistakes you may encounter while reading a knitting pattern and how to troubleshoot them:
Mistake 1: Misreading the Pattern Instructions

It is easy to misread or misunderstand the instructions in a knitting pattern, especially if you are new to knitting. To avoid this mistake, read the pattern instructions carefully multiple times before starting your project. Pay close attention to any abbreviations or special symbols used in the pattern, as they may have different meanings than what you expect.
Mistake 2: Wrong Stitch Count
If your stitch count is not matching the pattern’s instructions, it can result in an uneven or misshapen finished object. To troubleshoot this mistake, carefully count your stitches at regular intervals while knitting. If you notice that the stitch count is off, review the pattern instructions to see if you missed any increases or decreases.
Mistake 3: Tension Issues

Tension refers to how tightly or loosely you hold your yarn while knitting. If your tension is inconsistent, it can affect the size and appearance of your project. To troubleshoot tension issues, practice knitting with different levels of tension until you find the right balance. Experiment with different needle sizes and yarn types to achieve the desired gauge mentioned in the pattern.
Mistake 4: Misinterpreting Stitch Patterns
If you misinterpret a stitch pattern, it can lead to an entirely different result than what the pattern intended. To avoid this mistake, carefully read the stitch pattern instructions and practice the stitch on a small swatch before starting your project. If you still struggle with understanding the stitch pattern, consider watching video tutorials or seeking help from experienced knitters.
Mistake 5: Missing or Extra Rows

Inadvertently skipping or adding rows can throw off the pattern’s design and proportions. To address this mistake, use stitch markers to mark the end of each row and count the number of rows completed periodically. Double-check your work against the pattern instructions to ensure that you are following the correct number of rows.
In conclusion, knitting patterns can be intimidating for beginners, but with practice and patience, you can become proficient in reading and following them. By avoiding common mistakes and troubleshooting any issues that arise, you’ll be able to create beautiful and well-finished knitted projects.
Q&A:
What is a knitting pattern?
A knitting pattern is a set of instructions that tells you how to make a specific knitted item, such as a sweater, hat, or scarf.
What do the abbreviations in a knitting pattern mean?
Abbreviations in a knitting pattern are commonly used to save space and make the instructions easier to read. Some common abbreviations include k for knit, p for purl, and st for stitch.
How do I choose the right knitting pattern for beginners?
When choosing a knitting pattern for beginners, look for patterns labeled as “beginner-friendly” or “easy.” These patterns usually have simpler designs and straightforward instructions.
How do I read a knitting pattern chart?
To read a knitting pattern chart, start from the bottom right corner and read each row from right to left. The symbols on the chart represent different knitting stitches or actions. Consult the chart’s key for explanations of each symbol.
What should I do if I don’t understand a knitting pattern?
If you don’t understand a knitting pattern, try looking for online tutorials or videos that explain the specific techniques or stitches used in the pattern. You can also reach out to more experienced knitters or join knitting groups for help and advice.
What is a knitting pattern?
A knitting pattern is a set of instructions that guide you through the steps to create a specific knitted item. It includes information on the type of stitches to be used, the size and shape of the item, and any additional details or embellishments.