
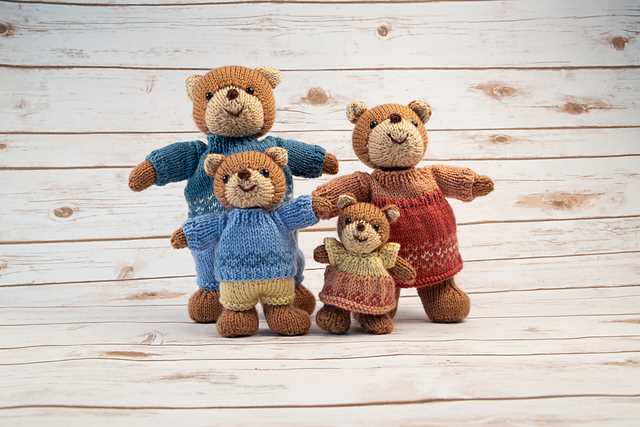
Are you a fan of the lovable and iconic Paddington Bear? Do you have a passion for knitting? Well, you’re in luck! The Family Circle Paddington Bear Knitting Pattern is the perfect project for you. This pattern allows you to create your very own Paddington Bear using your knitting skills and a few basic materials.
Whether you’re a beginner or an experienced knitter, this pattern is suitable for all skill levels. With detailed instructions and clear diagrams, you’ll be able to follow along and create a cuddly and adorable Paddington Bear in no time. The finished bear stands approximately 12 inches tall and is the perfect companion for children or collectors.
Not only is this pattern a fun and engaging knitting project, but it also allows you to bring a classic character to life. Paddington Bear has been beloved by generations of readers, and now you can have your very own handmade version. It’s the perfect gift for Paddington Bear enthusiasts or anyone who appreciates the art of knitting.
How to Knit Paddington Bear with Family Circle Knitting Pattern

If you’re a fan of Paddington Bear and love knitting, then you’re in luck! The Family Circle knitting pattern allows you to create your very own adorable Paddington Bear toy. With this pattern, you can bring the beloved bear to life and add a touch of nostalgia to your knitting projects.
To get started, you’ll need to gather all the necessary materials. This includes yarn in various colors, knitting needles, stuffing, and buttons for the bear’s eyes. The Family Circle knitting pattern provides detailed instructions on the specific yarn weights and needle sizes you’ll need for the project.
The next step is to carefully follow the instructions in the Family Circle knitting pattern. The pattern provides step-by-step guidance on how to knit each part of the bear, from the head and body to the arms and legs. It also includes instructions on how to sew the different parts together to create a finished toy.
As you work on your Paddington Bear, make sure to pay attention to the tension and gauge recommended in the pattern. This will help ensure that your toy turns out the right size and shape. Take your time and be patient with the knitting process – it may take some practice to perfect your skills, but the end result will be worth it.
Once you’ve completed knitting all the parts and sewing them together, it’s time to stuff your Paddington Bear. Use the recommended stuffing material and carefully fill each part of the bear to give it a soft and cuddly feel. Make sure to stuff the bear evenly to maintain its shape.
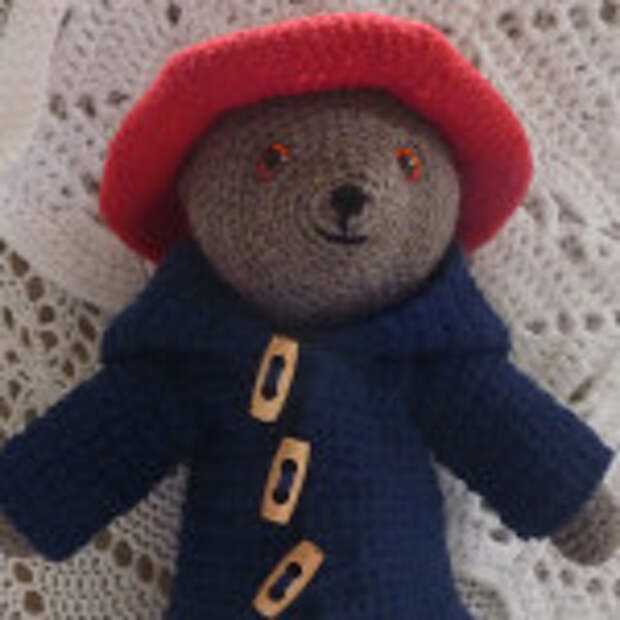
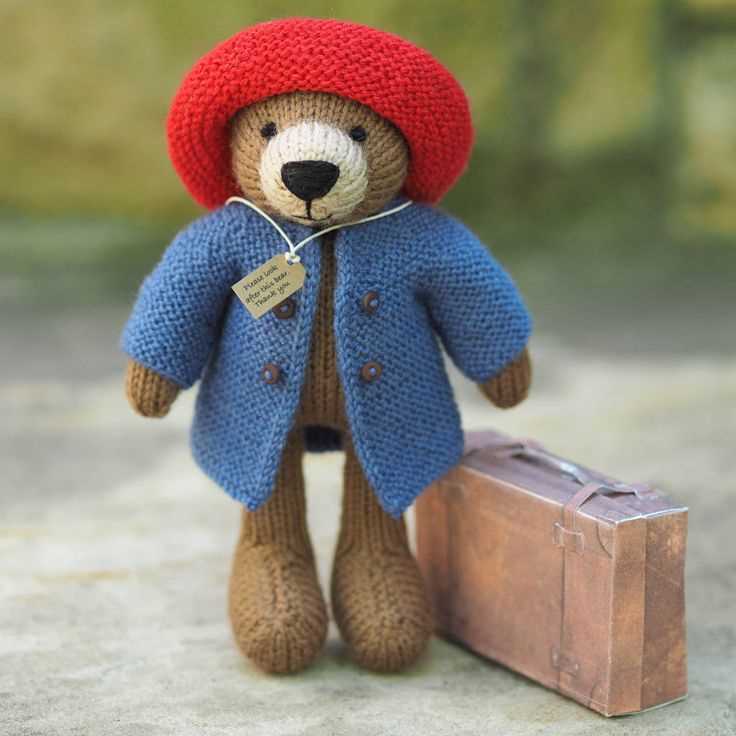
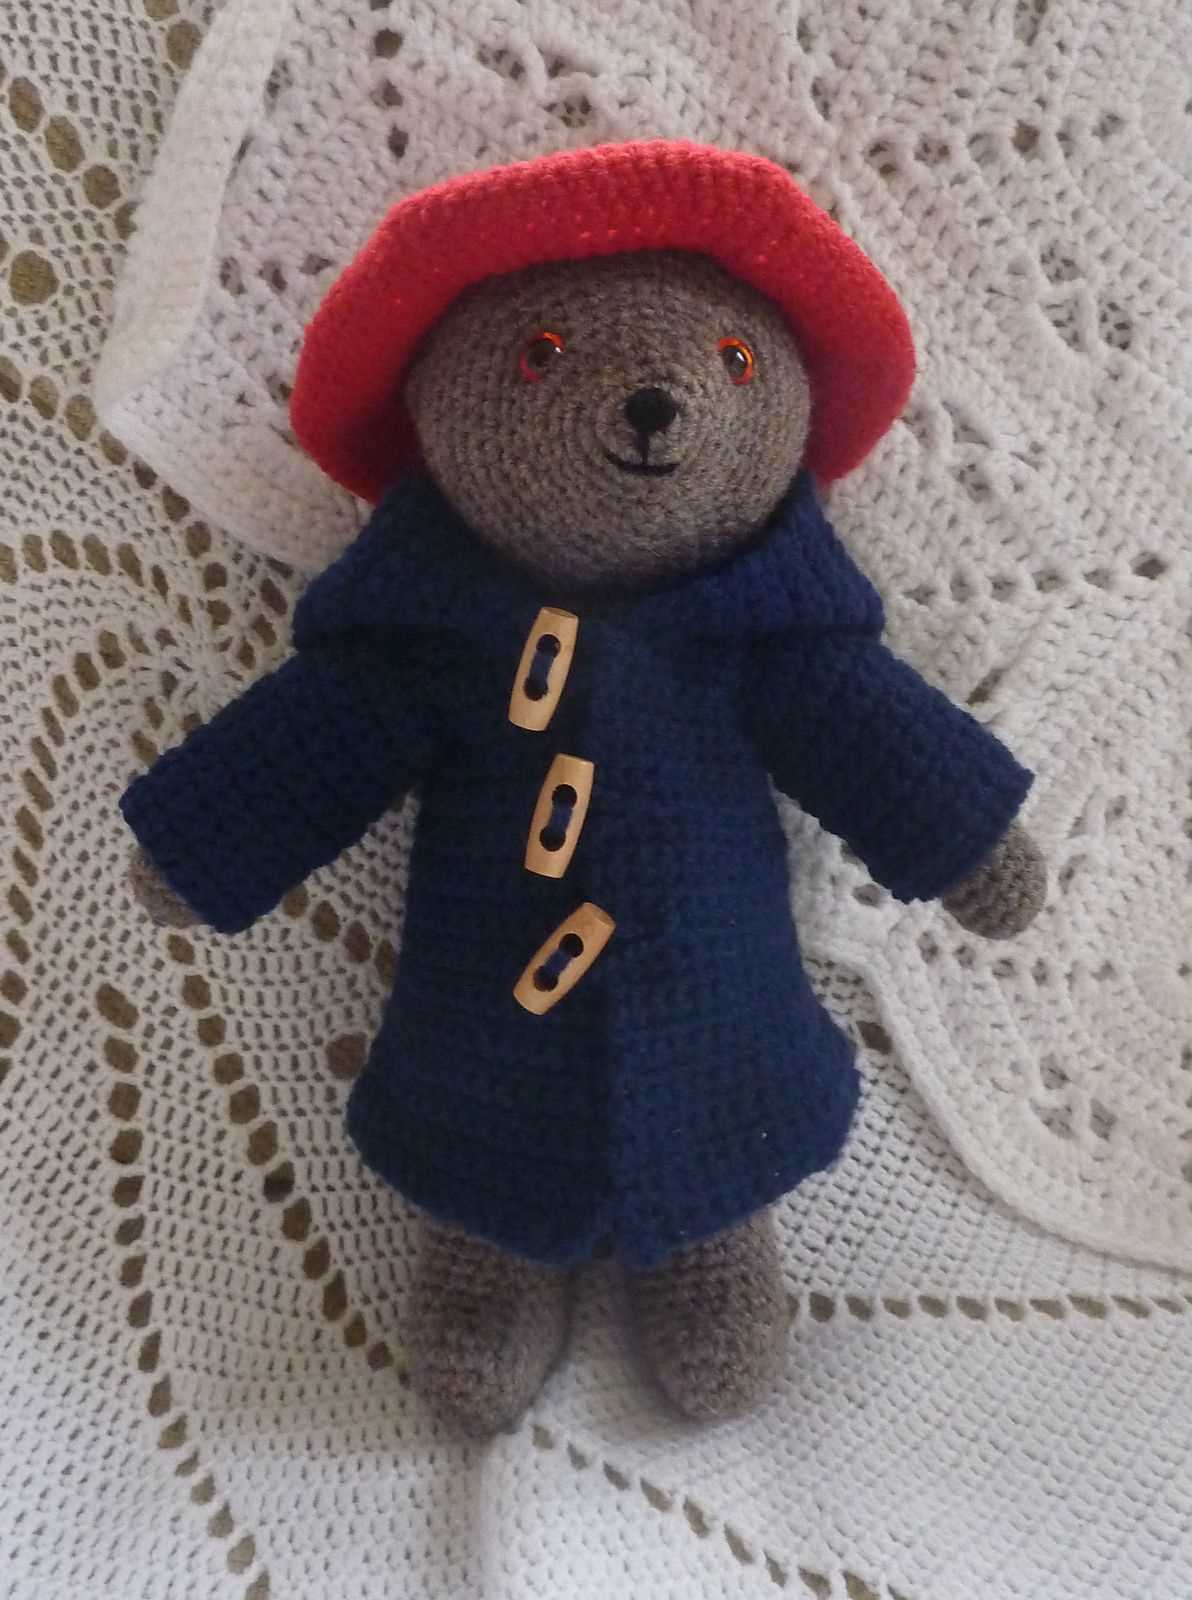
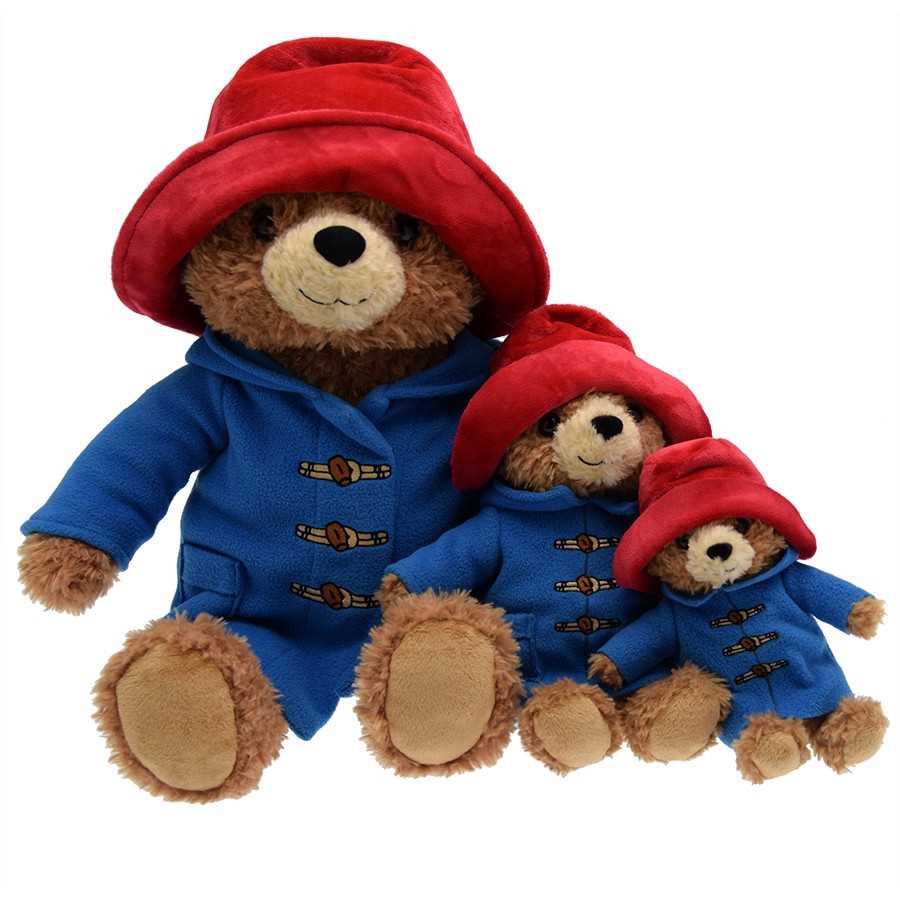
Finally, you can add the finishing touches to your knitted Paddington Bear. Sew on the buttons for the eyes, embroider the bear’s nose and mouth, and add any additional details like a red hat or a blue coat, just like the iconic Paddington Bear. Use your creativity to make your bear unique and personalized.
With the Family Circle knitting pattern, you can create a charming Paddington Bear toy that will bring joy to both children and adults alike. Whether you keep it for yourself or give it as a gift, this handmade toy will be treasured for years to come. Happy knitting!
Choosing the Right Yarn and Needles
When it comes to knitting the Family Circle Paddington Bear, choosing the right yarn and needles is crucial. The pattern calls for specific yarn and needle sizes to ensure that the finished project turns out as intended.
First, let’s talk about the yarn. The pattern suggests using a medium weight yarn made from acrylic or wool. This type of yarn will give the bear a soft and cuddly texture, perfect for hugging. It’s important to choose a yarn that is easy to work with and has good stitch definition, so you can see the details of the bear’s face and body.
Yarn Weight
The recommended yarn weight for the Family Circle Paddington Bear is medium or worsted weight. This weight is ideal for creating a bear that is not too bulky, but still has enough body to stand on its own. Make sure to check the yarn label for the weight category and choose one that falls within the medium or worsted weight range.
Needle Size
Next, let’s talk about the needles. The pattern suggests using US size 6 (4mm) needles for the bear’s body and US size 4 (3.5mm) needles for the bear’s clothes. These needle sizes will give you the right gauge and tension for the project. It’s important to use the recommended needle sizes to ensure that the bear turns out the correct size and shape.
Tension and Gauge
Tension and gauge play a key role in knitting projects, and the Family Circle Paddington Bear is no exception. The pattern provides instructions for achieving the correct tension and gauge, so make sure to follow them carefully. Using the recommended yarn and needle sizes will help you achieve the correct tension and gauge, resulting in a bear that looks just like the one in the pattern.
In conclusion, choosing the right yarn and needles is essential for knitting the Family Circle Paddington Bear. By selecting a medium weight yarn, following the recommended needle sizes, and paying attention to tension and gauge, you can create a bear that is soft, cuddly, and true to the design. Happy knitting!
Exploring Different Yarn Options for Your Paddington Bear
If you’re a fan of knitting and are looking to make your very own Paddington Bear, one of the most important considerations is choosing the right yarn. The type and quality of yarn you use can greatly affect the final outcome of your project, so it’s worth spending some time exploring your options.
Wool: Wool is a classic choice for knitting toys, as it provides excellent stitch definition and durability. It also has a natural warmth that will make your Paddington Bear feel cozy and huggable. Look for a wool yarn that is soft and suitable for children, as it will be gentle on sensitive skin.
Acrylic: Acrylic yarn is a popular option for toy knitting due to its affordability and wide range of colors. It is easy to care for and can be machine-washed, which is a convenient factor when it comes to a toy that will likely be loved and played with frequently. However, keep in mind that acrylic yarn may not have the same softness or natural feel as wool.
Cotton: Cotton yarn is a great choice if you prefer a breathable, lightweight stuffing for your Paddington Bear. It is hypoallergenic and perfect for those with sensitivity to wool or acrylic fibers. Cotton yarn also works well for creating clothes or accessories for your bear, as it has a smooth texture and holds its shape nicely.
Mohair: For a luxurious touch, consider using mohair yarn to create your Paddington Bear. Mohair has a beautiful sheen and a soft, fuzzy texture that adds a touch of elegance to any toy. Just be aware that mohair can be a bit more delicate and may require extra care when handling and washing.
Bamboo: Bamboo yarn is a sustainable and eco-friendly option for your Paddington Bear. It has a silky feel and a natural drape, making it perfect for creating adorable outfits or accessories. Bamboo is also known for its antibacterial properties, making it a great choice for toys that will be handled by children.
Finding the Perfect Needles for Your Knitting Project
When it comes to knitting, having the right needles can make a world of difference in your project. The type of needles you choose can impact the overall look and feel of your finished piece, as well as your knitting experience. Whether you’re a beginner or an experienced knitter, it’s important to find the perfect needles for your next project.
1. Needle Material: One of the first factors to consider when selecting knitting needles is the material they are made from. Common options include bamboo, wood, metal, and plastic. Bamboo and wood needles are known for their warmth, flexibility, and lightweight nature. Metal needles, on the other hand, provide excellent speed and durability. Plastic needles are a budget-friendly option but may not be as durable as other materials.
2. Needle Size: The size of the needles you choose will depend on the thickness of the yarn you plan to use for your project. Most yarn labels will recommend a needle size range to achieve the desired gauge. It’s important to use the correct needle size to ensure your stitches are even and the finished piece turns out as intended.
3. Needle Length: The length of the needles can also vary, with options ranging from shorter straight needles to longer circular needles. The length you choose will depend on the type of project you are working on. Straight needles are great for smaller projects, such as scarves or dishcloths, while circular needles are ideal for larger projects like sweaters or blankets.
4. Needle Tip: The tip of the needles can be either sharp or blunt. Sharp tips are excellent for intricate stitch patterns and cables, as they can easily maneuver through stitches. Blunt tips are great for beginner knitters or those who prefer a more relaxed knitting style.
5. Needle Brand: While there are many different brands of knitting needles available, some knitters may have a preference based on personal experience. It can be helpful to try out different brands to see which ones you prefer in terms of comfort, flexibility, and overall performance.
By considering these factors, you can find the perfect needles for your knitting project and ensure a rewarding and enjoyable knitting experience.
Understanding the Family Circle Paddington Bear Pattern
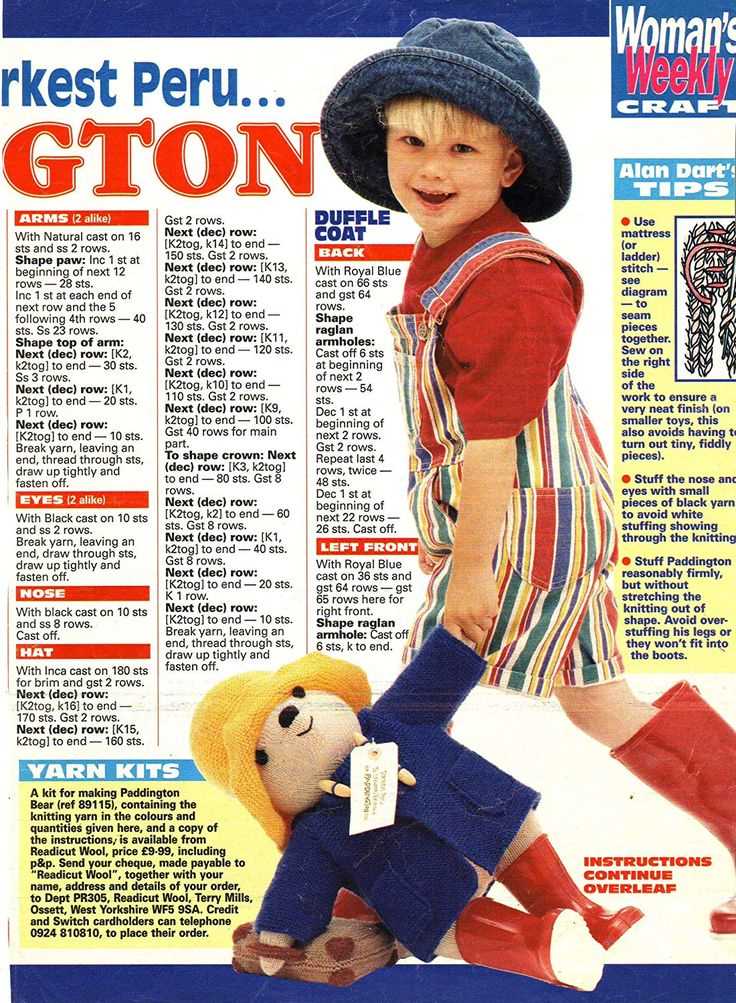
The Family Circle Paddington Bear knitting pattern is a popular choice for those looking to create their own Paddington Bear toy. This pattern is widely available and offers detailed instructions on how to knit each part of the bear, including the body, head, arms, and legs. By following the pattern, knitters can create a soft and cuddly toy that resembles the beloved Paddington Bear character.
One of the key features of the Family Circle Paddington Bear pattern is its attention to detail. The pattern includes specific instructions on how to create the bear’s signature features, such as his iconic hat, duffle coat, and Wellington boots. Knitters can follow these instructions to ensure that their finished bear closely resembles the original Paddington Bear character.
The pattern also provides knitters with a list of the materials they will need to complete the project. This includes the type and amount of yarn, as well as the recommended needle size. By using the specified materials, knitters can ensure that their finished bear has the right texture and appearance as intended by the pattern designer.
The Family Circle Paddington Bear pattern is suitable for knitters of all skill levels. It includes clear and concise instructions, accompanied by diagrams and illustrations to help guide the knitting process. Even those who are new to knitting can successfully complete this pattern and create their own Paddington Bear toy.
Overall, the Family Circle Paddington Bear knitting pattern provides knitters with the opportunity to create their own version of the beloved Paddington Bear character. With its detailed instructions and attention to detail, this pattern is a great choice for those who want to bring a little bit of Paddington Bear magic into their own homes.
Interpreting the Pattern Instructions
When working on the Family Circle Paddington Bear knitting pattern, it is important to carefully interpret the instructions provided to ensure accurate knitting. The pattern instructions for this project contain several key phrases that need to be understood and followed correctly.
Understanding Gauge

The pattern often mentions the importance of gauge, which refers to the number of stitches and rows per inch. It is crucial to match the gauge specified in the pattern in order to achieve the correct size and fit of the knitting project. To check your gauge, knit a small swatch using the recommended needle size and yarn type, and measure the number of stitches and rows against the gauge given in the pattern. Adjust your needle size if necessary to achieve the correct gauge.
Familiarizing with Abbreviations
The pattern instructions are often written using abbreviations for various knitting techniques. It is important to become familiar with these abbreviations before starting the project. Common knitting abbreviations used in the pattern may include K (knit), P (purl), M1 (make one), and K2tog (knit two stitches together). The pattern usually provides an abbreviation key at the beginning or end of the instructions for easy reference.
Following the Row-by-Row Instructions
The pattern provides detailed row-by-row instructions for each section of the knitting project. It is crucial to follow these instructions carefully, noting any changes in stitch pattern, increases or decreases, and any other specific instructions for that particular row. It is recommended to read the instructions thoroughly before starting each row to ensure accurate knitting.
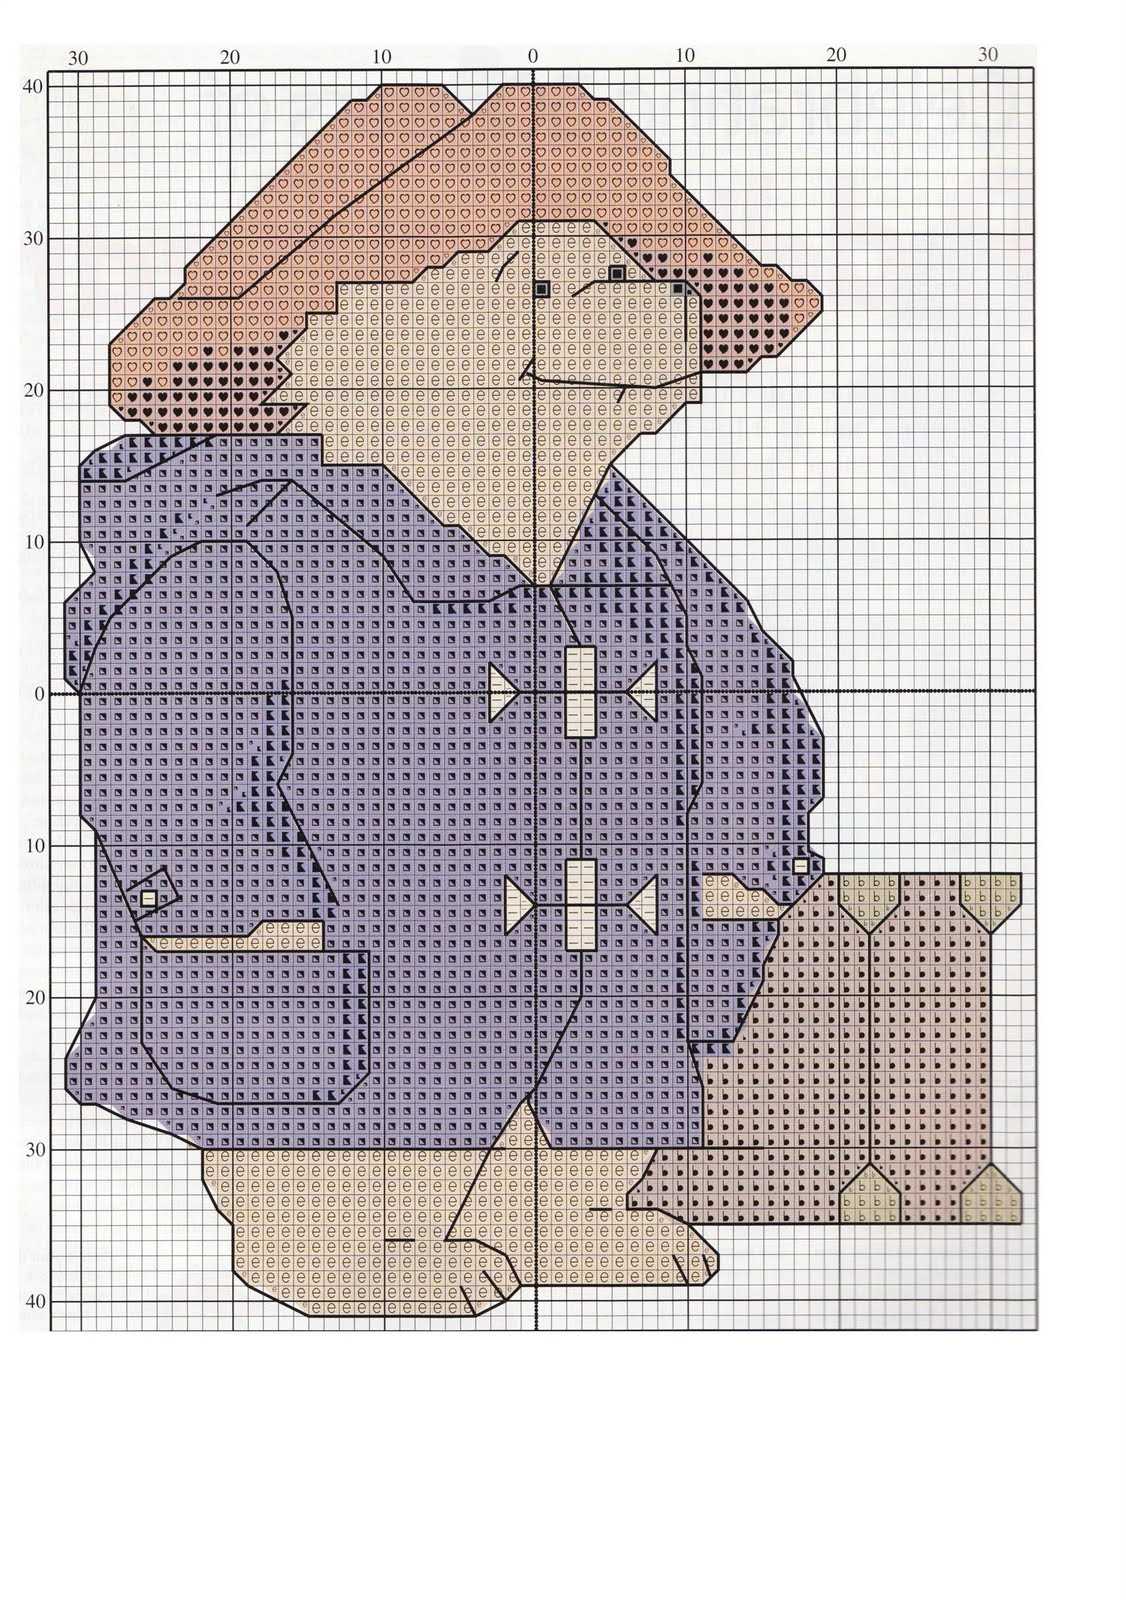
Using the Stitch Chart
In addition to row-by-row instructions, the pattern may include a stitch chart or diagram. This visual representation of the stitch pattern can be helpful in understanding the overall design of the project. Follow the stitch chart alongside the written instructions to ensure that the correct stitches are being made in each row.
In conclusion, understanding and accurately interpreting the pattern instructions is crucial for successful knitting of the Family Circle Paddington Bear project. Pay attention to the gauge, familiarize yourself with abbreviations, follow the row-by-row instructions, and utilize any stitch charts provided. With careful interpretation of the instructions, you can create a beautiful knitted bear to add to your collection.
Getting Familiar with Knitting Abbreviations and Techniques
Knitting is a popular craft that allows people to create beautiful and intricate designs using just a few simple tools: knitting needles and yarn. But for beginners, knitting can seem intimidating with its long list of abbreviations and techniques. However, once you become familiar with these knitting terms, you’ll be able to follow knitting patterns and create stunning projects with ease.
Knitting abbreviations
One of the first things you’ll need to learn as a knitter is the various abbreviations used in knitting patterns. These abbreviations are shortcuts for different knitting stitches or techniques, and they help make patterns more concise. For example, “k” stands for knit stitch, “p” stands for purl stitch, and “yo” stands for yarn over. By understanding these abbreviations, you can quickly decipher the instructions in a knitting pattern and know exactly what you need to do.
Knitting techniques
Aside from abbreviations, there are also various knitting techniques that you’ll encounter as you advance in your knitting skills. Some common techniques include casting on, binding off, increasing, decreasing, and seaming. Each technique has its own set of instructions and steps, but with practice, you’ll be able to master them and incorporate them into your knitting projects.
Resources for learning
If you’re new to knitting and feeling overwhelmed by all the abbreviations and techniques, don’t worry! There are plenty of resources available to help you learn. You can find online tutorials, videos, and even knitting classes in your local community. These resources will guide you through the basics of knitting, teach you how to read patterns, and provide step-by-step instructions for different stitches and techniques. With patience and dedication, you’ll soon become comfortable with the world of knitting and be able to tackle any project that comes your way.
Whether you’re a beginner or an experienced knitter, familiarizing yourself with knitting abbreviations and techniques is crucial for success. By understanding these fundamental aspects of knitting, you’ll be able to follow patterns, create intricate designs, and explore your creativity with every stitch.
Step-by-Step Guide to Knitting Your Own Paddington Bear

Knitting your own Paddington Bear can be a fun and rewarding project. With this step-by-step guide, you’ll be able to create your very own adorable bear that will bring joy to your family circle. Whether you’re a knitting enthusiast or a beginner, follow these instructions to craft a classic Paddington Bear that will be cherished for years to come.
Materials You’ll Need:
- Knitting Needles: Make sure to use the recommended size for your chosen yarn.
- Yarn: Opt for a soft and durable yarn that will result in a cuddly Paddington Bear.
- Stuffing: Choose a high-quality stuffing that will give your bear the perfect shape and texture.
- Tapestry Needle: This needle will be used for sewing up seams and attaching the bear’s features.
- Scissors: A sharp pair of scissors is essential for trimming yarn and cutting thread.
- Pattern: Find a reliable and detailed Paddington Bear knitting pattern to guide you through the process.
Step 1: Cast On
Using the cast-on method of your choice, start by casting on the required number of stitches for the bear’s body. Pay attention to the pattern instructions and take your time to ensure accurate and even stitches.
Step 2: Knit the Body
Follow the pattern instructions to knit the body of the Paddington Bear. This may include knitting in different stitch patterns, shaping the body, and adding any necessary details. Take your time with each row, following the pattern closely to achieve the desired shape and size.
Step 3: Create the Arms and Legs
Using the same yarn and knitting needles, knit the arms and legs of the bear separately. These may be knitted flat or in the round, depending on the pattern. Make sure to stuff the limbs lightly and securely, leaving room for sewing them onto the body later.
Step 4: Sew and Attach

Using the tapestry needle and matching yarn, sew up any seams on the bear’s body, leaving a small opening for the stuffing. Then, attach the arms and legs to the body by sewing them securely in place.
Step 5: Add Features
Using additional yarn in different colors, knit or crochet features such as the bear’s ears, eyes, nose, and mouth. Attach these features to the bear’s head and body using the tapestry needle. Be mindful of the pattern instructions to achieve the authentic Paddington Bear look.
Step 6: Stuff and Finish
Once all the features are securely attached, stuff the bear’s body with the chosen stuffing, filling it evenly and firmly. Ensure that the bear is symmetrical and well-shaped before closing up the remaining opening. Secure any loose yarn ends or seams, and trim any excess yarn or thread.
With these step-by-step instructions and a little patience, you’ll have your very own knitted Paddington Bear to cherish or gift to a loved one. Enjoy the process and embrace the joy of creating a timeless cuddly companion.
Creating the Body and Limbs
When knitting the body and limbs for your Paddington Bear, it is important to start with the right size and type of needles and yarn. The pattern typically recommends using size 4 or 5 knitting needles and a standard double knitting (DK) yarn. This will ensure that the finished pieces are the correct size and have a nice, even tension.
Once you have gathered your materials, you can begin by creating the body. The body is typically knit in one piece, starting with the legs and working your way up to the head. You will begin by casting on stitches for the legs and knitting in the round to create the seamless tube shape. As you knit, you can add stuffing to give the legs a bit of shape and firmness.
After completing the legs, you will join them together to start knitting the body. This is done by picking up stitches along the top of one leg and knitting across the stitches of the second leg. From there, you will continue working in the round to create the torso of the bear. If desired, you can add additional stuffing to give the body a more plush feel.
Once the body is complete, you can move on to knitting the limbs. The limbs are knit separately and then sewn onto the body. Typically, the arms and legs are knit in a similar manner, starting with a small number of stitches and increasing gradually to create the desired shape. When sewing the limbs onto the body, make sure to position them evenly and securely so that they will withstand play and handling.
By following the pattern instructions and taking your time, you can create the body and limbs of your Paddington Bear with confidence. Remember to use the correct materials and techniques to ensure a successful outcome. Happy knitting!
Knitting the Details: Face, Ears, and Accessories
When knitting a family circle Paddington Bear, attention to detail is key to capturing the charm of this iconic character. The face is one of the most important parts to get right, as it will bring the bear to life. Using a small amount of black yarn, embroider the eyes using a satin stitch. Take care to position the eyes evenly and symmetrically, ensuring that they are the correct distance apart. Using a dark brown or black yarn, embroider the nose using a small straight stitch. This will create a defined and cute little snout.
Next, it’s time to knit the ears. Using the same color yarn as the bear’s body, cast on the required number of stitches and work in stockinette stitch until the piece measures the desired length. Fold the ear in half along the horizontal axis and sew the sides together using a mattress stitch. Attach the ears to the bear’s head, making sure they are evenly positioned and secure.
To complete the look, consider knitting some accessories for your Paddington Bear. The classic red hat and blue coat are essential to his outfit. Use the appropriate yarn colors and follow the pattern instructions to create these pieces. Additionally, you can knit a little red knapsack for Paddington to store his marmalade sandwiches. This can be done by knitting a small rectangular piece in red yarn and adding straps to attach it to the bear’s back. Don’t forget to embroider the initials “PB” on the front of the knapsack to truly capture Paddington’s style.
Assembling Your Paddington Bear
Once you have finished knitting all the parts of your Paddington Bear, it’s time to assemble him and bring him to life! Follow these steps to put him together:
1. Sewing the Body and Limbs: Start by sewing the head, arms, and legs onto the body. Use small, neat stitches and make sure to secure each piece firmly. Position the limbs and head according to the pattern instructions, and take your time to make sure everything is symmetrical.
2. Attaching the Eyes: Embroider or attach the eyes securely to the head. You can use small buttons, safety eyes, or even just yarn. Make sure they are positioned correctly, with the same distance between them as indicated in the pattern.
3. Adding the Nose: Sew or embroider a small triangle-shaped nose on Paddington’s face, just below the eyes. Use a contrasting color of yarn to make it stand out.
4. Stitching the Mouth: Use a small length of black yarn or embroidery floss to stitch a simple curved line for Paddington’s mouth. Position it just below the nose, slightly angled upwards to give him a friendly smile.
5. Attaching the Ears: Sew or attach the ears to the sides of Paddington’s head. Make sure they are positioned symmetrically and secure them firmly. You can fold the ears slightly to give them a more lively appearance.
6. Stuffing and Closing: Carefully stuff Paddington’s body and limbs with soft toy filling, making sure to distribute it evenly. Use small amounts at a time to avoid overstuffing. Once he is nicely plump, sew up any remaining openings securely.
7. Finishing Touches: Give Paddington’s fur a gentle brush with a soft-bristled brush or comb to fluff it up and make it look neat. If desired, you can add a small felt or fabric hat to complete his iconic look.
With these steps, your Paddington Bear will be assembled and ready to join your family circle! He will make a charming and cuddly addition to your home, bringing a touch of nostalgia and joy to everyone who sees him.
Finishing Touches: Adding Color and Personalization
When it comes to knitting projects, adding color and personalization can really make your creation stand out and become even more special. With the Family Circle Paddington Bear knitting pattern, there are several ways you can add these finishing touches to your bear.
One option is to use different colors of yarn for different parts of the bear. For example, you could use a dark brown yarn for the bear’s body, a lighter brown for its face and paws, and even a contrasting color for its jacket. This can not only add visual interest to the bear, but also help define its features and make it more unique.
To further personalize your bear, you can also consider adding small details like buttons or embroidered features. Sewing on a couple of buttons for eyes or using embroidery thread to create a mouth can give your bear a more expressive face. You could also add embellishments like a ribbon or bowtie to give your bear an extra touch of charm.
If you’re looking for even more personalization options, consider knitting accessories to go along with your bear. You could knit a miniature scarf, hat, or even a tiny sweater to dress up your bear. This allows you to experiment with different colors and patterns, and it can also make your bear more versatile for different seasons or occasions.
Remember, adding color and personalization to your Family Circle Paddington Bear knitting project is all about allowing your creativity to shine. Have fun choosing colors and details that speak to you and make your bear unique and special.
Displaying and Caring for Your Hand-Knitted Paddington Bear
Once you have completed knitting your Paddington Bear, you will want to display it proudly in your home. Here are some tips for displaying and caring for your hand-knitted masterpiece:
1. Choose the perfect spot:
Find a special place in your home to showcase your Paddington Bear. Consider a bookshelf, side table, or display cabinet where it can be easily seen and admired. Make sure it is out of reach from pets or young children to avoid any damage.
2. Keep it clean:
To keep your hand-knitted Paddington Bear looking its best, it’s important to keep it clean. Use a soft brush or a lint roller to remove any dust or pet hair that may accumulate over time. Avoid using harsh cleaning products or washing the bear, as this may damage the knitting or stuffing.
3. Handle with care:
While your Paddington Bear is durable, it’s still a delicate handmade item. When handling or moving it, be gentle to avoid any unraveling or stretching of the stitches. Support the bear from underneath or around its body when lifting or repositioning.
4. Store it properly:
If you need to store your hand-knitted Paddington Bear for a period of time, it’s important to do so properly to avoid any damage. Place it in a clean, dry container or bag, and make sure it is protected from dust, moisture, and sunlight. Consider using acid-free tissue paper to preserve its shape and prevent any discoloration.
5. Enjoy the memories:

Your hand-knitted Paddington Bear is not just a decorative item, but also a symbol of the time and effort you put into creating it. Take a moment to appreciate the craftsmanship and the memories associated with making it. Share the story of your hand-knitted Paddington Bear with family and friends, and let it bring joy to your home for years to come.