
Knitting is a beloved craft that allows us to create beautiful and cozy items, and there’s nothing quite like wrapping yourself in a handmade blanket. If you’re looking for a new knitting project, why not try your hand at a two-color blanket? This pattern combines simplicity with elegance, making it the perfect choice for knitters of all skill levels.
This two-color blanket pattern uses basic knitting techniques, such as knit and purl stitches, to create a stunning geometric design. The contrasting colors give the blanket a modern and stylish look, while the soft and warm yarn keeps you cozy on chilly evenings. Whether you’re a beginner or an experienced knitter, this project is sure to bring you joy and satisfaction as you watch your creation take shape.
Not only is knitting a two-color blanket a fun and creative project, but it also provides numerous benefits. Knitting has been shown to reduce stress and anxiety, improve focus and concentration, and increase feelings of well-being. By immersing yourself in this project, you can experience the meditative and therapeutic effects of knitting while creating a beautiful and functional item.
Two Color Blanket Knitting Pattern

If you enjoy knitting and want to make a beautiful and cozy blanket, the two-color blanket knitting pattern is a great project to take on. This pattern utilizes two contrasting colors to create a visually striking design, with options for different stitch patterns and techniques. Whether you’re an experienced knitter looking for a new challenge or a beginner wanting to try something new, this pattern is versatile and fun to work on.
Materials Needed: To begin your two-color blanket, you will need two colors of yarn in a weight of your choice. The amount of yarn required will depend on the size of the blanket you wish to create. You will also need knitting needles in a size suitable for your chosen yarn weight, a tapestry needle for weaving in ends, and scissors.
Pattern Instructions: Start by casting on the desired number of stitches using one of the two colors. You can choose to start with a simple garter stitch for a classic look or experiment with more intricate stitch patterns, such as seed stitch, ribbing, or even cables. Once you have completed a desired number of rows in the first color, switch to the second color and continue knitting in the desired stitch pattern.
Tip: When switching colors, bring the new color yarn up from under the old color to ensure the strands are twisted and create a neat join.
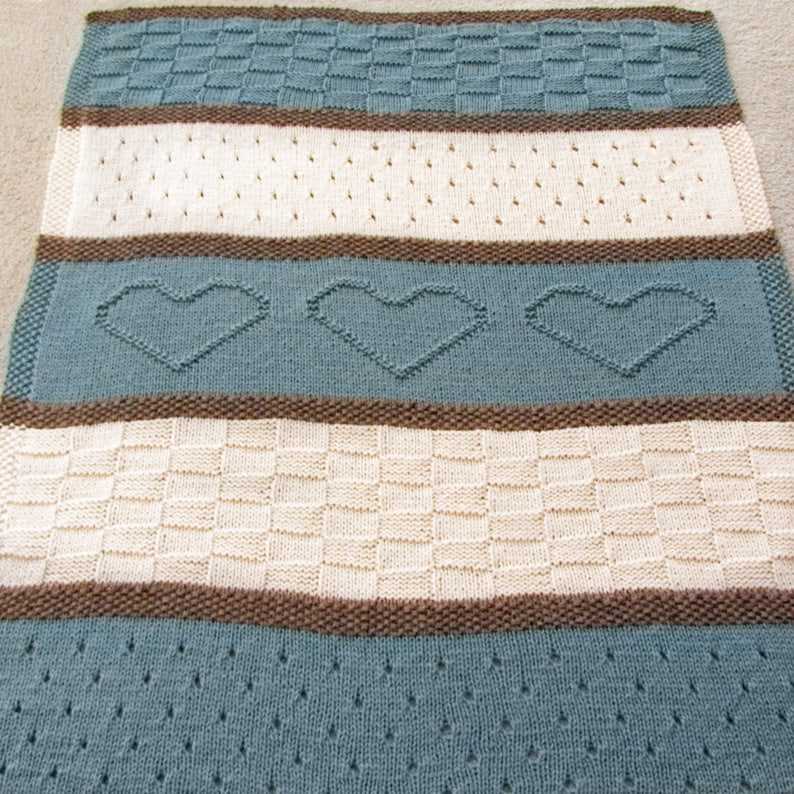
To create a two-color blanket with a striped design, continue alternating between the two colors for the desired length of the blanket. You can choose to create equal-sized stripes or experiment with different widths to create a more dynamic visual effect. When you have reached your desired length, finish the blanket with a few rows of the same stitch pattern used for the beginning, creating a cohesive design.
Finishing: Once you have completed the final rows of the blanket, bind off all stitches and weave in any loose ends using a tapestry needle. Block the finished blanket to even out the stitches and enhance the drape of the fabric. Your two-color blanket is now ready to be enjoyed and cherished for years to come.
In conclusion, the two-color blanket knitting pattern offers an excellent opportunity to get creative with color and stitch combinations. Whether you prefer a simple design or want to experiment with more intricate patterns, this project allows you to showcase your knitting skills and create a beautiful and personalized blanket.
Choose Your Colors
When it comes to knitting a two-color blanket, one of the most exciting parts is choosing the colors you want to work with. The colors you choose will ultimately determine the overall look and feel of the blanket, so it’s important to choose them carefully. Whether you prefer bright and vibrant colors or a more subdued and neutral palette, there are a few things to consider when making your decision.
Color Combination: One important factor to consider is how the colors you choose will look together. You want to make sure that the two colors complement each other and create a harmonious and visually pleasing combination. Consider contrasting colors, such as pairing a light color with a dark color or using complementary colors from opposite sides of the color wheel. Experiment with different combinations to see what works best for your personal taste.
Personal Preference: Ultimately, the colors you choose should be ones that you love and enjoy working with. Consider your personal preferences and the colors that make you feel happy and inspired. Do you have a favorite color or a color that holds special meaning to you? Incorporating these colors into your blanket can make it even more meaningful and special.
Pattern Considerations: The pattern you choose for your two-color blanket may also dictate the colors you use. Some patterns may call for specific color combinations or provide suggestions on how to choose colors that will showcase the pattern’s design. Take these considerations into account when making your color choices to ensure that the final result is exactly what you envisioned.
Sample and Swatch: Before committing to your chosen colors, it’s always a good idea to make a sample or a swatch to see how the colors look together. This can help you visualize the final result and make any necessary adjustments before starting the actual blanket. Knit a small section using the chosen colors to see how they interact and if they create the effect you desire.
By carefully selecting your colors, you can create a stunning and unique two-color blanket that reflects your personal taste and style. Whether you opt for bold and contrasting colors or stick to a more monochromatic scheme, the final result will be a beautiful and cozy blanket that you can treasure for years to come.
Required Materials
In order to knit the two-color blanket, you will need the following materials:
- Yarn: You will need two colors of medium-weight yarn. The exact amount will depend on the size of the blanket you wish to make.
- Knitting Needles: You will need a pair of knitting needles appropriate for the yarn you have chosen. Check the yarn label for the recommended needle size.
- Tapestry Needle: A tapestry needle will be used for weaving in the ends of the yarn and any other finishing touches.
- Scissors: You will need a pair of scissors for cutting the yarn.
- Stitch Markers: It may be helpful to have stitch markers to keep track of certain stitches or sections of the blanket.
- Measuring Tape: A measuring tape will be useful for checking the dimensions of your blanket as you work.
- Pattern: Lastly, you will need the pattern for the two-color blanket. You can either find a pre-made pattern online or create your own design.
Once you have gathered all of these materials, you will be ready to start knitting your two-color blanket. Make sure to double-check the pattern instructions and gauge before beginning to ensure the best results.
Getting Started
In order to begin knitting the two-color blanket, you will need to gather all the necessary materials. For this particular pattern, you will need two colors of yarn and the appropriate knitting needles. Make sure to choose a yarn that is suitable for a blanket, as it needs to be warm and durable.
Once you have all the materials, you can start by casting on the desired number of stitches onto your knitting needles. The number of stitches will depend on how wide you want your blanket to be. You can refer to the pattern instructions for the specific number of stitches to cast on.
Casting On

Casting on is the first step in starting your two color blanket knitting project. It creates the foundation row of stitches on your knitting needle.
There are several different methods for casting on, but for this pattern, we will be using the long-tail cast on method. This method creates a neat and sturdy edge and is perfect for starting the blanket.
To cast on using the long-tail cast on method, you will need two yarns of different colors. Start by making a slipknot with one of the colors, leaving a long tail. Hold the slipknot in your left hand and the other color in your right hand.
With the slipknot on your left hand needle, insert your right hand needle into the slipknot from front to back, wrapping the other color of yarn around your right thumb and then pulling it through the slipknot. This will create a loop on your right hand needle.
Continue this process, alternating between the two colors, until you have cast on the required number of stitches for your blanket. Make sure to keep the tension of the yarn relaxed but not too loose so that your stitches are even and consistent.
Once you have cast on all the stitches, you can begin working the pattern with the two colors. The long-tail cast on method will give you a clean and professional-looking edge for your two color blanket project.
First Color Section

In the first color section of this two-color blanket knitting pattern, you will be using the main color to create a solid background. This section sets the foundation for the pattern and will create a beautiful backdrop for the contrasting color that will be added later.
To begin, cast on the desired number of stitches using the main color yarn. The number of stitches will depend on the size of the blanket you wish to knit. Make sure to leave a long enough tail to weave in later.
Once you have cast on, you will work in your chosen stitch pattern using the main color. This can be a simple knit or purl stitch, or you can choose a more intricate stitch pattern for added texture. Follow the instructions provided in the pattern to create the desired effect.
Continue working in the main color until you have reached the desired length for the first color section. The length will depend on your personal preference and the overall design of the blanket. Make sure to leave enough yarn to finish off the section and weave in the ends.
Once the first color section is complete, you can move on to the next color section. This is where the contrasting color will be introduced, creating a beautiful visual contrast and adding depth to the blanket. The instructions for the next color section will be provided in the pattern.
Switching Colors
Switching colors is an important technique in knitting a two-color blanket. It allows you to create patterns and designs by alternating between different colored yarns. To switch colors, you need to follow a few simple steps.
1. Cut the yarn: When you reach the point where you want to switch colors, cut the yarn of the current color, leaving a tail of about 6 inches. This will secure the color change and prevent the stitches from unraveling.
2. Join the new color: Take the end of the new color yarn and make a slip knot. Insert the right-hand needle into the next stitch, then pass the slip knot through the stitch from back to front, placing it onto the right-hand needle. Pull the new color yarn tight to secure it.
Note: Make sure to leave a tail of about 6 inches when joining the new color to allow for weaving in the ends later.
3. Carry the unused color: When switching colors, you will have two yarns attached to your work. The unused color can be carried along the back of the work, twisting it with the new color every few stitches to prevent long floats.
4. Continue knitting: Once you have joined the new color, continue knitting in the new color according to the pattern instructions. The color switch will create a line in your work, which can be used to create stripes or other designs.
5. Weave in the ends: After completing your project, you will need to weave in the ends of the yarn to secure them. Use a tapestry needle to thread the yarn tails onto the needle and weave them into the fabric, making sure they are securely fastened.
Switching colors is an essential technique in knitting a two-color blanket. By mastering this skill, you can create beautiful and intricate patterns, adding visual interest to your project.
Second Color Section

The second color section of the two-color blanket follows the same pattern as the first color section, but with a different color yarn. This section adds variety and visual interest to the blanket, creating a contrasting design.
To start the second color section, cut the yarn from the first color and attach the second color by making a slipknot and placing it on the right needle. Slide the slipknot towards the tip of the needle and tighten it.
Row 1: With the second color yarn, knit across all stitches.
Row 2: Purl across all stitches using the second color yarn.
Repeat Rows 1 and 2: Continue working in stockinette stitch pattern, alternating between knit and purl rows, until the second color section reaches the desired length.
Remember to keep consistent tension and check the gauge periodically to ensure the blanket remains the correct size. The transition between the first and second color sections should be smooth and seamless, with no gaps or holes.
- Tip: When changing colors, twist the yarn tails together at the back of the work to prevent any gaps or loose stitches.
- It is important to weave in the yarn ends as you go to avoid a large amount of finishing work at the end. Use a tapestry needle to weave the ends into the back of the work, following the natural path of the stitches.
- Continue following the pattern instructions for any additional color sections or stitch patterns as desired.
Adding Fringe
Step 1: To add fringe to your two color blanket, you will need some yarn in a complementary color. Choose a yarn that is similar in weight and texture to the main colors of your blanket. You will also need a crochet hook or tapestry needle for attaching the fringe.
Step 2: Cut several lengths of the fringe yarn, each about twice the length you want the fringe to be. For example, if you want 4-inch-long fringe, cut each length of yarn to be about 8 inches long. The number of strands you cut will depend on the width of your blanket and how dense you want the fringe to be. A good starting point is to cut about 20 strands of yarn.
Step 3: Take one length of fringe yarn and fold it in half. Insert the crochet hook or tapestry needle from front to back through the edge of the blanket, creating a small loop. Hold the folded end of the fringe yarn and pull it through the loop, creating a knot. Repeat this process along the entire edge of the blanket, spacing the fringe strands evenly.
Step 4: Once you have attached all the fringe strands, trim them to your desired length. Use sharp scissors to cut them straight across or at an angle for a more decorative look. You can also comb or brush the fringe to give it a softer, more even appearance.
Step 5: Repeat Steps 3 and 4 for the other three edges of the blanket, if desired. You can choose to add fringe to all edges or just one or two, depending on your preference.
Tips:
- Experiment with different lengths and densities of fringe to achieve the desired look for your blanket.
- If you want to add fringe to a finished blanket, simply attach it to the edge using the same method described above.
- Consider using a contrasting color for the fringe to create a bold and eye-catching effect.
Finishing Touches

Once you have completed knitting your two-color blanket, it’s time to add some finishing touches to give it a polished look. Here are a few suggestions:
Weave in the ends
Start by weaving in all the loose ends of yarn that were created during the knitting process. This will ensure that the blanket looks neat and tidy. Use a yarn needle to carefully weave the ends into the back of the work, making sure they are secure and not visible from the front.
Block the blanket
Blocking is an important step in finishing any knitted project, and the same applies to your two-color blanket. To block the blanket, lay it flat on a clean, dry surface and gently stretch it to its desired shape. You can use blocking pins to hold the edges in place if needed. Then, mist the blanket with water using a spray bottle and allow it to dry completely. This will help even out the stitches and give the blanket a professional finish.
Trim the edges

To add a clean and professional touch to your blanket, consider adding a border or trim to the edges. This can be done using a contrasting color yarn or even a crochet edging. Choose a simple stitch pattern that complements the overall design of your blanket and work it evenly along the edges. This will not only give a finished look but also help reinforce the edges and prevent them from curling.
Add a personalized touch
If you want to make your blanket even more special, consider adding a personalized touch. You can embroider the recipient’s initials or name onto the blanket using a coordinating color yarn. Alternatively, you can sew or knit on decorative patches or appliques that hold sentimental value. These personal touches will make the blanket unique and cherished.
By taking the time to complete these finishing touches, you can transform your two-color blanket into a beautifully finished and personalized gift. Whether you are making it for yourself or someone else, these details will make all the difference in the final result. Enjoy your beautiful blanket!
Blocking the Blanket
Blocking is an essential step in the knitting process, especially for a blanket. It helps to even out the stitches, relax the fibers, and give the blanket its final shape and size. Whether you’re knitting a two-color blanket or any other pattern, blocking will make a significant difference in the finished project.
The first step in blocking a knitted blanket is to thoroughly wet it. Fill a basin or sink with lukewarm water and add a bit of gentle wool wash or baby shampoo. Submerge the blanket and gently squeeze it to ensure the fibers are fully saturated. Let it soak for about 15 minutes.
Once the blanket is thoroughly wet, remove it from the water and gently squeeze out the excess moisture. Avoid wringing or twisting the blanket, as this can cause the fibers to stretch or become misshapen. Lay a clean towel on a flat surface and place the blanket on top. Roll the towel and blanket together to remove even more moisture.
Now it’s time to shape the blanket. Lay it out on a flat surface, such as a blocking mat or clean foam board. The size and shape of the blanket will depend on the pattern and personal preference. Use T-pins or blocking wires to secure the edges and corners of the blanket, making sure it is stretched evenly.
Leave the blanket to dry completely, which can take anywhere from a few hours to a couple of days, depending on the thickness of the yarn and the climate. Once dry, remove the pins or wires, and admire your beautifully blocked blanket. It will be transformed into a smooth and professional-looking piece that is ready to be enjoyed or gifted.
Final Thoughts

Knitting a two color blanket can be a fun and rewarding project for knitters of all skill levels. Whether you’re a beginner looking to challenge yourself or an experienced knitter wanting a new project, this pattern is a great choice. The combination of two colors adds visual interest to the blanket, and the simple repeating pattern makes it easy to work on while still providing a sense of accomplishment.
By following the instructions and tips provided in this article, you should be able to successfully knit your own two color blanket. Remember to choose colors that you love and that complement each other well. Pay attention to your tension and gauge to ensure that your blanket turns out the right size. And don’t forget to enjoy the process of knitting, as it can be a very therapeutic and relaxing activity.
In conclusion, knitting a two color blanket is a wonderful way to explore colorwork and create a cozy and beautiful item. Whether you keep it for yourself or give it as a gift, this blanket is sure to be cherished for years to come. So grab your knitting needles, pick out your favorite colors, and get started on your own two color blanket today!
Q&A:
What is a two color blanket knitting pattern?
A two color blanket knitting pattern is a knitting pattern that uses two different yarn colors to create a blanket. The pattern usually consists of alternating rows or sections of each color, creating a beautiful two-toned design.
How do I choose colors for a two color blanket knitting pattern?
Choosing colors for a two color blanket knitting pattern is a matter of personal preference. You can choose two colors that complement each other or create a contrasting effect. It’s important to consider the overall aesthetic you want to achieve and select colors that will achieve your desired outcome.
What are some popular two color blanket knitting patterns?
There are many popular two color blanket knitting patterns available. Some popular options include striped blankets, chevron blankets, and geometric patterned blankets. You can find a wide range of patterns online and in knitting books and magazines.
Are two color blanket knitting patterns suitable for beginners?
Two color blanket knitting patterns can be suitable for beginners, depending on the complexity of the pattern. Some patterns may require intermediate or advanced knitting skills, while others may be simpler and more beginner-friendly. It’s important to choose a pattern that matches your skill level and provides clear instructions.
Can I modify a two color blanket knitting pattern?
Yes, you can modify a two color blanket knitting pattern to suit your preferences. You can change the size of the blanket, adjust the color placement, or even add additional design elements. Just make sure to carefully read and understand the pattern instructions before making any modifications.
What is a two color blanket knitting pattern?
A two color blanket knitting pattern is a knitting pattern that uses two different colors of yarn to create a design for a blanket. The pattern usually specifies how and when to switch between the two colors to create the desired pattern or design.
How do I knit a two color blanket?
To knit a two color blanket, you will need two different colors of yarn and the corresponding size knitting needles. Follow the instructions provided in the two color blanket knitting pattern, which will guide you on when to switch between the two colors and how to create the desired pattern or design. Typically, you will carry the yarn not in use up the side of your work so that it’s ready when you need it again. Practice the basic knitting stitches and techniques before attempting a two color blanket to ensure a successful outcome.