
If you are a beginner knitter looking for a simple and easy project to start with, look no further than this beginner knit cardigan pattern. This pattern is perfect for those who want to try their hand at knitting a garment for the first time, as it uses basic stitch patterns and minimal shaping.
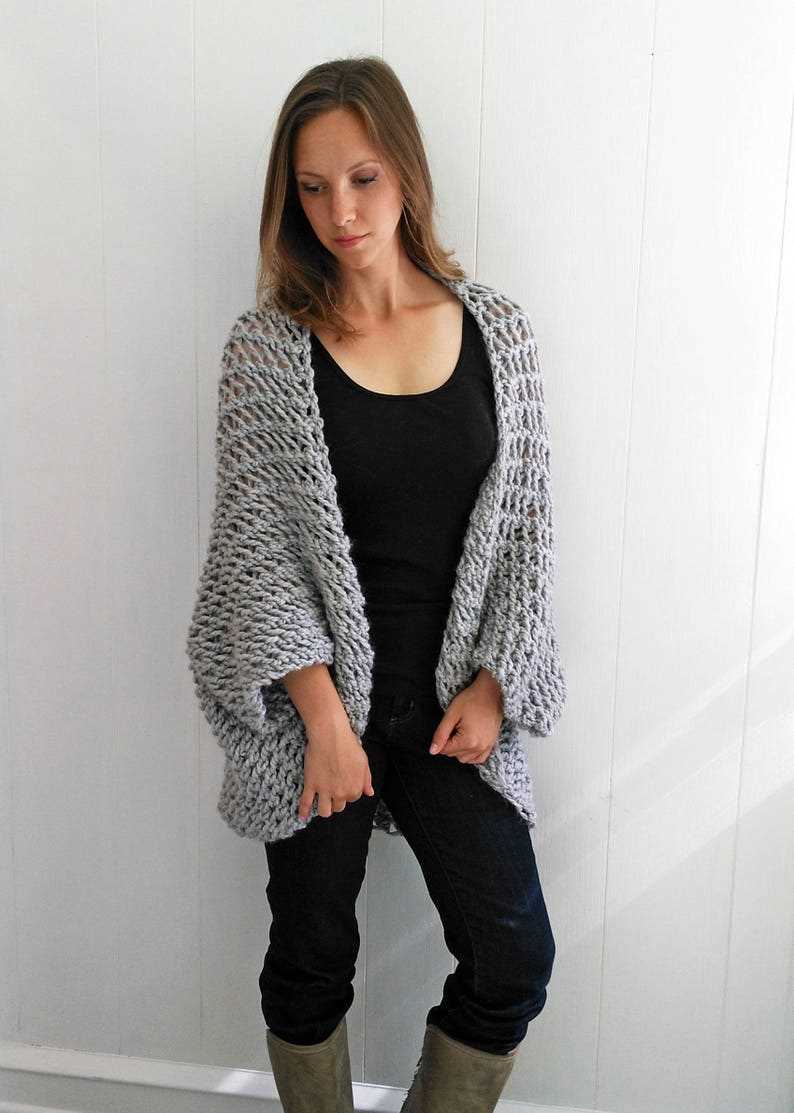
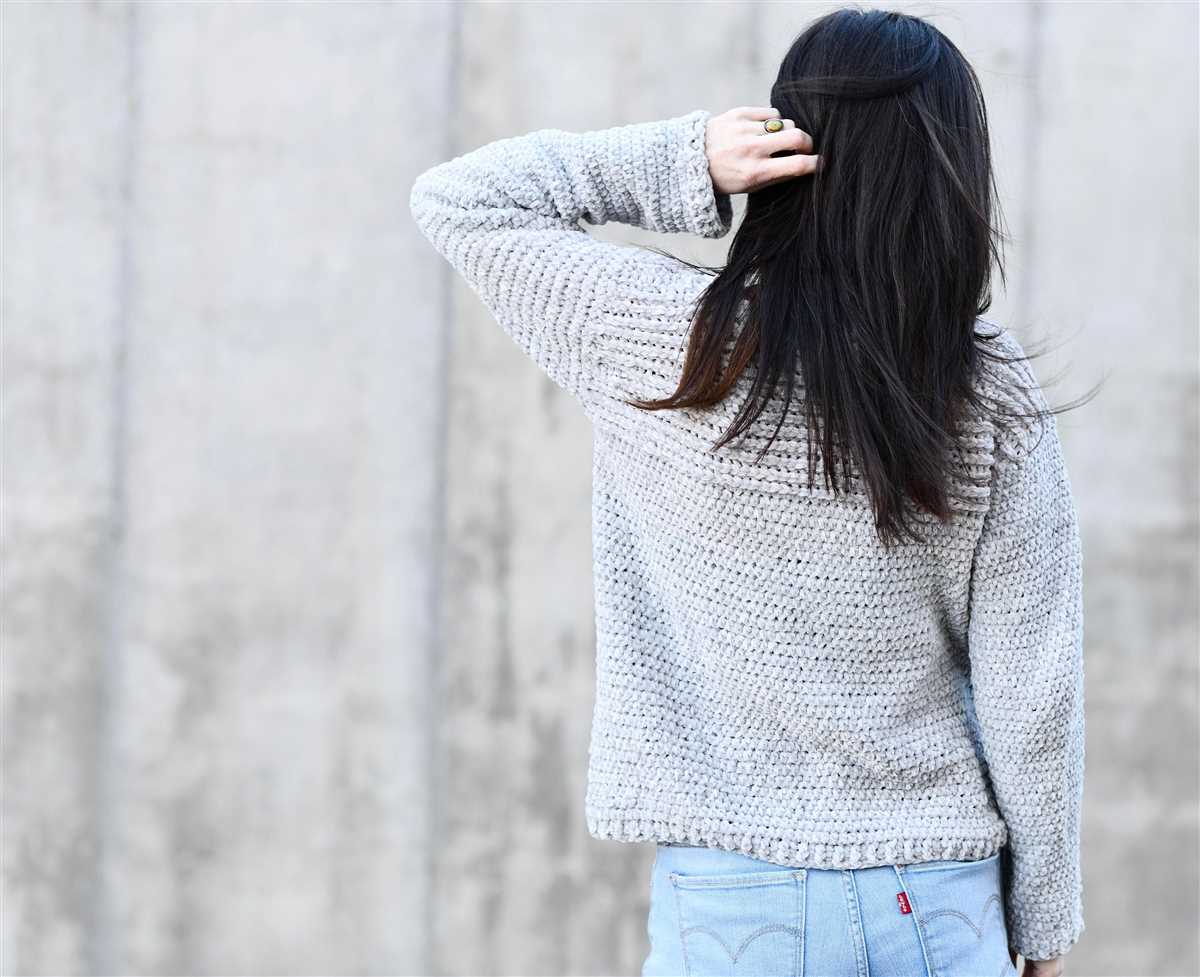
This free cardigan pattern is designed to be knit with chunky weight yarn, making it a quick and satisfying project. The oversized fit and drop shoulders give it a relaxed and cozy look, perfect for layering over your favorite t-shirts or dresses. The simple construction and minimal seaming make it a great choice for beginners.
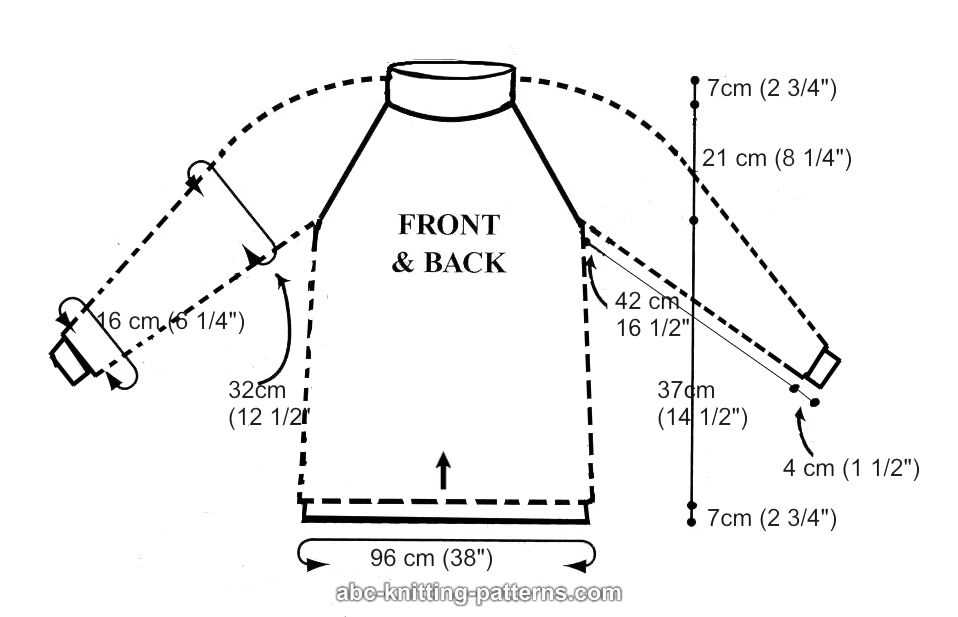
With step-by-step instructions and clear diagrams, this pattern will guide you through the process of knitting your very own cardigan. Whether you choose a classic neutral color or a fun bold shade, this cardigan is sure to become a staple in your wardrobe. So grab your knitting needles and get started on this beginner-friendly project today!
Beginner Knit Cardigan Pattern Free: A Step-by-Step Guide
Are you a beginner knitter looking for a free cardigan pattern to practice your skills? Look no further! In this step-by-step guide, we will walk you through the process of knitting a basic cardigan that is perfect for beginners.
Materials Needed
Before we get started, let’s gather the materials you’ll need for this project:
- Knitting needles (size 8 or as recommended on your yarn label)
- Yarn (worsted weight or your preferred yarn type)
- Scissors
- Tapestry needle
Step 1: Casting On
To begin, cast on the required number of stitches for your desired size using the long-tail cast on method. Make sure to leave a long tail for sewing later on. If you’re unsure about the number of stitches to cast on, refer to the pattern instructions.
Step 2: Knitting the Body
Once you have cast on your stitches, it’s time to start knitting the body of the cardigan. Follow the pattern instructions for the stitch pattern and length. This pattern is designed with beginner knitters in mind, so it should be relatively straightforward.
Step 3: Shaping the Sleeves
After completing the body, it’s time to shape the sleeves. This pattern typically includes instructions for decreasing stitches to create a tapered sleeve shape. Follow the pattern carefully and make sure to keep track of your stitch count.
Step 4: Finishing Touches

Once you have completed knitting the body and sleeves, it’s time to finish the cardigan. This may involve sewing the seams together, adding a button band, or knitting ribbing for the cuffs and hem. Follow the pattern instructions for these finishing touches.
And there you have it – a beautifully knit cardigan made by you! With this beginner knit cardigan pattern, you’ll be able to practice your knitting skills and create a cozy and stylish garment. Don’t be afraid to customize the pattern to fit your personal style – add pockets, experiment with different yarn colors, or even try out different stitch patterns. The possibilities are endless!
Choosing the right yarn and knitting needles
When it comes to knitting a beginner cardigan, choosing the right yarn and knitting needles is essential for achieving the desired outcome. The type of yarn you select will greatly impact the finished look and feel of your cardigan. It’s important to consider factors such as fiber content, weight, and texture when making your decision.
Fiber Content: The fiber content of the yarn will determine how warm, soft, and durable your cardigan will be. Common options include wool, cotton, acrylic, and blends of different fibers. Wool is known for its warmth and elasticity, while cotton is lightweight and breathable. Acrylic is an affordable and easy-care option, perfect for beginners. Consider your personal preferences and the climate you live in to choose the most suitable fiber for your cardigan.
- Weight: The weight of the yarn refers to its thickness or how thin the individual strands are. The most commonly used yarn weights for cardigans are DK (double knitting), worsted, and bulky. DK weight yarn is perfect for lightweight garments, while worsted weight is a versatile choice that works well for a variety of projects. Bulky weight yarn will create a chunky and cozy cardigan, perfect for colder weather.
- Texture: Consider the texture of the yarn as it can add interest and detail to your cardigan. Smooth, plied yarns provide a clean and classic look, while yarns with a halo or boucle texture can add softness and dimension to your garment. Experiment with different textures to achieve the desired aesthetic for your cardigan.
Once you have chosen your yarn, it’s important to select the appropriate knitting needles for your project. The size of the needles will depend on the weight of the yarn and the desired gauge. For most beginner cardigan patterns, a set of US size 7-9 (4.5-5.5mm) needles will work well. However, it’s always important to check the gauge recommended in the pattern and make a gauge swatch before starting your project. This will ensure that your cardigan turns out the correct size and fit.
Understanding basic knitting stitches
Knitting is a popular craft that involves creating fabric by interlocking loops of yarn with knitting needles. To get started with knitting, it’s important to understand the basic stitches that form the foundation of any knitting project. These stitches include the knit stitch, the purl stitch, and the yarn over.
The knit stitch is the most basic stitch in knitting. It is formed by inserting the right needle into the first stitch on the left needle, wrapping the yarn around the right needle, and pulling it through the stitch to create a new loop. This stitch creates a pattern of interlocking V shapes on the fabric.
The purl stitch is another essential stitch in knitting. It is the reverse of the knit stitch and creates a pattern of bumps on the fabric. To purl, the needle is inserted into the stitch from right to left, the yarn is wrapped counter-clockwise around the right needle, and then pulled through the stitch to create a new loop.
Yarn over is a technique used to create an extra loop on the needle, which adds an additional stitch to the fabric. This technique is commonly used to create decorative lace patterns or increase stitches in a project. To yarn over, simply bring the yarn forward between the needles and then continue with the next stitch as usual.
By mastering these basic knitting stitches, you’ll be able to create a wide variety of patterns and projects. Practice these stitches and experiment with different yarns, needle sizes, and stitch combinations to expand your knitting skills and create beautiful garments and accessories.
Casting on and creating the ribbing
Before you start knitting your beginner knit cardigan, you need to cast on your stitches. Casting on is the process of creating the foundation row of stitches on your needle. For this pattern, you will need to cast on a specific number of stitches, usually indicated in the pattern instructions. You can use any cast-on method you prefer, such as the long-tail cast-on or the knitted cast-on.
Once you have cast on your stitches, it’s time to create the ribbing. Ribbing is a pattern of alternating knit and purl stitches that creates a stretchy and elastic fabric. It is commonly used for cuffs, hems, and neckbands in knitwear. For this beginner knit cardigan pattern, the ribbing is usually worked at the bottom edge, the cuffs, and the front bands.
The most common ribbing pattern is the 1×1 ribbing, which means you alternate one knit stitch with one purl stitch. To create the ribbing, you will repeat this pattern for a certain number of rows, again indicated in the pattern instructions. Make sure to keep track of your rows using a row counter or by marking them with a stitch marker.
When working the ribbing, it’s important to maintain an even tension and avoid knitting too tightly or loosely. This will ensure that the ribbing has the desired stretch and elasticity. If your ribbing looks too loose, you can try using a smaller needle size. On the other hand, if it looks too tight, you can use a larger needle size or adjust your tension.
Working the body of the cardigan
Once you have completed the ribbing for the cuffs and the bottom hem of the cardigan, you are ready to start working on the body. To do this, you will continue using the same size knitting needles that you used for the ribbing.
To begin the body, you will need to calculate how many stitches you will have in total. This will depend on the size of the cardigan you are making and the gauge of your knitting. Using the pattern instructions, cast on the required number of stitches and join in the round.
- Next, you will need to work the body of the cardigan in your chosen stitch pattern. This could be a simple stockinette stitch, a textured stitch pattern like seed stitch, or a more complex lace pattern.
- Continue working in the stitch pattern until the body of the cardigan reaches the desired length. This could be measured from the underarm or from the beginning of the body section, depending on the pattern instructions.
- Remember to regularly check your gauge as you work to ensure that the sizing is correct.
Once the body section is complete, you can move on to the next step, which is usually shaping the neckline or adding buttonholes. Follow the pattern instructions carefully to ensure that you achieve the desired shape and fit for your cardigan.
Shaping the shoulders and neckline
When knitting a cardigan, one of the important steps is shaping the shoulders and neckline. This is where you create the curves and openings that will frame the upper body and give the cardigan its overall shape. There are several techniques and methods that can be used to achieve this.
Shoulder shaping
Shoulder shaping is done to create a slope that matches the natural curve of the shoulder. This is usually achieved by decreasing stitches at the edge of the shoulder on both sides. The number of decreases and the rate at which they are made will depend on the size of the cardigan and the desired fit. Common decreases used for shoulder shaping include knit two together (k2tog) and slip, slip, knit (ssk).
Neckline shaping
The neckline of a cardigan can be shaped in various ways to achieve different styles. For a rounded neckline, increases are made at the center front and center back of the cardigan. This can be done by knitting into the front and back of stitches or by working yarn-overs to create new stitches. For a V-neckline, decreases are made in a V-shape at the center front. This is usually achieved by working a series of decreases, such as knit two together (k2tog) or purl two together (p2tog).
It is important to carefully follow the pattern instructions for shaping the shoulders and neckline as these are crucial to achieving the desired fit and style of the cardigan. Paying attention to stitch counts and keeping track of shaping rows will help ensure that the cardigan is symmetrical and well-proportioned. By diligently shaping the shoulders and neckline, you will be able to create a beautifully fitting and flattering cardigan.
Adding sleeves to the cardigan
Once you have completed the body of your knit cardigan, the next step is to add the sleeves. There are a few different methods you can use to do this, depending on your personal preference and knitting skills. One common technique is to pick up stitches along the armhole edges and then knit the sleeves in the round. This creates a seamless look and allows for easy customization of sleeve length.
To pick up stitches for the sleeves, start by marking the center of the armhole and then divide the stitches evenly on either side. Use a smaller circular knitting needle to pick up stitches along the armhole edge, making sure to maintain the proper stitch count. This will create the foundation for your sleeve. Once you have picked up the desired number of stitches, join in the round and begin knitting in the desired stitch pattern.
Another option for adding sleeves to your cardigan is to knit them separately and then seam them onto the body. This method allows for more intricate stitch patterns or colorwork on the sleeves. To do this, you will need to follow a separate sleeve pattern and knit the sleeves flat. Once you have completed the sleeves, use a yarn needle and matching yarn to seam them onto the armholes of the cardigan. Make sure to line up the stitches and match any shaping, such as decreases or increases, to ensure a smooth and professional-looking finish.
Regardless of which method you choose, it is important to carefully follow the pattern instructions and take accurate measurements to ensure that the sleeves fit correctly. Try the cardigan on as you work to check the fit and make any necessary adjustments. Adding sleeves to your knit cardigan will not only provide warmth and comfort but also complete the overall look of your garment.
Finishing the cardigan with ribbing
Once you have completed all the necessary knitting for your beginner knit cardigan, it’s time to finish it off with ribbing. Ribbing is a great way to add a polished and professional look to your cardigan, while also providing some stretch and structure to the garment. Follow these steps to add the ribbing:
1. Determine the desired length
Before you start adding the ribbing, decide on the desired length for your cardigan. Measure the bottom edge of your cardigan and subtract any length that will be added by the ribbing. This will give you the length of the ribbing section that needs to be knit.
2. Choose a ribbing pattern
There are many different ribbing patterns you can choose from, such as 1×1 ribbing (alternating knit and purl stitches), 2×2 ribbing (alternating two knit stitches with two purl stitches), or any other combination that you prefer. Look for a ribbing pattern that complements the style of your cardigan and matches your knitting skills.
3. Pick up stitches
Using a circular needle or double-pointed needles, pick up stitches along the bottom edge of your cardigan. The number of stitches you pick up will depend on the ribbing pattern and the gauge of your knitting. Make sure to evenly distribute the stitches along the edge.
4. Knit the ribbing
Once you have picked up all the necessary stitches, start knitting the ribbing pattern that you have chosen. Follow the pattern instructions for the desired length, making sure to maintain the pattern consistently. Keep in mind that the ribbing should be stretchy but not overly tight.
5. Bind off
After you have reached the desired length for the ribbing, bind off the stitches using your preferred method. Make sure to bind off loosely to maintain the stretchiness of the ribbing.
With the ribbing completed, your beginner knit cardigan is now finished and ready to be worn or gifted. The ribbing adds a beautiful finishing touch to the garment and enhances its overall look and fit. Enjoy your new cardigan and the satisfaction of completing a knitting project!
Blocking and seaming the cardigan
Once you have finished knitting all the pieces of the cardigan, it’s time to block them. Blocking is an important step in the knitting process as it helps to shape and even out the stitches, making the finished garment look more polished and professional.
To block the cardigan, you will need to wet the pieces by soaking them in lukewarm water and a little bit of mild detergent. Gently squeeze out the excess water and then lay the pieces flat on a clean towel or blocking mat. Use rust-proof pins to pin the pieces in place, making sure to stretch and shape them to the correct measurements. Leave the pieces to dry completely before moving on to the next step.
Once the pieces are dry, it’s time to seam them together. Start by aligning the front and back pieces at the shoulders, making sure the right sides are facing each other. Use a tapestry needle and matching yarn to sew the pieces together using the mattress stitch. This stitch creates an invisible seam that blends in with the knit fabric, giving the cardigan a professional finish.
- Sew the shoulder seams first, then move on to the side seams. Make sure to match up the stitches as closely as possible for a neat seam.
- Next, sew the sleeves into the armholes. Again, use the mattress stitch to create a seamless and invisible seam.
- After the sleeves are attached, sew the button bands to the front edges of the cardigan. You can use the mattress stitch to sew the bands in place, or you can pick up stitches along the front edges and knit the bands directly onto the cardigan.
Once all the seams are complete, give the cardigan a final steam or press with a warm iron to help the seams lay flat and the stitches settle into place. Now your cardigan is ready to be worn and enjoyed!
Adding buttons or other closures
Once you have completed knitting your beginner cardigan, the next step is to add buttons or other closures to secure the front of the cardigan. This not only adds functionality but also enhances the overall look of the garment. There are several options for closures that you can choose from, depending on your personal preference and the style of the cardigan.
A popular choice for closures is buttons. You can use either traditional buttons or modern decorative buttons, depending on the style of the cardigan. Make sure to choose buttons that are the right size and color to complement your cardigan. You can sew the buttons onto the cardigan using a needle and thread or use a sewing machine for a more secure attachment.
Other closure options include:
- Toggle buttons: These are larger buttons that are attached with loops or straps. They provide a rustic and vintage look to the cardigan.
- Snap fasteners: These are quick and easy to use closures that can be sewn or snapped onto the cardigan. They are available in a variety of sizes and styles.
- Hook and eye closures: These are small metal hooks and eyes that can be sewn onto the cardigan. They provide a discreet closure option.
- Zipper: If you prefer a more modern and streamlined look, you can add a zipper to the front of the cardigan. Measure and cut the zipper to the correct length and sew it onto the cardigan using a zipper foot on your sewing machine.
Before sewing on the closures, it is a good idea to mark the placement of the buttons or other closures on the cardigan. Use a ruler or measuring tape to ensure that the closures are evenly spaced. Once you have marked the placement, sew on the closures securely, making sure to reinforce the stitching to ensure durability.
Adding buttons or other closures to your beginner knit cardigan is a simple yet important step in completing your garment. Choose a closure option that matches your style and the overall look of the cardigan, and enjoy wearing your cozy and stylish creation!
Tips and Tricks for a Polished Finish
When it comes to knitting a beginner cardigan, it’s important to pay attention to the finishing touches. These final steps can make all the difference in achieving a polished and professional-looking garment. Here are some tips and tricks to help you finish your knit cardigan with finesse.
1. Blocking
Blocking is a crucial step in the finishing process. It involves wetting the knit fabric and shaping it to the desired measurements, then allowing it to dry flat. This helps even out the stitches, relax the fibers, and give the cardigan its proper shape. Follow the blocking instructions in your pattern to ensure the best results.
2. Seaming
Seaming is where you join the different pieces of your cardigan together. Take your time with this process to ensure neat and strong seams. Use a mattress stitch or a whip stitch for invisible and sturdy seams. Make sure to align the edges evenly and use stitch markers to keep everything in place.
3. Buttonholes and Buttons

If your cardigan has button closures, pay attention to the placement and size of the buttonholes. They should be evenly spaced and sized to fit your buttons. Reinforce the edges of the buttonholes with a few extra stitches to prevent stretching. Choose buttons that complement your cardigan and sew them securely.
4. Weaving in Ends
Don’t forget to weave in the ends of your yarn to give your cardigan a clean and polished look. Use a yarn needle to carefully weave the loose ends into the fabric, making sure they are secure and hidden. Trim any excess yarn, being careful not to cut any of the stitches.
5. Finishing Touches
Consider adding some finishing touches to enhance the overall look of your cardigan. This could include picking up stitches around the neckline or sleeves to add ribbing or a decorative edge. You can also sew on a cute label or add some embellishments like buttons or embroidery to personalize your cardigan.
By following these tips and tricks, you’ll be able to achieve a polished finish for your beginner knit cardigan. Don’t be afraid to take your time and pay attention to the small details – it will be well worth it in the end!