
Knitting baby hats is a delightful and rewarding project for any knitter. Not only are they quick to finish, but they also make for thoughtful and heartfelt gifts. If you’re new to knitting or looking for a simple pattern to try using circular needles, we’ve got you covered. In this article, we’ll guide you through an easy knit baby hat pattern using circular needles. Whether you’re knitting for your own little one or a loved one’s newborn, this pattern is perfect for beginners.
The beauty of using circular needles for this project is that they allow you to seamlessly knit in the round. With no need to switch needles or sew seams together, you can create a beautifully finished hat in no time. Circular needles also provide a more ergonomic and comfortable knitting experience, making them ideal for longer knitting sessions.
Our easy knit baby hat pattern features a simple ribbed brim and a basic stockinette stitch body. The brim can be adjusted for a snug fit by increasing or decreasing the number of cast-on stitches, and the body can be knit to any desired length. This versatility allows you to customize the hat to perfectly fit the baby’s head size and style preference.
Easy Knit Baby Hat Pattern Circular Needles
If you’re looking for a quick and easy knitting project to make a baby hat, using circular needles can be a great option. Circular needles are perfect for knitting in the round and can make the process much faster and easier. Plus, they eliminate the need for seaming, which can be a big time-saver.
One easy knit baby hat pattern that you can try is the classic ribbed baby hat. This pattern is perfect for beginners and can be customized with different colors and yarns. To create this hat, you’ll need a set of circular needles in the appropriate size for your chosen yarn, as well as a yarn needle for weaving in ends.
To start, cast on the desired number of stitches onto your circular needles. You can use a long-tail cast-on or any other cast-on method you’re comfortable with. Once you have your stitches cast on, join in the round by placing a marker and making sure the stitches are not twisted.
Next, you’ll begin the ribbing pattern. This is done by alternating knitting and purling stitches in a specific pattern. For example, you could knit 2 stitches, purl 2 stitches, and repeat this pattern until the end of the round. Continue this ribbing pattern for the desired length of the hat.
Once you’ve reached the desired length, you can switch to knitting every stitch in the round to create the body of the hat. This is known as the stockinette stitch. Continue knitting in the round until the hat is the desired height.
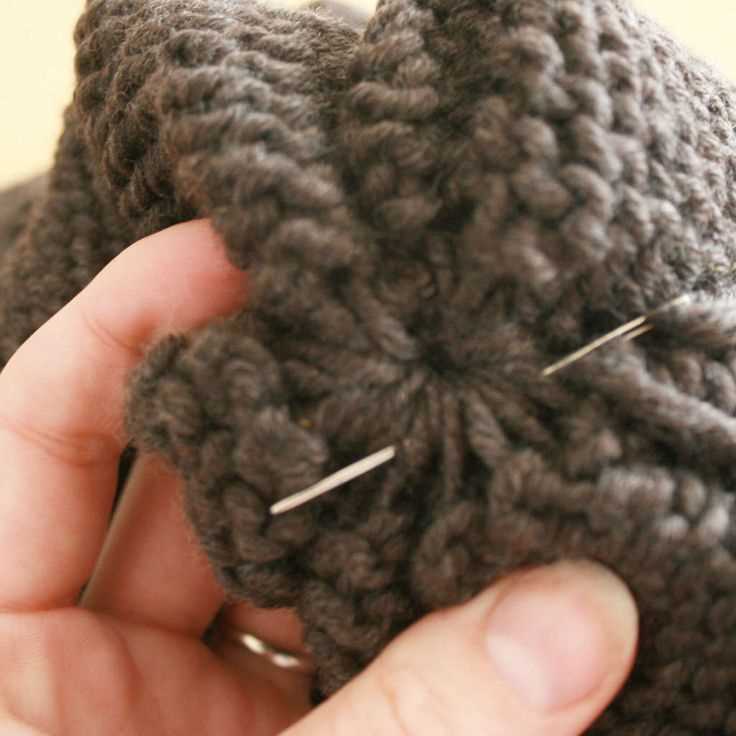
To finish off the hat, you can create a simple decrease at the top. This can be done by knitting 2 stitches together, and then knitting the next 2 stitches together, and repeating this decrease pattern until you have a few stitches left. Then, cut the yarn, leaving a long tail. Thread the tail through the remaining stitches and pull tight to close the top of the hat. Finally, weave in any loose ends with a yarn needle.
This easy knit baby hat pattern is a great project for beginners and can be completed in just a few hours. It’s perfect for gifting or donating to newborns in need. So grab your circular needles and start knitting!
Materials You Need for Knitting a Baby Hat with Circular Needles
When knitting a baby hat with circular needles, it is important to have the right materials on hand. Here is a list of items you will need to complete this project:
Circular Needles

First and foremost, you will need a set of circular knitting needles. These needles have a flexible cable that connects the two needle tips, allowing you to knit in the round. Circular needles are ideal for projects like baby hats that require a seamless finish.
Yarn
Next, you will need a suitable yarn for knitting the baby hat. Choose a soft and lightweight yarn that is gentle on a baby’s delicate skin. Consider using a yarn with natural fibers such as cotton or bamboo, as these materials are breathable and hypoallergenic. It is also important to select a yarn that is machine washable for easy care.
Stitch Markers

Stitch markers are essential tools for keeping track of your stitches when knitting in the round. These small plastic or metal rings can be placed on your needle to mark specific stitches or sections of your pattern. They help you keep your place and ensure that you are knitting the correct number of stitches.
Darning Needle
A darning needle, also known as a yarn needle or tapestry needle, is necessary for weaving in loose ends and finishing your knitting project. This needle has a large eye and a blunt, rounded tip, making it easy to thread yarn through and sew it into your work.
Scissors
A pair of sharp scissors is essential for cutting yarn and trimming any excess ends. Choose a pair of scissors that are small and portable, making them easy to carry around with your knitting project.
Tape Measure or Ruler
Finally, you will need a tape measure or ruler to ensure that your baby hat is the correct size. Taking accurate measurements will help you achieve the desired fit and ensure that the hat is comfortable for the baby to wear.
Choosing the Right Circular Needles for Knitting a Baby Hat
When it comes to knitting a baby hat, choosing the right circular needles is an important decision. Circular needles are a great option for knitting smaller projects like hats because they offer flexibility and allow you to knit in the round without the need for seam stitching. Here are some factors to consider when selecting the perfect circular needles for your baby hat project.
Firstly, it’s important to choose the right size of circular needles. The size of the needles will determine the gauge and the overall size of the hat. For a baby hat, smaller needles are typically used to create a tight and snug fit. You can find circular needles in various sizes, so make sure to check the pattern requirements to ensure you have the correct size.
Another aspect to consider is the length of the circular needles. For knitting a baby hat, shorter circular needles are preferred as they are easier to handle and can better accommodate the smaller circumference of the hat. A 16-inch circular needle is usually a good option for baby hat knitting projects.
Material is another important factor to think about when choosing circular needles for a baby hat. The most common materials for circular needles are bamboo, wood, metal, and plastic. Each material has its own characteristics, such as flexibility, weight, and smoothness. For a baby hat, it’s best to choose needles made of a smooth and lightweight material to ensure comfort for the baby’s delicate skin.
In conclusion, when knitting a baby hat using circular needles, it’s crucial to choose the right size and length of needles, as well as consider the material. Taking these factors into account will help you achieve the desired fit, ease of knitting, and comfort for your little one.
Understanding the Basics of Knitting with Circular Needles
Knitting with circular needles is a popular method for creating seamless projects such as hats, socks, and sweaters. Unlike traditional straight needles, circular needles have two pointed ends connected by a flexible cable. This allows you to knit larger or smaller projects with ease, eliminating the need to constantly switch needles. With a little practice, knitting with circular needles can become an essential technique in your knitting repertoire.
Choosing the Right Circular Needles
When it comes to choosing circular needles, there are a few important factors to consider. The first is the length of the cable. The length should be chosen based on the circumference of your project. For hat knitting, a 16 inch or 40 cm cable is typically sufficient. However, for larger projects like sweaters, you may need a longer cable.
Another factor to consider is the material of the needles. Circular needles can be made from various materials such as bamboo, wood, metal, or plastic. The choice of material is largely a personal preference, but some knitters find that certain materials are better suited for specific projects. For example, wood or bamboo needles may be preferred for delicate yarns, while metal needles may be better for projects that require speed or durability.
Knitting in the Round
One of the main advantages of circular needles is the ability to knit in the round. This means that you can create seamless projects without any seams or stitches to sew together later. To knit in the round, simply cast on the required number of stitches onto the circular needles, ensuring that the stitches are evenly distributed around the cable. Then, join the ends of the stitches together, being careful not to twist the stitches. You can then begin knitting in a continuous spiral, using either the stockinette stitch or any other desired stitch pattern.
It’s important to note that when knitting in the round, you will need to use a different technique for certain stitches, such as purling or creating ribbing. Instead of turning the work, you will need to learn how to work these stitches from the opposite side. However, once you get the hang of it, knitting in the round with circular needles can be a rewarding and efficient method.
Circular Needles Tips and Tricks
To make your knitting experience with circular needles even more enjoyable, here are a few tips and tricks:
- Use stitch markers to keep track of your rounds, especially if you’re working on a pattern that requires increases or decreases.
- Try using a shorter cable length for small projects to keep the stitches more compact and easier to manage.
- Experiment with different needle sizes to achieve the desired gauge and fabric drape for your project.
- If you’re finding it difficult to slide the stitches along the cable, you can use a little bit of baby powder or wax to make them glide more smoothly.
By understanding the basics of knitting with circular needles and practicing a few essential techniques, you’ll be able to create beautiful seamless projects with ease. So grab your circular needles and start knitting!
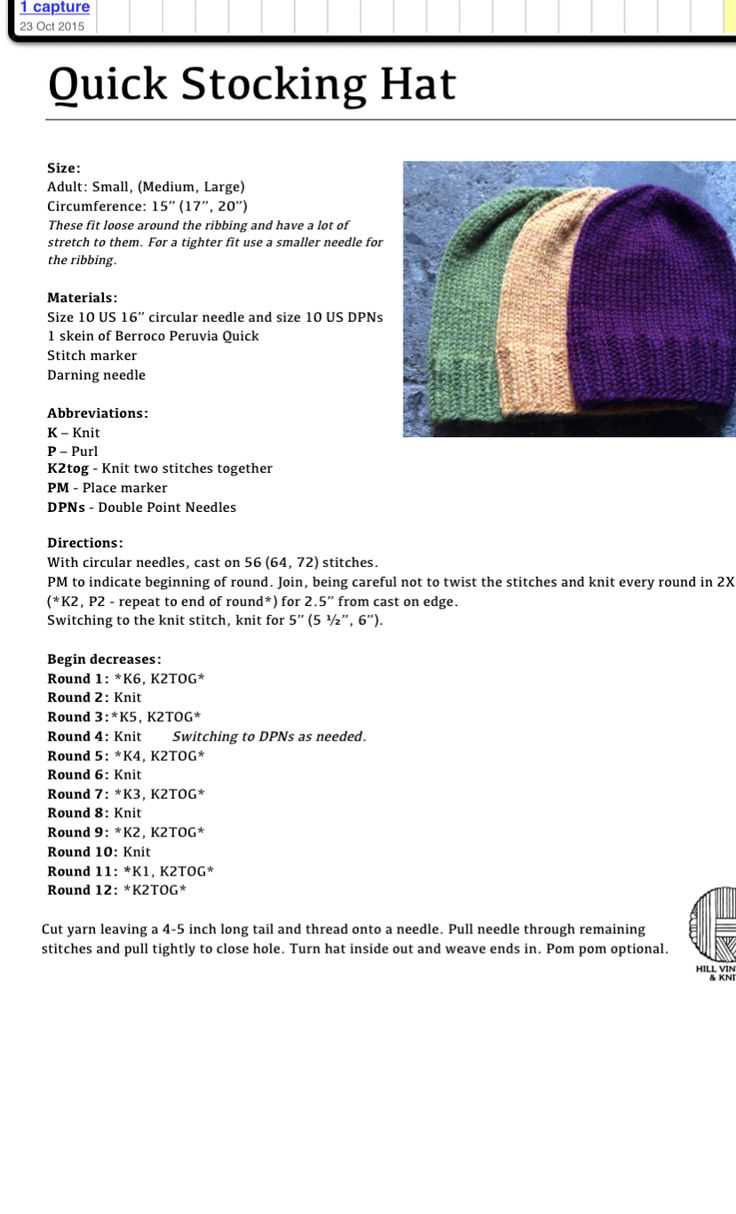
Step-by-Step Instructions for Knitting a Baby Hat with Circular Needles

Knitting a baby hat with circular needles is a fun and rewarding project that can be completed in just a few hours. With the right materials and a basic understanding of knitting techniques, you can create a cozy and adorable hat for the little one in your life. Follow these step-by-step instructions to get started.
Materials:
- Circular knitting needles (size 8)
- Worsted weight yarn
- Stitch marker
- Tapestry needle
Step 1: Cast On
Begin by casting on 72 stitches onto your circular needles. This will create the brim of the hat and provide a comfortable fit for the baby’s head. Use a long-tail cast on method or your preferred cast on method.
Step 2: Join and Place Marker
After casting on, join the round by bringing the last stitch you cast on to meet the first stitch. Be careful not to twist the stitches. Place a stitch marker to mark the beginning of the round.
Step 3: Knit Ribbing
To create a ribbed brim, knit two stitches, then purl two stitches, repeating this pattern until you reach the end of the round. Continue this knit 2, purl 2 pattern for approximately 1 inch or desired length for the brim.
Step 4: Knit in Stockinette Stitch
Once you have completed the ribbing, continue knitting in stockinette stitch (knit every stitch) for the body of the hat. Knit every round until the hat measures approximately 5 inches from the cast on edge.
Step 5: Decrease Rounds
To shape the crown of the hat, you will need to decrease the number of stitches. Begin by knitting 6 stitches, then knit 2 stitches together. Repeat this pattern until the end of the round. On the next round, knit all stitches. Continue alternating these two rounds until you have 8 stitches remaining.
Step 6: Finishing
Cut the yarn, leaving a long tail. Thread the tail through a tapestry needle and slide it through the remaining stitches. Remove the needles and pull the tail tightly to close up the top of the hat. Weave in any loose ends and trim excess yarn.
Congratulations! You have successfully knitted a baby hat with circular needles. This hat will keep the little one warm and stylish. Customize it with different yarn colors or add a cute pom-pom for extra flair. Enjoy the process of knitting and gifting this special handmade item.
Tips and Tricks for Knitting the Perfect Baby Hat
Knitting a baby hat can be a fun and rewarding project, but it’s important to make sure that the final product is cozy, comfortable, and well-fitting. Here are some tips and tricks to help you knit the perfect baby hat using circular needles.
Choose the Right Yarn:
When knitting a baby hat, it’s important to choose a soft and gentle yarn that won’t irritate the baby’s sensitive skin. Look for yarns that are specifically made for baby items, as they are often made from hypoallergenic materials and have a soft and smooth texture. Avoid yarns that have any scratchy or rough fibers, as they can cause discomfort to the baby.
Use the Right Size Needles:
Using the right size circular needles is crucial for achieving the correct gauge and ensuring that the hat fits the baby’s head properly. Refer to the pattern’s gauge information and use the recommended needle size to achieve the desired tension. If your gauge doesn’t match the pattern, try using a different needle size to adjust it accordingly.
Pay Attention to Tension:

Consistent tension is essential for knitting a baby hat that fits well. Make sure to maintain a steady tension throughout your knitting, neither too tight nor too loose. A good tip is to give your work a little tug after each stitch to ensure an even tension. It’s also helpful to periodically measure your gauge as you progress to ensure that you’re on track.
Consider Adding Ribbing:

Adding ribbing to the brim of the baby hat can provide extra stretch and help ensure a snug fit. Ribbing creates a flexible band that can accommodate different head sizes and also helps keep the hat in place. Consider using a 1×1 rib or a 2×2 rib pattern for the brim of the hat to give it a nice stretch.
Add a Cute Embellishment:
Once the basic hat is complete, consider adding a cute embellishment to make it extra special. You can add a pom-pom, a knitted flower, or even a small animal-shaped applique. Just make sure to choose an embellishment that is securely attached to the hat, as loose parts can be a choking hazard for babies.
By following these tips and tricks, you’ll be able to knit a baby hat that is not only adorable but also comfortable and well-fitting. Happy knitting!
Customizing Your Baby Hat with Embellishments and Decorations
Once you have completed the basic pattern for your easy knit baby hat using circular needles, you can take it to the next level by adding embellishments and decorations. These small details can make a big difference in the overall look of the hat and can be customized to suit your personal style or the theme of the baby’s nursery.
1. Pom Poms: Adding a pom pom to the top of the hat is a classic and fun way to embellish your baby’s hat. You can use a contrasting yarn color to make the pom pom stand out, or choose a neutral color that matches the rest of the hat. You can easily make pom poms using a pom pom maker or by wrapping yarn around a cardboard template.
2. Ribbons and Bows: Another option for embellishing your baby hat is to add ribbons or bows. You can sew a ribbon around the base of the hat or attach a bow to the front or side. This adds a touch of femininity and can be a cute addition to a baby girl’s hat.
3. Embroidery: If you have basic embroidery skills, you can add small designs or motifs to your baby hat. This could be as simple as stitching the baby’s name or initials onto the hat, or you could create more intricate designs such as flowers, animals, or geometrical patterns. Embroidery adds a personal touch and allows you to create a one-of-a-kind hat for your baby.
4. Appliqués: Appliqués are fabric or felt shapes that can be sewn onto your baby hat. You can find pre-made appliqués in craft stores or make your own using fabric scraps. Popular choices for baby hats include animals, flowers, hearts, or stars. Appliqués are a great way to add texture and interest to your hat.
5. Buttons: Sewing buttons onto your baby hat can also add a decorative touch. Choose buttons that are safe for babies, with no small parts that could pose a choking hazard. You can sew the buttons on in a specific pattern or randomly, depending on your preference. Just make sure they are securely attached so they don’t come loose when the hat is worn.
By customizing your baby hat with embellishments and decorations, you can create a unique and personalized accessory for your little one. Whether you choose pom poms, ribbons, embroidery, appliqués, or buttons, these small details will make your baby’s hat stand out and become a cherished keepsake for years to come.
Caring for Your Knitted Baby Hat
A knitted baby hat is a delicate and precious piece of clothing for your little one. It not only provides warmth and comfort but also adds an adorable touch to their outfit. To ensure that your baby’s hat stays in great condition, it’s important to care for it properly. Here are some tips on how to care for your knitted baby hat:
Hand wash: The best way to clean a knitted baby hat is by hand washing it. Fill a basin or sink with lukewarm water and add a gentle detergent suitable for delicate fabrics. Gently swirl the hat in the soapy water, paying extra attention to any stained areas. Rinse the hat thoroughly with cool water to remove all the soap.
Flat drying: After washing, reshape the hat by carefully stretching it back into its original shape. Lay it flat on a clean towel or drying rack, making sure it is not hanging or folded, as this can cause it to lose its shape. Avoid placing the hat in direct sunlight or near a source of heat, as this can damage the fibers.
Storage: When your baby is not wearing the hat, store it in a clean and dry place. Avoid storing it in a plastic bag or container, as this can trap moisture and lead to mold or mildew. Instead, consider using a breathable cotton bag or wrapping it in tissue paper to protect it from dust and dirt.
Gentle spot cleaning: If your baby’s hat gets a small stain, you can try spot cleaning it. Dampen a clean cloth with water and a mild detergent, then gently dab the stained area. Avoid rubbing or scrubbing, as this can cause the fibers to become damaged. Rinse off the detergent and let the hat air dry.
Handle with care: When putting on or taking off the hat, make sure to handle it gently. Avoid pulling or stretching the hat too forcefully, as this can cause it to lose its shape or even tear. Instead, use a gentle touch to ensure the hat stays in great condition.
By following these care instructions, you can keep your knitted baby hat looking like new for years to come. Remember to give it the same love and care you give to your little one!
Alternative Patterns for Knitting Baby Hats on Circular Needles
In the world of knitting, baby hats are always a popular project. They are small, quick to make, and perfect for practicing new techniques. Circular needles are a popular choice for knitting baby hats, as they allow you to easily work in the round without the need for seam sewing. However, if you’re looking for alternative patterns for knitting baby hats on circular needles, there are several options to consider.
1. Magic Loop Method
The magic loop method is a technique that allows you to knit small circumference projects, such as baby hats, using a long circular needle. Instead of using double-pointed needles or a shorter circular needle, you can use a longer circular needle and create a loop to work on a small number of stitches at a time. This method eliminates the need for changing between different needles and is great for those who prefer not to work with multiple needles.
2. Two Circular Needles
Another alternative pattern for knitting baby hats on circular needles is using two circular needles of the same size. With this method, you divide your stitches between two circular needles and work them simultaneously. This allows you to easily work in the round and can be a good option if you find the magic loop method challenging or if you simply prefer working with two needles.
3. Interchangeable Circular Needles
If you already own a set of interchangeable circular needles, you can easily customize the length of your circular needle for knitting baby hats. Simply attach the appropriate needle tips to a flexible cable and choose a length that suits the size of your project. This gives you the flexibility to create a circular needle with any length you need, making it suitable for knitting baby hats or other small circumference projects.
These alternative patterns for knitting baby hats on circular needles provide options for those who may not be comfortable with the traditional method or who are looking for different techniques to try. Whether you choose the magic loop method, two circular needles, or interchangeable circular needles, they all offer the convenience and ease of working in the round without the need for seam sewing.
Exploring Other Projects You Can Make with Circular Needles
Once you’ve mastered knitting baby hats with circular needles, you may be excited to explore other projects that can be made using this versatile tool. Circular needles can be used to knit a wide variety of garments and accessories, making them a great addition to any knitter’s toolbox.
1. Sweaters and Cardigans: Circular needles are perfect for knitting seamless sweaters and cardigans. With the ability to knit in the round, you can create a garment without the need for sewing or seaming. This makes for a more comfortable fit and a neater finished product.
2. Socks: Knitting socks on circular needles is a popular technique that eliminates the need for double-pointed needles. By using the magic loop method, you can comfortably knit small circumference projects, such as socks, without the hassle of juggling multiple needles.
Tip: When knitting socks on circular needles, using a smaller cable length, such as 9 or 12 inches, can make the process easier and more comfortable.
3. Cowls and Scarves: Circular needles are great for creating seamless accessories like cowls and scarves. Knitting in the round allows you to easily create a continuous loop that can be worn around the neck or wrapped multiple times for added warmth.
4. Hats and Beanies: In addition to baby hats, circular needles are also ideal for knitting hats and beanies of all sizes. By knitting in the round, you can create a seamless hat with no visible seams, giving it a clean and professional look.
5. Blankets and Afghans: Circular needles can also be used to create large, cozy blankets and afghans. By using circular needles with a long cable length, you can easily accommodate the large number of stitches required for these types of projects. This also allows you to work on smaller sections at a time, making it more manageable and portable.
These are just a few examples of the many projects you can make using circular needles. Whether you prefer larger garments or smaller accessories, circular needles offer a convenient and versatile knitting tool that can help you bring your creative ideas to life.
Share Your Baby Hat Knitting Experience with the Community

After completing your adorable baby hat using the easy knit pattern with circular needles, don’t forget to share your experience with the knitting community. Whether you faced challenges or found the pattern to be a breeze, your feedback can be really helpful to other knitters who are looking to create the same hat.
Sharing your experience can be done in a variety of ways. Here are a few suggestions:
- Online Communities: Join knitting forums or groups on social media platforms like Facebook or Ravelry to share your journey. You can post pictures, describe your process, and answer any questions others may have.
- Blog or Website: If you have a knitting-related blog or website, dedicate a post to your baby hat project. Write about your inspiration, the pattern, and any modifications you made. Don’t forget to include pictures of your finished hat!
- Videos: Create a tutorial or vlog-style video demonstrating how you knitted the baby hat. This can be a great way to visually guide others through the process and share your tips and tricks.
By sharing your baby hat knitting experience, you can inspire and encourage fellow knitters while fostering a sense of community. You never know who might stumble upon your post or video and find the motivation to start their own baby hat project.
Remember, the knitting community is all about supporting and learning from each other. Your contribution can make a difference and help others on their knitting journey. So don’t hesitate to share your experience and spread the joy of knitting!