
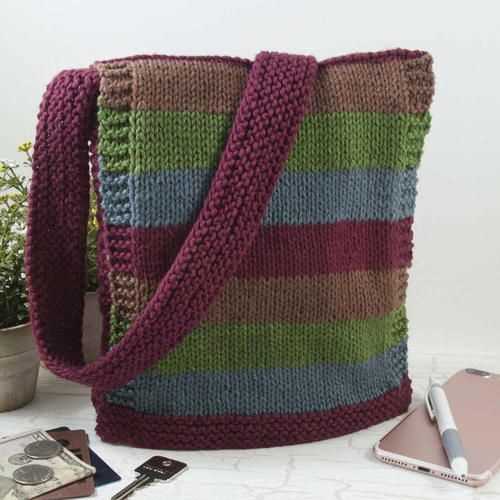
If you love knitting and want to create a stylish and functional bag, then this knit messenger bag pattern is perfect for you. The Messenger bag is a versatile accessory that can be used for work, school, or running errands. It’s a great way to show off your knitting skills and create a unique and personalized bag that fits your style.
This pattern is suitable for intermediate knitters and requires basic knitting skills such as casting on, knitting, purling, and binding off. The bag is knit in a sturdy and durable stitch pattern, making it durable enough to hold all your essentials.
The pattern includes detailed instructions and a stitch chart to help you create the perfect bag. You can customize the bag by choosing your favorite colors and adding embellishments such as buttons or a fabric lining. Whether you’re a beginner or an experienced knitter, this pattern allows you to create a beautiful and functional bag that you’ll be proud to carry with you everywhere.
Knit Messenger Bag Pattern
A knit messenger bag is a stylish and practical accessory that you can make yourself. Whether you’re a seasoned knitter or just starting out, this pattern is perfect for all skill levels. With its simple yet functional design, this bag is great for carrying your everyday essentials, such as books, notebooks, and electronics.
To create this knit messenger bag, you’ll need a few basic knitting skills, including casting on, knitting in the round, and decreasing. You’ll also need some yarn and knitting needles in the appropriate size for your chosen pattern. The great thing about this pattern is that you can customize it to fit your preferences and style. You can choose from a variety of yarn colors and textures to create a bag that suits your taste.
Materials:
- Size 8 knitting needles
- Worsted weight yarn in your choice of color
- Yarn needle
- Scissors
- Button or snap closure (optional)
Instructions:
- Cast on 60 stitches using your chosen color of yarn.
- Join in the round, being careful not to twist your stitches.
- Knit in a rib pattern (k1, p1) for 4 inches.
- Switch to stockinette stitch and knit for 12 inches.
- Begin shaping the flap by knitting 4 stitches, then binding off 16 stitches. Knit to the end of the round.
- Continue knitting in stockinette stitch for 10 inches.
- To create the strap, knit 8 stitches, then bind off 44 stitches. Knit to the end of the round.
- Knit for 2 inches, then bind off all stitches.
- Using a yarn needle, weave in any loose ends.
- If desired, sew a button or snap closure onto the flap for added security.
Once you’ve finished knitting and assembling your messenger bag, you’ll have a stylish and functional accessory that you can use every day. This bag makes a great gift for friends and family, and you can even customize it with embroidery or other embellishments to make it truly unique. So grab your knitting needles and get started on your own knit messenger bag today!
Materials Needed
In order to create a knit messenger bag, you will need the following materials:
- Knitting Needles: Size 8 (5mm) circular knitting needles, 24 inches long
- Yarn: Worsted weight yarn, approximately 500 yards
- Tapestry Needle: A large eye blunt needle for weaving in ends
- Stitch markers: To mark the beginning of rounds
- Scissors: To cut the yarn
- Button: A decorative button for the bag closure
These materials will provide you with everything you need to knit your own messenger bag. Please note that the size of the bag may vary depending on your personal knitting tension and needle size.
Choosing the Right Yarn
When it comes to knitting a messenger bag, choosing the right yarn is crucial for achieving the desired results. The yarn you choose will not only determine the look and feel of the finished bag, but also its durability and functionality.
Fiber Content: One of the first things to consider when selecting yarn for your messenger bag is the fiber content. Different fibers have different properties, which will affect the bag’s performance and care instructions. For a sturdy and durable bag, consider using yarns with high amounts of wool or acrylic. These fibers are known for their strength and ability to withstand everyday wear and tear. Cotton yarns are also a popular choice for bags, as they are breathable and often machine washable.
Weight: The weight of the yarn will also play a role in the final outcome of your bag. Lighter weight yarns, such as fingering or sport weight, are often used for delicate or lightweight bags. They create a more drapey and softer fabric, which can be suitable for a casual or bohemian style bag. On the other hand, heavier weight yarns, like worsted or bulky, will produce a sturdier and more structured bag that can hold its shape well.
Color and Texture: The color and texture of yarn will contribute to the overall aesthetic of your bag. When choosing a color, consider the intended use of the bag and your personal style. Neutral colors like black, gray, or brown can be versatile and match a variety of outfits, while bold colors or vibrant patterns can make a statement. As for texture, think about whether you want a smooth and sleek bag or one with more texture and dimension.
Quantity: Before starting your project, make sure to calculate the amount of yarn you’ll need. This will depend on the pattern you’re following and the size of the bag you want to make. It’s always better to have a little extra yarn than to run out in the middle of your project. Look for the yarn label for information on yardage and suggested needle size.
In conclusion, choosing the right yarn for your messenger bag is essential for creating a bag that not only looks great but also meets your functionality needs. Consider factors such as fiber content, weight, color, and texture to find the perfect yarn for your project. Happy knitting!
Gauge and Swatching
When starting a knitting project, it is important to determine the gauge, or the number of stitches and rows per inch, in the desired pattern. This is crucial because the gauge affects the overall size and fit of the final product. To ensure an accurate gauge, it is recommended to knit a swatch before diving into the main project.
What is a swatch?
A swatch is a small sample piece of knitting that is worked using the same stitch pattern and needle size as the main project. It allows the knitter to check if their knitting matches the required gauge. Swatching is an essential step in any knitting project, as it helps to ensure that the final product will be the desired size and fit.
Importance of Gauge
Gauge is important because it determines how the finished project will turn out. If the gauge is too large, the final product will be too big, and if the gauge is too small, the final product will be too small. This is especially crucial for garments, as improper gauge can result in ill-fitting items that do not look as intended.
Additionally, gauge is crucial for ensuring that the yarn and needle size used in the pattern will create the desired fabric. Using a different gauge can result in differences in drape, elasticity, and overall appearance of the finished project. It is important to note that individuals knit with different tension, so it is essential to determine your own gauge instead of relying solely on the gauge provided in the pattern.
How to Swatch
To create a swatch, start by casting on a few extra stitches than the specified stitch count, this will allow for a more accurate measurement. Knit a few rows in the stitch pattern specified in the pattern, then continue knitting in stockinette stitch (knit on the right side, purl on the wrong side) for several inches. Remember to knit with the same needles and tension as you would for the main project.
Once the swatch is complete, bind off and gently block the swatch by washing and laying it flat to dry. Then, using a ruler or measuring tape, measure the number of stitches and rows in a given inch of the swatch. Compare these measurements to the gauge specified in the pattern. If the swatch does not match the gauge, adjust the needle size accordingly and knit another swatch until the desired gauge is achieved.
Conclusion
Taking the time to swatch and check gauge is an important step in any knitting project. It ensures that the final product will have the correct size and fit and can help prevent frustration and disappointment. By following the correct swatching technique and making necessary adjustments, knitters can create beautiful, well-fitting items that they can be proud of.
Knitting Techniques
Knitting is a versatile craft that allows knitters to create a variety of textures and patterns using different techniques. Whether you’re a beginner or an experienced knitter, it’s essential to have a good understanding of various knitting techniques to ensure your projects turn out beautifully.
Casting On: The first step in any knitting project is casting on. This technique creates the foundation row of stitches on your needle. There are different methods to cast on, including the long-tail cast on, which is commonly used and creates a neat and elastic edge.
Knit Stitch: The knit stitch is the most basic stitch in knitting. It creates a smooth and flat fabric and is often used as the main stitch in many patterns. To knit, simply insert your right needle into the front of the stitch on the left needle, wrap the yarn around the needle, and pull it through the stitch, sliding the old stitch off the left needle.
Purl Stitch: The purl stitch is the reverse of the knit stitch and creates a bumpy texture on the fabric. To purl, insert your right needle into the front of the stitch on the left needle, but this time, bring the yarn to the front of the work, wrap it around the needle, and pull it through the stitch as you slide it off the left needle.
Increasing and Decreasing: Increasing and decreasing stitches are essential techniques in shaping your knitting projects. Common methods for increasing include yarn over, where you create a new stitch by simply wrapping the yarn around the needle, and knitting into the front and back of a stitch. Decreasing methods include knit two stitches together, where you knit two stitches as if they were one, and slip, slip, knit, where you slip two stitches individually knitwise, then insert the left needle into the front of both stitches and knit them together.
Finishing: Once you’ve completed your knitting project, it’s important to finish it off neatly. This may involve weaving in loose ends, blocking the finished piece to shape it, or adding any necessary finishing touches like buttons or zippers. These finishing techniques give your project a polished look and ensure it will last for years to come.
Knitting the Body of the Bag
Once you have finished knitting the base of your messenger bag, it’s time to start working on the body. The body of the bag will determine the size and shape of your final product, so make sure to follow the pattern carefully.
You will need to continue knitting in the round for the body of the bag. This means that you will be knitting every row without turning your work. Make sure to keep track of your stitches and use stitch markers to mark the beginning of each round.
To create the body of the bag, you can use a simple knit stitch or experiment with different stitch patterns to add texture or design to your bag. You can also change colors or incorporate different yarns to create a unique look.
If you want to add pockets or other features to your bag, make sure to plan ahead and knit the necessary stitches in the right places. You can consult the pattern for guidance on where to place pockets or compartments.
Once you have completed the desired number of rows for the body of the bag, you can start working on the straps or handles. This will involve knitting separate pieces that will be attached to the sides of the bag. You can choose to knit flat or in the round for the straps, depending on your preference and the desired look of your bag.
Adding the Handles
Once you have completed knitting the main body of the messenger bag, it’s time to add the handles. These handles will allow you to carry the bag comfortably and securely.
To add the handles, you will need two double-pointed knitting needles and the yarn of your choice. Start by folding the bag in half to find the center point. This is where you will attach the first handle. Thread one of the double-pointed needles through the center stitches, making sure to leave a long tail for sewing later.
Next, divide the remaining stitches evenly on each needle. This will create the first handle. Knit in a pattern of your choice for the desired length of the handle. You can experiment with different stitch patterns or keep it simple with a basic stockinette stitch.
Repeat the process for the second handle, making sure it is aligned with the first handle. Once both handles are complete, use the long tails to securely sew the ends of the handles to the sides of the bag. Make sure to sew them tightly to ensure they can handle the weight of the bag.
Once the handles are securely attached, trim any excess yarn and weave in the ends to finish off your messenger bag. You now have a beautiful and functional knit messenger bag with sturdy handles to carry all your essentials. Enjoy using your new bag or give it as a thoughtful handmade gift!
Knitting the Flap

Once you have completed knitting the body of your messenger bag, it’s time to move on to the flap. The flap is the part of the bag that folds over and secures with a button or a strap. It adds both functionality and style to your bag.
To begin knitting the flap, you will need to pick up stitches along the top edge of the body. This is done by inserting your needle into the stitches along the edge and knitting into them. You can use a contrasting color of yarn for visual interest, or stick with the same color as the body for a more cohesive look.
Once you have picked up the stitches, you can begin knitting the flap in the desired pattern. You can continue with the same stitch pattern as the body, or choose a different one to add some variety. You may also want to incorporate some shaping into the flap, such as decreasing stitches at the sides to create a tapered effect.
As you knit the flap, make sure to periodically check the measurements to ensure that it is the desired length. You can do this by placing the flap on top of the body and measuring the distance from the picked up stitches to the desired point. Adjust your knitting accordingly to achieve the desired length.
Once the flap is the desired length, you can finish off your knitting by binding off the stitches. You can do this using a basic bind off method or choose a more decorative bind off, such as a picot edge. After binding off, weave in any loose ends and your flap is complete.
Adding a Button or Closure

When knitting a messenger bag, one important element to consider is how to close the bag securely. There are several options for adding a button or closure that will keep your belongings safe while also adding a decorative touch to your bag.
1. Button and Buttonhole:
A classic and timeless choice is to add a button and buttonhole to your messenger bag. To do this, decide where you want the button to be placed and knit a corresponding buttonhole. This can be done by binding off several stitches in one row and then casting them back on in the next row. Once the buttonhole is complete, sew the button securely onto the opposite side of the bag. This method provides a secure closure while also allowing for easy access to the bag’s contents.
2. Magnetic Snap:
If you prefer a more modern and sleek closure option, consider adding a magnetic snap to your messenger bag. These snaps consist of two separate pieces – one with a magnet and the other with a metal disc. To install the snap, mark the desired location on the bag and carefully cut a small hole to insert the metal disc. Attach the magnet piece to the inside of the bag and secure it with the provided screws or adhesive. This type of closure is quick and easy to use, making it a convenient option for daily use.
3. Drawstring Closure:
For a casual and versatile closure option, a drawstring can be incorporated into the design of your messenger bag. Knit a channel for the drawstring at the top of the bag by folding over a few rows and leaving an opening. Feed a cord or ribbon through the channel, allowing it to extend beyond the edges of the bag. To close the bag, simply pull the drawstring tight and tie a knot or bow. This closure option provides flexibility in terms of the bag’s capacity and allows for easy access to the contents.
When choosing a button or closure for your knit messenger bag pattern, consider the overall aesthetic you want to achieve as well as the functionality of the closure. Whether you prefer a classic button and buttonhole, a modern magnetic snap, or a casual drawstring closure, adding this element will ensure your bag is both stylish and secure.
Finishing Touches: Blocking and Seaming
Once you have completed knitting your messenger bag, there are a few finishing touches that will give it a polished look. Blocking and seaming are two important steps that will help shape your bag and ensure that it holds its form over time.
Blocking: Before starting the seaming process, it is recommended to block your knitted pieces. Blocking involves wetting your knitting and then shaping it to the desired dimensions. This step helps even out the stitches, relaxes the fibers, and makes the seaming process easier. To block your bag, fill a sink or basin with lukewarm water and add a gentle wool wash. Place your knitted pieces in the water, ensuring they are fully submerged. After soaking for about 15 minutes, gently squeeze out the excess water and lay your pieces flat on a clean towel. Shape them to the correct measurements and let them dry completely.
Seaming: Seaming is the process of stitching together the various parts of your bag to create the final product. To seam your bag, you will need a tapestry needle and matching yarn or thread. Start by positioning the pieces in the correct alignment and use a whip stitch or mattress stitch to join them together. Make sure to match the stitch pattern and tension as closely as possible to create an invisible seam. It is advisable to sew in the ends as you seam each section to minimize the amount of weaving in required at the end. Once all the seams are complete, weave in any remaining loose ends.
To add extra reinforcement and durability, you may also consider adding a lining to your messenger bag. This can help protect the knitted fabric from wear and tear, as well as provide additional pockets and compartments for storage. Cut a piece of fabric to match the dimensions of the bag and sew it in place using a sewing machine or hand stitching. Remember to leave an opening for turning the bag right side out before stitching it closed.
By taking the time to block your knitted pieces and carefully seam them together, you can ensure that your messenger bag looks and feels professional. These finishing touches will not only enhance the overall appearance of your bag but also contribute to its longevity and usability.
Adding Pockets or Compartments (Optional)

One great way to customize your knit messenger bag is by adding pockets or compartments. This will not only make your bag more functional but also allow you to organize your belongings more effectively. Here are some ideas on how to incorporate pockets or compartments into your design:
1. Exterior Pockets
Consider adding exterior pockets to the front or sides of your bag. These pockets can be used to store items that you need quick and easy access to, such as your phone, keys, or wallet. You can create these pockets by knitting separate panels and then attaching them to the main body of the bag.
2. Interior Dividers

If you want to keep the contents of your bag separate and organized, adding interior dividers can be a great option. You can knit these dividers as separate panels and attach them to the inside of the bag. This will create separate compartments that can hold different items, such as a laptop, notebooks, or pens.
3. Zipper or Button Closures
To keep your belongings secure, you can add a zipper or button closure to your pockets or compartments. This will ensure that nothing falls out when you’re on the go. You can sew a zipper or attach buttons to the knit panels, depending on your preference and skill level.
Remember, adding pockets or compartments is optional and depends on your personal preferences and needs. Experiment with different designs and placements to find the perfect configuration for your knit messenger bag.
Embellishing the Bag (Optional)
If you want to add some extra flair to your knit messenger bag, there are several ways you can embellish it. One option is to add buttons or beads to the front flap of the bag. This can add a pop of color and texture to the design. You can sew these embellishments onto the bag using a needle and thread, or use a hot glue gun for a quicker option.
Another way to embellish the bag is to add embroidery or appliqué designs. You can use contrasting yarn to embroider patterns or images onto the bag, or you can cut out fabric shapes and sew them onto the bag using a sewing machine or needle and thread. This can create a personalized and unique look for your messenger bag.
If you’re feeling creative, you can also experiment with different knitting stitches or patterns to add texture to the bag. For example, you can try using a cable stitch or a lace pattern to create interesting details on the front flap or sides of the bag. This can elevate the overall look of the bag and make it stand out.
Finally, consider adding a lining to the inside of the bag for a polished finish. You can choose a fabric that complements the color of the yarn you used for the bag, or opt for a fun and colorful fabric to add an unexpected pop of color when you open the bag. This can add a professional touch and make the bag more durable.
Remember, embellishing the bag is completely optional and depends on your personal taste and style. Feel free to get creative and make the bag your own!
Care Instructions for Your Knit Messenger Bag

Taking care of your knit messenger bag is important to ensure its longevity and maintain its appearance. Here are some care instructions to help you keep your bag in good condition.
1. Hand Wash Only: Knit fabrics are delicate and can easily get damaged in a washing machine. It is best to hand wash your messenger bag using cold or lukewarm water and a gentle detergent. Avoid wringing or twisting the bag, as this can stretch or misshape the knit.
2. Air Dry: After washing, gently squeeze out excess water from the bag and lay it flat to air dry. Avoid using a dryer as it can shrink or damage the fabric. Make sure to reshape the bag and smooth out any wrinkles while it is still damp.
3. Store Properly: When not in use, store your knit messenger bag in a dry and clean place. Avoid folding or squishing the bag for long periods of time, as this can cause creases and distortions in the knit fabric. Instead, fill the bag with tissue paper or a lightweight fabric to help it maintain its shape.
4. Avoid Excessive Weight: While knit fabrics are generally strong, they are not intended to carry heavy loads. Avoid overloading your messenger bag to prevent strain on the straps and potential stretching or tearing of the fabric.
5. Spot Cleaning: In case of minor stains or spills, spot clean the affected area using a mild detergent and a soft cloth or sponge. Gently blot the stain without rubbing, as this can spread the stain or damage the fabric.
Summary:
- Hand wash your knit messenger bag
- Air dry and reshape the bag
- Store in a dry and clean place
- Avoid excessive weight
- Spot clean for minor stains
By following these care instructions, you can ensure that your knit messenger bag remains in great condition and lasts for years to come. Take care of your bag, and it will continue to serve you well on your everyday adventures.