
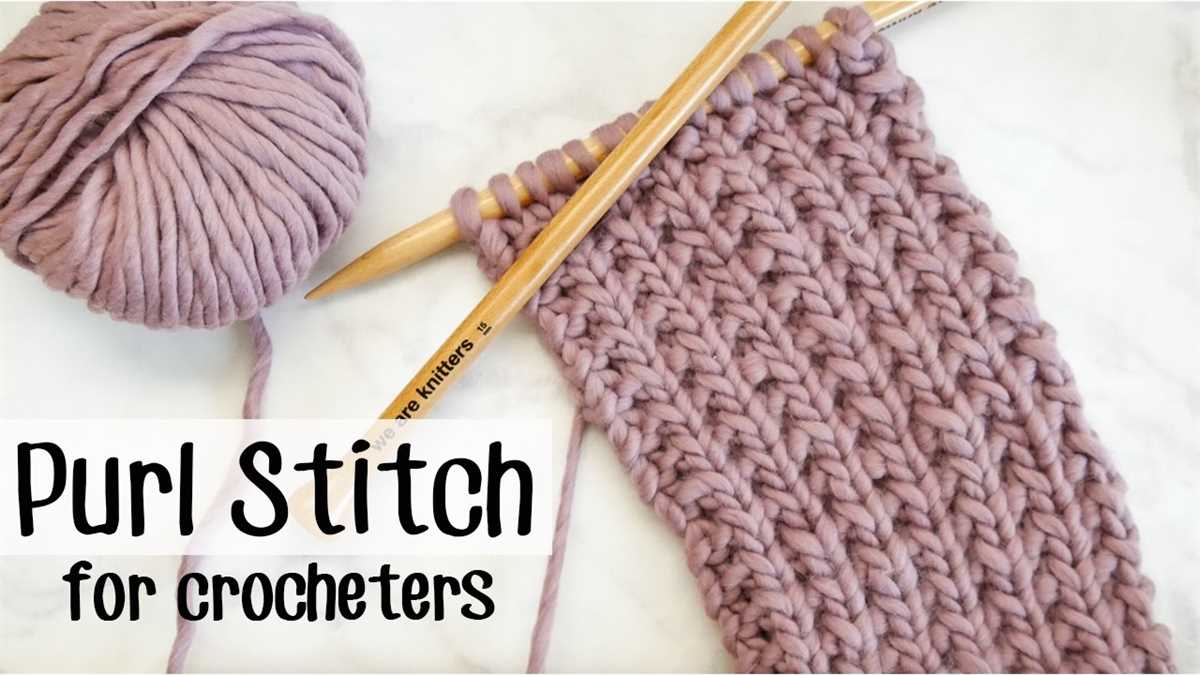
If you’re a beginner knitter looking for a fun and easy project, look no further than knit purl scarf patterns. Knit purl patterns involve using two basic stitches, the knit stitch and the purl stitch, to create a variety of beautiful textures and patterns. They are perfect for practicing your knitting skills while creating a stylish and cozy accessory.
One of the great things about knitting a scarf is that it is a versatile accessory that can be worn in any season. Whether you choose a lightweight yarn for a summer scarf or a chunky yarn for a winter scarf, there are endless possibilities for creating a unique and personalized accessory.
Not only are knit purl scarf patterns easy to follow, they also allow for endless creativity and customization. You can experiment with different stitch patterns, color combinations, and yarns to create a scarf that reflects your personal style. Whether you prefer a classic striped pattern or a more intricate lace design, there is a knit purl scarf pattern out there for everyone.
Easy Knit Purl Scarf Patterns
1. Garter Stitch Scarf

The garter stitch is one of the simplest stitch patterns in knitting, making it ideal for beginners. To create this scarf, simply cast on the desired number of stitches and knit every row. The result is a squishy, reversible fabric that’s perfect for staying warm during chilly weather.
2. Seed Stitch Scarf
The seed stitch is another easy-to-master stitch pattern that creates a lovely texture. To make this scarf, alternate between knitting and purling every stitch in each row. This simple alternating pattern creates a beautiful texture that looks great on both sides of the scarf.
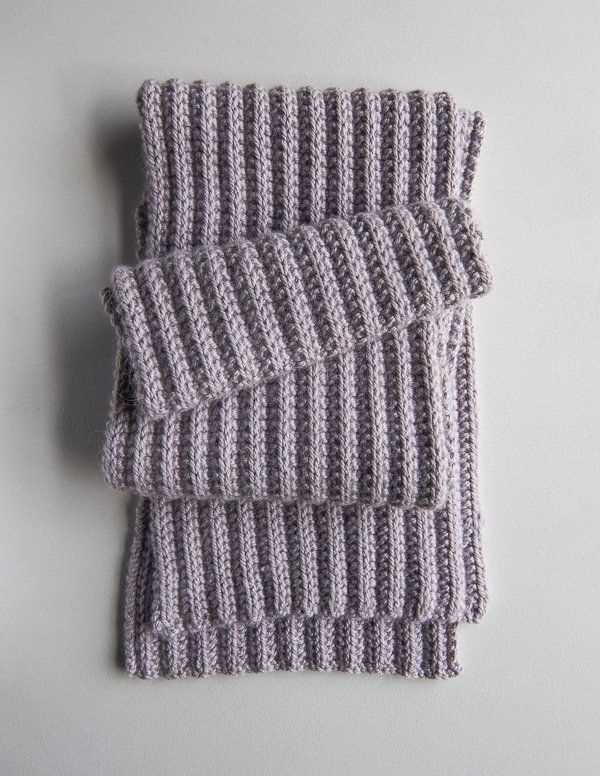
3. Ribbed Scarf
The rib stitch is a classic pattern that adds stretch and flexibility to a scarf. To knit a ribbed scarf, alternate between knitting and purling stitches in a specific pattern, such as knitting 2 stitches, purling 2 stitches. This pattern creates a ribbed fabric that looks stylish and keeps the scarf snug around your neck.
With these easy knit purl scarf patterns, you’ll be able to create beautiful scarves that are not only functional but also showcase your knitting skills. Whether you’re a beginner or an experienced knitter, these patterns offer a fun and rewarding project to work on. So grab your knitting needles and start crafting your own cozy scarves!
Classic Garter Stitch Scarf Pattern

The garter stitch is one of the simplest and most classic stitches in knitting. It is created by knitting every row, resulting in a fabric with ridges and a reversible texture. Garter stitch scarves are perfect for beginners or those looking for a quick and easy knitting project. They also make great gifts!
To create a classic garter stitch scarf, you will need a pair of knitting needles and a ball of yarn. Choose a soft and warm yarn, such as a chunky weight or a cozy wool blend, for an extra cozy scarf. Start by casting on an even number of stitches. You can adjust the width of the scarf by adding or subtracting stitches.
Once you have your stitches on the needle, simply knit every row. The garter stitch pattern is as simple as that! Repeat this process until the scarf reaches your desired length. You can opt for a shorter scarf that sits comfortably around the neck or go for a longer scarf that can be wrapped multiple times.
When you are ready to finish your garter stitch scarf, bind off all the stitches. Weave in any loose ends and your scarf is ready to wear! You can add fringe or tassels to the ends for some extra flair, or leave it as is for a clean and classic look.
The garter stitch scarf is a timeless accessory that can be worn with any outfit and in any season. It is also a great way to practice your knitting skills and perfect your tension. So grab your needles and yarn, and start knitting your own classic garter stitch scarf today!
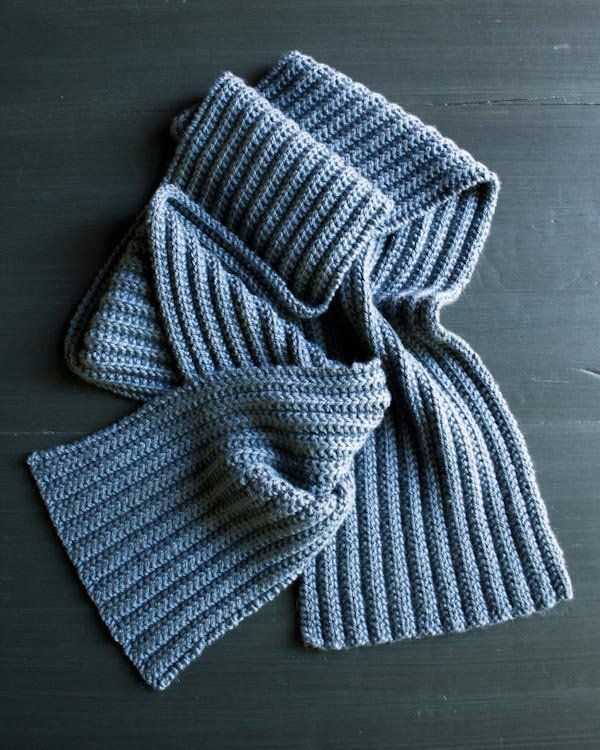
Chunky Ribbed Scarf Pattern
The Chunky Ribbed Scarf Pattern is a simple and stylish knitting project that is perfect for beginners. With just a few basic knitting techniques, you can create a warm and cozy scarf that will keep you stylish and comfortable throughout the colder months.
To create this scarf, you will need chunky weight yarn and a pair of knitting needles. The pattern uses a combination of knit and purl stitches to create a ribbed texture, which adds visual interest and depth to the finished piece.
Begin by casting on an even number of stitches. The width of your scarf will depend on how many stitches you cast on, so adjust accordingly to achieve your desired size. Once you have cast on, the pattern is simply repeating rows of knit and purl stitches.
To create the ribbed texture, alternate between knitting and purling every row. This will create a pattern of raised ribs that give the scarf its unique look and feel. Repeat this pattern until the scarf reaches your desired length, then bind off and weave in any loose ends.
The Chunky Ribbed Scarf Pattern is versatile and can be customized to fit your personal style. You can choose to use any color of yarn you prefer, or even experiment with different yarn textures to create a unique and one-of-a-kind scarf. Whether you are a beginner knitter or an experienced crafter, this pattern is sure to become a favorite in your collection.
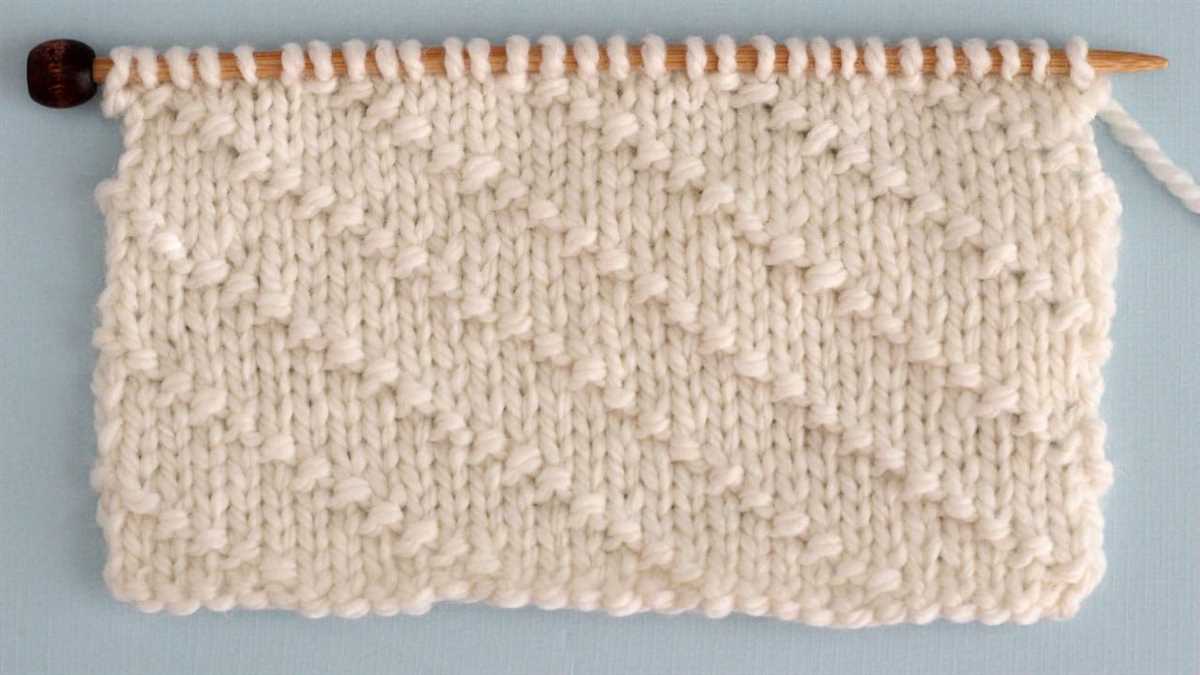
Seed Stitch Scarf Pattern

A seed stitch is a simple knitting pattern that creates a textured fabric with alternating knit and purl stitches. It is a great stitch for beginners as it only requires basic knitting skills and can be used to create a variety of projects, including scarves.
To create a seed stitch scarf, you will need a pair of knitting needles and a ball of yarn in your desired color. Start by casting on an odd number of stitches, as the seed stitch pattern requires an odd number of knit and purl stitches in each row.
Once you have cast on your stitches, begin the seed stitch pattern by knitting the first stitch, then purling the next stitch. Continue this pattern of knitting and purling across the row until you reach the end. On the next row, you will need to start with a purl stitch instead of a knit stitch, as you want to alternate the stitches in each row.
Continue knitting in the seed stitch pattern, alternating knit and purl stitches in each row. This will create a fabric with a textured, bumpy look. Continue knitting in the seed stitch pattern until your scarf reaches your desired length.
Once you have reached the desired length, cast off your stitches to secure the final row. You can then weave in any loose ends of yarn and block your scarf if desired. The seed stitch scarf is now ready to be worn or given as a gift.
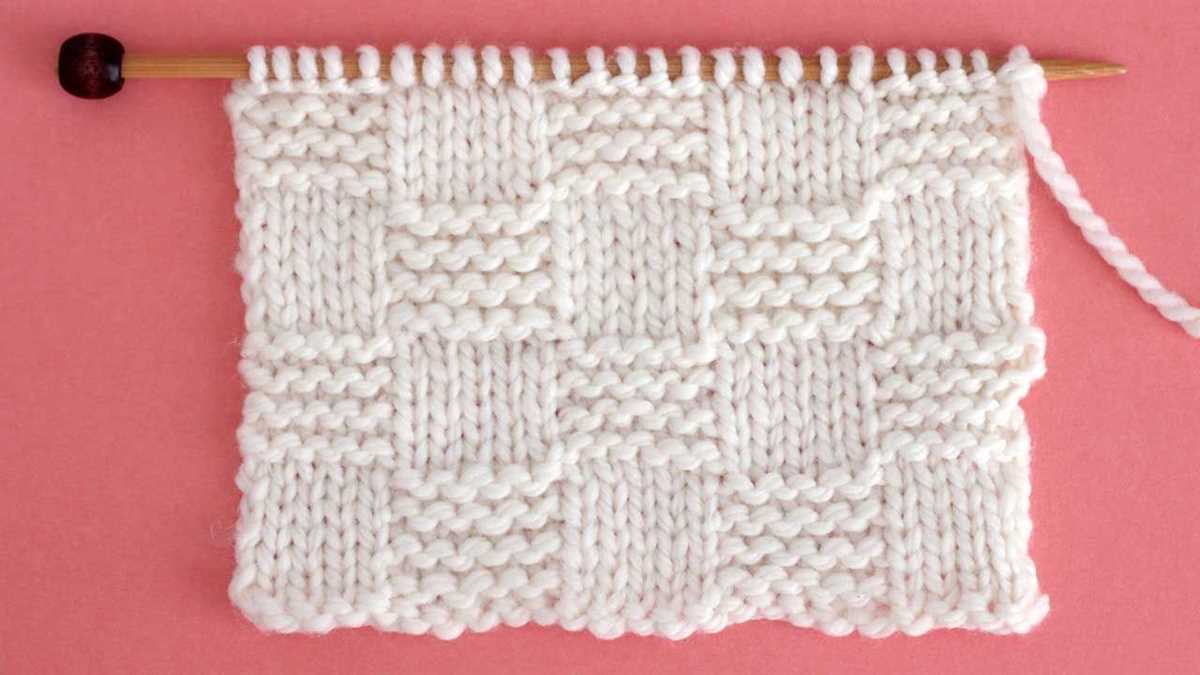
Basketweave Scarf Pattern
A basketweave pattern is a classic and versatile design that adds texture and interest to any knitting project. This pattern is perfect for creating a warm and cozy scarf that will keep you stylish and comfortable during the colder months.
To create a basketweave scarf, you will need to know how to knit and purl. The pattern consists of alternating blocks of knit and purl stitches to create a woven effect. This pattern can be easily adjusted to any width and length, allowing you to customize the size of your scarf.
Materials:
- Size US 8 knitting needles
- Approximately 400-500 yards of worsted weight yarn
- Tapestry needle for weaving in ends
Instructions:
- Cast on an even number of stitches, depending on the desired width of your scarf.
- Row 1: *Knit 8, purl 8*; repeat from * to * until the end of the row.
- Row 2: *Purl 8, knit 8*; repeat from * to * until the end of the row.
- Repeat rows 1 and 2 until your scarf reaches the desired length, ending with a row 2.
- Bind off all stitches in pattern.
- Weave in any loose ends with a tapestry needle.
Once you have completed this pattern, you will have a beautiful basketweave scarf that is perfect for keeping yourself warm or giving as a thoughtful and handmade gift. The alternating knit and purl stitches create a snug and cozy fabric that is both stylish and functional. Experiment with different yarn colors and textures to create a scarf that matches your personal style.
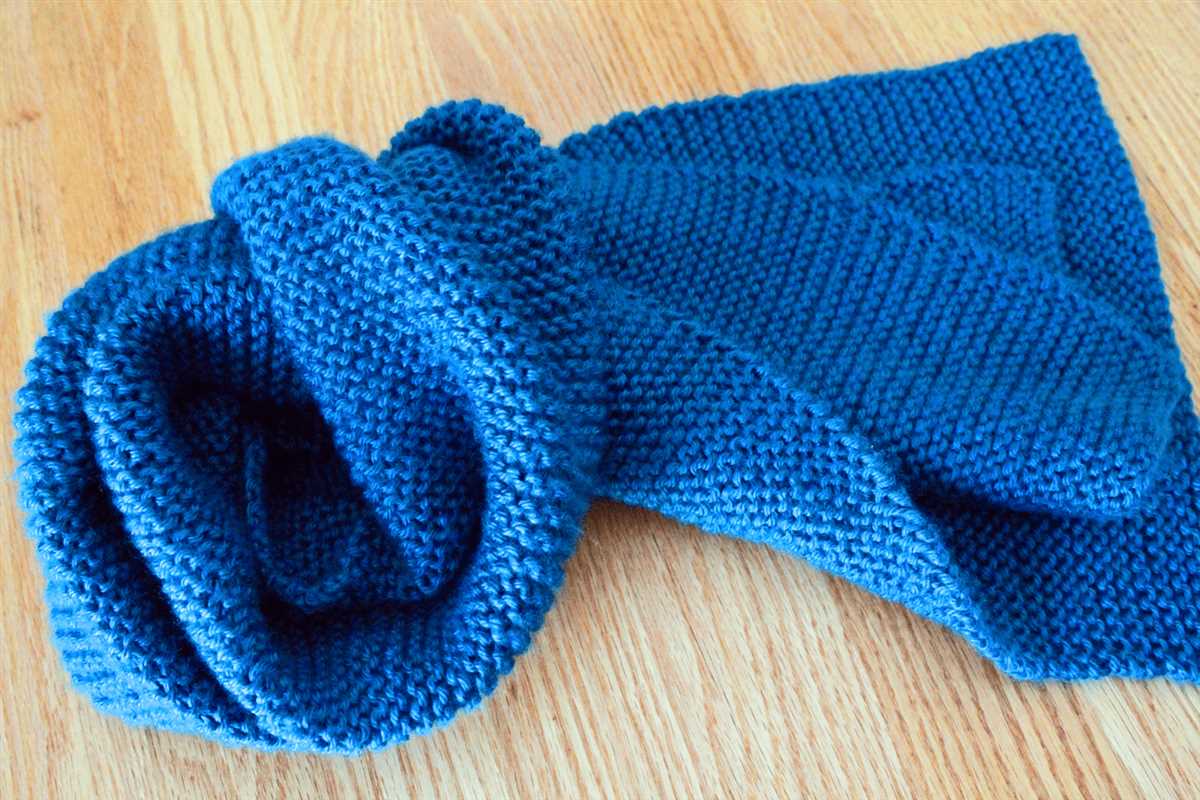
Diagonal Knit Purl Scarf Pattern
If you’re looking for a fun and unique scarf pattern to knit, try the diagonal knit purl scarf pattern. This pattern is great for beginners who want to practice their knit and purl stitches, as well as more advanced knitters who are looking for a new challenge. With its diagonal design, this scarf will definitely stand out in your winter wardrobe.
Materials: To get started with this pattern, you’ll need a pair of knitting needles (size 8 or 9), a skein of yarn in your desired color, and a pair of scissors.
Instructions:
- Cast on 36 stitches using the long-tail cast on method.
- Row 1: Knit all stitches.
- Row 2: Purl all stitches.
- Repeat rows 1 and 2 until the scarf reaches your desired length.
- Bind off all stitches.
That’s it! With just a few simple steps, you can create a beautiful diagonal knit purl scarf. You can experiment with different yarn colors and textures to make each scarf unique. This pattern is also customizable – you can cast on more or fewer stitches to adjust the width of the scarf.
This scarf is perfect for keeping warm during the colder months, and it also makes a great gift for family and friends. Whether you’re an experienced knitter or just starting out, give the diagonal knit purl scarf pattern a try for a fun and stylish project.
Ripple Stitch Scarf Pattern
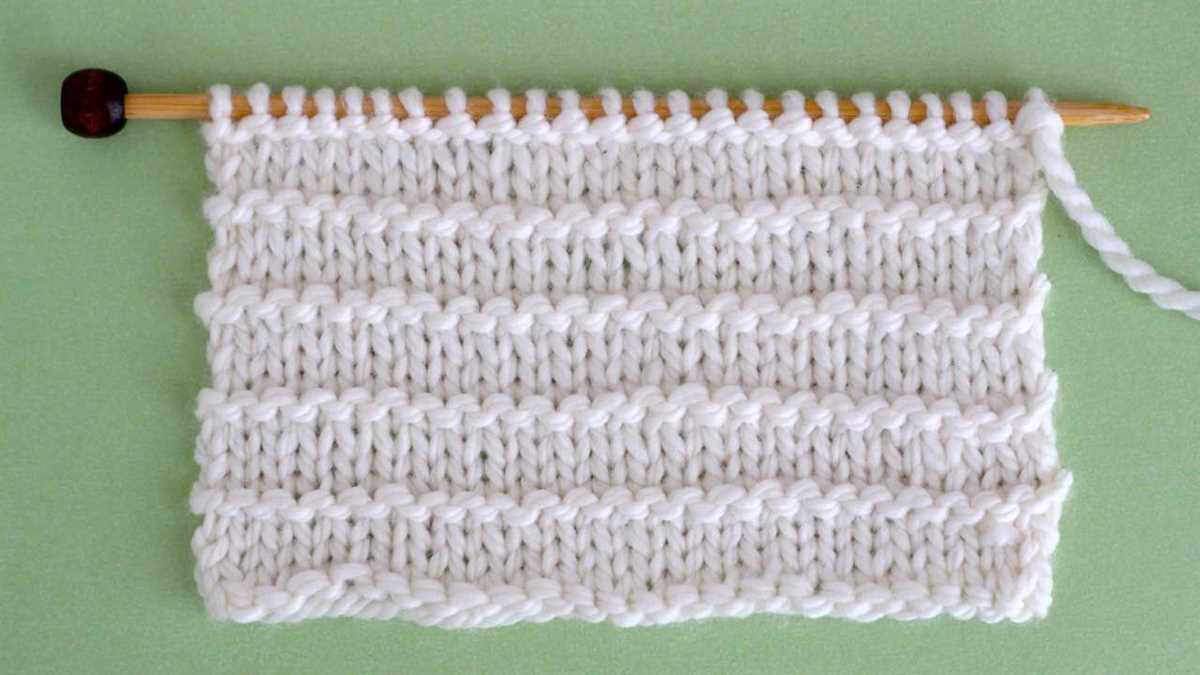
The ripple stitch is a versatile knitting pattern that creates a beautiful, wavy texture. This pattern is perfect for beginner knitters looking to try something new and intermediate knitters looking for a fun project. By alternating between knit and purl stitches, you can create a scarf that has a stunning ripple effect.
To begin the ripple stitch scarf pattern, you will need two skeins of your favorite yarn and a pair of knitting needles in an appropriate size. Cast on an even number of stitches, such as 20 or 40, depending on how wide you want your scarf to be. Keep in mind that the more stitches you cast on, the wider your scarf will be.
Row 1: *Knit 2 stitches together, purl 2 stitches together.* Repeat from * to * until the end of the row.
Row 2: *Purl 2 stitches together, knit 2 stitches together.* Repeat from * to * until the end of the row.
Repeat Rows 1 and 2 until your scarf reaches the desired length. You can continue alternating between the knit and purl stitches to create more ripples, or you can end the pattern and bind off your stitches.
Once you have finished knitting your ripple stitch scarf, you can block it to enhance the wavy texture. Simply dampen the scarf, lay it flat on a towel, and gently stretch it to shape. Allow it to dry completely before wearing or gifting.
This ripple stitch pattern is a great way to add some texture and visual interest to your scarves. Whether you choose a solid color or a variegated yarn, the ripple stitch will make your scarf stand out in a crowd. So pick up your needles and give this easy knit purl pattern a try!
Honeycomb Lace Scarf Pattern
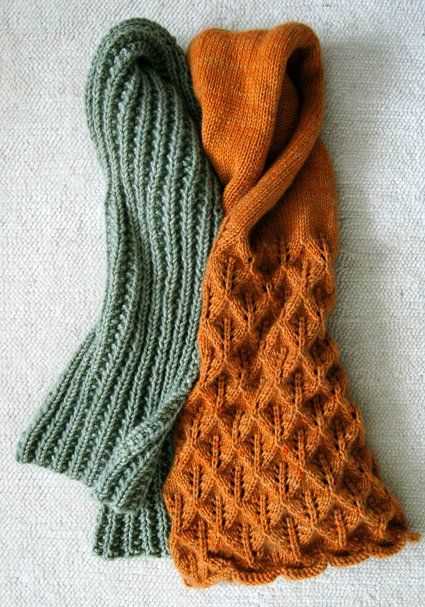
If you’re looking for a beautiful and intricate scarf pattern, look no further than the Honeycomb Lace Scarf Pattern. This pattern features a stunning honeycomb stitch that adds texture and elegance to any scarf. It’s perfect for both beginners and experienced knitters who are looking for a new challenge.
To start knitting the Honeycomb Lace Scarf Pattern, you’ll need a pair of knitting needles and your favorite yarn. The pattern starts with a simple cast on, followed by a few rows of basic knitting stitches. Then, the honeycomb lace stitch pattern begins, creating a delicate and intricate design.
The honeycomb lace stitch: The honeycomb lace stitch is created by alternating knit and purl stitches in specific sequences. This creates a series of interlocking honeycomb shapes that give the scarf its unique and beautiful look.
- Row 1: Knit all stitches
- Row 2: Purl all stitches
- Row 3: *Knit 3 stitches together, yarn over, knit 1 stitch, yarn over, slip 1 stitch, knit 2 stitches together, pass slipped stitch over, yarn over,* repeat from * to * until the end of the row
- Row 4: Purl all stitches
Continue repeating these four rows until your scarf reaches your desired length. Once you’ve reached the desired length, finish with a few rows of knitting stitches and bind off. You can also add fringe or tassels to give your scarf a finishing touch.
The Honeycomb Lace Scarf Pattern is perfect for adding a touch of elegance to your winter wardrobe. Whether you’re knitting it for yourself or as a gift, this pattern is sure to impress. So grab your knitting needles and yarn and start creating a beautiful and stylish scarf today!
Cable Knit Purl Scarf Pattern

If you’re looking for a stylish and cozy scarf pattern to add to your collection, the cable knit purl scarf pattern is a perfect choice. This pattern combines the classic cable stitch with the simple purl stitch to create a stunning and textured design that will keep you warm during the colder months.
To start knitting this beautiful scarf, you’ll need a set of knitting needles, a cable needle, and your choice of yarn. Begin by casting on the desired number of stitches, which will depend on the width of the scarf you want to create. Make sure to leave a few extra stitches on each end for a neat border.
Once you have cast on, it’s time to start working the cable and purl stitches. The cable stitch adds intricate detail to the scarf and gives it a sophisticated look. To create the cable stitch, transfer a few stitches onto the cable needle and hold it in the back of your work or in the front, depending on the desired direction of the cable. Then, knit or purl the next few stitches from the left-hand needle and then repeat the cable stitch by knitting or purling the stitches from the cable needle.
To add more texture to the scarf, alternate the cable stitches with simple purl stitches. The purl stitch creates a bumpy texture that contrasts with the smoothness of the cable stitch. Simply bring the yarn to the front of the work, insert the right-hand needle from right to left through the next stitch, and wrap the yarn around the needle. Pull the stitch through and slip it off the left-hand needle. Continue alternating cable and purl stitches until you reach the desired length of the scarf.
Once you have completed the scarf, cast off all the stitches and weave in any loose ends. You can also add tassels or fringe for an extra decorative touch. The cable knit purl scarf pattern is a versatile and timeless design that you can wear with any outfit. Whether you’re an experienced knitter or a beginner, this pattern is a great way to enhance your knitting skills and create a beautiful accessory for yourself or as a gift.
Two-Tone Reversible Scarf Pattern

If you’re looking for a versatile and stylish scarf pattern, the two-tone reversible scarf pattern is a great option. This pattern allows you to create a scarf that looks great on both sides, making it perfect for wearing in any way you choose.
Materials Needed:
- Size 8 (5mm) knitting needles
- Worsted weight yarn in two contrasting colors
- Yarn needle for weaving in ends
Instructions:
- Cast on 30 stitches using the first color of yarn.
- Knit 1 row.
- Purl 1 row.
- Change to the second color of yarn and knit 1 row.
- Purl 1 row.
- Continue alternating between the two colors, knitting one row and purling one row, until the scarf reaches your desired length.
- Bind off all stitches.
- Weave in any loose ends.
Notes:
- The two-tone reversible scarf pattern is a great way to practice your knitting skills and experiment with different color combinations.
- You can use any two colors of yarn that you like, making this pattern a great way to use up any leftover yarn you have in your stash.
- The scarf will have a beautiful and reversible ribbed texture, perfect for keeping you warm and stylish.
Infinity Loop Scarf Pattern

Knitting an infinity loop scarf is a great way to create a versatile and stylish accessory. This pattern is perfect for beginners and experienced knitters alike, as it uses basic knit and purl stitches to create a beautiful textured design. Whether you’re knitting for yourself or as a gift, this infinity loop scarf is sure to be a hit.
To start knitting the infinity loop scarf, you will need:
- Size 8 knitting needles
- Approximately 300 yards of worsted weight yarn
- Tapestry needle for weaving in ends
Pattern:
- Cast on 30 stitches.
- Row 1: (Right side) Knit all stitches.
- Row 2: Purl all stitches.
- Repeat Rows 1 and 2 until scarf measures desired length, approximately 60 inches.
- Bind off all stitches.
- Join the two ends of the scarf to create a loop.
You can adjust the size of the scarf by casting on more or fewer stitches. Additionally, you can experiment with different yarn colors and textures to create a unique look. This infinity loop scarf is a versatile accessory that can be worn in various ways, making it a must-have for your wardrobe.
So, grab your knitting needles and get started on this easy and stylish infinity loop scarf pattern. Happy knitting!