
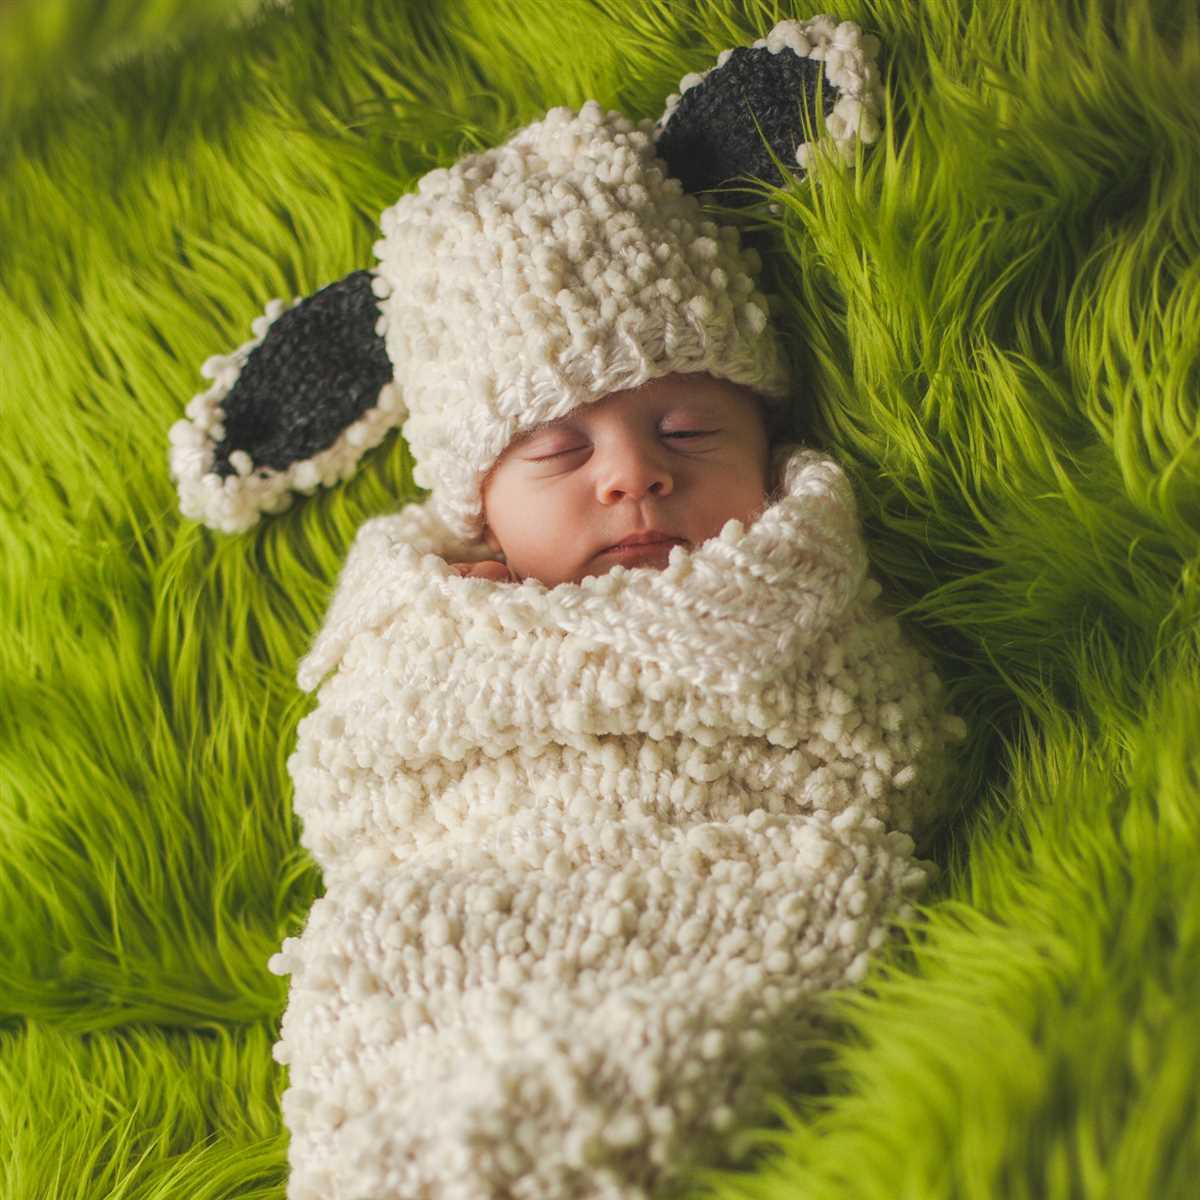
Winter is finally here, and what better way to stay warm and adorable than with a knitted sheep hat? Whether you’re a beginner or an experienced knitter, this free pattern is perfect for adding a cozy and whimsical touch to your winter wardrobe.
This adorable hat features a cute sheep face, complete with floppy ears and tiny horns. The soft and warm yarn will keep you snug during those chilly winter months, while the playful design is sure to put a smile on your face.
With this free knitting pattern, you can create a one-of-a-kind hat that is both practical and fun. Whether you’re knitting for yourself or making a special gift for a loved one, this hat is sure to be a hit.
How to Knit a Free Sheep Hat Pattern
Knitting a sheep hat can be a fun and creative project for knitters of all skill levels. With a free pattern, you can easily make a cozy and adorable hat that resembles a fluffy sheep. Here is a step-by-step guide on how to knit a free sheep hat pattern:
Materials Needed:
- Worsted weight yarn in white, black, and pink
- Knitting needles in size 8 or size needed to obtain gauge
- Tapestry needle
- Stitch markers
- Scissors
Step 1: Cast on
Begin by casting on the desired number of stitches, typically around 80 stitches for an adult-sized hat. Use the white yarn for the cast on.
Step 2: Knit the brim
Knit the brim of the hat in a ribbing stitch pattern, such as k1, p1 or k2, p2. Continue knitting in the ribbing pattern for about 2 inches or until the desired length is reached.
Step 3: Switch to the main color

Switch to the white yarn to knit the main body of the hat. Knit in stockinette stitch (knit one row, purl one row) until the hat measures about 6 inches from the cast-on edge.
Step 4: Shape the crown
Begin shaping the crown of the hat by decreasing stitches. This can be done by knitting two stitches together (k2tog) at regular intervals, such as every sixth stitch, on the knit rows. Continue shaping the crown until there are about 6 stitches remaining.
Step 5: Add the sheep details
Using the black and pink yarn, embroider the sheep’s face onto the hat. Create the eyes, nose, and mouth using small, straight stitches. Then, use the pink yarn to stitch two small ears onto the top corners of the hat.
Once all the details are added, weave in any remaining yarn ends, and the sheep hat is complete!
This free sheep hat pattern is a great way to showcase your knitting skills and create a unique and charming accessory. Whether you’re knitting it for yourself or as a gift, this cute sheep hat is sure to bring a smile to anyone’s face!
Gathering Materials

Before you can start knitting your sheep hat, you will need to gather all the necessary materials. Here is a list of what you will need:
- Yarn: You will need a yarn in the color of your choice to knit your sheep hat. Make sure to choose a soft yarn that is suitable for hats.
- Knitting Needles: You will need a pair of knitting needles in the appropriate size for your yarn. Check the yarn label for recommended needle size.
- Darning Needle: A darning needle will be used to weave in ends and sew any necessary seams.
- Stitch Markers: Stitch markers are helpful for keeping track of your stitches, especially if you are using circular needles.
- Scissors: A pair of scissors will be necessary for cutting the yarn.
- Tape Measure: A tape measure or ruler will be useful for checking your gauge and measuring your progress.
Once you have gathered all the necessary materials, you will be ready to start knitting your sheep hat. Make sure you have everything on hand before you begin to ensure a smooth and enjoyable knitting experience.
Choosing the Right Yarn
When it comes to knitting a sheep hat, choosing the right yarn is essential for the success of your project. The right yarn can make a difference in the texture, appearance, and durability of your hat. It can also affect the ease of knitting and the overall satisfaction with the finished product. So, how do you choose the right yarn for your sheep hat?
Consider the Fiber: The first thing to consider when choosing yarn for a sheep hat is the fiber. You want to choose a yarn that is soft, comfortable, and suitable for the intended wearer. Wool is a popular choice for knitting because it is warm, breathable, and has excellent insulation properties. Cotton is another option for those who prefer a lighter and cooler hat. Alternatively, you can also consider using yarn blends that combine different fibers to achieve desired qualities.
Check the Gauge: In order to ensure that your sheep hat will fit properly, it is important to check the gauge of the yarn you plan to use. The gauge refers to the number of stitches and rows per inch that you achieve when using a specific yarn and needle combination. The pattern for the sheep hat should specify the recommended gauge, and you can adjust your needle size or yarn weight accordingly to match it. Taking the time to swatch and measure your gauge before starting the project can save you from ending up with a hat that is too small or too large.
Consider the Weight: The weight of the yarn refers to its thickness or diameter. It is another important factor to consider when choosing yarn for your sheep hat. Bulky or chunky weight yarns are thicker and can create a warm and cozy hat. Worsted or medium weight yarns are versatile and widely used for hats. They strike a good balance between warmth and drape. Lighter weight yarns, such as fingering or sport weight, can produce a more delicate and lightweight hat. Choose the weight of yarn that suits the style and seasonality of your sheep hat project.
Check the Care Instructions: Lastly, don’t forget to check the care instructions for the yarn you choose. Some yarns require special care and may not be suitable for machine washing or drying. Consider the practicality and longevity of the hat, and choose a yarn that can withstand regular use and cleaning. Always follow the care instructions provided by the yarn manufacturer to ensure the longevity and quality of your sheep hat.
By considering the fiber, gauge, weight, and care instructions of the yarn, you can choose the perfect yarn for your sheep hat project. Remember to have fun with your color choices and enjoy the process of knitting a cozy and adorable hat!
Getting the Perfect Gauge

When it comes to knitting a project, achieving the right gauge is crucial. The gauge is the number of stitches and rows per inch in a knitted fabric, and it determines the size and fit of the final piece. Whether you’re following a free knitting pattern or creating your own design, getting the perfect gauge is essential for a successful outcome.
Why is gauge important?
Gauge is important because it ensures that your knitted item will turn out the correct size and fit. If your gauge is too loose, your finished project may be larger than intended, while a too tight gauge can result in a smaller item. This is especially important when knitting wearable items like hats, as an incorrect gauge can lead to an ill-fitting and uncomfortable final product.
How to measure gauge?
To measure your gauge, you’ll need the recommended knitting needles and yarn specified in the pattern. Start by knitting a swatch, which is a small sample of the stitch pattern and yarn that you’ll be using. The swatch should be at least 4 inches square.
Note: Be sure to follow the instructions for the stitch pattern and the recommended knitting needles size. Knit the swatch in the same manner as the project you’re planning to make, whether it’s in the round or flat.
Note: When measuring gauge, it’s important to measure over a blocked swatch. Blocking is the process of wetting or steaming the knitted item to set the stitches and even out the fabric. This allows for an accurate gauge measurement.
Once your swatch is finished and blocked, use a ruler or a gauge swatch tool to measure the number of stitches and rows per inch. Compare your measurements to the gauge specified in the pattern. If your gauge is off, you may need to adjust your needle size or tension to achieve the correct gauge before starting your project.
Starting with the Ribbing

The first step in knitting a sheep hat is to start with the ribbing. The ribbing adds elasticity to the hat and helps it to fit snugly on the head. To begin the ribbing, cast on the required number of stitches using the long tail cast on method. Make sure to leave a long enough tail for later seaming.
Next, you will need to work the ribbing pattern. The pattern usually consists of alternating knit and purl stitches. For example, you can start with a *K2, P2* rib pattern. This means you knit 2 stitches, then purl 2 stitches, and repeat this sequence until the end of the round. Repeat this pattern for a few rows to create the ribbing.
When working the ribbing, it’s important to maintain tension and consistency in your stitches. This will ensure that the ribbing is uniform and stretchy. You can use a stitch marker to mark the beginning of the round and help you keep track of your progress.
After completing the ribbing, you can continue with the main body of the hat. The ribbing provides a nice transition between the brim and the rest of the hat. Now, you can move on to the next step in the pattern, such as knitting the sheep motif or continuing with the desired stitch pattern for the hat.
Creating the Sheep’s Face
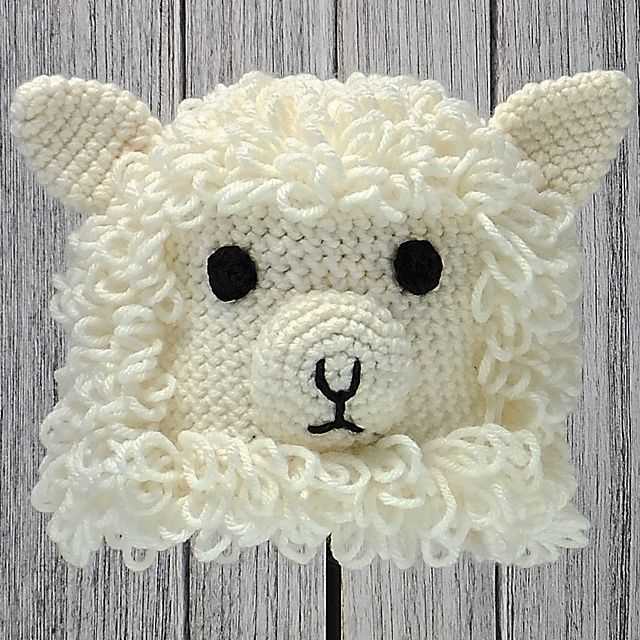
Once you have completed knitting the main body of the sheep hat, it’s time to move on to creating the adorable face. This is where the hat truly comes to life and adds a touch of cuteness to your little one’s wardrobe.
Start by gathering all the necessary materials for the face, including black yarn for the eyes and mouth, and pink yarn for the nose and ears. You will also need a small amount of stuffing to give the face some dimension.
1. Sewing the Eyes
To create the sheep’s eyes, take your black yarn and a tapestry needle. Starting from the inside of the hat, sew two small circles for the eyes, making sure they are evenly spaced and positioned correctly on the face. Secure the yarn on the inside of the hat to keep the eyes in place.
2. Adding the Mouth
Using the same black yarn and needle, create a smile or any desired expression for the sheep’s mouth. Start from the bottom center of the eyes and work your way downwards, forming a gentle curve. Make sure to secure the yarn on the inside of the hat as you go along.
3. Embroidering the Nose
Switch to the pink yarn and needle to embroider the sheep’s nose. Starting from the middle of the eyes, form a small triangle shape using a series of small stitches. This will give the sheep a cute snout. Secure the yarn on the inside of the hat once you are satisfied with the shape.
4. Attaching the Ears
Take the pink yarn and a tapestry needle to attach the ears to the sides of the hat. Position them above the eyes and sew them securely to the hat using small stitches. Make sure the ears are evenly spaced and symmetrical.
Once you have completed all these steps, you will have successfully created the sheep’s face on your knitted hat. Admire your handiwork and enjoy the adorable and unique addition to your little one’s wardrobe!
Adding the Ears

Once you have completed knitting the main part of the sheep hat, it’s time to add the ears. The ears will give your hat an adorable, sheep-like look. To start, you will need two double-pointed knitting needles and a small amount of black or dark gray yarn.
Step 1: Thread your needle with the black or dark gray yarn and position the first ear on the right side of the hat. Insert your needle through the side of the hat, slightly above the brim, and bring it out on the other side, creating a loop. Repeat this process to create a second loop slightly below the first one.
Step 2: Carefully pull the loops tight, securing the ear to the hat. Make sure the ear is positioned vertically, with the top loop slightly higher than the bottom loop. Repeat this process to attach the second ear on the left side of the hat.
Step 3: Once both ears are securely attached, weave in any loose ends of yarn on the inside of the hat to keep it neat and tidy. Trim any excess yarn if necessary.
Step 4: Finally, try on your completed sheep hat and adjust the ears if needed. You can shape the ears by gently bending them forward or backward to give the sheep a different expression. Enjoy your adorable, knitted sheep hat!
Knitting the Body of the Hat

Once you have finished knitting the brim of your sheep hat, it’s time to move on to the body. This is where you will create the main portion of the hat and give it the shape of a fluffy sheep. Follow these instructions to knit the body of the hat:
1. Increase Stitches

- Begin by knitting several rows of stockinette stitch, working in the round.
- Every few rounds, increase stitches evenly across the row to create the desired width of the hat.
- This will ensure that the hat gradually expands as it reaches the top, giving it a rounded shape.
2. Create the Sheep’s Face
- After knitting the desired length for the body of the hat, it’s time to create the sheep’s face.
- To do this, switch to a different color of yarn and continue working in the round.
- Follow a chart or pattern to create the facial features, such as the eyes, nose, and mouth.
- You can use different knitting techniques, such as intarsia or duplicate stitch, to add these details.
3. Shape the Top
- Once the face of the sheep is complete, continue knitting in the round with the main color yarn.
- To shape the top of the hat, you can decrease stitches evenly across the row.
- Alternatively, you can create small loops using the knitting technique called “bobble stitch” to add some texture to the top of the hat.
- Continue knitting until you have reached the desired length for the hat.
By following these steps, you can create a charming knitted sheep hat with a fluffy body. Feel free to customize the design and add any additional details you like, such as ears or a pom-pom tail, to make your hat truly unique.
Shaping the Crown

Once you have completed the ribbing and main body of the hat, it is time to shape the crown. This is the part of the hat that will give it its unique shape and fit.
Decrease Rounds:
To begin shaping the crown, you will need to decrease the number of stitches in each round. This will create the tapered shape that is characteristic of a knitted hat. You can use a variety of decrease stitches, such as knit two together (K2tog) or slip slip knit (SSK), to achieve the desired effect. The pattern will provide instructions on which decrease stitches to use and when to use them.
For example:
- Round 1: K2tog, knit to last 2 stitches, SSK
- Round 2: Knit all stitches
- Repeat these two rounds until the desired number of stitches remain
Decrease Placement:
The placement of the decrease stitches will determine the shape of the crown and how quickly it tapers. You can place the decrease stitches evenly spaced throughout the round, or you can stagger them for a different effect. The pattern will typically provide guidelines on where to place the decrease stitches.
For example:
- Decrease every 10 stitches
- Stagger the decrease stitches every 8 stitches
Finishing:
Once you have completed the decrease rounds and only a few stitches remain, you will need to cut the yarn, leaving a long tail. Thread the tail through a yarn needle and slide it through the remaining stitches, removing them from the needles. Pull the yarn tight to close the top of the hat. Secure the yarn by weaving it through a few stitches on the inside of the hat. Finally, weave in any loose ends and give your hat a good block to shape it and bring out the stitch pattern.
Finishing Touches
After completing the knitting of the sheep hat, it’s time to add the finishing touches to make it truly unique and adorable. These final details will give the hat its charm and personality.
Embroidered facial features: Use black yarn to embroider the sheep’s eyes, nose, and mouth onto the hat. Use small vertical stitches for the eyes and nose, and a tiny smile for the mouth. Be sure to position the features symmetrically for a balanced look.
Ear flaps:
To create the ear flaps, pick up stitches along the sides of the hat. Using double-pointed needles or a circular needle, knit a few rows in a contrasting color to create the flaps. You can add a small knot or tassel to the end of each flap for an extra touch of cuteness.
Fringe:

If you want to add some texture and playfulness to the hat, consider attaching a fringe along the bottom edge. Cut yarn strands of equal length and fold them in half. Insert the folded end through a stitch along the bottom edge of the hat and pull the loose ends through the loop, securing it in place. Repeat this process until the entire bottom edge is adorned with a fringe.
Pom-pom:
No sheep hat is complete without a fluffy pom-pom! Create a pom-pom using a pom-pom maker or by wrapping yarn around your fingers. Attach the pom-pom at the top of the hat using a needle and thread, making sure it is secure. Fluff it up and admire the finished result.
Final Thoughts and Styling Ideas
Knitting a sheep hat can be a fun and rewarding project for knitters of all skill levels. Whether you’re a beginner looking for a simple pattern to practice your knitting skills or an experienced knitter looking for a quick and enjoyable project, this free pattern is sure to meet your needs.
This pattern is versatile and can be customized to fit your own personal style. You can use different colors of yarn to create a unique and colorful sheep hat, or you can stick to classic black and white for a more traditional look. You can also add embellishments such as buttons or ribbons to give your hat a special touch.
Once you’ve completed your sheep hat, there are endless styling possibilities. You can pair it with a cozy sweater and jeans for a casual look, or you can dress it up with a dress and tights for a more polished outfit. The sheep hat is a fun and whimsical accessory that is sure to turn heads and add a touch of playfulness to any outfit.
Whether you’re knitting this hat for yourself or as a thoughtful gift for a loved one, the free pattern for the sheep hat is sure to bring joy and warmth to anyone who wears it. So grab your knitting needles and get started on this adorable and charming project today!