
Knitting is not only a practical skill, it is also a creative and enjoyable hobby. With just a few basic stitches, you can create beautiful and unique designs. One popular pattern among knitters is the bear paw pattern. This pattern features a repeating motif that resembles the shape and texture of a bear’s paw.
The bear paw knitting pattern is a great way to add some personality to your projects. Whether you’re making a scarf, a hat, or even a pair of socks, incorporating this pattern will give your finished item a charming and playful touch. Plus, the bear paw pattern is relatively easy to knit, making it suitable for both beginners and more experienced knitters.
To create the bear paw pattern, you will need to be familiar with a few basic knitting techniques. These include knit stitches, purl stitches, increases, and decreases. By using these techniques in different combinations, you can create the desired bear paw motif. The pattern typically involves knitting a central panel of stitches and then adding the paw details on either side.
There are many variations of the bear paw knitting pattern, allowing you to customize your project to your liking. You can experiment with different colors, sizes, and placements of the paw motif. You can also incorporate other elements such as stripes or cables to make your item even more unique. Whether you’re knitting for yourself or for a loved one, the bear paw pattern is sure to bring a smile to your face.
Bear Paw Knitting Pattern
Knitting patterns are a great way to create beautiful and unique items, and the bear paw pattern is no exception. The bear paw pattern is inspired by the shape and texture of a bear’s paw, and it adds a fun and playful touch to any knitting project. Whether you’re making a sweater, blanket, or hat, the bear paw pattern is sure to make it stand out.
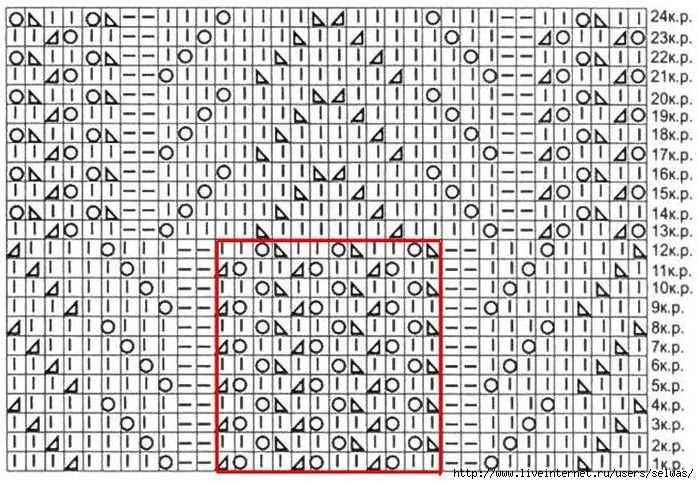
The bear paw knitting pattern is relatively easy to learn and perfect for knitters of all skill levels. To create the bear paw pattern, you’ll need to know how to knit and purl, and how to increase and decrease stitches. The pattern typically consists of a series of diagonal lines or V-shapes, which mimic the look of a bear’s paw. You can use different colors of yarn to add even more visual interest to the pattern.
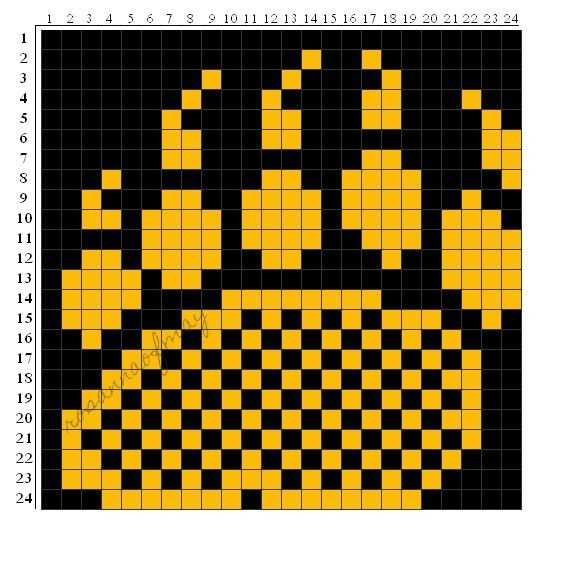
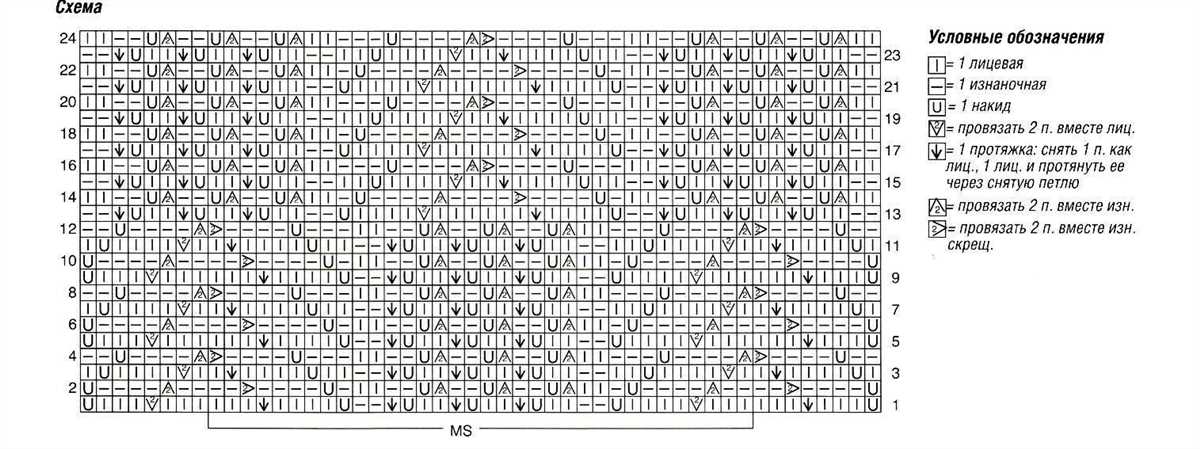
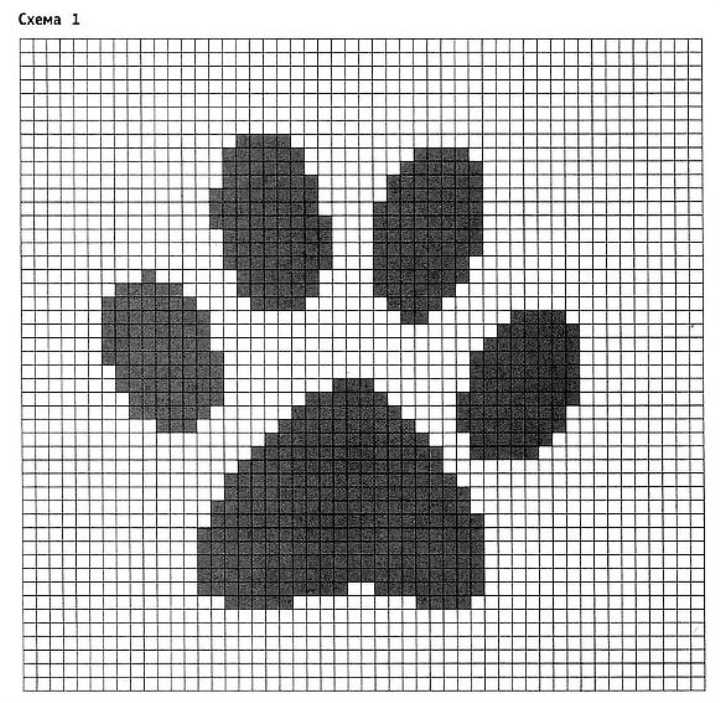
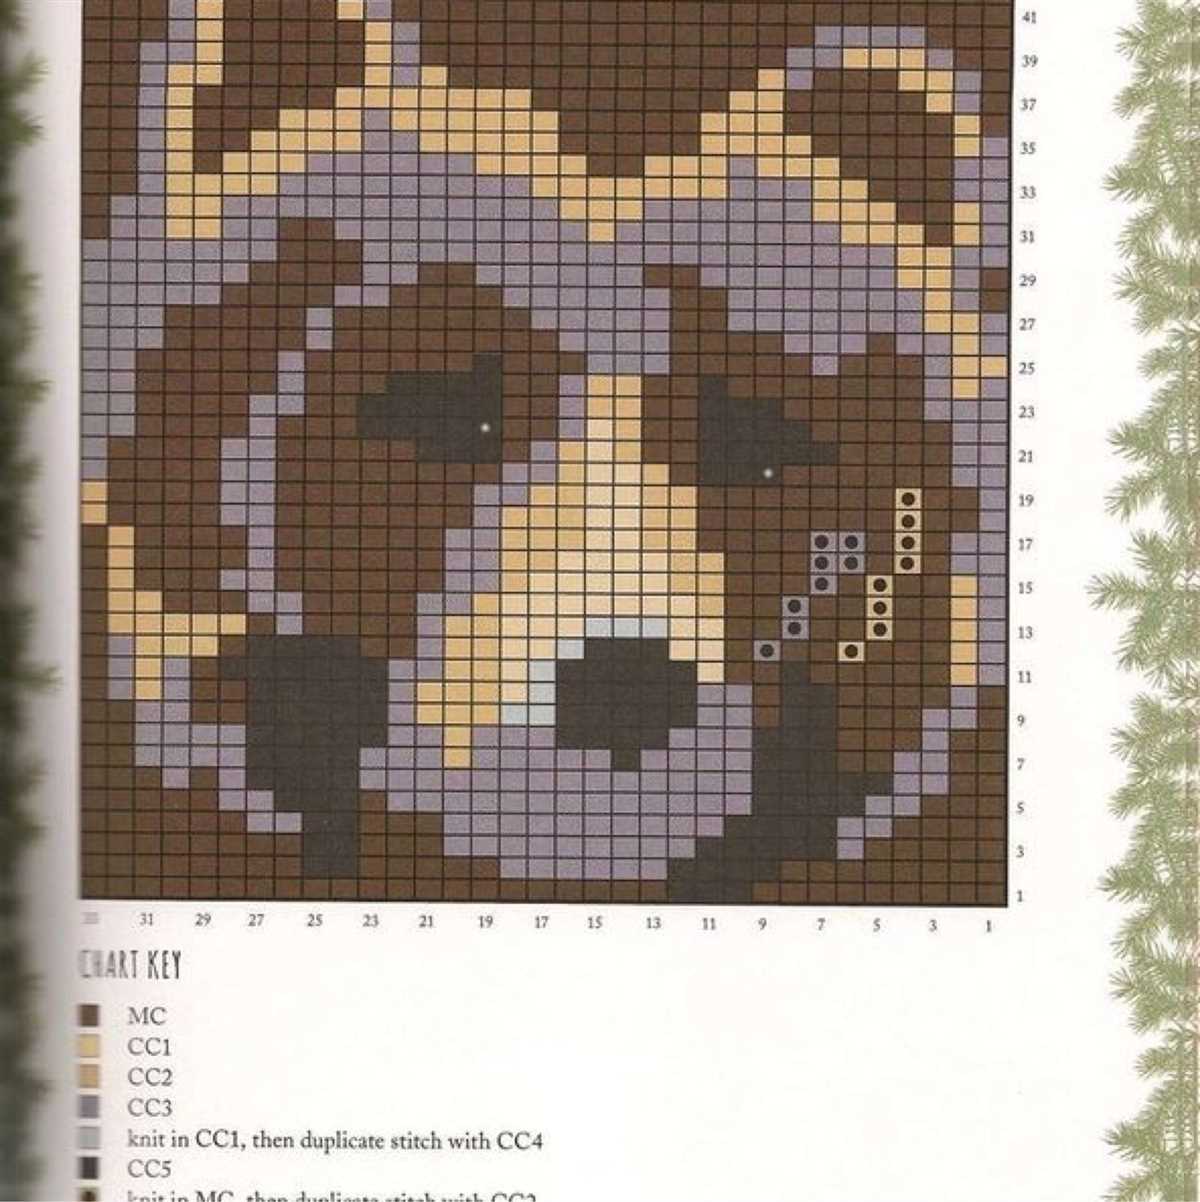
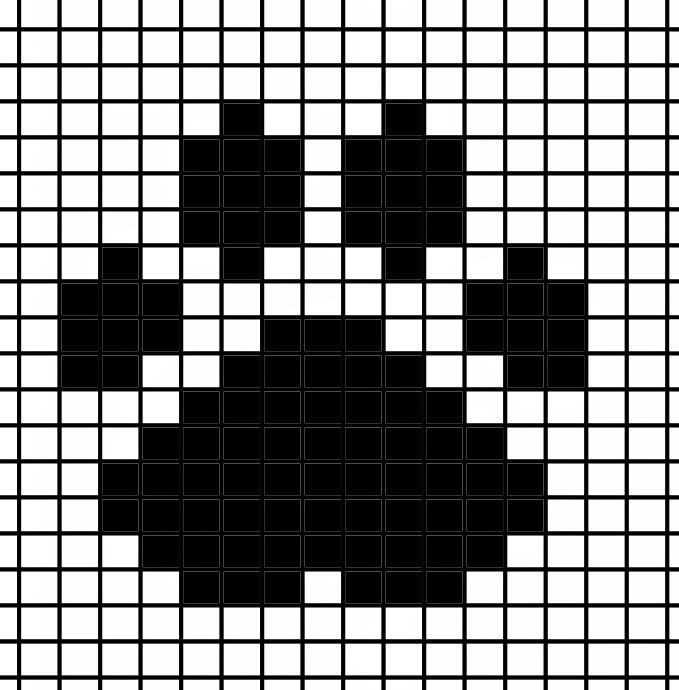
To get started with the bear paw pattern, you’ll need to cast on the desired number of stitches and knit a few rows in a base color. Then, you’ll begin following the pattern by knitting and purling stitches in a specific order to create the bear paw shape. The pattern usually includes a chart or written instructions that outline the stitch sequence, making it easy to follow along.
Once you’ve completed the bear paw pattern, you can continue knitting the rest of your project using the same pattern or switch to a different stitch pattern to create contrast. The bear paw pattern is versatile and can be used for a variety of knitting projects, including scarves, mittens, and even toys. Whether you’re knitting for yourself or a loved one, the bear paw pattern is a great choice for adding a touch of whimsy and charm.
What is a Bear Paw Knitting Pattern?
A bear paw knitting pattern is a design that mimics the appearance of a bear’s paw on knitted items such as hats, scarves, mittens, and blankets. Knitting patterns are instructions that guide knitters on how to create specific designs and textures using different stitches and techniques. The bear paw knitting pattern typically features a combination of cables, bobbles, and textured stitches to create the distinctive shape and look of a bear’s paw.
Knitting patterns are a popular way for knitters to add unique and personalized touches to their projects. The bear paw knitting pattern, in particular, can add a playful and whimsical element to knitted items, making them stand out and add a touch of nature-inspired charm. The pattern is often used in winter and outdoor-themed designs, adding an extra layer of warmth and coziness to the finished piece.
The bear paw pattern can be customized and modified to suit different knitting skill levels and project types. It can be incorporated into various knitting techniques, such as stranded colorwork or lace knitting, for different effects and styles. The pattern can also be adapted for different sizes and gauges, allowing knitters to create bear paw designs for items of all sizes, from baby booties to adult-sized sweaters.
In addition to its aesthetic appeal, the bear paw knitting pattern can also hold symbolic meanings for some knitters. It can represent a love for nature and wildlife or serve as a reminder of a special connection to bears or the outdoors. The pattern can also evoke feelings of comfort and nostalgia, reminiscent of childhood memories of cozying up with warm knitted items during winter.
To create a bear paw knitting pattern, knitters typically follow a set of written instructions or a chart that indicates the specific stitches, yarn colors, and techniques to use. They may also find inspiration and guidance from knitting books, online resources, or other knitters who have previously created bear paw designs. With practice and patience, knitters can master the bear paw pattern and incorporate it into their own unique projects.
In conclusion, the bear paw knitting pattern is a versatile and charming design that adds a touch of whimsy and nature-inspired charm to knitted items. It can be customized and modified to suit different knitting skill levels and project types, allowing knitters to create unique and personalized pieces. Whether used for its aesthetic appeal or symbolic meanings, the bear paw pattern is a popular choice among knitters and adds an extra layer of warmth and coziness to winter projects.
Materials Needed for Bear Paw Knitting
Before you start knitting your bear paw pattern, it’s important to gather all the necessary materials. Here is a list of items you will need to complete this project:
Yarn:
- Chunky or bulky weight yarn in the color of your choice
- Contrasting color yarn for the paw pads
Knitting Needles:
- A pair of size US 9 (5.5mm) knitting needles
Stitch Markers:
- Stitch markers to keep track of your stitches
Tapestry Needle:

- A tapestry needle for weaving in ends and sewing seams
Scissors:
- A pair of sharp scissors for cutting yarn
Stuffing:
- Polyester fiberfill or another type of stuffing material
Once you have gathered all these materials, you will be ready to start knitting your bear paw pattern. Make sure to choose yarn colors that you love and have fun creating your very own bear paw design!
Step-by-Step Guide to Knitting Bear Paws
Knitting bear paws can be a fun and rewarding project for both experienced knitters and beginners. This step-by-step guide will walk you through the process of creating adorable bear paw motifs that you can incorporate into your knitting projects.
Materials Needed:
- Knitting needles (size depending on your desired gauge)
- Yarn (preferably in a color that matches the bear paw motif you want to create)
- Tapestry needle
- Scissors
Step 1: Cast On
Start by casting on the desired number of stitches onto your knitting needle. This will depend on the size of the bear paw motif you want to create. You can refer to a knitting pattern or simply experiment with different stitch counts to achieve the desired size.
Step 2: Knit the Base Rows
Knit the base rows using the knit stitch, as per your knitting pattern or personal preference. This will create a solid base for your bear paw motif.
Step 3: Begin the Bear Paw Motif
Once the base rows are complete, it’s time to start forming the bear paw motif. Switch to the contrasting color yarn (usually a darker shade) to create the paw markings.
Step 4: Knit the Paw Pad
To create the paw pad, knit a small square or rectangle in the center of the bear paw motif. This will be the lighter colored portion of the paw, resembling the paw pad.
Step 5: Create the Toes
To form the individual toes, you will need to decrease stitches. Follow your knitting pattern or decrease evenly across the paw pad section to create the desired number of toes.
Step 6: Shape the Paw
To shape the bear paw, you will need to gradually increase stitches on either side of the paw pad section. This will give it a rounded appearance. Follow your knitting pattern or increase evenly across the necessary rows.
Step 7: Finish and Secure
Once the bear paw motif is complete, finish off your knitting project by binding off the stitches. Weave in any loose ends using a tapestry needle to ensure everything is secure.
Now you have successfully knitted adorable bear paws that can be used to embellish various knitting projects such as hats, scarves, mittens, or even stuffed animals. Get creative and have fun incorporating these cute bear paw motifs into your knitting projects!
Tips for Creating Realistic Bear Paws
Achieving a realistic bear paw design in your knitting project requires attention to detail and a few key techniques. By following these tips, you can create lifelike bear paws that will add a charming touch to your knitted items.
1. Use a textured stitch
Choosing the right stitch pattern can make a big difference in creating the appearance of bear paws. Opt for a textured stitch, such as seed stitch or basketweave, which will give your knitting depth and dimension. These stitches mimic the look of fur, adding to the realism of your bear paws.
2. Incorporate claw details
To make your bear paws truly authentic, consider adding claw details. You can achieve this by using a duplicate stitch or embroidery technique to create small, pointed stitches that resemble claws. Place them strategically at the tips of the paw pattern to give the illusion of bear claws.
3. Play with different yarn colors
Varying the colors of your yarn can contribute to the realistic effect of bear paws. Consider using shades of brown or gray for the paw pads and a contrasting color for the main part of the paw. This color variation will give depth and visual interest to your knitting, making the bear paws more lifelike.
4. Add shaping for a 3D effect
To truly capture the shape of a bear paw, incorporate shaping techniques into your knitting. This can be done through increases and decreases to create a rounded, curved shape. By adding this 3D effect, you’ll enhance the realism of your bear paws and make them visually dynamic.
5. Consider using a fuzzy or textured yarn
If you want to take your bear paws to the next level, consider using a fuzzy or textured yarn. Yarns with a soft halo or a fluffy texture can mimic the appearance of bear fur, adding an extra touch of realism to your knitting project. Look for yarns specifically designed for plush or stuffed animals to achieve the desired effect.
By incorporating these tips into your bear paw knitting project, you’ll be able to create realistic and eye-catching paws that will make your knitted items truly special.
Choosing Yarn Colors for Bear Paw Knitting
Making a bear paw knitting pattern is a fun and creative project. One of the most important decisions you’ll make when starting this project is choosing the yarn colors. The right colors can bring your bear paw design to life and make it stand out. Here are some tips to help you choose the perfect yarn colors for your bear paw knitting project.
Consider the Bear’s Natural Colors
When choosing yarn colors for your bear paw knitting, it’s a good idea to consider the natural colors of a bear. Bears typically have shades of brown, black, and white in their fur. You can draw inspiration from these colors and incorporate them into your knitting. Mixing different shades and tones of browns can create a realistic and textured effect, while adding touches of black can give your bear paw pattern depth and definition. Don’t forget to include some white yarn for the bear’s claws.
Experiment with Fun and Playful Colors
If you want to add a unique twist to your bear paw knitting pattern, you can experiment with fun and playful colors. Consider using bright and vibrant yarns to add pops of color to your design. This can give your bear paw a cheerful and whimsical look. You can choose colors like pink, blue, or even rainbow hues to make your bear paw truly stand out. Just remember to balance the bright colors with the natural tones to maintain the bear-like feel of the pattern.
Create Contrast with Background Colors
To make your bear paw knitting pattern really pop, you can create contrast with the background colors. If you’re using natural browns and blacks for the bear paw design, consider using a lighter color for the background, like a soft cream or light gray. This will help the bear paw stand out and draw attention to the intricate details of the pattern. On the other hand, if you’re using vibrant and playful colors for the main design, a darker background can create a sense of depth and make the colors more vibrant.
Remember, choosing yarn colors for your bear paw knitting project is ultimately a personal choice. Have fun with it and let your creativity shine. Whether you go for a realistic look or a playful twist, the key is to select colors that you love and that bring your bear paw pattern to life.
Alternative Knitting Techniques for Bear Paws
Knitting is a versatile craft that allows for creativity and personalization. When it comes to knitting bear paws, there are several alternative techniques that can be used to achieve different textures and designs. These techniques can add depth and uniqueness to your bear paw knitting projects.
Felting
Felting is a popular technique in which knitted fabric is shrunk and matted together to create a denser and more solid texture. To create bear paws with felting, you can knit the paw shape using a feltable yarn and then agitate it by hand or in a washing machine to shrink and felt the fabric. This technique gives the bear paws a fluffy and fuzzy appearance, perfect for adding an extra touch of cuteness to your knitting projects.
Cable Knitting

Cable knitting is another technique that can be used to create intricate patterns and designs. By crossing stitches over each other, you can create a braided effect that resembles the texture of bear paws. To incorporate cable knitting into your bear paw pattern, you can add a cable panel in the center of the paw or create a larger cable design that covers the entire paw. This technique adds a unique and eye-catching element to your bear paw knitting projects.
Intarsia
Intarsia is a colorwork technique that involves knitting with multiple colors to create geometric patterns or images. With intarsia, you can create bear paws that have contrasting colors or even incorporate a paw print design. This technique requires careful attention to detail and the use of bobbins or separate balls of yarn for each color block. Intarsia adds a fun and playful element to your bear paw knitting projects, making them truly one-of-a-kind.
In conclusion, there are various alternative knitting techniques that can be used to create unique bear paw designs. Whether you choose felting, cable knitting, or intarsia, these techniques allow you to add depth, texture, and creativity to your bear paw knitting projects. Experiment with different techniques to find the one that best suits your style and preferences, and have fun creating adorable bear paws!
Adding Detail to Bear Paws with Embroidery
Knitting bear paws can be a fun and creative way to add a unique touch to your knitting projects. While the basic bear paw pattern is cute on its own, you can take it to the next level by adding detail with embroidery. Embroidery allows you to incorporate different colors and textures into your bear paws, making them more eye-catching and personalized.
To start adding detail to your bear paws with embroidery, you will need a few basic supplies. These include embroidery floss in the colors of your choice, a embroidery hoop, embroidery needles, and a pair of embroidery scissors. You can also use an embroidery transfer pen or water-soluble fabric pen to mark your design onto the knitting, if desired.
Once you have gathered your supplies, you can begin the embroidery process. Start by selecting the design or pattern you want to add to your bear paws. This can be anything from simple stitches to more complex motifs. Consider using contrasting colors to make your embroidery pop against the background of the knitting.
Next, place your knitting into the embroidery hoop, making sure the area you want to embroider is stretched tight. Thread your embroidery needle with the desired color of floss and begin stitching. You can use different embroidery stitches, such as backstitch, satin stitch, or French knots, to create the desired effect. Be patient and take your time to ensure neat and tidy stitches.
As you embroider, remember to work with the shape and curves of the bear paw. Follow the lines of the knitting pattern and adjust your stitches accordingly to create smooth and natural-looking designs. Don’t be afraid to experiment with different stitches and techniques to achieve the desired look.
Once you have finished embroidering the first bear paw, repeat the process for the remaining paws. Take your time and enjoy the process of adding detail and personalization to your knitting project. With patience and practice, you can create beautiful and unique bear paws that will impress and delight.
Creating Different Sizes of Bear Paw Knitting
Knitting bear paw patterns is a fun and adorable way to add a touch of nature to your projects. Whether you want to make a cozy pair of mittens, a cute hat, or a soft blanket, it’s important to be able to create different sizes to fit your needs. Here are some tips for adjusting the size of your bear paw knitting.
1. Adjusting the Number of Stitches: One of the easiest ways to change the size of your bear paw pattern is to adjust the number of stitches in each row. If you want to make a larger size, you can increase the number of stitches. Conversely, if you want a smaller size, you can decrease the number of stitches. Keep in mind that adding or subtracting stitches might change the overall look of the pattern, so it’s important to make careful adjustments and test your gauge.
2. Changing the Gauge: Another way to create different sizes of bear paw knitting is to change the gauge of your knitting. Gauge refers to the number of stitches and rows per inch in your knitting. By using a different size of knitting needles or switching to a different weight of yarn, you can alter the gauge and create a larger or smaller size. Just be sure to check your gauge before starting your project to ensure the correct size and fit.
- For larger sizes: If you want to make a larger size, try using thicker yarn and larger needles. This will result in a looser and more open knit, creating a larger size.
- For smaller sizes: If you want to make a smaller size, opt for thinner yarn and smaller needles. This will result in a tighter and denser knit, creating a smaller size.
3. Adjusting the Length: In addition to changing the overall size of your bear paw knitting, you may also need to adjust the length of your project. For example, if you want to make longer mittens or a longer hat, you can simply continue knitting more rounds or rows before shaping the paw pattern. Conversely, if you want a shorter length, you can finish the project earlier. Make sure to take accurate measurements and adjust the length accordingly for your desired size.
By using these techniques, you can easily create different sizes of bear paw knitting to suit your needs. Whether you want a small and cute accessory or a larger and cozier garment, you can customize your projects to fit your style. Have fun experimenting with different sizes and enjoy the process of creating adorable bear paw patterns.
Finished Product Ideas for Bear Paw Knitting Patterns
If you have recently completed a bear paw knitting pattern and are wondering what to make with it, there are many creative and practical options to consider. Whether you want to use your bear paw knitting project as a decorative item or a functional piece, here are some ideas to inspire you.
1. Cozy Blanket
Transform your bear paw knitting pattern into a cozy blanket that you can snuggle up with on chilly evenings. Use a soft and warm yarn in neutral colors to create a timeless and versatile piece. The intricate bear paw design will add a touch of whimsy to your home decor.
2. Cushion Covers
Add a touch of rustic charm to your living room or bedroom by using your bear paw knitting pattern to create cushion covers. Choose bold and contrasting colors to make the bear paw design stand out. You can even experiment with different textures and yarn types to add dimension to your cushion covers.
3. Scarf or Shawl
Show off your bear paw knitting pattern by turning it into a stylish accessory. Knit a long scarf or a cozy shawl that incorporates the bear paw design. Opt for a chunky yarn to create a dramatic and eye-catching look. Wrap yourself in warmth while making a fashion statement.
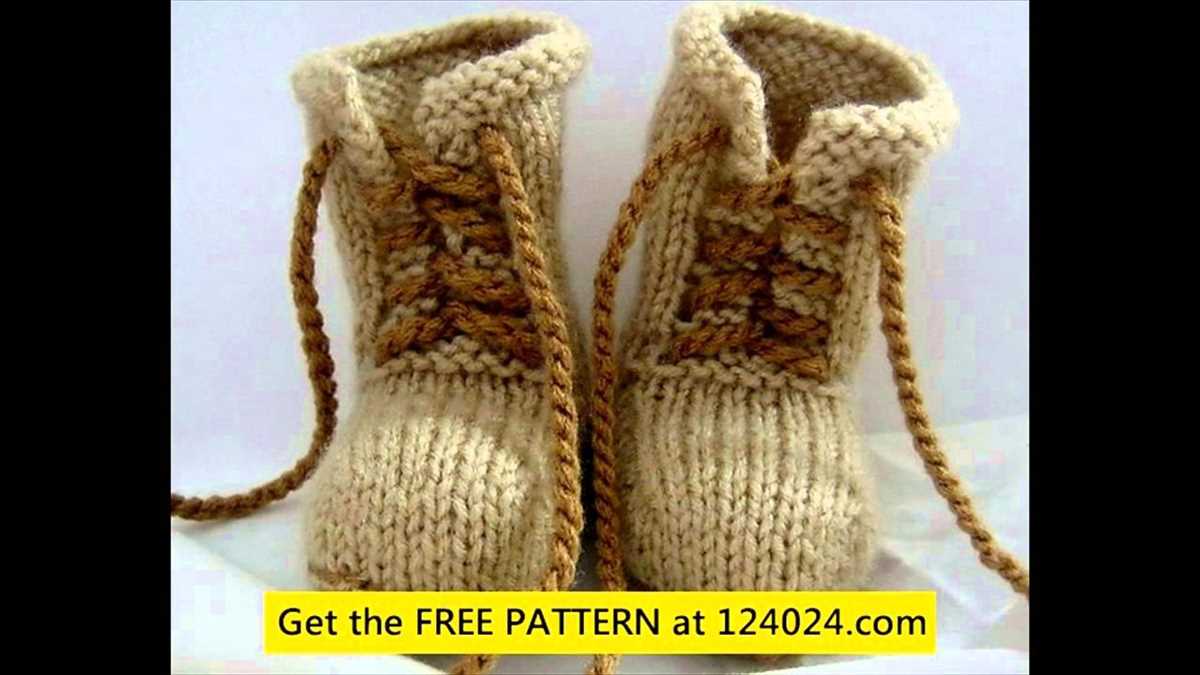
4. Mittens or Gloves
Add a playful touch to your winter wardrobe by knitting bear paw mittens or gloves. The bear paw design will stand out against the cold white background and add a touch of fun to your outdoor attire. Choose a soft and warm yarn to ensure that your hands stay cozy all winter long.
5. Baby Blanket

Create a precious keepsake for a newborn by using your bear paw knitting pattern to make a baby blanket. Choose baby-friendly yarn in soft pastel colors to create a gentle and soothing piece. The bear paw design will add a touch of cuteness to the blanket and make it a cherished item for years to come.
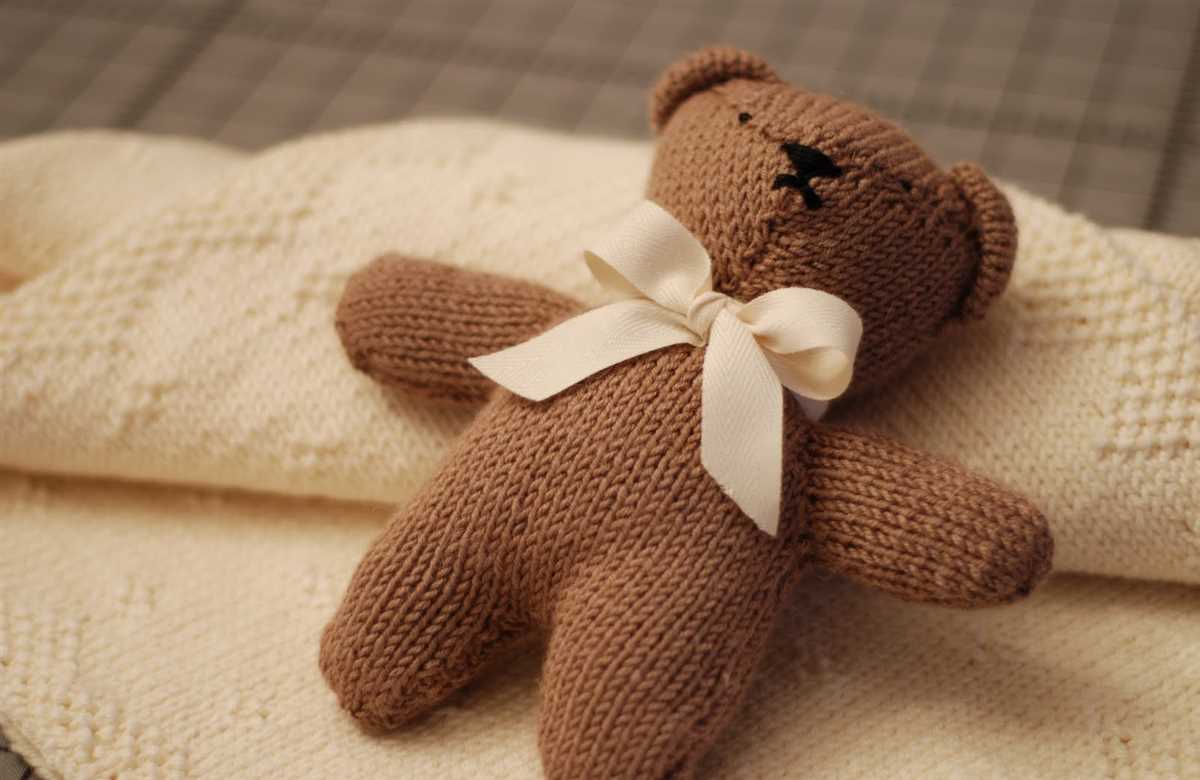
6. Knitted Toys
Bring the bear paw design to life by knitting adorable stuffed toys. Use your bear paw knitting pattern to create unique and cuddly bears or other animals. Your knitted toys will make wonderful gifts for children or charming additions to your home decor.
7. Wall Hanging
Turn your bear paw knitting project into a stunning wall hanging that showcases your knitting skills. Use a sturdy and decorative branch as the base and attach your bear paw knitting piece to create a beautiful and eye-catching wall decoration. This unique piece will add warmth and charm to any room in your home.
With these ideas, you can transform your bear paw knitting pattern into a variety of finished products that are both practical and beautiful. Let your creativity and knitting skills shine as you bring the bear paw design to life in new and exciting ways.
Caring for Bear Paw Knitted Items
Knitted items made with the Bear Paw pattern require special care to ensure their longevity and maintain their appearance. Here are some tips on how to properly care for your Bear Paw knitted items:
1. Hand Wash Only: Due to the intricate nature of the Bear Paw pattern, it is recommended to hand wash your knitted items. Fill a basin or sink with lukewarm water and add a gentle wool wash or mild detergent. Gently agitate the item in the water, avoiding any twisting or wringing. Rinse thoroughly and gently squeeze out excess water. Do not use bleach or harsh chemicals, as they can damage the fibers of the knitted item.
2. Dry Flat: After washing, reshape the item to its original dimensions and lay it flat on a clean towel or drying rack. Avoid hanging the item to dry, as it can stretch and lose its shape. Leave it to air dry away from direct heat or sunlight, as this can cause fading and damage the fibers.
3. Avoid Excessive Wear: While the Bear Paw pattern is durable, it is best to avoid excessive wear to maintain its original appearance. Limit exposure to rough surfaces and be cautious when wearing jewelry or accessories that may snag or pull at the knitted fibers.
4. Storage: When not in use, store your Bear Paw knitted items in a cool, dry place away from direct sunlight. Fold them neatly and avoid hanging them, as this can cause stretching and deformity. Consider using moth repellents or storing the items in a sealed container to protect them from potential damage.
Summary:
Caring for your Bear Paw knitted items is essential to ensure their longevity and preserve their beauty. Remember to hand wash them, dry them flat, avoid excessive wear, and store them properly. By following these care instructions, you can enjoy your Bear Paw knitted items for years to come.
Q&A:
What kind of stitch is used in the bear paw knitting pattern?
The bear paw knitting pattern typically uses a combination of knit and purl stitches to create the paw-like design.
Can I use any type of yarn for the bear paw knitting pattern?
Yes, you can use any type of yarn for the bear paw knitting pattern, but keep in mind that the thickness and texture of the yarn will impact the final look of the pattern.
Is the bear paw knitting pattern suitable for beginners?
The bear paw knitting pattern can be a bit more challenging for beginners due to the appearance of the paw design, but with some practice and patience, anyone can give it a try.
Are there any variations of the bear paw knitting pattern?
Yes, there are many variations of the bear paw knitting pattern. Some designs feature larger or smaller paws, while others use different color combinations to create a unique look.
Are there any specific techniques I need to know to knit the bear paw pattern?
To knit the bear paw pattern, you should be familiar with basic knitting techniques such as casting on, knit stitch, purl stitch, and binding off. Additionally, some patterns may include more advanced techniques such as cables or colorwork.
What is a bear paw knitting pattern?
A bear paw knitting pattern is a knitting pattern that creates a design resembling the shape of a bear’s paw. It typically involves a combination of knit and purl stitches to create a textured pattern that resembles a bear paw.