
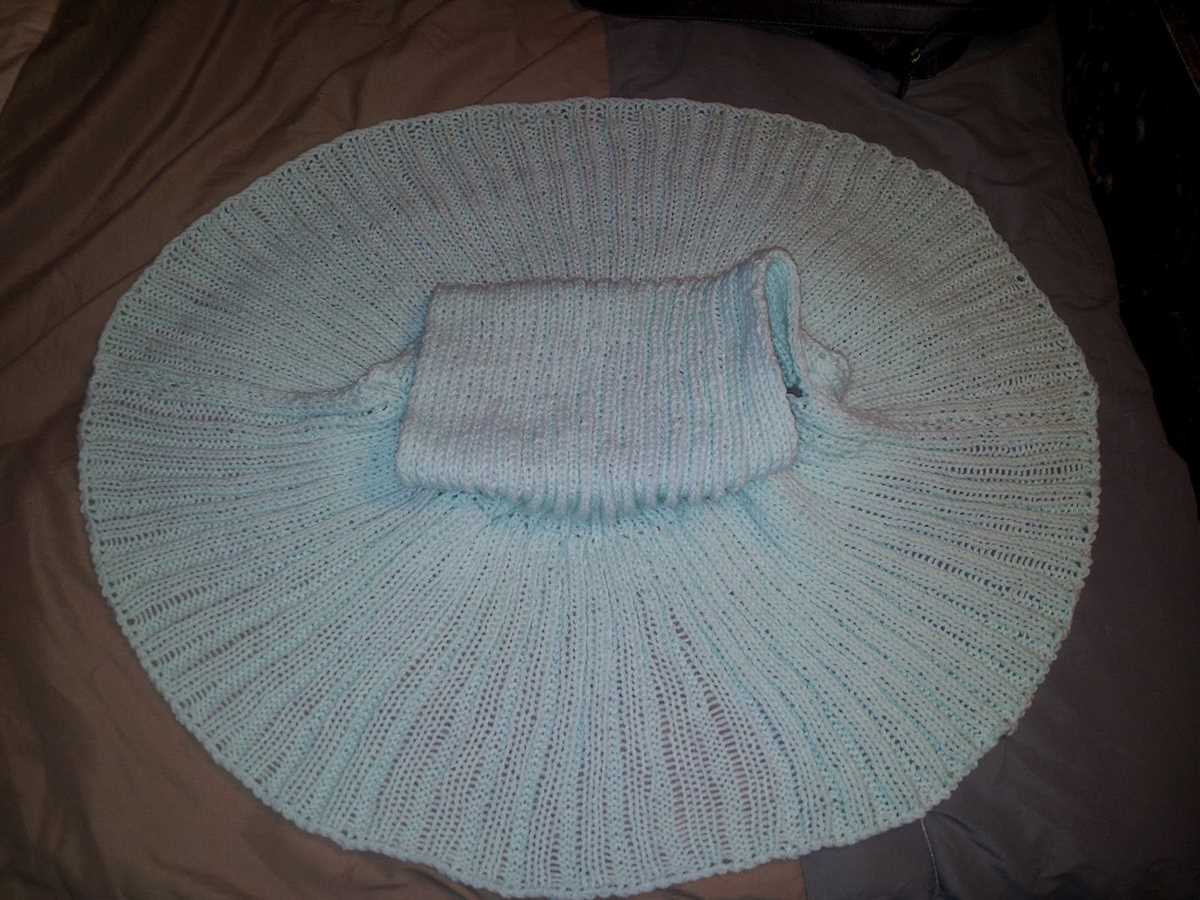
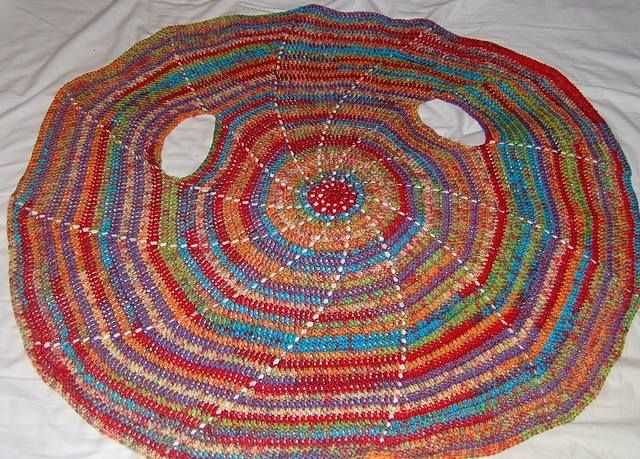
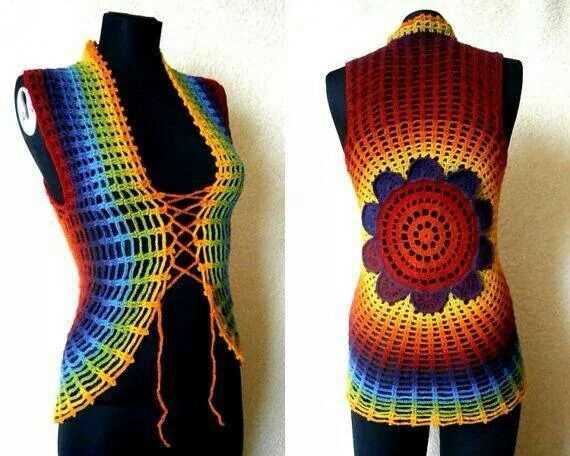
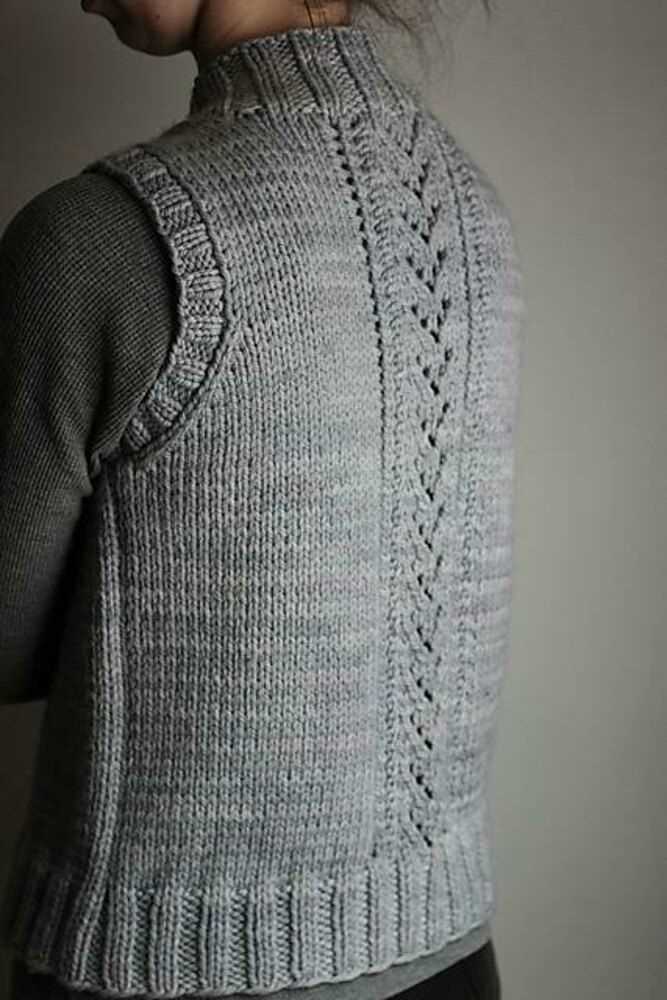
Knitting is a popular craft that allows you to create beautiful and functional garments. One versatile and trendy knitting pattern is the circle vest. This unique garment is constructed in a circular shape, making it a fun and engaging project for knitters of all skill levels. Whether you’re a beginner or an experienced knitter, the circle vest pattern offers endless opportunities for creativity and customization.
The circle vest is a versatile addition to any wardrobe. It can be worn as a stylish layering piece in any season, providing warmth and comfort without the bulk of a traditional sweater. With its circular construction, the circle vest drapes beautifully and is flattering on all body types. Whether you prefer a loose and flowy fit or a more tailored look, the circle vest can be easily customized to suit your personal style.
One of the great things about the circle vest knitting pattern is its simplicity. Knitted in the round, the circle vest is a seamless garment that requires minimal finishing work. This makes it an ideal project for knitters who are new to circular knitting or who prefer to avoid sewing seams. Additionally, the circle vest pattern can be easily adjusted to fit any size or gauge, making it a versatile pattern that can be used with different yarns and needle sizes.
How to Knit a Circle Vest: Step-by-Step Guide with Pattern
Knitting a circle vest is a fun and rewarding project that allows you to create a stylish and versatile piece of clothing. With just a few basic knitting techniques, you can make a beautiful circle vest that can be worn in various ways. Whether you’re a beginner or an experienced knitter, this step-by-step guide will help you create your own circle vest.
Materials:
- 500-800 yards of worsted weight yarn
- Size US 10 (6mm) circular knitting needles, 32-inch or longer
- Tapestry needle
- Stitch marker
Pattern:
Step 1: Cast on 100 stitches using the long tail cast on method. Place a stitch marker to mark the beginning of the round.
Step 2: Join the round by knitting the first stitch from the left needle with the last stitch on the right needle. Be careful not to twist the stitches.
Step 3: Knit every stitch in the round until the piece measures approximately 12 inches from the cast on edge.
Step 4: Decrease round: *Knit 8, knit 2 together* repeat from * to * until the end of the round (90 stitches).
Step 5: Continue knitting every round until the piece measures approximately 19 inches from the cast on edge.
Step 6: Decrease round: *Knit 7, knit 2 together* repeat from * to * until the end of the round (80 stitches).
Step 7: Continue knitting every round until the piece measures approximately 26 inches from the cast on edge.
Step 8: Bind off all stitches using the standard bind off method.
Finishing:
Weave in any loose ends using a tapestry needle. Block your circle vest by wetting it and laying it flat to dry, shaping it into the desired shape and size.
Your circle vest is now ready to be worn! Experiment with different ways of styling it – you can wear it open or fasten it with a brooch or a belt. It’s a versatile addition to your wardrobe that can be dressed up or down depending on the occasion.
Materials and Tools Needed for Knitting a Circle Vest
Before you start knitting a circle vest, it is important to gather all the necessary materials and tools. Having everything prepared in advance will make the knitting process smoother and more enjoyable. Here is a list of items you will need:
Yarn:
- Weight: Choose a yarn weight that suits your desired vest. This can range from lightweight yarn for a spring or summer vest to a bulkier yarn for a warmer winter vest.
- Quantity: Depending on the size and length of the vest, you will need a certain amount of yarn. The pattern you are following will likely provide recommendations.
- Color: Select a color or combination of colors that you love and that will complement your wardrobe.
Knitting Needles:

- Type: Circular knitting needles are recommended for knitting a circle vest. They allow you to easily knit in the round without the need for seams.
- Size: The size of your knitting needles will depend on the yarn weight you are using. Refer to the yarn label or the pattern for the recommended needle size.
Stitch Markers:
Stitch markers are essential for keeping track of your stitches and marking important sections or increases in the pattern. They can be small plastic rings or even pieces of yarn tied into loops.
Scissors and Tapestry Needle:
Scissors and a tapestry needle will be used for finishing touches, such as weaving in loose ends, cutting yarn, and sewing parts of the vest together if necessary.
Measuring Tape:
Having a measuring tape handy will help you ensure that your vest is the right size and fits you properly. It will also be useful for determining the length of the vest as you knit.
By gathering these materials and tools, you will be well-equipped to start knitting your circle vest and create a beautiful and cozy addition to your wardrobe.
Choosing the Right Yarn for Your Circle Vest
When it comes to knitting a circle vest, choosing the right yarn is essential for achieving the desired result. The yarn you select will determine the drape, texture, and overall appearance of your finished garment. Here are some key factors to consider when choosing yarn for your circle vest:
Type of Yarn:
The type of yarn you choose will greatly affect the look and feel of your circle vest. There are various options to consider, such as acrylic, wool, cotton, or blends of different fibers. Each type of yarn has its own unique properties, so it’s important to select one that suits your preferences and the intended use of your vest.
Weight of Yarn:
The weight of the yarn refers to its thickness or gauge. For a circle vest, you’ll want to choose a yarn that is suitable for the pattern you’re using. Some patterns may specify a particular yarn weight, while others may give you more flexibility. It’s important to match the recommended yarn weight to ensure that your vest turns out as intended.
Texture and Drape:
The texture and drape of the yarn will determine how the circle vest hangs and moves when worn. If you prefer a lightweight and flowy vest, you may want to choose a yarn with a soft and silky texture. Alternatively, if you’re looking for a more structured vest, a yarn with more body and stiffness may be preferable. Consider how you want your circle vest to look and feel, and choose a yarn accordingly.
Color and Pattern:
The color and pattern of the yarn can greatly enhance the overall aesthetic of your circle vest. You can choose a solid color for a classic and versatile look, or opt for a variegated yarn to add some visual interest to your garment. Additionally, choosing a yarn with a subtle or intricate pattern can create a unique and eye-catching effect in your circle vest.
Ultimately, the choice of yarn for your circle vest is a personal one. Consider your preferences, the specific pattern you’re using, and the intended use of your vest. By carefully selecting the right yarn, you’ll be able to create a beautiful and functional circle vest that you’ll love to wear.
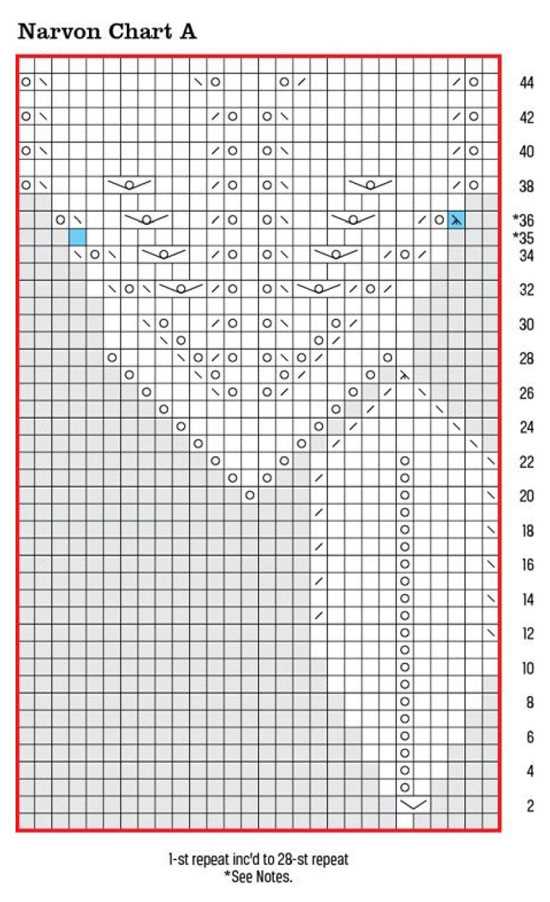
Understanding the Circle Vest Knitting Pattern

Knitting a circle vest can be a fun and rewarding project for knitters of all skill levels. This versatile garment can be worn in multiple ways, making it a great addition to any wardrobe. The circle vest knitting pattern provides detailed instructions on how to create this unique and stylish piece.
When starting the circle vest knitting pattern, it is important to select the right yarn and needles for the project. The pattern will usually specify the recommended yarn weight and needle size to achieve the desired gauge. It is important to check your gauge before starting to ensure that your finished project will turn out the correct size.
Step 1: Casting On
The first step in knitting a circle vest is casting on. The pattern will specify the number of stitches to cast on, which is typically a multiple of 4. Care should be taken to cast on loosely to ensure that the vest will fit comfortably around the body.
Step 2: Knitting in the Round
Once the stitches are cast on, the knitting is worked in the round. This means that the work is continuous, with no need to turn the piece. The pattern will specify the stitch pattern to follow, and it may include knit stitches, purl stitches, and various combinations to create texture and design.
Step 3: Shaping the Vest
The circle vest knitting pattern will typically include instructions for shaping the vest. This may involve increasing or decreasing stitches at specific intervals to create the desired shape. The pattern will provide details on how many stitches to increase or decrease and at which point in the knitting to do so.
Step 4: Finishing and Blocking
Once the body of the vest is complete, the pattern will provide instructions for finishing the garment. This may include binding off stitches, seaming any edges or seams, and adding any desired finishing touches such as tassels or fringe. After completing the knitting, it is recommended to block the vest to help shape and set the stitches.
The circle vest knitting pattern offers an exciting opportunity to create a unique and stylish garment. By following the instructions carefully and selecting the right materials, knitters can create a beautiful and versatile piece that will be a favorite in their wardrobe. Whether for themselves or as a gift, knitting a circle vest can be a rewarding and enjoyable project.
Starting the Circle Vest: Casting On
Before you can begin knitting the circle vest, you need to cast on your stitches. Casting on is the process of creating the first row of stitches onto your knitting needle, which forms the foundation of your project. While there are several different methods for casting on, I will outline a simple and common method that is suitable for this circle vest pattern.
Long tail cast on
The long tail cast on is a versatile and widely used method that provides a neat edge and a good amount of stretch. To start the long tail cast on, you will need to estimate the amount of yarn required for your project. Measure out a length of yarn that is about four times the desired width of your circle vest, allowing for extra tail length for the first few stitches.
- Hold the needle in your right hand and make a slipknot at the end of the yarn, leaving a long tail.
- Insert the needle through the loop from left to right, and pull it snug.
- Hold the needle in your left hand and the tail of the yarn in your right hand.
- Place your thumb and middle finger of your left hand between the two strands of yarn, with the tail over your thumb and the working yarn over your finger.
- Bring the needle under your thumb and over your finger, catching the working yarn.
- Bring the needle through the loop on your thumb, from front to back, and allow the loop to slip off your thumb.
- Gently pull the yarn tail to tighten the stitch on the needle.
- Repeat steps 4-7 until you have cast on the desired number of stitches for your circle vest.
Once you have cast on all your stitches, you are ready to begin knitting the circle vest. The long tail cast on method creates a clean and elastic edge, which will be important for the drape and fit of the finished garment. Take your time with the casting on process, ensuring that each stitch is even and tight enough to hold its shape.
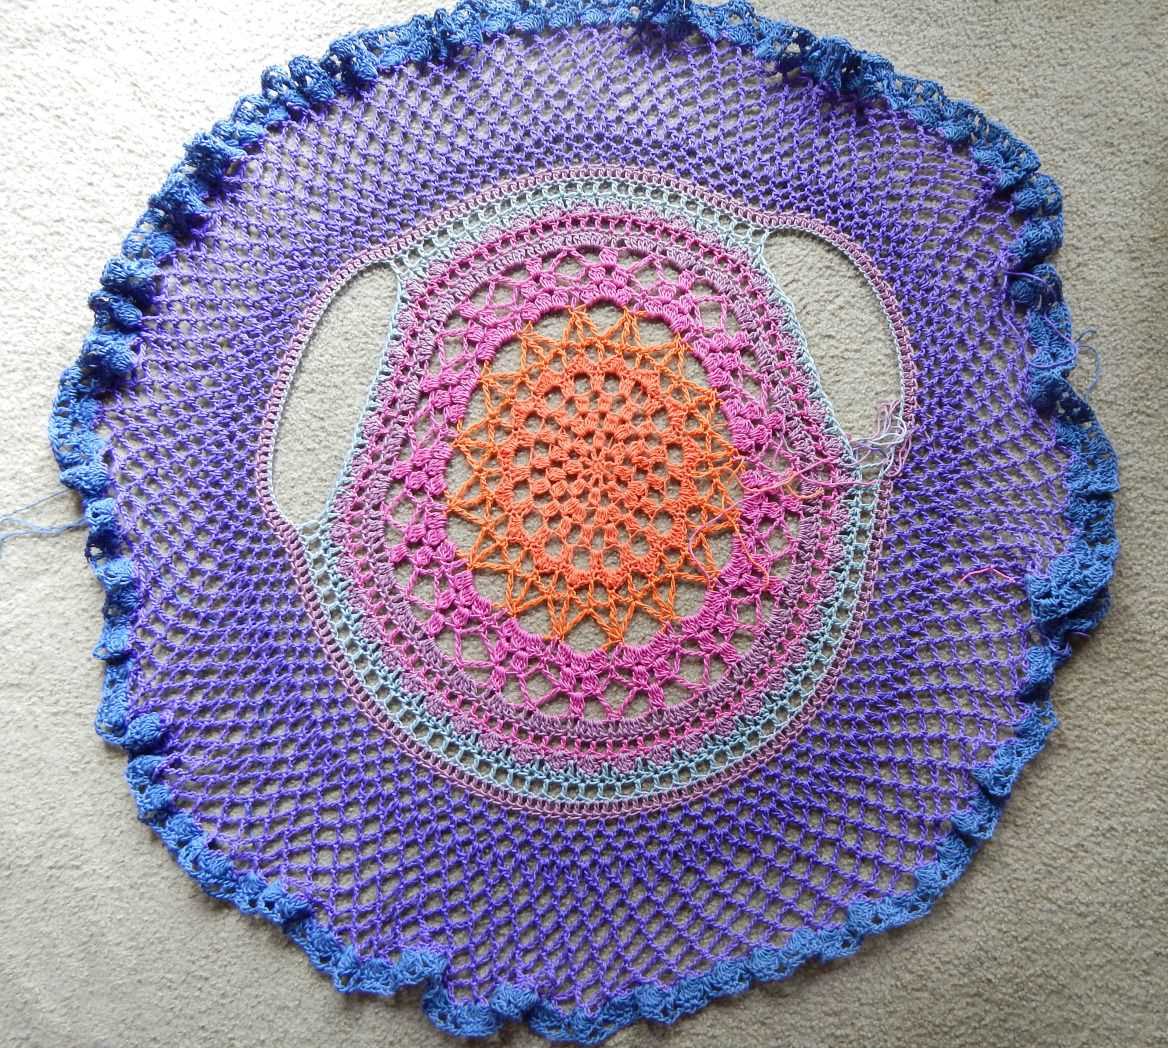
Knitting the Body of the Circle Vest

Once you’ve completed the ribbing and casted on your desired number of stitches, it’s time to start knitting the body of the circle vest. This is where the pattern really starts to take shape and you’ll see how the circle begins to form.
To begin, knit the first round of the body, following the pattern instructions for the stitch pattern. This could be a simple stockinette stitch, a ribbed pattern, or any other stitch pattern you’ve chosen for your vest.
Continue knitting in the round, following the pattern instructions, until you reach the desired length for your vest. This will depend on your size and personal preference. Some patterns may specify a certain number of rounds to knit, while others may give measurements in inches or centimeters.
As you knit, you’ll start to see the circle shape forming. The circumference of the circle will gradually increase with each round as you add more stitches. This is what creates the drape and flow of the vest when it’s worn.
Remember to periodically try on the vest as you knit to ensure it fits well and is the desired length. This will prevent any surprises when you finish knitting and try on the finished garment.
Once you’ve reached the desired length, you can proceed to the next step of the pattern, whether that’s shaping the armholes, adding sleeves, or finishing off the edges. Follow the pattern instructions carefully to ensure your vest turns out just as you envisioned.
Shaping the Armholes
When knitting a circle vest, one important step is shaping the armholes. This is necessary to create the proper fit and comfort in the garment. To do this, you will need to decrease the number of stitches in a specific area to form the armholes.
To begin shaping the armholes, you will typically divide the stitches into front and back sections. This can be done by placing stitch markers on either side of the desired armhole area. This helps you keep track of where the decreases need to be made.
Once the stitches are divided, you can start decreasing. This is usually done by knitting two stitches together to reduce the number of stitches. The specific pattern or instructions you are following will indicate how many decreases to make and at what intervals. It’s important to follow these instructions carefully to achieve the desired shape.
You may continue decreasing for a few rounds or until you have reached the desired number of stitches for the armholes. Afterward, you can continue knitting the remainder of the vest, following the pattern as instructed. Once the knitting is complete, you can seam the armholes together, creating a finished, wearable circle vest.
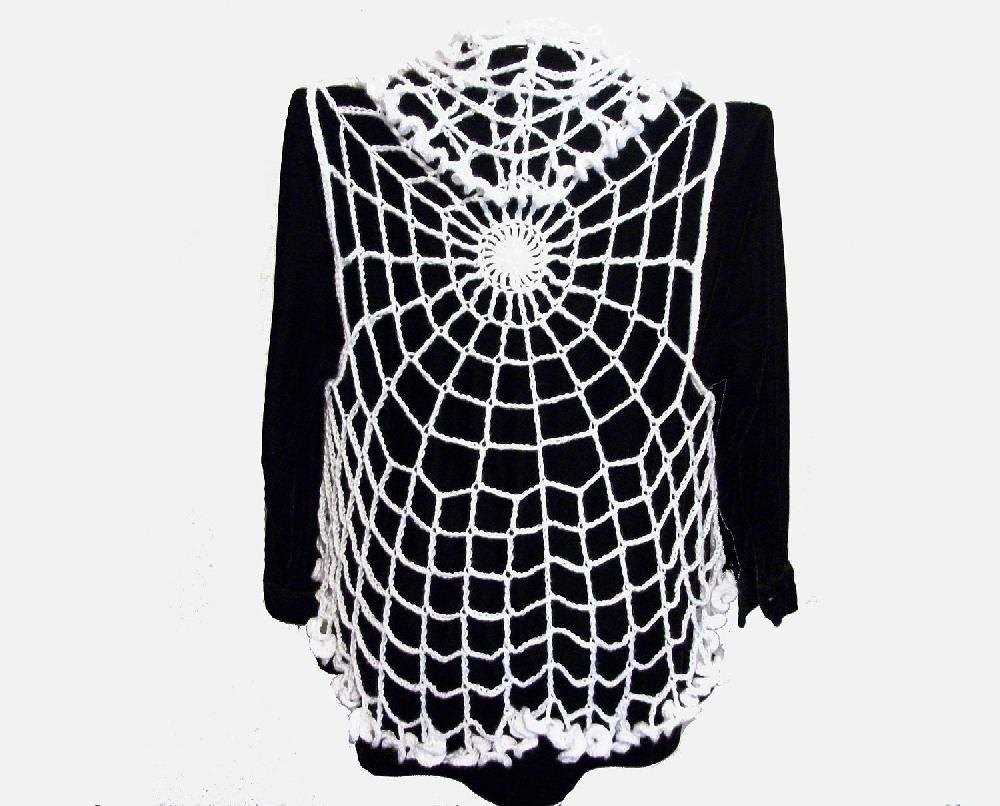
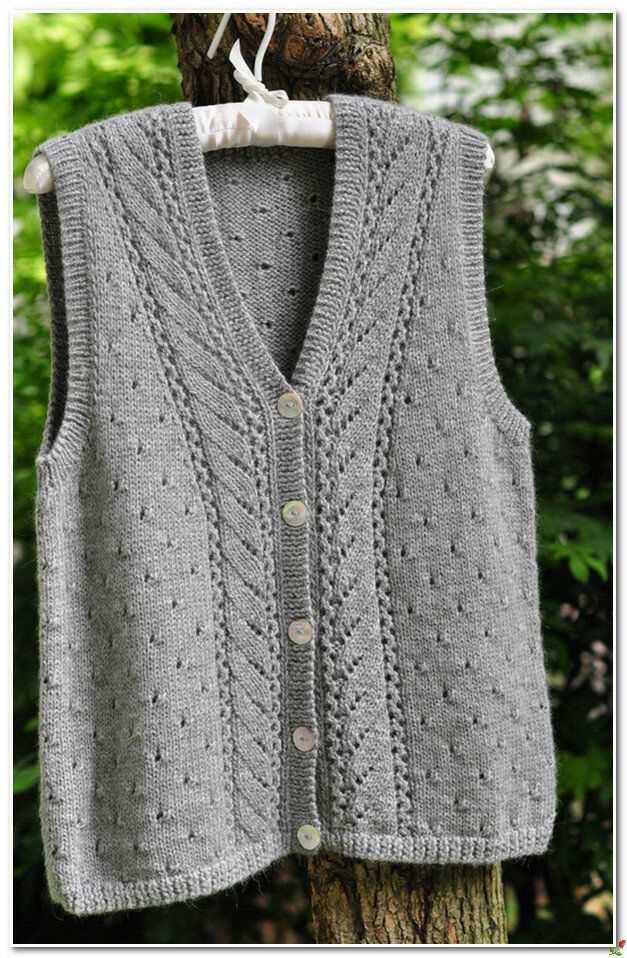
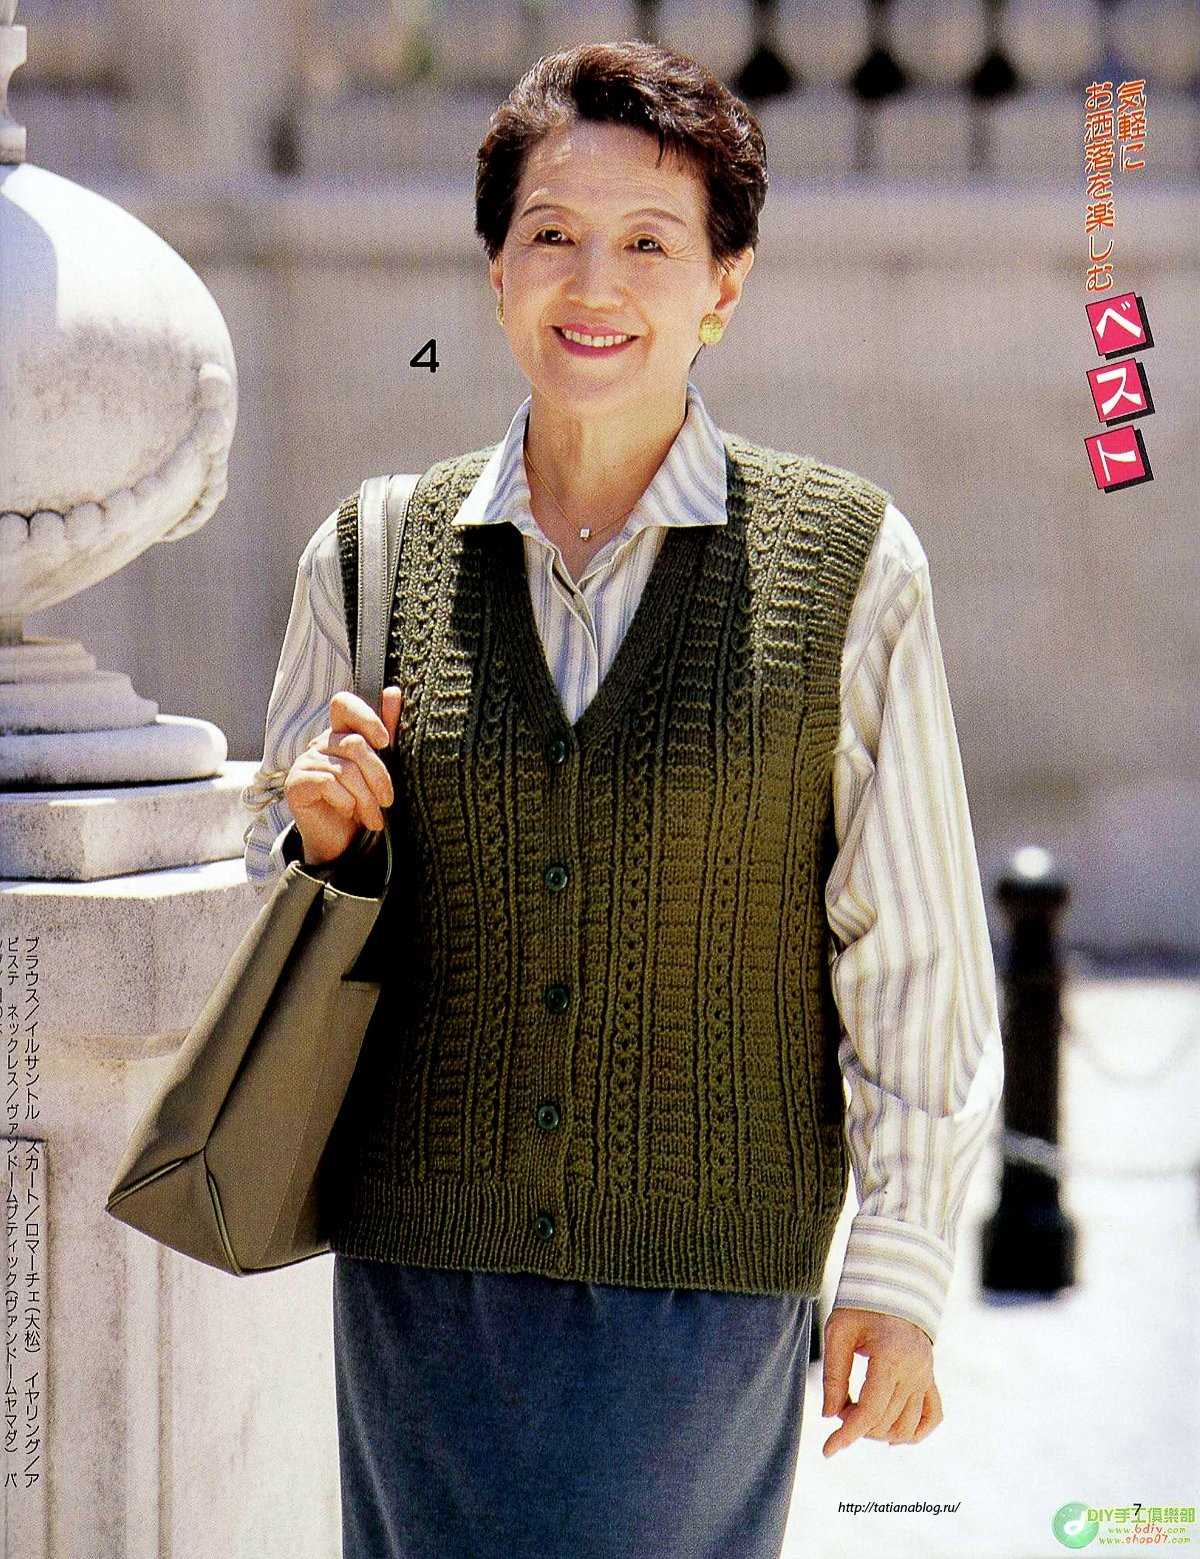
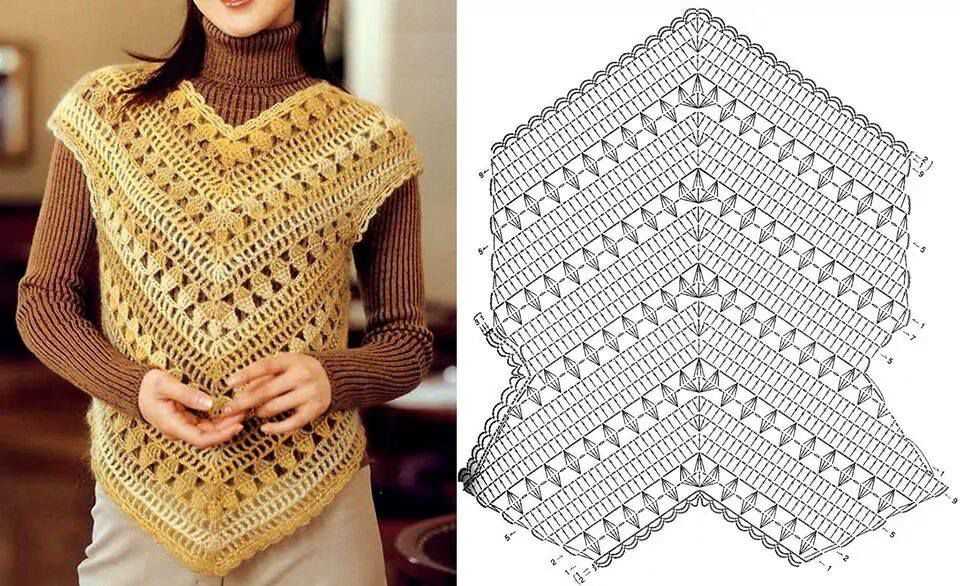
Creating the Neckline
When knitting a circle vest, one of the important steps is creating the neckline. The neckline is the opening at the top of the vest where it sits around the neck. It is crucial to get the right fit and shape for the neckline to ensure a comfortable and stylish garment. There are several techniques that can be used to create the neckline, depending on the desired look and design of the vest.
1. Round Neckline: The round neckline is a classic and simple option for a circle vest. It is created by binding off a certain number of stitches at the center front of the vest and then continuing to knit in the round. This creates a circular opening for the neck. The number of stitches to bind off depends on the desired width of the neckline. It is important to evenly distribute the stitches around the neckline to maintain the symmetry of the vest.
2. V-Neckline: For a more modern and stylish look, a V-neckline can be created. This involves shaping the neckline to form a V shape at the center front of the vest. To achieve this, stitches are usually bound off in a diagonal fashion on each side of the center front. The number of stitches to bind off on each side can vary depending on the desired depth of the V. This neckline is ideal for adding a touch of sophistication to the circle vest.
3. Cowl Neckline: Another popular option for a circle vest is the cowl neckline. This creates a draped and voluminous effect around the neck. The cowl neckline is achieved by adding extra stitches to the neckline and then knitting several rows in a rib or textured pattern. This creates a fold of fabric that sits around the neck, giving the vest a cozy and fashionable look. The depth of the cowl can vary depending on personal preference.
4. Boat Neckline: The boat neckline is a wide and shallow neckline that sits slightly off the shoulders. It is created by binding off a small number of stitches at the center front and back of the vest. This creates a wide opening for the neck, resembling the shape of a boat. The boat neckline is great for showing off the collarbones and adding an elegant touch to the circle vest.
Knitting the Border for a Finished Look
When it comes to knitting a circle vest, the border is an important element that can add a finished look to the final piece. In this article, we will explore different techniques and patterns that can be used to create a beautiful border for your circle vest.
1. Ribbing Border: One of the most common ways to add a border to a circle vest is by using ribbing. Ribbing creates a stretchy and elastic border that can add a polished look to your vest. To create a ribbing border, you can use a combination of knit and purl stitches in a specific pattern, such as knit 2 stitches, purl 2 stitches. This pattern creates a textured border that can complement the rest of your vest.
2. Lace Border: If you want to add a delicate and elegant touch to your circle vest, consider knitting a lace border. Lace patterns can create intricate and lacy designs that can instantly elevate the look of your vest. There are various lace knitting patterns available, ranging from simple to complex, so you can choose the one that suits your skill level and desired aesthetic. Remember to choose a lace pattern that complements the overall design of your circle vest.
3. Garter Stitch Border: Another option for creating a border is using garter stitch. Garter stitch is created by knitting every row, resulting in a bumpy texture. This simple yet timeless stitch can add a classic and clean look to your circle vest. To create a garter stitch border, simply continue knitting in garter stitch for a certain number of rows or until your desired border width is achieved. You can also experiment with different color combinations to make your border stand out.
4. I-cord Border: For a more intricate and decorative border, you can consider knitting an I-cord border. An I-cord is a tube-like knitted cord that can be attached to the edges of your circle vest. This type of border adds a unique and finished look to your vest, and it can be created using double-pointed needles or a circular needle. It may require some practice and attention to detail, but the end result is definitely worth it.
With these techniques and patterns, you can create a beautiful and finished border for your circle vest. Whether you prefer a simple ribbing border or an intricate lace border, the choice is yours. The border adds the final touch to your vest, so don’t be afraid to get creative and experiment with different designs and colors.
Blocking and Finishing Your Circle Vest
Once you have completed knitting your circle vest, the next step is to block and finish it. Blocking is a crucial step in the knitting process as it helps to even out the stitches, relax the fabric, and improve the overall appearance of the finished garment.
1. Wet blocking: To block your circle vest, start by filling a basin or sink with lukewarm water and a mild detergent. Gently immerse the vest in the water, making sure it is fully soaked. Allow the vest to sit in the water for about 15-20 minutes. Then, carefully remove the vest from the water and gently squeeze out the excess moisture, being careful not to wring or twist the fabric. Lay the vest flat on a clean towel and roll it up, pressing down firmly to remove additional moisture. Once the vest is slightly damp, you can proceed to the next step.
2. Blocking: Lay the slightly damp circle vest on a flat, clean surface, such as a blocking mat or a towel. Gently stretch and shape the vest to the desired size and shape, paying special attention to any lace or pattern details. Use rustproof pins to secure the edges and keep the shape in place. Make sure the vest is symmetrical and the edges are straight. Allow the vest to dry completely in this blocked shape.
3. Finishing touches: Once the vest is dry, remove the pins and gently unpin it. Use a tapestry needle to weave in any loose yarn ends, carefully hiding them within the stitches. If desired, you can add any additional finishing touches, such as attaching buttons, sewing a border, or adding decorative stitch details. Follow the instructions for the specific pattern you are using to ensure the best finish for your circle vest.
Blocking and finishing your circle vest is an important step in the knitting process. It not only enhances the appearance of the garment but also ensures that it fits properly and drapes nicely when worn. Take your time and pay attention to detail, and you will have a beautiful, well-finished circle vest to enjoy.
Styling and Wearing Your Circle Vest
Once you have finished knitting your circle vest using the pattern, it’s time to style and wear it! The great thing about circle vests is that they can be worn in multiple ways, allowing you to create different looks depending on your personal style and the occasion. Here are some ideas on how to style and wear your circle vest:
1. Wrap it around your shoulders: One of the simplest and most common ways to wear a circle vest is to drape it over your shoulders like a shawl. This is a great option for chilly days when you need an extra layer of warmth. You can let the vest hang loose or secure it with a brooch or a shawl pin for added style.
2. Belt it at the waist: If you want to define your waist and add some structure to your outfit, try belting your circle vest at the waist. This creates a flattering silhouette and adds a touch of sophistication to your look. Choose a wide or narrow belt depending on your preference and the thickness of your vest.
3. Layer it over a long-sleeved top: For a cozy yet stylish look, layer your circle vest over a long-sleeved top. This works well with both casual and more dressed-up outfits. Choose a contrasting color or pattern for your top to create an eye-catching combination.
4. Pair it with jeans or leggings: Circle vests go well with any type of bottoms, but they particularly complement jeans or leggings. Keep your bottoms simple and let the vest be the focal point of your outfit. Add some ankle boots or sneakers to complete the look.
5. Dress it up with a skirt: If you’re looking to dress up your circle vest, opt for a skirt instead of pants. A flowy maxi skirt or a pencil skirt can instantly elevate your outfit and give it a more feminine touch. Add some heels and accessories for a polished look.
These are just a few ideas to get you started, but feel free to get creative and experiment with different styling options. With its versatile shape and design, your circle vest can be a wardrobe staple that you’ll want to wear in various ways.
Conclusion
Knitting a circle vest can be a rewarding project, but it’s not without its challenges. Understanding common issues that can arise during the process can help you troubleshoot and overcome them with confidence. Keep in mind that practice and patience are key to mastering this pattern.
In summary:
- Ensure you have the correct gauge and measurements before starting.
- Use stitch markers to keep track of your rounds and decreases.
- Pay attention to the pattern instructions and any special techniques required.
- If your vest is turning out too big or small, adjust your needle size accordingly.
- If you make mistakes, don’t be afraid to unravel and try again. It’s all part of the learning process.
- Blocking your finished project can help even out stitches and give a polished look.
Remember, knitting is a personal journey, and each project is an opportunity to learn and grow. Embrace the challenges and enjoy the process of creating a beautiful circle vest.