
If you’re looking to add a stylish and versatile clothing item to your wardrobe, a sleeveless top can be the perfect choice. With its light and airy design, a sleeveless top is perfect for spring and summer, and can be easily layered with a cardigan or jacket for colder months. Plus, knitting your own sleeveless top allows you to customize it to your own taste and preferences.
By following our free sleeveless top knitting pattern, you can create a beautiful and comfortable garment that you’ll love to wear. The pattern is beginner-friendly and includes step-by-step instructions, making it suitable for knitters of all skill levels. Whether you’re an experienced knitter looking for a quick project or a beginner looking to try something new, this pattern is perfect for you.
This sleeveless top pattern is not only stylish, but it’s also versatile. With a few modifications, you can create a top that’s perfect for any occasion. You can choose different yarns to create different effects – opt for a soft and flowy yarn for a feminine and elegant look, or choose a bold and colorful yarn for a more playful and casual style. The pattern also allows you to customize the length and neckline to suit your preferences.
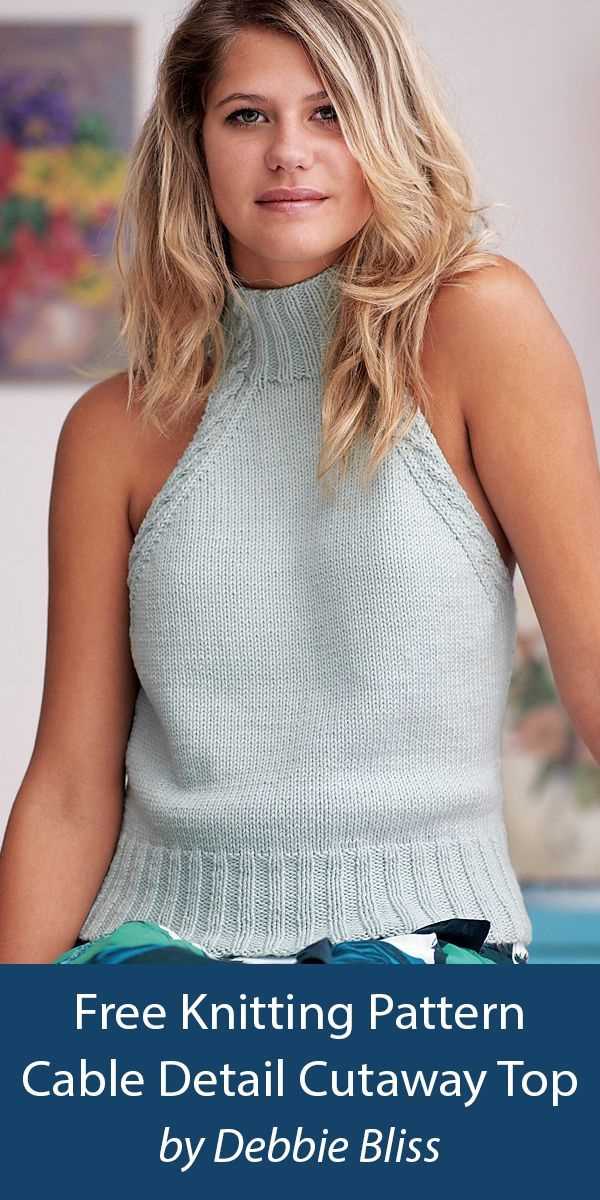
Free Sleeveless Top Knitting Pattern
If you love knitting and are looking for a new project, why not try making a sleeveless top? With a free knitting pattern, you can create a stylish and comfortable piece of clothing that is perfect for warm weather. Whether you are an experienced knitter or just starting out, this pattern provides a great opportunity to showcase your skills and create something unique.
The free sleeveless top knitting pattern includes detailed instructions and a list of materials needed. You can choose your favorite yarn and needle size to customize the fit and feel of the top. The pattern typically includes instructions for different sizes, so you can make a top that fits you perfectly.
To start knitting the top, you will need to cast on the required number of stitches and follow the pattern stitch by stitch. As you knit your way through the pattern, you will see the sleeveless top take shape. The pattern may include different stitch patterns, such as ribbing or lace, to add texture and visual interest to the top.
Once you have completed knitting the top, you can add any desired finishing touches, such as sewing up the seams or adding buttons or other embellishments. Then, simply try on your new sleeveless top and enjoy wearing your handmade creation!
Materials Needed for the Sleeveless Top Knitting Pattern

To create the sleeveless top, you will need the following materials:
1. Yarn:
Choose a yarn that is suitable for the desired weight and drape of your sleeveless top. It is recommended to use a lightweight yarn, such as a fingering weight or sport weight yarn, for a comfortable and breathable feel. Consider the fiber content and color of the yarn to match your personal preferences and the intended style of the top.
2. Knitting Needles:

Select a pair of knitting needles that correspond with the recommended gauge for the yarn you have chosen. The pattern may specify a specific needle size, but it is important to swatch and adjust your needle size to achieve the correct gauge. Circular or straight needles can be used, depending on your knitting preference.
3. Stitch Markers:

Markers are essential for keeping track of stitch patterns, shaping, and armhole placement in the sleeveless top. You will need both removable stitch markers (to mark specific stitches or sections) and progress keepers (to mark the beginning of each round if working in the round).
4. Tapestry Needle:
A tapestry needle, also known as a yarn needle or darning needle, is used for seaming, weaving in ends, and any finishing touches on the sleeveless top. Choose a needle with a large eye that can accommodate the yarn you are working with.
5. Scissors:

Sharp scissors are necessary for cutting yarn, trimming ends, and other precision tasks during the knitting process. Keep them handy to ensure smooth and precise work.
6. Stitch Holders or Waste Yarn:
If the pattern requires placing stitches on hold, you will need stitch holders or waste yarn to keep those stitches secure while working on other parts of the top.
7. Measuring Tape:
A measuring tape is necessary to check your gauge, measure the length, and ensure accurate sizing for the sleeveless top. It is a crucial tool for achieving the desired fit.
With these materials on hand, you’re ready to start knitting your own sleeveless top using the free pattern. Make sure to read the pattern instructions carefully before beginning and take your time to create a beautiful and well-fitting garment.
Choosing the Right Yarn for Your Sleeveless Top
When selecting yarn for your sleeveless top knitting project, it is important to consider a few factors to ensure that you achieve the desired results. The type of yarn you choose will impact the drape, fit, and overall look of your finished top.
Fiber content: The first consideration when choosing yarn is the fiber content. Common options for sleeveless tops include cotton, linen, bamboo, silk, and blends. Each fiber has its own unique properties that can affect the final garment. Cotton and linen are breathable and lightweight, making them great choices for summer tops. Bamboo and silk add a luxurious feel and drape to the fabric, while blends can offer a combination of different characteristics.
Weight and gauge: Another important factor to consider is the weight of the yarn, which will determine the thickness of your sleeveless top. Thicker yarns, such as bulky or chunky weight, will create a warmer and more substantial garment, while lighter weight yarns, like fingering or sport weight, will result in a lighter and more delicate top. It is crucial to match the yarn weight with the recommended gauge in the pattern to ensure proper sizing and fit.
Color and texture: The color and texture of the yarn can also play a role in the final look of your sleeveless top. Solid colors can showcase stitch patterns and textures, while variegated or self-striping yarns can add visual interest. It is important to consider how the yarn color and texture will interact with the stitch pattern or design of your top.
Care instructions: Lastly, consider the care instructions for the yarn. Some fibers may require special care, such as handwashing or dry cleaning, which may impact the practicality and longevity of your garment. It is important to choose a yarn that is easy to care for and aligns with your personal preferences.
By considering the fiber content, weight and gauge, color and texture, and care instructions, you can make an informed decision when selecting yarn for your sleeveless top knitting project. Experimenting with different yarns can also add versatility to your wardrobe, allowing you to create tops for different seasons and occasions.
Step-by-Step Instructions for Knitting the Sleeveless Top
Knitting a sleeveless top can be a fun and rewarding project for knitters of all skill levels. This step-by-step guide will walk you through the process of creating your own stylish and comfortable sleeveless top.
Materials Needed:
- Knitting needles (size will depend on your yarn and desired gauge)
- Yarn (choose a lightweight yarn suitable for warm weather)
- Tape measure
- Stitch markers
- Tapestry needle for weaving in ends
Step 1: Gauge and Measurements
Before you begin knitting, it’s important to determine your gauge and take accurate measurements of your bust, waist, and hips. This will ensure that your sleeveless top fits properly. To find your gauge, knit a swatch using your chosen yarn and needles and measure the number of stitches and rows per inch.
Step 2: Cast On
Using your chosen cast-on method, cast on the desired number of stitches for your size. This will typically be the measurement around your bust minus a few inches for ease. For a neat finish, consider using the long-tail cast-on method.
Step 3: Knit the Body
Once your stitches are cast on, begin knitting the body of your sleeveless top in the desired stitch pattern. You may choose to knit in the round or knit flat and seam the sides later. Use stitch markers to mark the beginning and end of each round if you’re knitting in the round.
Step 4: Shaping the Armholes
To create armholes, you’ll need to decrease stitches evenly on each side of the work. This can be done by knitting two stitches together or using a more complex decrease stitch. Consult the pattern or create your own shaping based on your measurements. Continue knitting the body until it reaches your desired length.
Step 5: Finishing
Once you’ve completed the desired length for your sleeveless top, bind off all stitches and weave in any loose ends using a tapestry needle. If you knit the body flat, you will also need to seam the sides of the top using a mattress stitch or another preferred seaming method.
With these step-by-step instructions, you’ll be able to create a beautiful sleeveless top that’s perfect for warm weather. Get creative with different stitch patterns and yarn colors to make a one-of-a-kind garment that reflects your personal style.
Understanding Knitting Abbreviations and Terms
Knitting is a popular craft that involves creating fabric by using two or more needles to loop yarn into interlocking stitches. To read and understand knitting patterns and instructions, it is important to familiarize yourself with the various knitting abbreviations and terms that are commonly used. These abbreviations make written instructions shorter, more concise, and easier to follow.
Some common knitting abbreviations include:
- k: knit
- p: purl
- yo: yarn over
- k2tog: knit two stitches together
- ssk: slip slip knit
These abbreviations indicate the specific stitches and techniques that need to be used in a pattern. For example, if a pattern says to “k2tog,” you would knit two stitches together as one. If it says to “p,” you would purl the next stitch. By understanding these abbreviations, you can easily follow a knitting pattern and create the desired design.
Along with abbreviations, there are also various knitting terms that you should know. These terms describe different actions and techniques used in knitting. Some common knitting terms include:
- Row: a horizontal line of stitches
- Cast on: creating the first row of stitches on the needle
- Bind off: finishing a piece of knitting by creating an edge and removing the stitches from the needle
- Gauge: the number of stitches and rows per inch that determine the size of the knitted piece
- Repeat: performing a set of stitches or instructions multiple times
Understanding these knitting terms will help you decipher the instructions in a knitting pattern and execute the techniques correctly. Whether you’re a beginner or an experienced knitter, having a good understanding of knitting abbreviations and terms is essential for successfully completing knitting projects and creating beautiful, well-finished pieces.
Tips for Achieving the Perfect Gauge
When knitting a sleeveless top using a free knitting pattern, achieving the perfect gauge is essential to ensure that the final product fits correctly and looks as intended. Here are some tips to help you achieve the perfect gauge:
1. Use the recommended yarn and needle size
Most knitting patterns provide recommendations for the type of yarn and needle size to use in order to achieve the desired gauge. It is important to follow these recommendations as closely as possible. Using a different yarn weight or needle size can significantly affect the gauge and result in a top that is either too tight or too loose.
2. Make a gauge swatch
Before starting your project, it is important to make a gauge swatch to determine if your tension matches the recommended gauge. To do this, cast on a few more stitches than specified in the pattern and work a square swatch using the recommended needle size. Measure the gauge by counting the number of stitches and rows per inch. Adjust your needle size if needed to match the gauge of the pattern.
3. Block your swatch
Blocking your swatch can help ensure that the measurement is accurate. Wet your swatch by soaking it in water, gently squeeze out the excess moisture, and lay it flat to dry. Use pins to stretch it to the correct measurements specified in the pattern. This will give you a better idea of how the fabric will behave after the top is complete.
4. Measure your gauge throughout the project
While working on your sleeveless top, it is important to periodically measure your gauge to ensure that it remains consistent. This is especially crucial if you take breaks from your project or switch between different needle sizes. Measure your gauge after a few inches of knitting to check if any adjustments need to be made to your tension.
5. Adjust your tension if necessary
If you find that your gauge is significantly different from the pattern, you may need to adjust your tension. If your gauge is too loose, try using a smaller needle size. Conversely, if your gauge is too tight, use a larger needle size. Remember to make adjustments gradually and keep measuring your gauge to ensure that you are achieving the desired tension.
By following these tips, you can achieve the perfect gauge when knitting a sleeveless top and ensure that your finished garment fits beautifully.
Adding Decorative Details to Your Sleeveless Top

When it comes to knitting a sleeveless top, adding decorative details can make a simple design truly stand out. Whether you prefer delicate lace patterns or bold colorwork, there are various ways to add flair to your knitting project. Here are a few ideas to inspire you:
1. Lace Inserts
One way to add elegance to your sleeveless top is by incorporating lace inserts. You can create a panel of intricate lace either on the front, back, or both sides of the top. This delicate detail not only adds visual interest but also allows for increased breathability, perfect for warmer weather.
2. Embroidery
Add a personal touch to your sleeveless top by incorporating some embroidery. You can choose to embroider small motifs, such as flowers or geometric shapes, onto the fabric. Alternatively, you can also opt for larger designs, such as an intricate pattern across the entire top. Embroidery not only adds texture but also allows you to showcase your creativity.
3. Colorwork
If you are a fan of vibrant and bold patterns, adding colorwork to your sleeveless top is an excellent option. You can experiment with different color combinations and stitch patterns to create unique and eye-catching designs. Whether you prefer fair isle, intarsia, or slip stitch patterns, colorwork can elevate the look of your top.
4. Beaded Accents

Add a touch of glamour to your sleeveless top by incorporating beads into your knitting. You can choose to sew on beads individually or create patterns with them. Beads can be used to highlight certain elements of your top, such as along the neckline or hem. They add a bit of sparkle and can turn your top into a stunning evening wear piece.
These are just a few ideas to get you started on adding decorative details to your sleeveless top. Remember to choose a design that suits your personal style and preferences. With a little creativity, you can create a unique and beautiful sleeveless top that will surely turn heads.
Customizing the Fit of Your Sleeveless Top
When knitting a sleeveless top, it is important to ensure that the fit is just right for your body. By customizing the fit, you can create a garment that flatters your figure and feels comfortable to wear. Here are some tips for customizing the fit of your sleeveless top:
1. Determine your measurements
Before beginning your project, take accurate measurements of your bust, waist, and hips. This will help you select the appropriate size and make any necessary adjustments to the pattern.
2. Adjust the length
Depending on your body shape and personal preference, you may need to adjust the length of your sleeveless top. Some patterns may provide instructions for lengthening or shortening the garment. If not, you can easily make adjustments by adding or subtracting rows.
3. Modify the neckline
The neckline of a sleeveless top can significantly impact its overall look. If you prefer a higher neckline, you can easily modify the pattern to achieve the desired shape. Conversely, if you want a deeper neckline, you can make adjustments by casting on or binding off more stitches.
4. Customize the armholes
The armholes of a sleeveless top should fit comfortably around your arms. Depending on your arm size, you may need to adjust the number of stitches cast on or bind off for the armholes. Additionally, you can modify the shape of the armholes to create a more tailored fit.
By following these tips and techniques, you can customize the fit of your sleeveless top to suit your unique body shape and style. Remember to always make a gauge swatch before starting your project to ensure the correct fit and to make any necessary adjustments along the way. Happy knitting!
Blocking and Finishing Your Knitted Sleeveless Top

Blocking
Blocking is an important step in finishing your knitted sleeveless top. It helps to shape and even out your stitches, ensuring that the garment fits well and looks its best. To block your sleeveless top, you will need a flat surface, such as a blocking mat or towel, pins, and a spray bottle filled with water.
Start by laying your knitted sleeveless top on the blocking mat or towel, making sure that it is flat and has the desired measurements. Gently pin the edges and corners to hold it in place. Then, use the spray bottle to lightly dampen the fabric. Avoid saturating it too much, as it may take longer to dry. Let the top dry completely before unpinning it.
Finishing
Once your knitted sleeveless top is blocked and dry, it’s time to finish it off. Start by weaving in any loose ends of yarn using a yarn needle. Be sure to secure the ends tightly, so they don’t come undone with wear.
If your pattern includes any decorative elements, such as ribbing or lace, make sure they are properly blocked and shaped as well. Gently stretch or pat them into place to achieve the desired effect.
If you want to add any closures, such as buttons or clasps, now is the time to sew them on. Place them evenly along the opening of the top, making sure they are secure and aligned correctly.
Finally, give your knitted sleeveless top one last inspection. Check for any loose stitches or areas that may need reinforcement. Fix any issues you come across, and then your top is ready to wear!
Styling Your Sleeveless Top for Different Occasions
Whether you’re heading to a casual brunch or a formal evening event, a sleeveless top can be a versatile and stylish addition to your wardrobe. With the right pairing and accessories, you can easily transform your top to suit any occasion. Here are some ideas on how to style your sleeveless top for different occasions:
Casual Day Out
For a casual outing, pair your sleeveless top with a pair of high-waisted jeans and some fashionable sneakers. This combination offers a trendy and laid-back look that is perfect for running errands or meeting friends for coffee. Add a denim jacket or a cardigan for cooler weather, and accessorize with a statement necklace or a chunky bracelet to add some personality to your outfit.
Office Chic
If you want to wear your sleeveless top to the office, pair it with a tailored blazer or a structured jacket. Opt for neutral colors, such as black, navy, or gray, to create a polished and professional look. Pair it with a pencil skirt or tailored pants for a sophisticated ensemble. Complete the outfit with a pair of closed-toe heels or stylish flats, and accessorize with minimal jewelry.
Evening Glam
When dressing up for a special occasion or a night out, style your sleeveless top with a skirt or a pair of tailored trousers. Opt for fabrics like silk or chiffon to add an elegant touch. For a glamorous look, choose a top with beading or sequin embellishments. Add a pair of heels or dressy sandals, and accessorize with statement earrings and a clutch bag. You’ll be ready to shine on the dance floor!
Remember, the key to styling your sleeveless top for different occasions is to experiment with different combinations and find what makes you feel confident and comfortable. Play with different textures, colors, and accessories to create unique looks that reflect your personal style. With a little creativity, you can take your sleeveless top from day to night and impress in any setting.
Troubleshooting Common Knitting Issues

Knitting is a wonderful craft that allows you to create beautiful garments and accessories with just a few basic stitches. However, like any craft, knitting can sometimes come with its fair share of challenges. Here are some common knitting issues and tips on how to troubleshoot them:
1. Dropped Stitches
Dropped stitches are a common problem in knitting, and they can be quite frustrating. If you notice that you have dropped a stitch, don’t panic! To fix a dropped stitch, you can use a crochet hook or a knitting needle to pick up the stitch and place it back on the needle. Make sure to catch the dropped stitch before it unravels any further.
2. Uneven Tension

Uneven tension is another common issue that knitters face. It can result in stitches that are too tight or too loose, which can affect the overall appearance of your project. To fix uneven tension, try adjusting your grip on the needles and yarn. Practice knitting with a relaxed hand and experiment with different needle sizes until you find a tension that works for you.
3. Twisted Stitches
Twisted stitches can happen when you accidentally twist the stitch on the needle while knitting. This can result in an uneven fabric and affect the overall fit of your project. To fix twisted stitches, carefully unravel the stitch and re-knit it correctly. Pay attention to the direction of the stitch and make sure it is not twisted before continuing with your pattern.
4. Yarn Tangles
Yarn tangles can be a common frustration, especially when working with multiple colors or different strands of yarn. To prevent yarn tangles, make sure to keep your working yarn organized and untangled. You can use yarn bobbins or simply take a few moments to untangle the yarn before you begin knitting. If you do encounter a tangle, take your time to patiently unravel it to avoid creating knots or damaging the yarn.
5. Gauge Issues
Gauge issues occur when your knitting does not match the recommended gauge specified in the pattern. This can result in a project that is too large or too small. To avoid gauge issues, make sure to swatch before starting your project and adjust your needle size if necessary. Measure your gauge carefully and compare it to the gauge specified in the pattern to ensure that your finished project will have the correct size and fit.
By being aware of these common knitting issues and knowing how to troubleshoot them, you can save yourself a lot of frustration and enjoy the process of knitting even more. Remember to stay patient and keep practicing, as knitting is a skill that improves with time and experience.
Frequently Asked Questions About Sleeveless Top Knitting

Here are some frequently asked questions about knitting sleeveless tops:
1. Can I resize the sleeveless top pattern to fit me?
Yes, you can resize the sleeveless top pattern to fit your measurements. Here are a few tips:
- Take accurate measurements of your bust, waist, and hip.
- Choose a size in the pattern that is closest to your measurements.
- Make a gauge swatch and adjust your needle size to match the gauge given in the pattern.
- Use the pattern instructions for your chosen size as a guide, but make adjustments to the stitch count and shaping as necessary to fit your specific measurements.
2. Can I substitute the yarn recommended in the pattern?
Yes, you can substitute the yarn recommended in the pattern with a different yarn. Here’s what you need to consider:
- Choose a yarn that has a similar gauge and fiber content as the recommended yarn.
- Make a gauge swatch using your chosen yarn and adjust your needle size if necessary to match the gauge given in the pattern.
- Keep in mind that changing the yarn may also affect the drape and overall look of the finished top.
3. How do I block my knitted sleeveless top?

Blocking is an important step in finishing your knitted sleeveless top. Here’s how to block it:
- Fill a basin or sink with lukewarm water and add a small amount of gentle wool wash or shampoo.
- Submerge your knitted top in the water and gently agitate it to ensure that it is completely saturated.
- Let the top soak for about 15 minutes.
- Drain the water and gently squeeze out the excess moisture without wringing or twisting the fabric.
- Lay the top flat on a clean towel and gently reshape it to the correct size and dimensions.
- Pin the top in place using rustproof T-pins or blocking wires.
- Let the top dry completely, preferably on a flat surface away from direct sunlight or heat.
With these frequently asked questions answered, you should feel more confident in knitting your own sleeveless top. Happy knitting!