
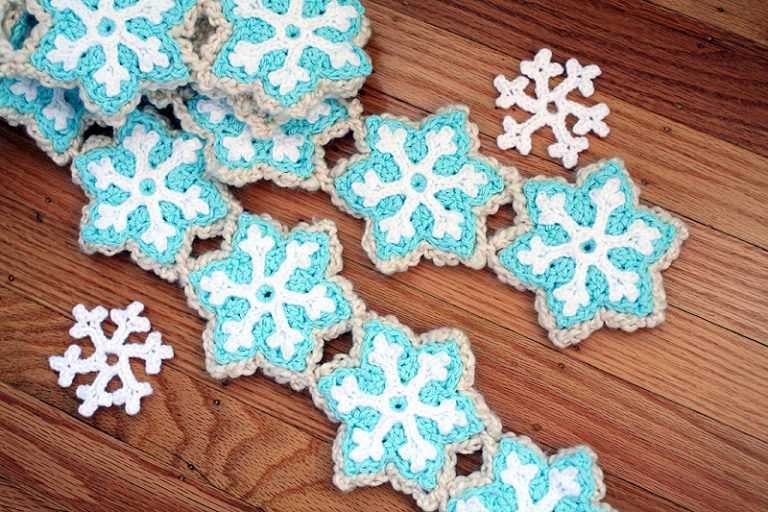
Knitting is a wonderful craft that allows you to create beautiful and unique pieces. One popular pattern to knit is the snowflake pattern. The snowflake pattern is perfect for adding charm and winter vibes to your knitting projects. Whether you want to create a cozy winter scarf or a festive holiday decoration, learning how to knit the snowflake pattern will definitely come in handy.
The snowflake pattern involves knitting a series of intricate and delicate designs that resemble the beautiful ice crystals. This pattern is typically done using a combination of knit and purl stitches, along with simple yarn overs and decreases. While it may seem complicated at first, with a little practice and patience, you will be able to master this pattern and create stunning snowflake designs.
When knitting the snowflake pattern, it’s important to choose the right yarn and knitting needles. Opt for a fine or medium weight yarn in a light or white color to mimic the snowflake’s ethereal beauty. Pair it with appropriate sized knitting needles, usually a size smaller than what is recommended for the yarn, to create a tight and defined stitch. Additionally, using stitch markers can be helpful in keeping track of the pattern and ensuring accuracy.
In this article, we will guide you through the steps of knitting the snowflake pattern, providing detailed instructions, tips, and tricks. With our easy-to-follow tutorial, you will soon be creating your own snowflake designs to incorporate into your knitting projects. Get ready to embrace the winter wonderland with your knitting needles!
How to Knit Snowflake Pattern

Knitting a snowflake pattern can be a fun and festive way to add a wintery touch to your knitting projects. Whether you’re making a scarf, hat, or even a holiday decoration, knitting a snowflake design can create a beautiful and unique finished piece.
To get started, you’ll need a few basic supplies. You’ll need yarn in your desired color, knitting needles in the appropriate size for your yarn, and a snowflake pattern. There are many different snowflake patterns available online or in knitting books, so you can choose one that fits your skill level and desired look.
Once you have your supplies ready, you can begin knitting the snowflake pattern. Start by casting on the required number of stitches for your pattern. Then, follow the instructions for each row, knitting or purling as directed. Pay close attention to any special stitches or techniques that may be required, such as yarn overs or decreases.
As you work through the pattern, you’ll start to see the snowflake design take shape. The combination of knits, purls, and special stitches will create the intricate and delicate pattern that resembles a snowflake. Take your time and enjoy the process of creating something beautiful with your knitting skills.
Once you’ve completed the snowflake pattern, you can finish off your knitting project by binding off the stitches and weaving in any loose ends. Depending on your project, you can then continue to assemble and block the finished piece for a professional and polished look.
With a little practice and patience, you can easily knit a snowflake pattern to add a touch of winter magic to your knitting projects. Whether you incorporate the snowflake design into a larger project or create standalone snowflake decorations, the end result will surely be stunning. Get started on your snowflake knitting adventure and see the beauty that this pattern can bring to your creations.
Gather Your Materials
Before you start knitting the snowflake pattern, you will need to gather all the necessary materials. Here is a list of items you will need:
- Yarn: Choose a yarn of your choice in the color you want your snowflake to be. Make sure it is a lightweight yarn that is suitable for knitting.
- Knitting needles: You will need a pair of knitting needles in a size appropriate for your yarn choice. Check the yarn label for recommendations.
- Tapestry needle: This needle will be used for weaving in ends and finishing touches.
- Scissors: A pair of sharp scissors will come in handy for cutting yarn.
- Stitch markers: These will help you keep track of your stitches and any pattern repeats.
- Pattern instructions: You can either find a printed pattern or use an online resource. Make sure you have clear instructions before you start.
Once you have gathered all these materials, you are ready to start knitting the snowflake pattern. Make sure you have a comfortable and well-lit space to work in, and take your time to familiarize yourself with the pattern instructions. With all the materials ready, you can now begin the knitting process and create beautiful snowflake designs to decorate your home or give as gifts.
Understand the Basics of Knitting
If you’re interested in learning how to knit, it’s important to understand the basics of this craft. Knitting is a method of creating fabric by interlocking loops of yarn with knitting needles. It’s a versatile and enjoyable hobby that allows you to create all kinds of items, from clothing and accessories to home decor.
Materials: To get started with knitting, you’ll need a few basic materials. These include knitting needles, which come in different sizes and lengths, and yarn, which can vary in thickness and composition. It’s important to choose the right combination of needles and yarn for your project, as this will affect the finished result.
Common Knitting Techniques and Stitches:
- Casting On: This is the first step in any knitting project. It involves creating the initial stitches on your needle.
- Knit Stitch: The knit stitch is the foundation of knitting. It involves inserting the needle into a stitch, wrapping the yarn around, and pulling it through to create a new stitch.
- Purl Stitch: The purl stitch is the reverse of the knit stitch. It creates a bumpy texture on the fabric.
- Binding Off: This is the final step in a knitting project. It involves securing the stitches and creating a finished edge.
Tension: The tension, or how tightly or loosely you knit, is important to achieve the desired result. Too tight tension can make the fabric rigid, while loose tension can cause the fabric to be too loose and floppy.
Reading Patterns: Knitting patterns are written instructions that guide you through each step of a project. It’s important to learn how to read and understand these patterns to successfully complete your knitting projects.
Choose the Right Yarn and Needles

When knitting a snowflake pattern, it is important to choose the right yarn and needles to ensure the best results. The yarn you choose will determine the overall look and feel of the snowflake, so it’s worth spending some time considering your options.
Yarn Weight: The weight of the yarn will determine the size and thickness of the snowflake. For delicate and intricate patterns, a laceweight or fingering weight yarn is recommended. If you prefer a chunkier snowflake, you can opt for a sport or DK weight yarn. Consider the desired outcome and the level of detail in the pattern when selecting the yarn weight.
Yarn Material: The material of the yarn can also affect the look of the snowflake. Natural fibers such as cotton or wool can give a more traditional and rustic feel to the snowflake, while synthetic fibers like acrylic or nylon can create a more modern and crisp look. Consider the desired texture and drape of the snowflake when choosing the yarn material.
Needle Size: The size of the needles will determine the tension and stitch size of the snowflake. For a more delicate and airy snowflake, choose smaller needles. If you prefer a chunkier and more substantial snowflake, opt for larger needles. Make sure to check the pattern’s gauge to ensure the correct needle size is used.
Needle Material: Like yarn material, the material of the needles can also affect the outcome of the snowflake. Metal or wooden needles are common choices, each providing a different feel and grip. Some knitters prefer the smoothness and speed of metal needles, while others prefer the warmth and comfort of wooden needles. Consider your personal preference and knitting style when selecting the needle material.
Selecting a Snowflake Pattern
When it comes to knitting snowflake patterns, there are many options to choose from. Whether you’re a beginner or an experienced knitter, finding the right pattern can make all the difference in your finished product. Here are some factors to consider when selecting a snowflake pattern:
1. Skill Level
First and foremost, consider your own skill level. If you’re new to knitting, it’s best to start with a beginner-friendly pattern that uses basic stitches and techniques. As you gain more experience, you can gradually take on more intricate and challenging patterns. Make sure to read the pattern description and difficulty level to ensure it aligns with your own abilities.
2. Design Complexity
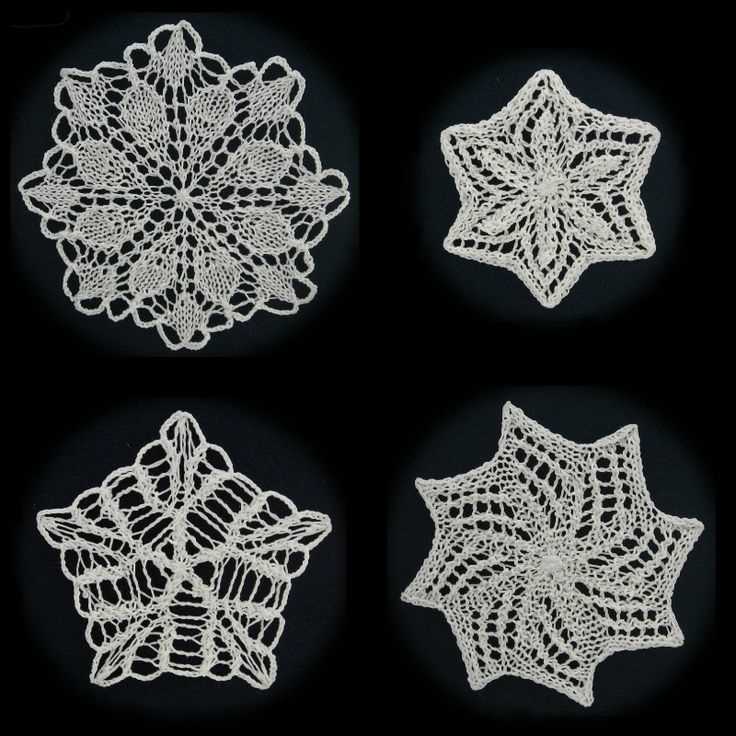
Snowflake patterns come in various designs and levels of intricacy. Some patterns feature simple and straightforward snowflake shapes, while others have more complex details and motifs. Take a look at the pattern’s photos or illustrations to get an idea of the overall design. Consider whether you prefer a minimalistic and clean look or a more intricate and detailed pattern.
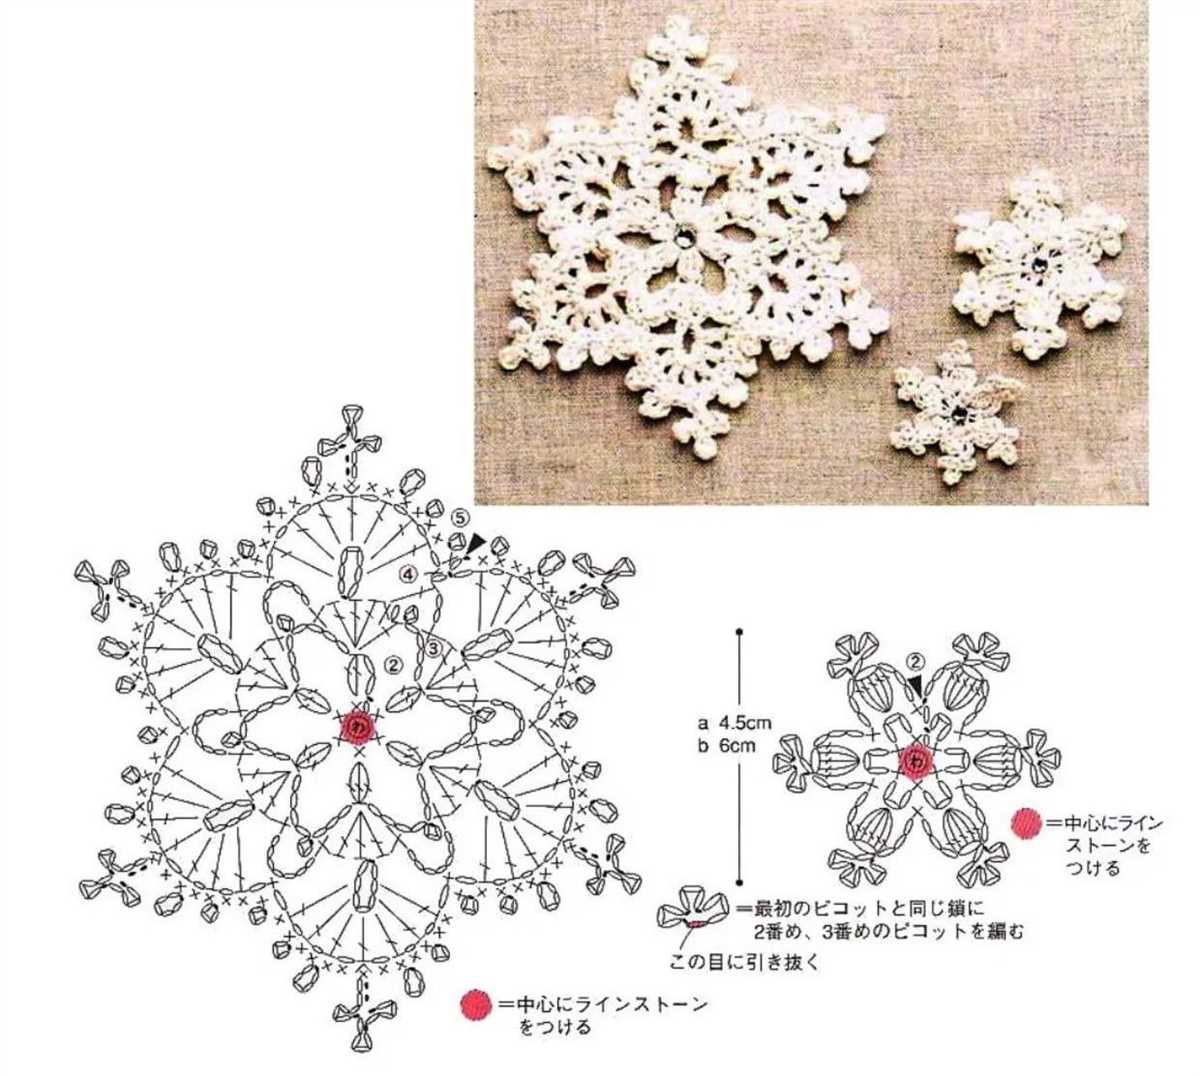
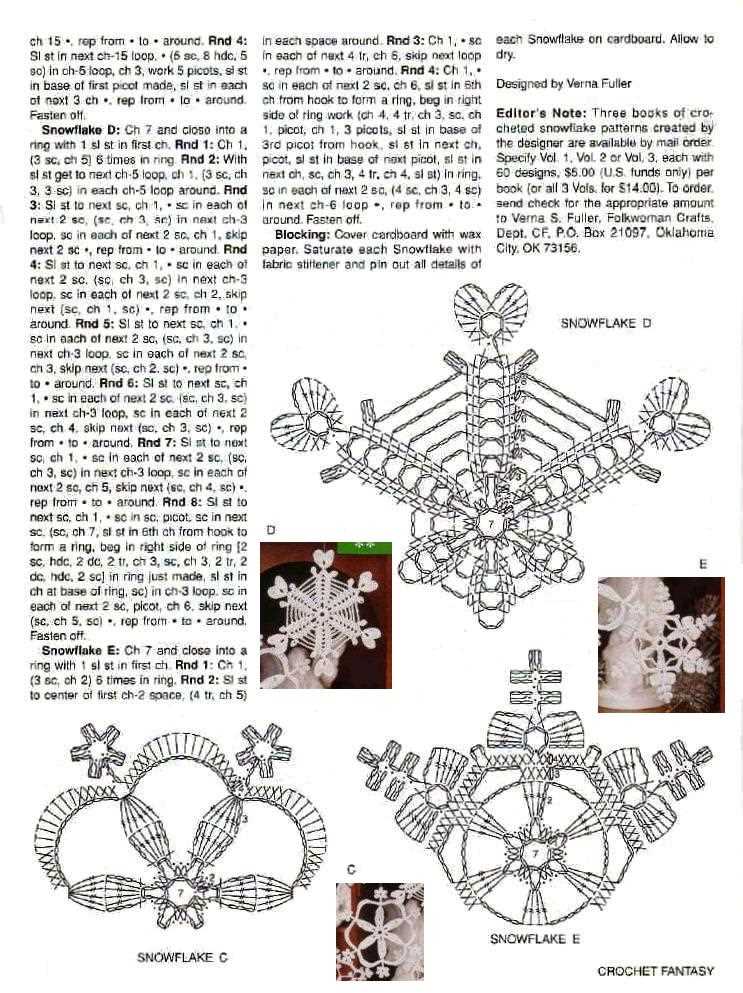
3. Pattern Format

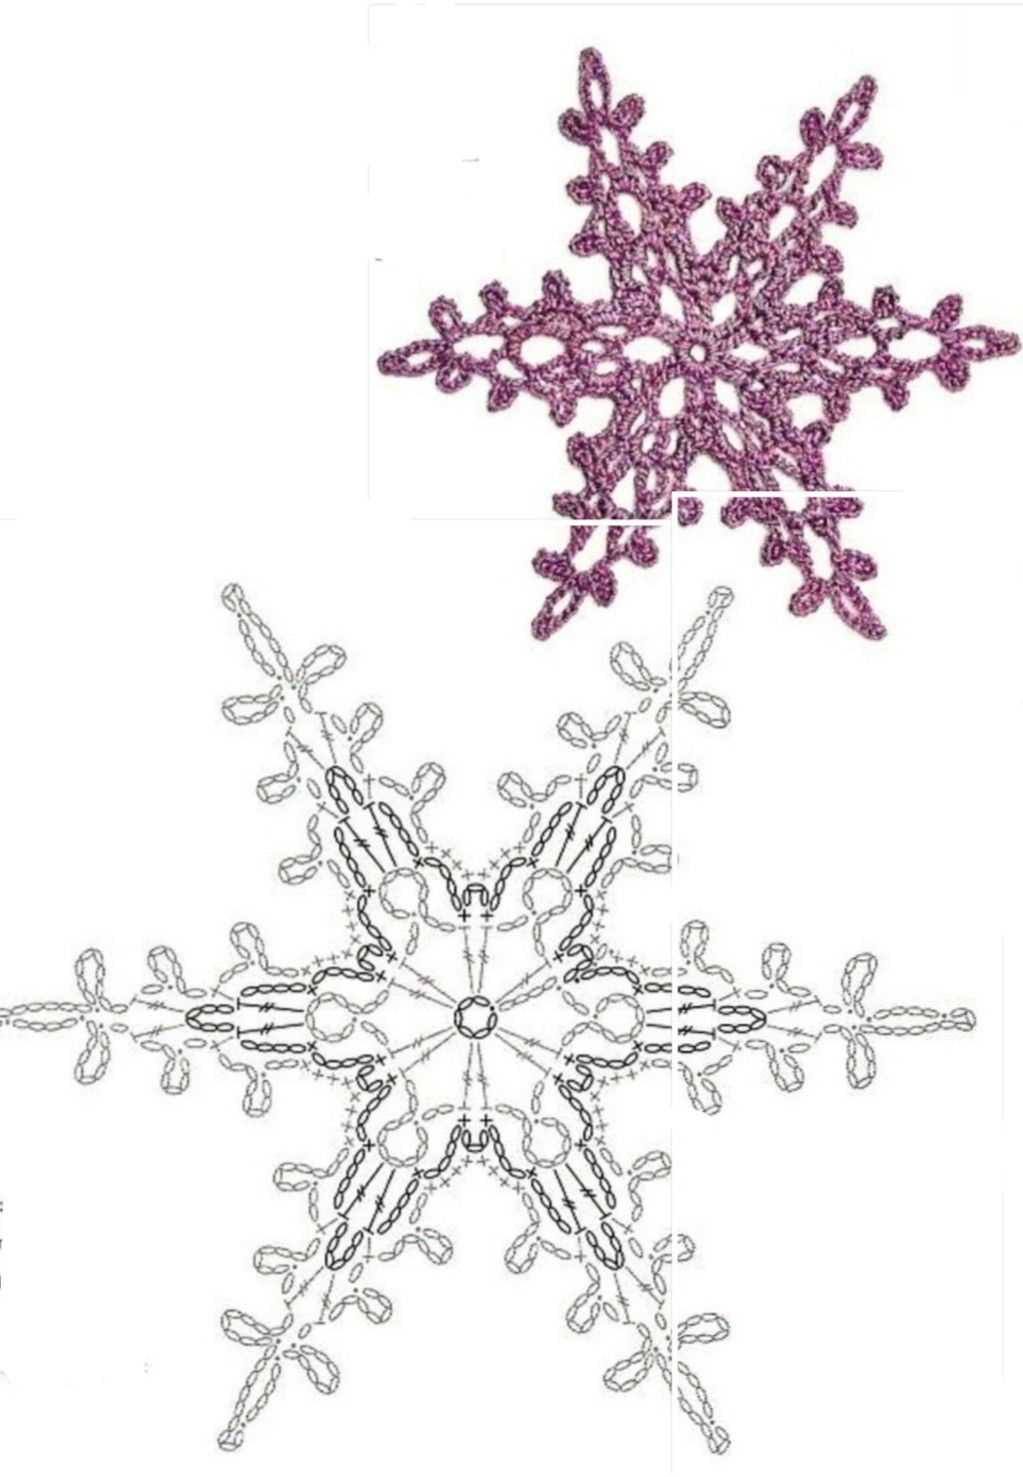
Consider the format of the pattern. Some patterns are written out row by row with detailed instructions, while others may include charts or diagrams. Think about your preferred method of following patterns and choose one that aligns with your preferences. Additionally, consider whether the pattern is available in a digital format, such as a PDF, or if you prefer a physical copy.
4. Yarn and Needle Requirements

Check the yarn and needle requirements listed in the pattern. Ensure that you have the correct yarn weight and needle size available. Some patterns may also recommend specific types of yarn or color combinations to achieve the desired effect. Take these requirements into consideration to ensure you have the necessary materials before starting the project.
5. Personal Style
Lastly, consider your personal style and the aesthetic you’re trying to achieve. Snowflake patterns come in a variety of styles, ranging from traditional and classic designs to more modern and artistic interpretations. Prioritize patterns that align with your personal taste and will complement your other knitting projects or seasonal decor.
By considering these factors when selecting a snowflake pattern, you can find the perfect design that suits your skill level, preferences, and desired finished product. Happy knitting!
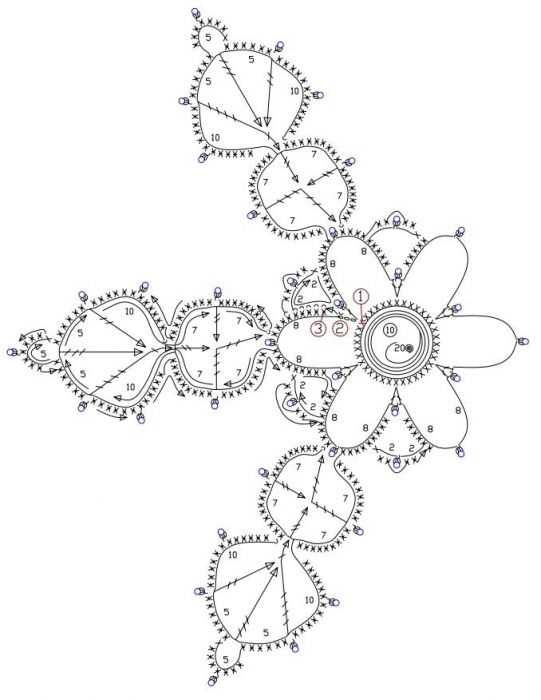
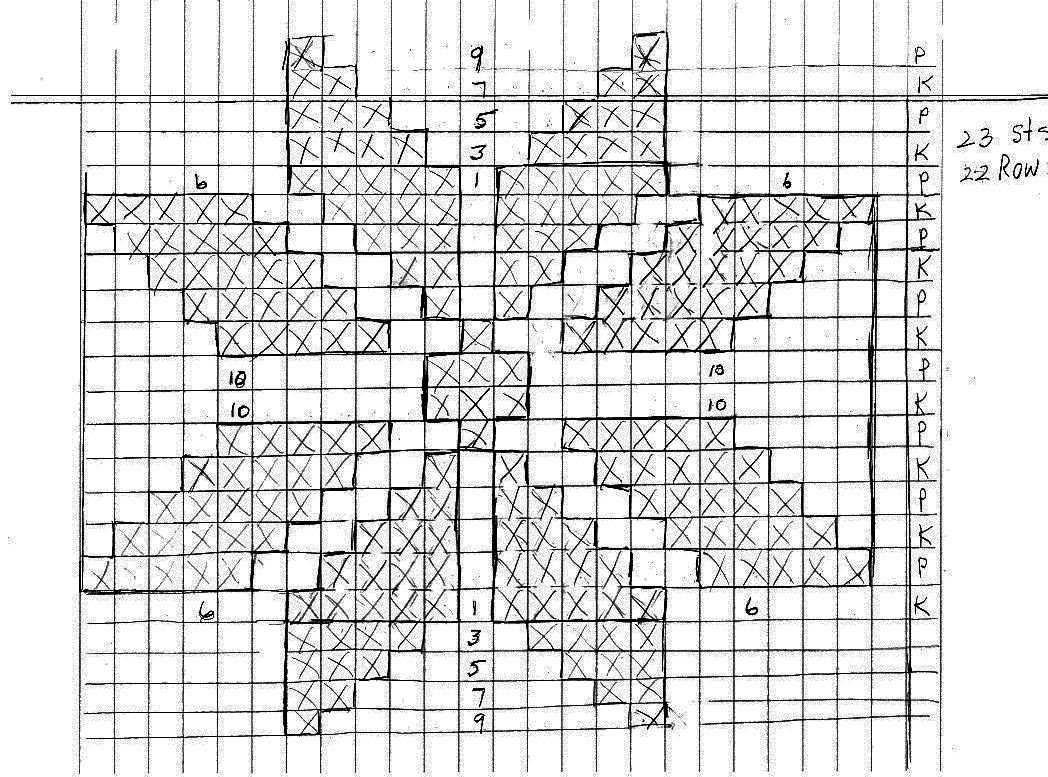
Reading Knitting Charts
Knitting charts are a visual representation of a knitting pattern. They use symbols and colors to indicate different stitches and actions to be taken while knitting. Understanding how to read knitting charts can greatly enhance your knitting skills and open up a world of possibilities for creating intricate and beautiful designs.
Symbols and Keys: One of the first things to familiarize yourself with when reading knitting charts is the symbols and keys used in the chart. Each symbol represents a specific stitch or action, such as knit, purl, yarn over, or decrease. The chart may also include a key that explains what each symbol means, allowing you to easily follow the pattern.
Reading Rows and Rounds: Knitting charts are typically read from right to left for flat knitting, and right to left for rounds. Each row or round in the chart corresponds to a specific row or round in your knitting. As you work your way through the chart, you will follow the symbols and keys to create the desired pattern.
When reading a knitting chart, it’s important to pay attention to the symbols and their placement. Sometimes, symbols will be stacked on top of each other to indicate multiple actions to be taken within the same stitch. Other times, symbols may travel diagonally across the chart to create a specific design or pattern. By carefully examining the chart and understanding how the symbols are arranged, you can successfully translate the chart into your knitting.
Color-Coded Charts: Some knitting charts use color-coding to make it even easier to follow along. Each color represents a different stitch or action, making it visually clear which stitches need to be worked. This can be especially helpful for more complex patterns or designs that involve multiple colors and stitch combinations.
Practice Makes Perfect: Reading knitting charts may seem a bit daunting at first, but with practice, it becomes easier and more intuitive. Start with simpler charts and gradually work your way up to more complex designs. As you become more comfortable with reading knitting charts, you’ll be able to tackle more intricate patterns and create beautiful knitted pieces.
Casting On and Starting Your Snowflake

Starting a snowflake pattern may seem intimidating, but with the right technique, you’ll be creating beautiful and intricate designs in no time. Before you begin, gather your knitting needles, yarn, and any other supplies you’ll need for the project.
Casting On:
To start your snowflake, you’ll need to cast on the desired number of stitches onto your knitting needles. The number of stitches will depend on the size of your snowflake and the pattern you’re following. You can cast on using the long-tail cast-on method or any other preferred method.
Starting the Pattern:
Once you have the required number of stitches cast on, it’s time to start the snowflake pattern. The pattern will typically provide row-by-row instructions on the stitches and techniques you need to use. Make sure to read the pattern carefully and familiarize yourself with any special stitches or techniques before you begin.
For example, the pattern may instruct you to knit the first row, purl the second row, and then repeat these two rows for the desired number of times. It may also include instructions for increasing or decreasing stitches to create the snowflake design.
Keeping Track:
As you work on your snowflake pattern, it’s essential to keep track of your rows and stitch counts. This will help you stay organized and ensure the snowflake looks consistent throughout. You can use stitch markers or a row counter to keep track of your progress.
Remember to pay attention to any chart symbols or written instructions provided in the pattern. These will guide you through the different stitches and techniques needed to create the snowflake’s intricate design.
With these steps in mind, you’re ready to start knitting your snowflake pattern. Stay patient and take your time, and soon you’ll have a beautiful snowflake to show off!
Following the Snowflake Pattern

If you want to create a beautiful snowflake pattern in your knitting, you’ll need to follow a specific set of instructions. The pattern may look complex at first, but with practice, you’ll be able to knit stunning snowflakes effortlessly.
Materials Needed:
- Knitting needles – size 5 or 6
- Yarn – white or any color of your choice
- Tapestry needle
- Scissors
Instructions:
- Cast on 6 stitches.
- Knit 1 row.
- Purl 1 row.
- Knit 1 row.
- Purl 1 row.
- Knit 9 stitches, then knit 2 stitches together. Repeat this pattern until the end of the row.
- Purl 1 row.
- Knit 8 stitches, then knit 2 stitches together. Repeat this pattern until the end of the row.
- Purl 1 row.
- Knit 7 stitches, then knit 2 stitches together. Repeat this pattern until the end of the row.
- Purl 1 row.
- Knit 1 stitch, *[slip 1 stitch, knit 1, pass slipped stitch over] 3 times, knit 2 stitches together, repeat from * to last stitch. Knit the last stitch.
- Purl 1 row.
- K2tog, knit 1, *[slip 1 stitch, knit 1, pass slipped stitch over] 2 times, k2tog, repeat from * to end of row.
- Purl 1 row.
- K2tog, [slip 1 stitch, knit 1, pass slipped stitch over] 2 times, k2tog, repeat from * to end of row.
- Purl 1 row.
- K2tog, [slip 1 stitch, knit 1, pass slipped stitch over] 2 times, k2tog, repeat from * to end of row.
- Purl 1 row.
- Break yarn, leaving a long tail. Thread the tapestry needle with the yarn tail, slip stitches onto the needle, and pull tight to gather the stitches.
- Weave in any loose ends and trim off excess yarn.
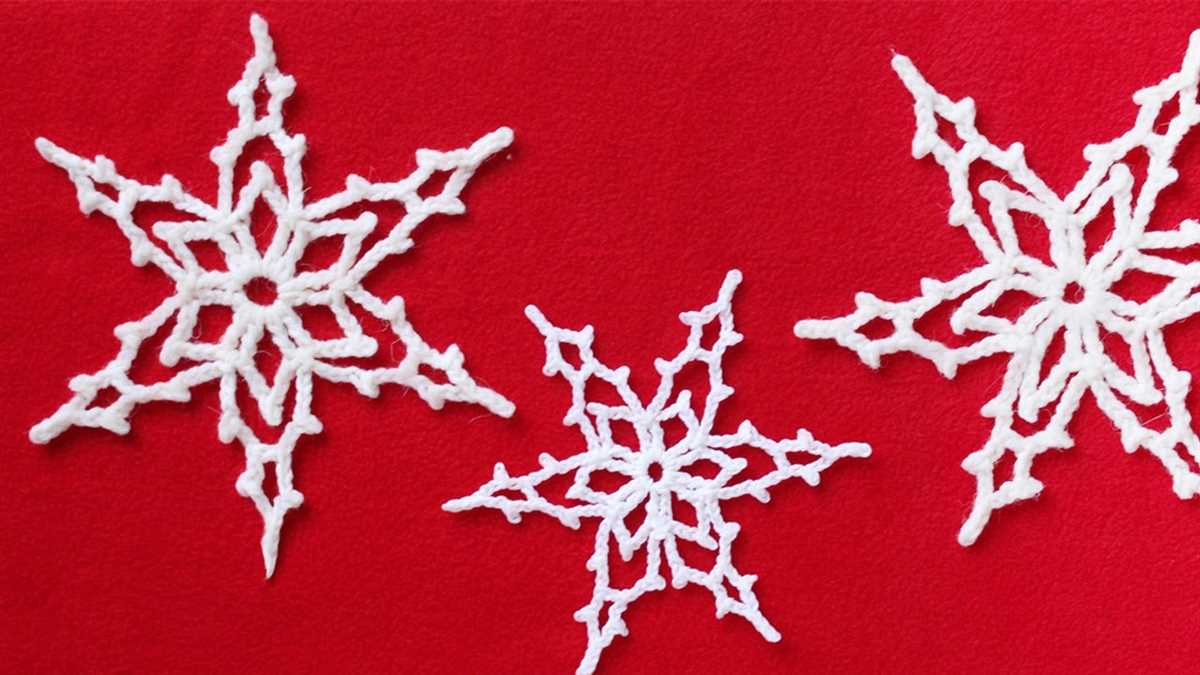
Once you have followed these instructions, you’ll have a beautiful knitted snowflake pattern. Feel free to experiment with different yarn colors and sizes to create a variety of snowflakes for your winter decorations or holiday gifts.
Adding Texture and Dimension
When knitting a snowflake pattern, adding texture and dimension can enhance the overall design and make the snowflake stand out. There are several techniques you can use to achieve this.
Cables and Twists: One way to add texture is by incorporating cables and twists into your snowflake pattern. This involves crossing stitches over each other to create a raised, three-dimensional effect. You can experiment with different cable patterns to achieve the desired look.
Bobbles and Pompoms: Another option is to add bobbles or pompoms to your snowflake pattern. These small, rounded embellishments create a playful and textured look. You can place them strategically in the design to simulate snowflakes or add them randomly for a more whimsical effect.
-
Lace Stitches: Lace stitches are a classic choice for adding texture and dimension to any knitting project. By incorporating lace patterns into your snowflake design, you can create an intricate and delicate look. Lace stitches often involve yarn overs and intricate decreases, resulting in a beautiful and airy pattern.
-
Sequins and Beads: For an extra touch of sparkle and dimension, you can also add sequins or beads to your snowflake pattern. These embellishments can be sewn onto the knitting using a crochet hook or a needle and thread. They can be placed in the center of the snowflake or scattered throughout the design for a shimmering effect.
-
Variegated Yarn: Using variegated yarn can instantly add texture and dimension to your snowflake pattern. Variegated yarns feature multiple colors that create a striped or speckled effect. This can add visual interest and make your snowflake pattern more eye-catching.
By incorporating these techniques into your snowflake pattern, you can create a unique and visually appealing design. Experiment with different combinations and let your creativity shine through.
Blocking Your Finished Snowflake
Once you have completed knitting your snowflake pattern, the next step is to block it. Blocking is an important technique in knitting that helps to shape and set your finished piece. It gives your snowflake a more polished and professional look.
To start blocking your snowflake, you will need to gather a few materials. First, you’ll need a large blocking board or surface. You can also use an old towel or foam mats. Next, you’ll need rustproof pins or blocking wires to hold your snowflake in place. Finally, you’ll need a spray bottle filled with water.
Here are the steps to block your snowflake:
- Fill the spray bottle with water and set it aside.
- Lay out your blocking board or surface, ensuring it is clean and free of any debris.
- Gently place your finished snowflake on the surface. Take care not to stretch or manipulate it too much at this stage.
- Starting from the center of the snowflake, secure it to the blocking board using rustproof pins or blocking wires. You can pin down each point of the snowflake to ensure it stays in place.
- Once the snowflake is secured, lightly mist it with water using the spray bottle. This will help the fibers relax and take on the desired shape.
- Allow the snowflake to dry completely before removing it from the blocking board. This may take several hours or even overnight.
- Once dry, carefully remove the pins or blocking wires. Your snowflake should now be beautifully blocked and ready to be displayed or used as desired.
Blocking your snowflake not only enhances its appearance but also helps to even out any inconsistencies in tension or stitch definition. It is an essential step in the knitting process that adds that extra touch of professionalism to your finished project. So take the time to block your snowflake, and enjoy the pride and satisfaction of a job well done!
Adding Embellishments
If you want to add some extra flair to your snowflake pattern, you can incorporate various embellishments. These additional elements can give your finished project a unique and eye-catching look. Here are a few ideas to get you started:
- Beads: One way to enhance your snowflake design is to add beads. You can thread small seed beads onto your yarn and incorporate them into your pattern. Place the beads on specific stitches to create a sparkling effect that resembles glistening snow.
- Sequins: Another option is to sew sequins onto your knit snowflake. Choose sequins in colors that complement your yarn and stitch them onto the desired areas of your pattern. This will give your snowflake a touch of shimmer and elegance.
- Embroidery: Embroidery can be used to add intricate details to your snowflake. Use a contrasting color of yarn to create decorative stitches on top of your knitted pattern. This technique allows you to personalize your snowflake and make it truly one-of-a-kind.
When incorporating embellishments into your snowflake pattern, it’s important to consider the weight and size of the additional materials. Beads and sequins should be light enough not to excessively weigh down your snowflake or alter its shape. Experiment with different types of embellishments to find the ones that work best for your design and create the desired effect.
Displaying and Using Your Knitted Snowflake
Now that you’ve successfully knitted a beautiful snowflake pattern, it’s time to display and use it to add a festive touch to your home decor. There are several ways you can showcase your knitted snowflake, whether you want to hang it on your Christmas tree, incorporate it into a garland, or use it as a decorative element for your table setting.
Hanging your snowflake: To hang your knitted snowflake on the Christmas tree, attach a loop of thread or yarn to the top of the snowflake and tie it securely. Choose a spot on the tree where it will be prominently displayed and hang your snowflake. You can also create a garland by stringing multiple knitted snowflakes together with some ribbon or twine.
Incorporating your snowflake into a garland: If you want to create a festive garland, you can mix and match your knitted snowflake with other holiday-themed elements like bells, ornaments, or pinecones. Use a hot glue gun or needle and thread to attach these elements together, and then drape your garland over the fireplace mantel, staircase railing, or doorway.
Using the snowflake as a table decoration: Get creative with your knitted snowflake by using it as a decorative element for your table setting. Place it in the center of your dining table as a festive centerpiece, or use it as a decorative accent on each place setting. You can also sew or glue it onto cloth napkins or table runners to add a touch of elegance to your holiday dining experience.
No matter how you choose to display and use your knitted snowflake, it will surely add a touch of charm and coziness to your holiday decor. Feel free to experiment with different ideas and combinations to create a unique and beautiful display that will capture the festive spirit of the season.
Conclusion
In conclusion, knowing how to troubleshoot common knitting issues can help you become a more confident and successful knitter. By understanding the causes and solutions to these problems, you can overcome challenges and create beautiful snowflake patterns.
Remember to always start with quality yarn and knitting needles, and maintain consistent tension throughout your knitting. Keep an eye out for dropped stitches, tight stitches, and uneven tension as you work. If you notice any mistakes, don’t be afraid to frog your work and start again.
When it comes to fixing mistakes, there are several techniques you can use, including ladder-back knitting, duplicate stitching, and using lifelines. Take the time to identify the best solution for the specific issue you encounter.
By being patient, persistent, and resourceful, you can knit snowflake patterns with ease and enjoyment. Happy knitting!