
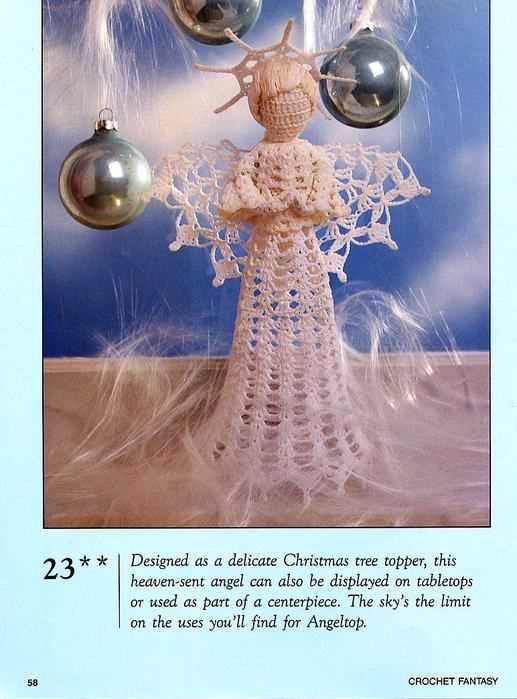
If you’re looking to add a touch of homemade charm to your Christmas tree this year, why not try knitting your own angel tree topper? This delightful pattern is perfect for both beginner and advanced knitters and will add a festive and whimsical touch to any holiday decor.
What makes this angel tree topper truly special is the intricacy of the details. From the delicate wings to the flowing gown, every element of this pattern is lovingly crafted to create a beautiful and unique ornament. Plus, the pattern includes step-by-step instructions and helpful tips to ensure that even novice knitters can successfully complete this project.
While the finished product is sure to be a stunning addition to your Christmas tree, this angel tree topper also makes a thoughtful and personal gift. Knitting this pattern for a loved one is a wonderful way to show them how much you care and to create a lasting memory that they can treasure for years to come.
Supplies needed for knitting your own angel tree topper
If you’re looking to create a beautiful angel tree topper for your Christmas tree, you’ll need a few supplies to get started. Knitting your own angel allows you to customize it to your liking and add a personal touch to your holiday decorations. Here are the supplies you’ll need:
1. Yarn:

Choose a soft, lightweight yarn in the color of your choice. Opt for a yarn with a bit of sparkle or metallic thread for an extra festive touch. You’ll need approximately 100 grams of yarn.
2. Knitting needles:
Select a pair of knitting needles that are appropriate for the weight of your chosen yarn. Circular or double-pointed needles may be necessary depending on the pattern you’re using. Make sure your needles are the right size for your chosen yarn to achieve the desired tension.
3. Stitch markers:
Stitch markers are essential for marking specific sections or stitches in your knitting pattern. Use them to keep track of decreases, increases, or any other important details of your angel’s construction.
4. Tapestry needle:

A tapestry needle with a large eye is useful for weaving in loose ends and sewing any parts of your angel together. Make sure you have a needle that is suitable for the weight of your yarn.
5. Stuffing:

To give your angel a three-dimensional shape, you’ll need some stuffing. Look for a soft, lightweight stuffing material that won’t weigh down your finished angel.
6. Embellishments:
Add some extra flair to your angel tree topper with embellishments such as beads, sequins, or ribbon. These can be used to decorate your angel’s dress, wings, or halo, and will give your creation a festive and personalized touch.
Gather these supplies and you’ll be ready to start knitting your own angel tree topper. Enjoy the process of creating a unique and beautiful decoration for your holiday celebrations!
Choosing the right yarn for your angel tree topper
When it comes to knitting an angel tree topper, choosing the right yarn is crucial to achieve the desired result. The yarn you select will determine the texture, drape, and overall appearance of your finished project. Here are some factors to consider when choosing the yarn for your angel tree topper.
1. Weight and thickness
The weight and thickness of the yarn will influence the size and structure of your angel tree topper. You will want to choose a yarn that is lightweight and easy to work with, as intricate details are often involved in knitting angel designs. Opt for a yarn that falls within the fine to worsted weight range to ensure that your angel has a delicate and elegant appearance.
2. Fiber content
The fiber content of the yarn will affect both the look and feel of your angel tree topper. Natural fibers such as cotton, wool, or silk can provide a luxurious and soft texture, adding an extra touch of sophistication to your project. Alternatively, acrylic yarns offer durability and affordability, making them a practical choice if you are working within a budget or prefer a yarn with less maintenance.
3. Color

The color of your yarn will play a significant role in the overall aesthetic of your angel tree topper. Traditional angel designs often feature white or cream-colored yarn, as it symbolizes purity and innocence. However, feel free to get creative with your color choice and select a yarn that matches your personal style or complements your existing holiday decor. Additionally, you may consider using metallic or sparkly yarns for a festive touch.
4. Texture and sheen

The texture and sheen of the yarn can add dimension and visual interest to your angel tree topper. Smooth and shiny yarns can create a polished and refined look, while textured yarns can add depth and a unique touch to your project. Consider experimenting with different yarns to achieve the desired effect and bring your angel to life.
In conclusion, choosing the right yarn is an essential step in knitting a beautiful angel tree topper. Take into account factors such as weight, fiber content, color, texture, and sheen to ensure that your finished project reflects your vision and enhances the overall holiday ambiance of your home.
Step-by-step instructions for casting on and starting your project

Before you start knitting your angel tree topper, it’s important to cast on and set up your project. Follow these step-by-step instructions to get started:
Gather your materials
Before you begin, make sure you have all the necessary materials for your project. You’ll need a set of knitting needles, yarn in your desired color, a pair of scissors, and a tapestry needle for finishing.
Choose your casting on method

Next, decide which casting on method you prefer to use for your angel tree topper. There are various methods to choose from, such as the long-tail cast on or the cable cast on. Consult a knitting guide or watch tutorial videos to learn more about each method and choose the one you feel most comfortable with.
Cast on your stitches
Once you’ve selected your casting on method, it’s time to cast on the required number of stitches for your angel tree topper. Follow the instructions for your chosen method, making sure to maintain an even tension throughout.
Start your project
With your stitches cast on, you can now begin knitting your angel tree topper. Follow the pattern instructions for the first few rows, which may involve knitting or purling stitches depending on the desired design. Take your time and double-check your work to ensure accuracy.
Continue knitting and shaping
As you progress through the pattern, continue knitting and shaping your angel tree topper according to the instructions provided. This may involve increasing or decreasing stitches, as well as following specific stitch patterns for different sections of the design.
Remember to refer to the pattern regularly to ensure you’re following the correct steps and stitch counts. Don’t rush the process and take breaks whenever needed to avoid frustration. With each row, you’ll be one step closer to completing your beautiful angel tree topper.
Knitting the body of your angel tree topper
Once you have gathered all your materials and familiarized yourself with the pattern, it’s time to start knitting the body of your angel tree topper. Follow these steps to create a beautiful and festive addition to your Christmas tree.
Step 1: Cast on stitches
Begin by casting on the required number of stitches as indicated in the pattern. This will form the base of your angel’s body. Make sure to use the appropriate size of knitting needles to achieve the desired gauge and tension.
Step 2: Knit the body
Once you have cast on your stitches, you will start knitting the body of your angel. Follow the pattern instructions for each row, making sure to maintain proper tension throughout your work. Pay attention to any special stitches or techniques required, such as increasing or decreasing stitches, to shape the body correctly.
Step 3: Add decorative details
As you knit the body, you can also incorporate decorative details to make your angel tree topper unique. This could include using different colors of yarn for the dress or adding intricate lace patterns. Get creative and experiment with different design elements to personalize your angel.
Step 4: Complete the body
Continue knitting the body of your angel tree topper until you reach the desired length specified in the pattern. Make sure to finish off any final rows or stitches as indicated before binding off. Check your work for any errors or mistakes and make any necessary adjustments before moving on to the next step.
Step 5: Block your knitting
Once you have completed the body of your angel tree topper, it’s a good idea to block your knitting. This involves wetting or steaming the finished piece to help it retain its shape and smooth out any wrinkles or unevenness. Follow the blocking instructions provided in the pattern or use your preferred blocking method.
With the body of your angel tree topper completed, you are now ready to move on to knitting the wings and other finishing touches. The body is the foundation of your angel, so take your time and enjoy the process of creating this festive decoration.
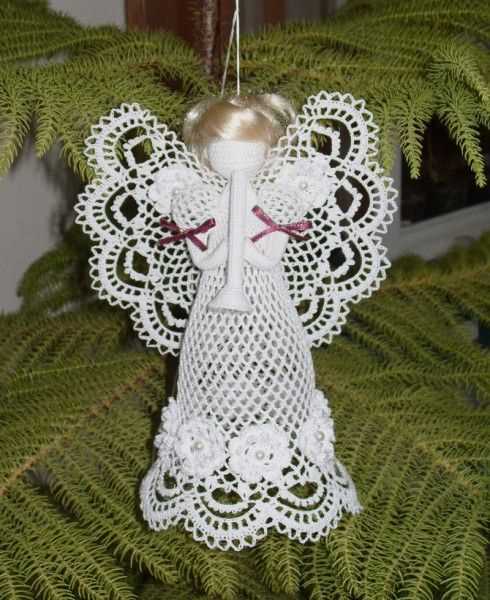
Creating the wings for your angel tree topper
The wings are an important part of your knit angel tree topper. They add a beautiful and angelic touch to your tree decoration. Creating these wings requires some basic knitting skills and materials.
Materials:
- White yarn
- Knitting needles
- Tapestry needle
- Scissors
Instructions:
- Begin by casting on stitches using white yarn and your knitting needles. The number of stitches will depend on how large you want your wings to be. For smaller wings, start with around 20 stitches, and for larger wings, you can cast on around 30 stitches.
- Next, follow a simple knit stitch pattern for several rows. This will create the main body of the wings. You can experiment with different knit stitch patterns to achieve the desired texture and look.
- Once you’ve reached the desired length for the wings, bind off the stitches. Cut the yarn, leaving a long tail for sewing purposes.
- Using a tapestry needle, sew the sides of the wings together to create the desired wing shape. You can make the wings more curved or straighter, depending on your preference.
- After sewing the sides, use the remaining yarn tail to attach the wings to your angel tree topper. Sew the wings securely to the back of the angel’s body, making sure they are symmetrical.
- Trim any excess yarn and adjust the wings as needed. Your knit angel tree topper is now complete with stunning wings!
With these simple instructions, you can create beautiful wings for your knit angel tree topper. Feel free to customize the size and style of the wings to match your own personal taste and the overall theme of your tree decorations.
Adding the finishing touches to your angel tree topper
Once you have completed knitting your angel tree topper, it’s time to add the finishing touches to make it truly stand out on your Christmas tree. Here are a few ideas to consider:
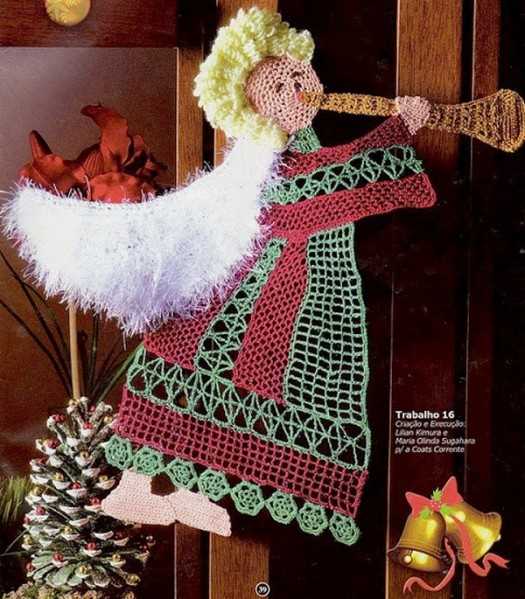
1. Dressing up the angel
To make your angel look even more festive, consider adding small accessories to her outfit. You can use tiny beads or sequins to create a sparkling effect. Additionally, you can crochet or knit a small shawl or cape for the angel to wear, using complementary colors that will enhance her appearance.
2. Adding angelic wings
No angel is complete without her wings! You can create delicate wings for your angel tree topper by knitting or crocheting lace patterns. Alternatively, you can cut out wings from sheer fabric and attach them securely to the back of your angel. Use a hot glue gun or a needle and thread to ensure they stay in place.
3. Creating a halo
A halo will add a heavenly touch to your angel tree topper. You can use wire or pipe cleaners to create a circular shape and then wrap ribbon or metallic thread around it. Attach the halo to the top of your angel’s head and adjust the height as needed to make it stand out among the branches of your Christmas tree.
4. Securing the angel to the tree

To ensure your angel stays securely in place on top of your tree, use a small wooden dowel or wire as a support structure. Attach the dowel or wire to the back of the angel, making sure it is long enough to reach the top branch of your tree. If necessary, use floral wire or tape to further secure the angel in place.
By adding these finishing touches to your angel tree topper, you’ll create a beautiful and unique centerpiece for your Christmas tree that will bring joy and happiness throughout the holiday season.
Tips for successful blocking and shaping
Blocking and shaping are important steps in finishing a knitted project, as they help to give the final piece a polished and professional look. Here are some tips to ensure successful blocking and shaping:
1. Use the right tools
Investing in the right tools for blocking and shaping can make a world of difference. A blocking mat or board, rust-proof blocking pins, and a spray bottle for misting the fabric are essential. Additionally, having a set of blocking wires can be incredibly helpful for achieving straight edges and even blocking.
2. Follow the instructions
Always read and follow the blocking instructions provided in the pattern or yarn label. Each type of fiber and project may have specific requirements for blocking. Some fibers, like wool, may need to be soaked before blocking, while others may be steam blocked. It’s important to understand the specific needs of your project to ensure successful blocking.
3. Take your time
Blocking and shaping can take time, especially for larger or more intricate projects. It’s important to be patient and not rush the process. Allow your project to fully dry and set in its blocked shape before moving or wearing it. This will help to ensure that the shaping holds and the finished piece looks its best.
4. Check your measurements
Before blocking, it’s a good idea to check your measurements to ensure the piece will end up the correct size. Use a tape measure or ruler to measure the length, width, and any specific dimensions of the project. This will help to guide your blocking and shaping process and ensure that the final piece meets your desired specifications.
Remember that blocking and shaping are important finishing touches that can greatly enhance the appearance of your knitted project. By using the right tools, following instructions, taking your time, and checking your measurements, you’ll be able to achieve successful blocking and shaping results every time.
Embellishing your angel tree topper with beads or sequins
If you want to add a touch of sparkle and elegance to your angel tree topper, consider embellishing it with beads or sequins. These small, decorative items can instantly transform a plain knitted angel into a stunning Christmas centerpiece.
Beads: One way to incorporate beads into your angel tree topper is by sewing them onto the wings. You can choose beads in various sizes, colors, and shapes to create a unique and eye-catching design. Consider using metallic beads for a glamorous look or translucent beads for a delicate and ethereal appearance. You can arrange the beads in a pattern or scatter them randomly to create a whimsical effect. Sewing the beads onto the wings can be a meticulous task, but the end result will surely be worth the effort.
Sequins: Another option for embellishing your angel tree topper is to use sequins. These shiny, flat discs can be attached to the angel’s dress or wings to add a touch of sparkle. You can either sew the sequins onto the fabric or use adhesive sequins for a quicker application. Consider using sequins in coordinating colors to complement the overall color scheme of your Christmas tree. You can create patterns or designs with the sequins or scatter them randomly for a glamorous yet whimsical look.
If you want to take your embellishments to the next level, you can combine both beads and sequins for a truly dazzling effect. Just make sure to choose beads and sequins that are lightweight and won’t weigh down the angel’s delicate structure. With a little creativity and patience, you can create a one-of-a-kind angel tree topper that will shine bright and become the centerpiece of your Christmas decorations.
Alternative options and customization ideas for your angel tree topper
If you’re looking for alternative options or want to customize your angel tree topper, there are plenty of possibilities to explore. Whether you want to add a unique touch or match your tree topper to your existing decor, here are some ideas to consider.
1. Fabric choices
When selecting the fabric for your angel tree topper, you can experiment with different textures and patterns to create a truly personalized look. Consider using metallic or sequin fabrics for a glamorous touch, or opt for a cozy knitted or crocheted fabric for a more rustic feel. Play around with colors and prints that complement your overall tree theme, such as red and green for a traditional Christmas vibe, or silver and blue for a winter wonderland theme.
2. Embellishments
Add some extra charm to your angel tree topper by incorporating embellishments. Consider attaching small ornaments, ribbons, or bows to the wings or dress of your angel to give it some extra sparkle. You could also use glitter glue or fabric paint to add intricate designs or patterns to your angel’s dress or halo. Be creative with your choices and make it uniquely yours.
3. Size and proportion

Instead of sticking to the traditional tall angel tree topper, you can experiment with different sizes and proportions. Depending on the height and fullness of your tree, you may opt for a smaller angel for a more delicate look, or a larger angel to make a bolder statement. Consider the overall balance and visual impact of your tree and adjust the size of your angel accordingly.
Displaying and Caring for Your Knit Angel Tree Topper
Once you have finished knitting your angel tree topper, it’s time to display it proudly on your Christmas tree. The angel adds a touch of elegance and beauty to your holiday decor, and it’s important to make sure it is showcased in the best way possible.
1. Placement: Choose a prominent spot on your tree to display your angel. Consider placing it at the top for a classic look, or slightly lower if you have a taller tree. Make sure the angel is positioned securely and balanced so that it doesn’t tip over or get obscured by branches.
2. Lighting: Use strategically placed lights to highlight your angel. Twinkle lights around the angel or a spotlight focused on it will enhance its delicate features and make it stand out. Experiment with different lighting arrangements to find the perfect effect.
3. Care: Hand-knit items require special care to ensure their longevity. Avoid placing the angel near heat sources, such as candles or a fireplace, as this can damage the delicate yarn. Keep it away from curious pets or small children who may accidentally damage it. Gently dust the angel occasionally to keep it looking its best.
4. Storage: When the holiday season is over, store your knit angel tree topper carefully to protect it until the next year. Wrap it in acid-free tissue paper or place it in a clean, dry container. Avoid storing it in a damp or humid environment, as this can lead to mold or mildew.
By following these tips, you can ensure that your knit angel tree topper remains a cherished part of your Christmas traditions for years to come.
Showcasing your completed project: Sharing photos and inspiring others
Once you have finished knitting your angel tree topper, it’s time to show off your hard work! Sharing photos of your completed project can inspire others who may also be interested in making their own. Here are a few ways you can showcase your knit angel tree topper:
1. Social Media: Share a photo of your angel tree topper on social media platforms like Instagram, Facebook, or Pinterest. Use relevant hashtags such as #knittingproject or #angeltopper to reach a wider audience. You can also join knitting communities or groups to connect with fellow knitting enthusiasts.
2. Craft Blogs: Write a blog post about your knitting process and include high-quality photos of your finished angel tree topper. Share any tips or techniques you used, and provide the pattern or link back to the source where you found it. Craft bloggers often have a dedicated audience of DIY enthusiasts who would love to see your work.
3. Online Knitting Forums: Join online knitting forums and communities, where you can post pictures of your completed project and interact with other knitters. These platforms provide a space to ask for feedback, share your experiences, and receive encouragement from fellow knitting enthusiasts.
4. Gift or Decoration: Use your completed angel tree topper as a gift or decoration during the holiday season. Whether you give it to a loved one or display it on your own tree, your angel will bring joy and warmth to any space.
By sharing your completed project, you can inspire others to try new knitting patterns, improve their skills, and find joy in the art of knitting. So, don’t hesitate to show off your beautiful angel tree topper and spread the love for knitting!