
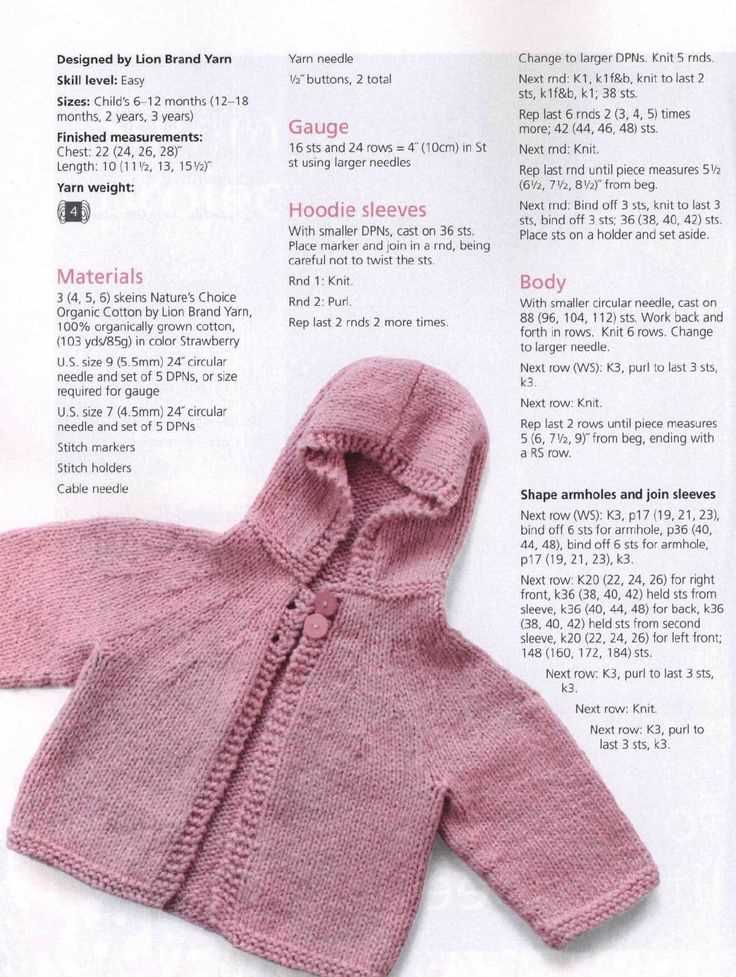
If you love to knit and want to create a cozy and stylish addition to your wardrobe, look no further than a knit hoodie. The best part? We have a free pattern for you to follow! Whether you’re a beginner or an experienced knitter, this pattern is perfect for you. With clear instructions and helpful tips, you’ll be able to create a beautiful hoodie in no time.
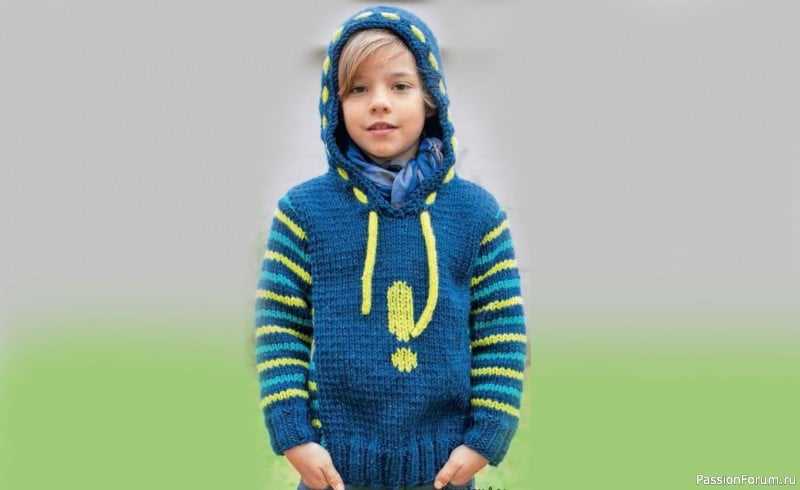
Our knit hoodie pattern is designed to be versatile and customizable. You can choose your own colors and yarns to create a unique hoodie that reflects your personal style. The pattern includes instructions for different sizes, so you can make one for yourself or create a matching set for your family and friends.
Not only is this hoodie practical for keeping warm on chilly days, but it’s also a fashionable statement piece. Whether you’re wearing it to the gym or pairing it with your favorite jeans, you’ll look effortlessly chic. Plus, the soft and cozy texture of the knit fabric will keep you comfortable all day long.
Free Knit Hoodie Pattern: Get Cozy and Stylish!
When it comes to comfort and style, you can’t go wrong with a knit hoodie. And the best part? You can create your own cozy masterpiece with a free knit hoodie pattern!
Whether you’re a seasoned knitter or just starting out, this pattern is perfect for all skill levels. With detailed instructions and helpful tips, you’ll be able to knit a hoodie that’s not only warm and comfortable but also fashionable.
Stay Warm with a Cozy Design

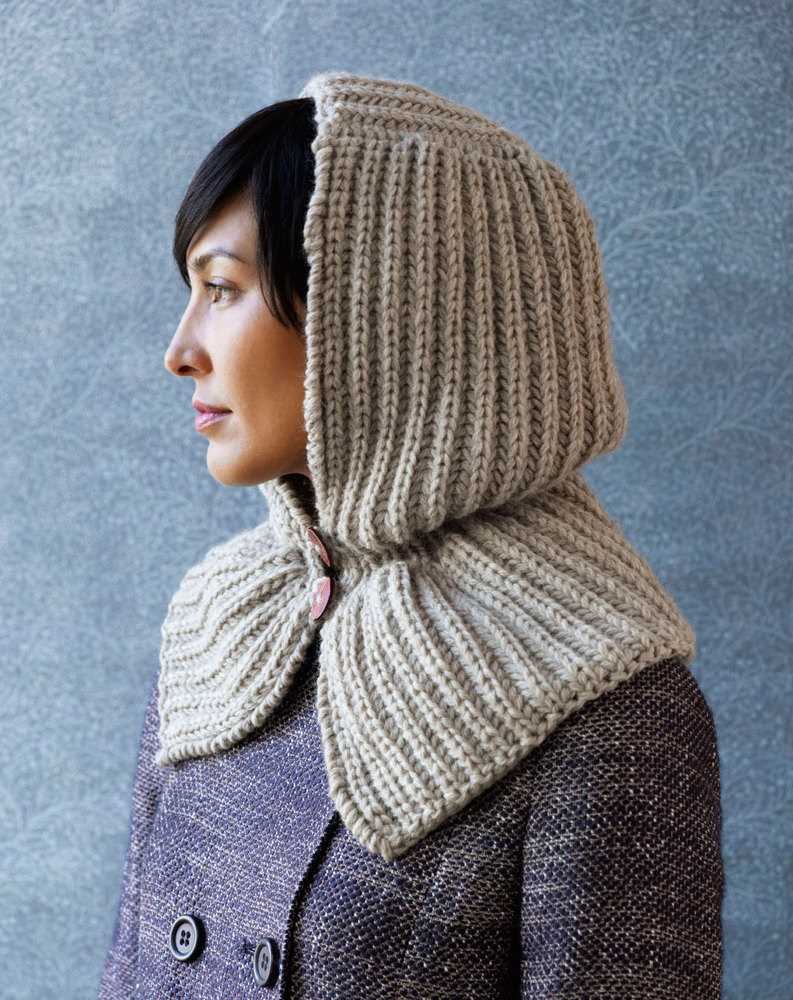
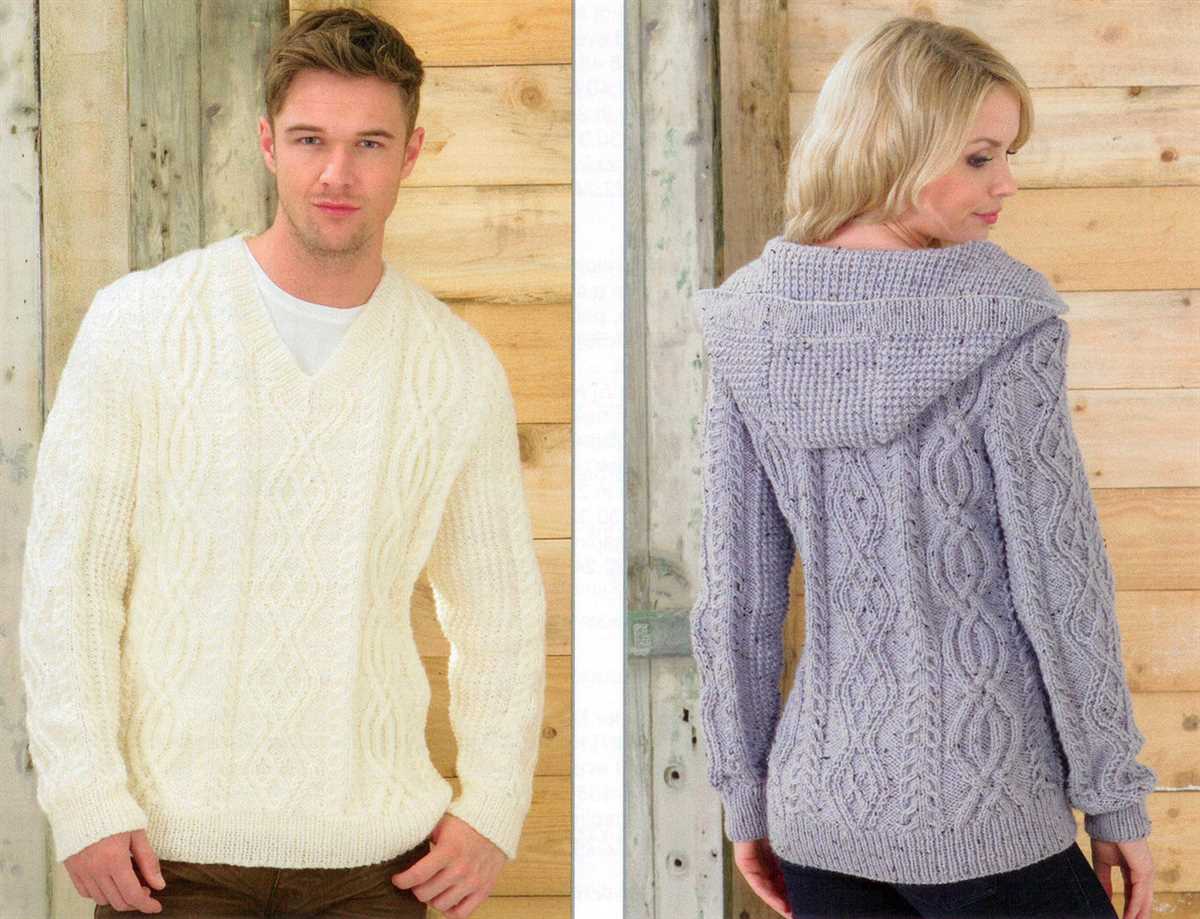
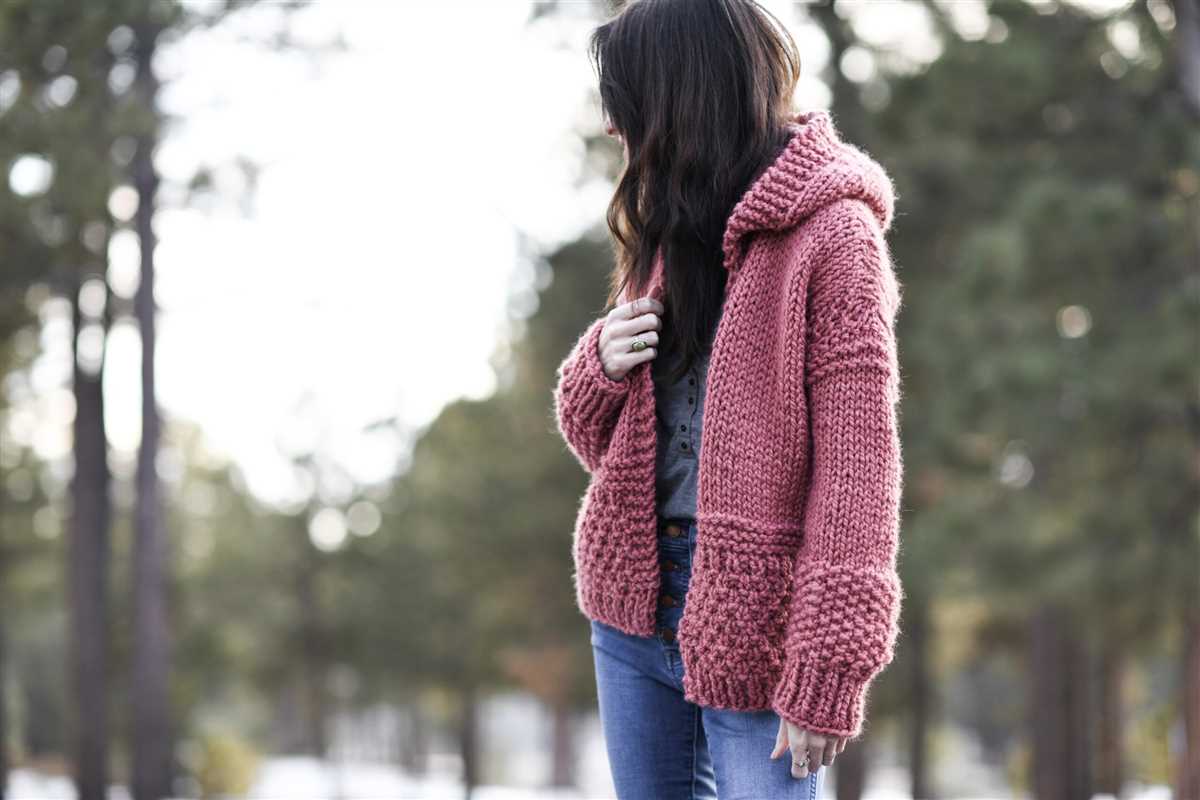
One of the key elements of a knit hoodie is its ability to keep you warm. This free pattern features a thick, textured stitch that’s not only great for insulation but also adds a stylish touch to the design. The pattern also includes instructions for a double-layered hood, ensuring maximum coziness on those colder days.
Additionally, this knit hoodie pattern offers customization options. You can choose the length of the sleeves and even add pockets for added functionality. The pattern also provides recommendations for yarn types and colors to help you achieve your desired look.
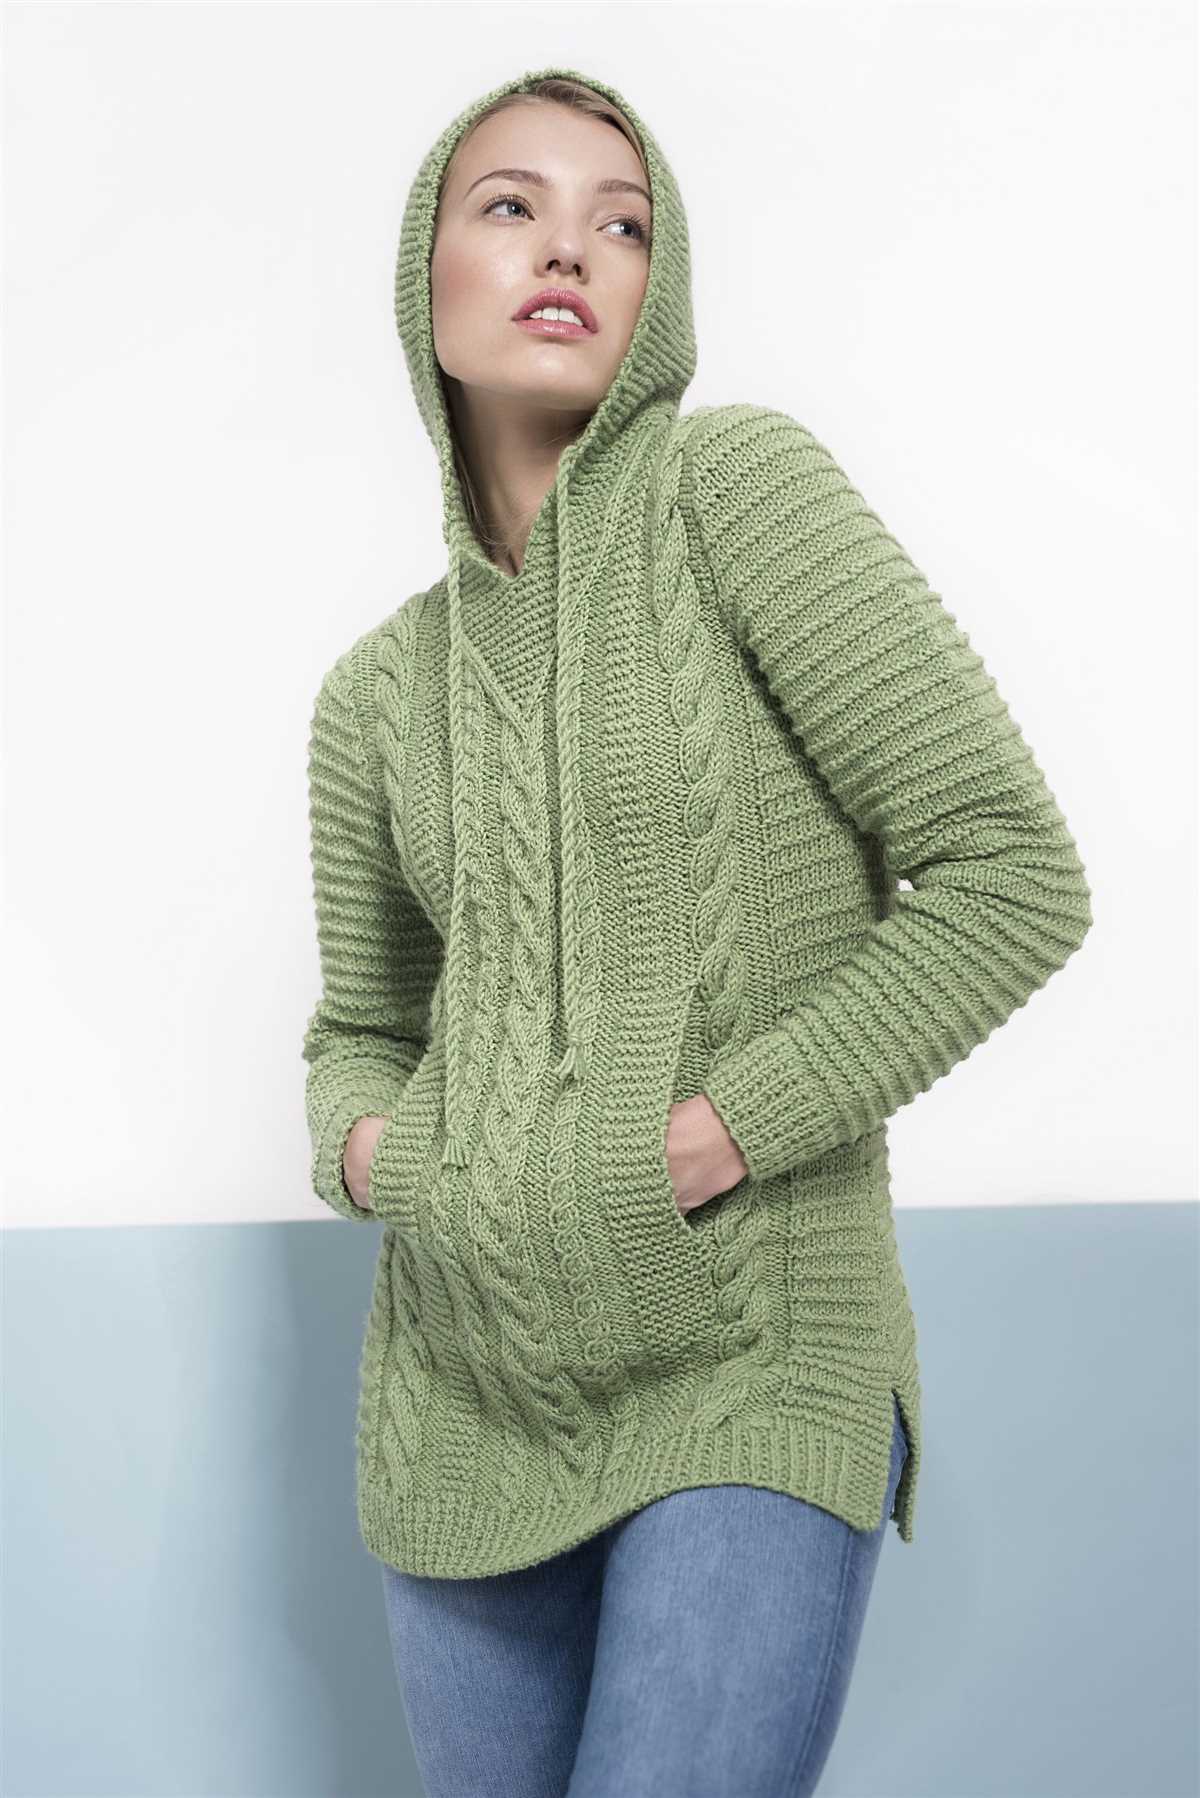
Create a Fashion Statement
Gone are the days when hoodies were solely reserved for loungewear. With this free knit hoodie pattern, you’ll be able to create a fashionable statement piece that can be dressed up or down. Pair it with jeans for a casual look or layer it over a dress for a more stylish ensemble.
The pattern includes details on different stitch patterns that you can incorporate into your hoodie to add a unique and trendy touch. So not only will you stay warm and cozy, but you’ll also be on-trend with your handmade creation.
So why wait? Download the free knit hoodie pattern now and get started on creating your cozy and stylish hoodie that’s perfect for any occasion!
Find the Perfect Free Knit Hoodie Pattern
Are you looking for a free knit hoodie pattern to make the perfect cozy sweater for the winter? You’re in luck! There are plenty of resources online where you can find a wide variety of free knit hoodie patterns to suit your style and skill level.
1. Ravelry: Ravelry is a popular online community for knitters and crocheters, and it’s a great place to start your search for a free knit hoodie pattern. You can browse through their extensive database of patterns, filter by category, difficulty level, and even yarn weight. With so many options, you’re sure to find the perfect hoodie pattern that fits your needs.
2. Knitting magazines: Many knitting magazines offer free patterns on their websites, and some of them may have a knit hoodie pattern that you can download and use. Check out magazines like Interweave Knits, Knit Simple, and Vogue Knitting for some inspiration.
3. Independent websites and blogs: There are also numerous independent websites and blogs dedicated to knitting that offer free patterns, including knit hoodie patterns. These sites often have a community of knitters who share their projects and experiences, making it a great place to find unique and trendy designs.
4. Pinterest: Pinterest is a visual discovery platform where you can find all sorts of inspiration, including free knit hoodie patterns. Simply search for “free knit hoodie pattern” and browse through the images to find patterns that catch your eye. Many of these pins will lead you to the original source where you can download the pattern.
Once you find the perfect free knit hoodie pattern, grab your knitting needles and yarn, and get ready to create a cozy and stylish hoodie that you can proudly wear all winter long. Happy knitting!
What Materials Do You Need?
When it comes to knitting a hoodie, it’s important to have the right materials on hand. Here are the essential items you’ll need:
1. Yarn

The most important material for knitting a hoodie is yarn. Choose a yarn that is suitable for the pattern you’ll be using. The weight and fiber content of the yarn will affect the final look and feel of your hoodie. Some popular yarn options for hoodies include wool, acrylic, or a blend of different fibers. Consider the season in which you’ll be wearing the hoodie and choose a yarn that will provide the desired warmth or breathability.
2. Knitting Needles

You’ll also need a pair of knitting needles that are appropriate for the yarn you’ll be using. The size of the needles will depend on the gauge specified in your pattern. Make sure you have the correct needle size to achieve the proper tension and stitch definition.
3. Stitch Markers
Stitch markers are helpful tools that can be used to mark specific points in your knitting, such as the beginning of a round or the placement of increase or decrease stitches. They come in various shapes and sizes, and you can choose between removable or non-removable markers depending on your preference.
4. Scissors
A pair of sharp scissors is essential for cutting yarn and trimming any loose ends or mistakes in your knitting. Make sure they are easily accessible so you can quickly snip away any unwanted yarn.
5. Tapestry Needle
A tapestry needle, also known as a yarn needle, is used for weaving in loose ends and seaming your finished pieces together. Choose a needle with a large eye and a blunt tip to make the process easier and prevent snags.
In addition to these materials, you may also need a measuring tape, stitch holders, or other accessories depending on the complexity of your pattern. Having all the necessary materials ready before you start knitting will ensure a smoother and more enjoyable knitting experience.
Choose the Right Yarn for Your Knit Hoodie
When it comes to knitting a hoodie, choosing the right yarn is essential for achieving the desired result. The yarn you select will determine the overall look and feel of your knit hoodie, as well as its durability and comfort. Here are some important factors to consider when choosing your yarn.
Fiber Content
The first thing to consider is the fiber content of the yarn. Different fibers have different characteristics, which will affect the drape, warmth, and texture of your hoodie. Common fiber choices for hoodies include wool, cotton, acrylic, and blends of these fibers.
- Wool: Wool is a popular choice for hoodies as it is warm, insulating, and has excellent elasticity. It is available in various weights, from fingering to bulky, allowing you to create different thicknesses for your hoodie.
- Cotton: Cotton is a breathable fiber that is comfortable to wear in warmer weather. It is not as elastic as wool, so keep that in mind when selecting your pattern and sizing.
- Acrylic: Acrylic yarn is an affordable option that is easy to care for, making it a popular choice for everyday wear. However, it may not have the same natural feel as wool or cotton.
- Blends: Blends of different fibers can combine the best properties of each fiber. For example, a wool/cotton blend can offer warmth and breathability.
Weight and Gauge

The weight of the yarn you choose will determine the thickness and heaviness of your knit hoodie. Consider the pattern you are using and the climate you will be wearing the hoodie in. A bulky weight yarn will create a thicker and warmer hoodie, while a lighter weight yarn will result in a more lightweight and breathable garment.
Additionally, pay attention to the recommended gauge in your knitting pattern. This measurement determines how many stitches and rows are required to achieve a specific size. Using a yarn that matches the pattern gauge will ensure that your hoodie turns out the correct size and fit.
With these considerations in mind, take the time to choose a yarn that you love and that will give you the desired end result for your knit hoodie. By selecting the right fiber content, weight, and gauge, you can create a hoodie that is comfortable, stylish, and perfect for any season.
Essential Knitting Techniques for Beginners

Knitting is a popular craft that allows you to create beautiful garments and accessories with just a pair of needles and some yarn. If you’re a beginner knitter, it’s important to start by learning some essential techniques that will set you up for success. Here are a few key techniques to get you started:
1. Casting On
Before you can start knitting, you’ll need to cast on your stitches. This is the process of creating a row of loops on your needle that will serve as the foundation for your project. There are several different methods of casting on, but the most common one for beginners is the long-tail cast on. It’s important to practice this technique until you feel comfortable with it, as it will be used in almost every knitting project.
2. Knit Stitch
The knit stitch is the most basic stitch in knitting and forms the foundation for many other stitch patterns. To knit, simply insert the right needle from left to right through the first stitch on the left needle, wrap the yarn around the right needle, and pull it through the stitch, sliding the stitch off the left needle. Practice knitting until you can create even, consistent stitches.
3. Purl Stitch
The purl stitch is the reverse of the knit stitch and creates a different texture on the fabric. To purl, insert the right needle from right to left through the first stitch on the left needle, wrap the yarn around the right needle, and pull it through the stitch, sliding the stitch off the left needle. Practice purling until you can create even, consistent stitches.
4. Binding Off
Binding off is the process of finishing your knitting project and creating a neat edge. To bind off, knit the first two stitches, then use the left needle to lift the first stitch over the second stitch and off the right needle. Continue knitting one stitch, then lifting the previous stitch over, until you have one stitch left. Cut the yarn, leaving a tail, and pull it through the last stitch to secure it.
These are just a few of the essential knitting techniques for beginners. As you continue to practice and explore different patterns and projects, you’ll learn and master many more techniques. Remember to start with small, simple projects and be patient with yourself as you learn. Happy knitting!
Understanding the Different Knit Stitch Patterns
When it comes to knitting, there are various stitch patterns that can be used to create different textures and designs. Understanding these different knit stitch patterns can help you bring variety and creativity to your knitting projects. Whether you’re a beginner or an experienced knitter, familiarizing yourself with these stitch patterns can elevate your knitting skills to the next level.
Garter Stitch: One of the simplest and most commonly used stitch patterns is the garter stitch. It is created by knitting every row and results in a fabric with horizontal ridges. This stitch pattern is great for beginners and can be used to create scarves, blankets, and other simple projects.
Stockinette Stitch: Another essential stitch pattern is the stockinette stitch. This pattern is created by knitting one row and purling one row, resulting in a fabric with smooth stockinette on one side and purl bumps on the other. It is commonly used for garments, as it creates a smooth and sleek surface.
Seed Stitch: The seed stitch is a textured stitch pattern that alternates between knit and purl stitches. It creates a bumpy fabric that is reversible and can be used for a variety of projects, such as scarves, hats, and sweaters. The seed stitch adds depth and interest to your knitting.
Ribbing: Ribbing is a stitch pattern commonly used for cuffs, collars, and hems. It is created by alternating knit and purl stitches in a specific pattern, such as 1×1 ribbing (knit 1, purl 1) or 2×2 ribbing (knit 2, purl 2). Ribbing creates elasticity and gives a neat and polished look to your knitting.
Cable Stitch: The cable stitch is a more advanced stitch pattern that involves crossing stitches over each other to create a twisted effect. It adds depth and texture to your knitting, and is often used to create intricate patterns and designs. Cable stitches can be combined with other stitch patterns to create unique and visually appealing projects.
Lace Stitch: Lace stitch patterns are delicate and airy, with patterns of holes and eyelets. They create a beautiful fabric that is perfect for lightweight garments and accessories. Lace stitch patterns require careful attention to detail and can be challenging for beginners, but with practice, they can produce stunning results.
These are just a few examples of the many knit stitch patterns that are available. Whether you’re looking for simplicity, texture, or intricate designs, there is a stitch pattern for every knitting project. By understanding and experimenting with these different stitch patterns, you can add interest and personal style to your knitting projects.
Tips for Successful Hoodie Construction
Constructing a knit hoodie can be a rewarding and enjoyable project, but it requires attention to detail and careful planning. Here are some tips to ensure successful hoodie construction:
1. Gauge Swatch
Before you start your project, make sure to knit a gauge swatch. This will help you determine if your tension and stitch count match the pattern instructions. Using the correct gauge is crucial for ensuring that your hoodie fits as intended.
2. Read the Pattern
Before you dive in, take the time to read the entire pattern from start to finish. Make sure you understand all the instructions, abbreviations, and techniques involved. This will help prevent any surprises or misunderstandings as you work through the pattern.
3. Select the Right Yarn
Choosing the right yarn for your hoodie is important for both the look and feel of the finished garment. Consider the fiber content, weight, and drape of the yarn to ensure it will create the desired effect. Additionally, make sure to check the yardage and buy enough yarn to complete the project.
4. Mark Your Progress
As you work through the pattern, be sure to mark your progress. This can be done with stitch markers or by placing a contrasting piece of yarn at regular intervals. Marking your progress will not only help you keep track of where you are in the pattern, but it will also make it easier to find and correct any mistakes.
5. Seam and Finish Carefully
The finishing touches can make a big difference in the final look of your hoodie. Take your time to seam the pieces together neatly and evenly. Use a suitable method for joining the seams, such as mattress stitch or the three-needle bind off. Additionally, make sure to weave in and secure any loose ends.
By following these tips, you can ensure successful construction of your knit hoodie and create a finished garment that you can be proud of.
Adding Customizations to Your Knit Hoodie
If you’re looking to make your knit hoodie pattern truly unique, consider adding some customizations to make it stand out. Customizations can be as simple or as elaborate as you’d like, and they allow you to put your own personal touch on your hoodie. Here are a few ideas to get you started:
1. Embroidered Designs
One way to add a personal touch to your knit hoodie is by adding embroidered designs. Whether you choose to add a small logo, your initials, or a larger intricate design, embroidery can add a pop of color and individuality to your hoodie. You can either hand embroider your design or use a machine embroidery method.
2. Custom Pockets
Another way to customize your knit hoodie is by adding custom pockets. You can choose to add patch pockets, kangaroo-style pockets, or even hidden pockets for added functionality. Consider using contrasting fabric or adding embellishments to make your pockets really stand out.
3. Hoodie Length
If you prefer a longer or shorter hoodie than what the pattern calls for, you can easily customize the length to suit your style. Simply adjust the number of rows or rounds you knit to achieve your desired length. This customization can completely change the look and feel of your hoodie.
4. Sleeve Cuffs
To add some visual interest to your knit hoodie, consider adding custom sleeve cuffs. You can experiment with different stitch patterns or ribbing techniques to create unique cuff designs. Adding buttons, zippers, or other embellishments can also make your cuffs stand out.
Remember, the key to successful customizations is to plan ahead and make sure your modifications work well with the overall design of your hoodie. Don’t be afraid to experiment and have fun – after all, it’s your hoodie and it should reflect your personal style and creativity!
Knitting the Hood: Step-by-Step Guide
Knitting a hoodie can be a fun and rewarding project for any knitting enthusiast. The hood is an essential part of a hoodie, providing warmth and style. In this step-by-step guide, we will walk you through the process of knitting the hood for your hoodie.
1. Gathering the materials
Before you start knitting the hood, make sure you have all the necessary materials. This includes the yarn of your choice, knitting needles in the appropriate size, a tapestry needle for sewing, and stitch markers to help you keep track of your stitches.
2. Casting on stitches
To begin knitting the hood, cast on the required number of stitches onto your knitting needles. The exact number of stitches will depend on the size and style of your hoodie, so make sure to follow the pattern instructions. Use a sturdy cast-on method, such as the long-tail cast-on, to ensure a neat and secure edge for your hood.
3. Knitting the body of the hood
Once you have cast on your stitches, you will start knitting the body of the hood. Follow the pattern instructions to determine the stitch pattern and shaping details. You may need to switch between different types of stitches, such as knit, purl, and ribbing, to create the desired texture and fit. Continue knitting until you reach the desired length for your hood.
4. Shaping the top of the hood
In order to create the shape of the hood, you will need to decrease stitches at the top. This can be done using various decrease techniques, such as knitting two stitches together or slipping stitches. Follow the pattern instructions to determine when and how to decrease stitches to achieve the desired shape. Continue shaping the top of the hood until you have the desired number of stitches remaining.
5. Binding off stitches
Once you have shaped the top of the hood, it is time to bind off the stitches. This will create a secure edge and prevent the stitches from unraveling. Use a basic bind-off technique, such as the knit bind-off, to bind off the stitches. Make sure to keep the tension loose to ensure a comfortable fit for the hood.
By following these step-by-step instructions, you can easily knit the hood for your hoodie. Remember to take your time, follow the pattern instructions, and enjoy the process of creating your own cozy and stylish hoodie.
Assembling and Finishing Your Knit Hoodie
After completing all the individual pieces of your knit hoodie, it’s time to assemble them and add the finishing touches. Follow these steps to bring your project to completion:
1. Sew the shoulder seams
Start by placing the front and back pieces of your hoodie right sides together. Align the shoulder seams and pin them in place. Using a yarn needle or a sewing machine, stitch the shoulder seams together, making sure to secure the ends. Repeat this step for the other shoulder.
2. Attach the sleeves
Next, align the sleeves with the armholes of the hoodie. Pin them in place, making sure to match the seams and any markings. Sew the sleeves to the body of the hoodie, being careful to sew along the edge without catching any extra fabric. Repeat this step for the other sleeve.
3. Sew the side seams
With the sleeves attached, fold the hoodie in half lengthwise, right sides together. Pin the side seams from the bottom hem to the end of the sleeve, making sure to align any shaping or pattern details. Sew the side seams together, starting from the bottom hem and ending at the sleeve cuff. Repeat this step for the other side.
4. Add the hood
Now it’s time to attach the hood to your hoodie. Align the center back of the hood with the center back of the neck opening. Pin the hood to the neckline, matching any markings. Sew the hood in place, stitching along the edge of the hood and neckline. Make sure to secure the ends and any loose threads.
5. Finish the edges
To give your knit hoodie a polished look, it’s important to finish the edges. You can choose to add ribbed cuffs and hem using a ribbing stitch or simply fold and sew along the edges for a clean finish. If desired, you can also add a drawstring to the hood or decorative buttons to the front for extra detail.
And there you have it! With these steps, you can assemble and finish your knit hoodie project. Once complete, make sure to weave in any loose ends and give your hoodie a final press with a steam iron before wearing or gifting.
Proper Care for Your Knit Hoodie
When it comes to taking care of your knit hoodie, there are a few important steps to follow to ensure that it remains in great condition for years to come. By properly caring for your hoodie, you can prevent damage, keep it looking its best, and extend its lifespan.
1. Washing: It is essential to wash your knit hoodie correctly to avoid any shrinkage or distortion. It is recommended to hand wash your hoodie in cold water using a gentle detergent. If you prefer to use a washing machine, make sure to place the hoodie inside a mesh laundry bag and choose the delicate cycle with cold water. Avoid using bleach or harsh detergents that can damage the fibers.
2. Drying: After washing, it is best to air dry your knit hoodie rather than using a dryer. Lay it flat on a clean towel and reshape it to its original size. Avoid exposing it to direct sunlight or high heat, as this can cause fading and shrinkage. If you’re in a hurry, you can also use a clothing rack or hanger to hang it up and let it dry naturally.
3. Storage: When storing your knit hoodie, make sure it is clean and dry. Fold it neatly and place it in a drawer or on a shelf to prevent it from getting tangled or stretched out. If you’re storing it for an extended period, consider using a breathable fabric bag or a natural cotton pillowcase to protect it from dust and moths.
4. Maintenance: Regularly check your knit hoodie for any loose threads or signs of wear. If you notice any, use a needle and thread to sew them back in place to prevent further damage. Avoid wearing sharp jewelry or carrying heavy bags that can cause snags or pulls on the delicate knit fabric.
Following these care instructions will help keep your knit hoodie in excellent condition and ensure that you can continue to enjoy its warmth, comfort, and style for years to come.
Showcase Your Finished Knit Hoodie
Congratulations on completing your knit hoodie! Now it’s time to showcase your finished masterpiece and proudly display your knitting skills. Whether you choose to wear it yourself or gift it to someone special, here are some ideas to show off your work:
- Wear it with pride: Pair your knit hoodie with your favorite jeans or leggings for a casual and comfortable look. Wear it out and about in town or when running errands, and be prepared for compliments on your stylish and cozy creation.
- Share on social media: Take a photo of yourself wearing the knit hoodie and share it on your favorite social media platforms. Use relevant hashtags such as #knitwear or #handmade to connect with other knitting enthusiasts and inspire them with your project.
- Participate in knitwear contests: Many knitting communities and websites hold contests and challenges where you can submit photos of your finished knitwear. Showcase your hoodie and potentially win prizes or recognition for your hard work.
- Create a portfolio: If you are an aspiring knitwear designer or looking to showcase your knitting skills, create a portfolio of your finished projects. Include high-quality photos of your knit hoodie and write a brief description of your pattern and techniques used.
- Gift it with love: If you have knitted the hoodie as a gift, present it to the recipient with a handwritten note or card. Share the story of how you made it and the care and effort you put into the project. Your recipient will appreciate the thoughtful gesture and the uniqueness of a handmade gift.
Remember, showcasing your finished knit hoodie is not just about displaying your knitting skills but also about inspiring others to start their own knitting journey. Happy knitting!