
When welcoming a new baby into the world, many parents want to celebrate the miracle of life in a meaningful and unique way. One creative option that has gained popularity in recent years is creating a knitted placenta pattern. This intricate and personalized keepsake captures the essence of the birth experience and serves as a reminder of the bond between mother and child.
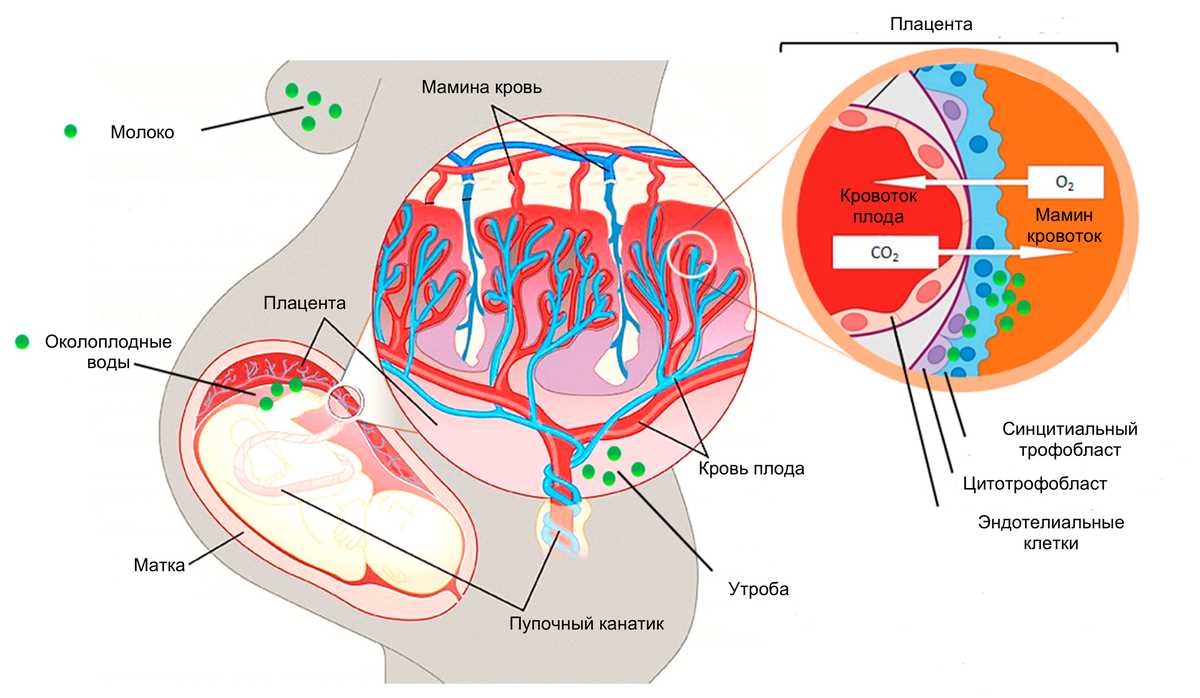
A placenta is the organ that nourishes the developing fetus during pregnancy. It is a truly remarkable and vital part of the birthing process. By creating a knitted placenta pattern, parents can honor this important organ and symbolize the love and connection they share with their baby.
The knitted placenta pattern is not only a beautiful work of art, but it also serves as a practical and functional item. Many parents choose to use it as a blanket for their newborn, providing warmth and comfort. Others display it as a unique piece of decor in the nursery or even frame it as a special keepsake to be treasured for years to come.
What Is a Knitted Placenta pattern and How Do You Make It?
A knitted placenta pattern is a unique and creative way to celebrate the birth of a baby. It is a knitted replica of a placenta, the organ that provides nutrients and oxygen to an unborn baby during pregnancy. This pattern allows you to create a soft and cuddly version of the placenta, which can be used as a decorative item or a fun toy for the child.
To make a knitted placenta pattern, you will need a basic understanding of knitting techniques and materials. Start by choosing the color yarn you want for your placenta. Many people opt for shades of pink or red to resemble the actual organ. You will also need knitting needles and a tapestry needle for sewing the pieces together.
Begin by casting on stitches to create a small circular shape, which will be the center of the placenta. Knit in a circular pattern, increasing the number of stitches periodically to create a ruffled effect. Once you have achieved the desired size, bind off the stitches and cut the yarn, leaving a long tail for sewing.
Next, create the umbilical cord by knitting a long, narrow strip. This can be done using basic knit stitches or more intricate cable patterns. Attach one end of the cord to the center of the placenta and sew it securely in place.
Finally, add any additional details or embellishments you desire, such as embroidered blood vessels or small beads to represent the nutrients passing through the placenta. Once you are satisfied with the finished product, weave in any loose ends and stitch the placenta closed. Your knitted placenta pattern is now complete and ready to be enjoyed.
Understanding the Knitted Placenta Pattern
Knitting is a craft that has been passed down through generations, allowing people to create beautiful and intricate designs with just a few simple tools. One particularly interesting pattern that has gained attention in recent years is the knitted placenta pattern. This unique design mimics the look of a real placenta, showcasing the intricacies of this vital organ in a creative and artistic way.
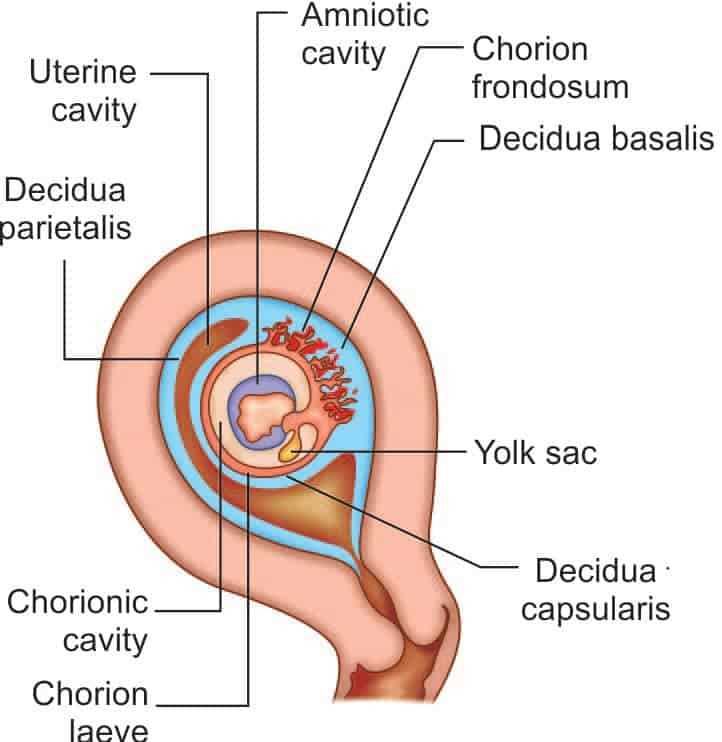
For those unfamiliar with the anatomy of a placenta, it is an organ that develops during pregnancy to provide oxygen and nutrients to the growing fetus. The knitted placenta pattern captures the various structures and textures of the placenta, including the umbilical cord, blood vessels, and the membranes that surround it.
Creating a knitted placenta requires careful attention to detail and an understanding of knitting techniques. The pattern typically involves using different colors of yarn to mimic the different shades and textures found in a real placenta. Yarn overs and decreases can be used to create the intricate blood vessels, and stitch patterns can be chosen to represent the various layers of the placenta.
Knitting a placenta can be a unique and meaningful way to celebrate the miracle of life and the bond between mother and child. It can also be a way to raise awareness about the importance of the placenta in pregnancy and childbirth. By showcasing the beauty of this often overlooked organ, the knitted placenta pattern highlights the incredible intricacies of the human body and reminds us of the incredible processes that occur during pregnancy.
Benefits of Using a Knitted Placenta Pattern

A knitted placenta pattern can be a unique and meaningful way to commemorate the birth of a baby. While the concept may seem unconventional, there are several benefits to using a knitted placenta pattern.
1. Personalized Keepsake
Using a knitted placenta pattern allows you to create a personalized keepsake that is unlike anything else. The placenta is a significant part of the birth process, and knitting it into a pattern can symbolize the unique bond between mother and child. It serves as a reminder of the journey and the love that brought the baby into the world.
2. Eco-Friendly and Sustainable
Using a knitted placenta pattern promotes sustainability and reduces waste. Instead of discarding the placenta, which is typically considered medical waste, knitting it into a pattern gives it a new purpose and eliminates the need for additional materials. It is a creative and eco-friendly way to honor the life-giving organ.
3. Therapeutic and Healing
The act of knitting can be a therapeutic and healing process for many individuals. Knitting a placenta pattern can provide a sense of calm and relaxation, allowing mothers to process their birth experience and connect with their emotions. It can serve as a form of self-care and help in the postpartum healing journey.
4. Conversation Starter
A knitted placenta pattern is undoubtedly a conversation starter. Displaying or wearing the pattern can pique curiosity and lead to meaningful discussions about birth experiences, motherhood, and the powerful connection between mother and child. It can help break the silence around certain birth-related topics and promote a deeper understanding of the birthing process.
Materials Needed for Knitting a Placenta
Knitting a placenta requires specific materials to create a realistic and intricate design. Whether you are a beginner or an experienced knitter, having the right tools and supplies is essential for this unique project.
1. Yarn:
To knit a placenta, you will need high-quality yarn that closely resembles the texture and color of a real placenta. It is recommended to choose a light pink or flesh-toned yarn for a more realistic appearance. The yarn should be soft and lightweight for comfortable use.
2. Knitting Needles:
To effectively work with the chosen yarn, you will need knitting needles that are compatible with the yarn weight. For knitting a placenta, it is recommended to use circular or double-pointed needles to accommodate the size and shape of the project.
3. Stitch Markers:
Stitch markers play a crucial role in keeping track of stitches and stitch pattern changes. They help to ensure the correct shaping and structure of the knitted placenta. Use small, removable stitch markers that won’t snag the yarn.
4. Yarn Needle:
A yarn needle, also known as a tapestry needle, is essential for weaving in loose ends and sewing any necessary seams. Choose a needle with a blunt tip to avoid splitting the yarn during the finishing process.
5. Scissors:
Having a pair of sharp scissors is essential for cutting yarn and trimming any excess during the knitting process. Make sure to use a pair of scissors that is comfortable to handle and provides clean cuts.
6. Stuffing Material:
To give the knitted placenta a three-dimensional shape, you will need a suitable stuffing material. This can be polyester fiberfill or any other soft, hypoallergenic stuffing that is washable.
7. Safety Pins or Stitch Holders:
Safety pins or stitch holders are necessary for holding stitches on hold while working on other parts of the placenta or to mark specific sections for later use. These tools prevent stitches from unraveling or getting lost during the knitting process.
- Optional:
- Row counter
- Knitting gauge/ruler
- Blocking tools
By gathering these materials, you will be well-equipped to start your knitting journey and create a unique and eye-catching knitted placenta.
Step-by-Step Guide: Knitting a Placenta
Knitting a placenta can be a unique and creative way to express one’s love for their unborn child. This step-by-step guide will take you through the process of creating a knitted placenta using basic knitting techniques.
Supplies Needed:
- Yarn in flesh tones and red
- Knitting needles in the appropriate size for your yarn
- Tapestry needle
- Scissors
- Stuffing material
Instructions:
- Start with the Amniotic Sac: Using the yarn in flesh tones, cast on 20 stitches on your knitting needles.
- Knit the Amniotic Sac: Knit every row until you have a rectangle that is approximately 6 inches wide and 8 inches long. This will be the amniotic sac.
- Create the Umbilical Cord: Using the red yarn, cast on 5 stitches on a separate needle.
- Knit the Umbilical Cord: Knit every row until the cord is about 12 inches long. Leave a long tail of yarn for sewing.
- Shape the Placenta: Fold the amniotic sac in half lengthwise. Sew the two shorter sides together, leaving one of the longer sides open. This creates a pocket for the stuffing.
- Stuff the Placenta: Take small amounts of stuffing and fill the pocket of the amniotic sac. Make sure to distribute the stuffing evenly.
- Add the Umbilical Cord: Insert the end of the umbilical cord into the open side of the amniotic sac. Sew the open side closed, securing the cord in place.
- Final Touches: Use the tapestry needle to weave in any loose ends of yarn. Make sure all the stitches are secure.
Congratulations! You have successfully knitted a placenta. This unique creation can be used as a sentimental keepsake or a quirky gift for an expecting parent. Remember to use your creativity to personalize your placenta by adding additional details like embroidery or applique. Enjoy the process and cherish the memories associated with this special knitting project.
Tips and Tricks for Successful Placenta Knitting
Knitting a placenta may seem like an unusual project, but it can be a beautiful and meaningful way to honor the journey of childbirth. Whether you are creating a placenta for yourself or for someone else, here are some tips and tricks to ensure successful results.
Choose the Right Yarn
When knitting a placenta, it is important to select the right type of yarn. Opt for a soft and hypoallergenic yarn that will be gentle against the skin. Consider choosing a yarn with natural fibers, such as cotton or bamboo, as they will be breathable and comfortable.
Follow a Detailed Pattern
Having a detailed pattern is key to knitting a placenta successfully. Look for a pattern that provides step-by-step instructions and includes clear photos or diagrams. Pay attention to any special stitches or techniques that are required for the pattern and practice them beforehand if needed.
Take Your Time
Knitting a placenta is a labor-intensive project, so it’s important to take your time and not rush through the process. Set aside dedicated time for knitting, where you can focus and work at a steady pace. Remember to take breaks when needed and give yourself time to rest and relax.
Pay Attention to Detail
Achieving a realistic look for your knitted placenta requires attention to detail. Take note of the different textures and shapes of a real placenta and try to replicate them in your knitting. Use different stitch patterns and techniques to create depth and dimension in your finished piece.
Finishing Techniques
Once you have completed knitting your placenta, it’s important to finish it off properly. Weave in any loose ends and secure them tightly to prevent unraveling. If desired, you can lightly block the placenta to shape it and enhance the overall appearance. Finally, give your finished piece a gentle wash and let it air dry completely before presenting or displaying it.
By following these tips and tricks, you can ensure a successful and meaningful knitting experience while creating a beautiful placenta. Whether it is as a gift or a personal keepsake, your knitted placenta will be a cherished reminder of the miracle of life.
Creative Ideas for Customizing Your Knitted Placenta

Knitting a placenta can be a unique and personal way to commemorate the birth of a child. Whether you’re knitting it for yourself or as a gift for someone else, there are plenty of creative ideas to customize your knitted placenta and make it truly special.
1. Embroidered details: Adding embroidered details to your knitted placenta can give it a personalized touch. You can use different colors of thread to create intricate designs, such as the baby’s initials or birthdate.
2. Beaded accents: Incorporating beads into your knitted placenta can add some sparkle and texture. You can sew on small beads in a pattern or scatter them randomly for a whimsical look.
3. Applique decorations: Attach small fabric shapes or appliques to your knitted placenta to create unique decorations. You can choose shapes that are meaningful to you, such as hearts, stars, or animals.
4. Dyeing or painting: Experiment with different dyeing or painting techniques to add color and patterns to your knitted placenta. You can use fabric dye, acrylic paint, or even natural dyes to create a one-of-a-kind design.
5. Texture play: Explore different knitting stitches to create texture and dimension in your placenta. You can try lace patterns, cables, or ribbing to give your placenta a tactile appeal.
6. Personalized labels: Sew or attach a personalized label to your knitted placenta to make it truly yours. You can include the baby’s name, birthdate, and any other information that holds significance.
7. Ribbon or bow accents: Add a touch of elegance to your knitted placenta by attaching ribbons or bows. You can choose colors that match the baby’s nursery or go for a festive look with bright and bold ribbons.
8. Applique motifs: Create your own motifs or use pre-made ones to add decoration to your knitted placenta. You can choose motifs that represent your baby’s interests or hobbies, or even incorporate elements from their birth culture.
Remember, the only limit is your imagination when it comes to customizing your knitted placenta. Get creative and make it a truly special keepsake that will be treasured for years to come!
Making the Knitted Placenta Look Realistic
When it comes to knitting a placenta, one of the main goals is to make it look as realistic as possible. This can be achieved through careful attention to detail and the use of specific techniques.
First and foremost, choosing the right yarn is crucial. Opt for a flesh-toned yarn that closely resembles the color of a real placenta. Consider using a variegated yarn to mimic the variations in color that can be seen in an actual placenta. Additionally, paying attention to the texture of the yarn can also help in achieving a realistic look. A slightly woolly or fuzzy texture can give the knitted placenta a more lifelike appearance.
In terms of pattern, it is important to focus on replicating the intricate details of a placenta. This can be done by incorporating various knitting techniques, such as slipped stitches, cabling, and lacework. These techniques can mimic the contours and folds of a real placenta, adding depth and dimension to the knitted piece.
Another factor to consider is the shape and size of the knitted placenta. Referencing anatomical diagrams or even working from a toy or prop can help in getting the proportions right. Adding stuffing or wire to specific areas can also help in creating a more realistic shape and structure.
To enhance the realism of the knitted placenta, consider adding additional details such as blood vessels or umbilical cords. These details can be achieved through embroidery, crochet, or even the use of beads or sequins. These small touches can greatly contribute to the overall authenticity of the knitted placenta.
How to Care for Your Knitted Placenta
After creating your knitted placenta, it’s important to take proper care of it to ensure its longevity and maintain its quality. Here are some tips on how to care for your knitted placenta:
Cleaning
To keep your knitted placenta clean, gently hand wash it using a mild detergent. Avoid using harsh chemicals or bleach, as they can damage the fibers. Rinse it thoroughly and squeeze out the excess water without wringing or twisting the placenta. Afterward, lay it flat to dry on a clean towel or a drying rack, away from direct sunlight.
Storage
When not in use, store your knitted placenta in a cool, dry place. Avoid exposing it to extreme temperatures, as this can cause the fibers to weaken or break. It’s best to keep it in a breathable bag or tissue paper to protect it from dust and moths. If you plan to store it for an extended period, consider adding a sachet of lavender or another natural moth repellent to keep insects away.
Handling and Display
When handling your knitted placenta, treat it with care to avoid stretching or snagging the stitches. If you plan to display it, use a soft, padded surface to prevent any damage. Avoid placing it near open flames or in areas of high humidity, as excessive moisture can affect its shape and texture.
Maintenance
Regularly inspect your knitted placenta for any signs of wear or damage. If you notice any loose threads or holes, mend them promptly to prevent further unraveling. If the placenta becomes soiled, spot clean it immediately using a gentle detergent and a soft cloth. Taking good care of your knitted placenta will help ensure that it stays beautiful and intact for years to come.
Frequently Asked Questions About Knitted Placenta Patterns
Interested in knitting a placenta pattern? Here are some frequently asked questions and answers to help you get started.
1. What is a knitted placenta pattern?
A knitted placenta pattern refers to a pattern or design that replicates the appearance of a placenta using knitting techniques. It is a unique and creative way to showcase the intricacies of this organ in a knitted form.
2. Why would someone want to knit a placenta pattern?
Knitting a placenta pattern can be a personal and meaningful project for several reasons. Some people may find it as a way to celebrate the beauty and complexity of the human body, while others might want to use it as a teaching tool for childbirth classes or medical students. It can also serve as an artistic expression or a conversation starter.
3. Can I find free knitted placenta patterns online?
Yes, there are websites and online communities where you can find free knitted placenta patterns. These patterns are often shared by knitting enthusiasts who enjoy creating unique and unconventional designs. You may also come across paid patterns or books dedicated to knitted placenta patterns.
4. What materials do I need to knit a placenta pattern?
To knit a placenta pattern, you will need knitting needles, yarn in flesh tones or shades that resemble the colors of a placenta, and basic knitting supplies such as scissors and a tapestry needle. It’s up to you to decide the size and type of yarn you prefer, depending on the pattern and your personal preference.
5. Are there different types of knitted placenta patterns available?
Yes, there are various knitted placenta patterns available, ranging from realistic representations to more abstract interpretations. Some patterns may include detailed textures and stitches to mimic the appearance of veins and membranes, while others may focus on the overall shape and color of the placenta.
If you are interested in creating a knitted placenta pattern, these FAQs should provide you with some basic information to get started. Remember to have fun and let your creativity shine through as you embark on this unique knitting project.
Showcasing Incredible Knitted Placenta Creations
The world of knitting never ceases to amaze, and the creativity of knitters knows no bounds. One area in which knitters have shown remarkable ingenuity is in the creation of knitted placenta patterns. These intricate designs celebrate the miracle of birth and provide a unique form of art that is both beautiful and meaningful.
Through the skillful use of various knitting techniques, such as lace, cables, and colorwork, talented knitters have transformed the placenta, a vital organ that nourishes and protects the fetus during pregnancy, into stunning works of art. Each creation is a testament to the love and devotion of the knitter, as well as a celebration of the incredible journey of pregnancy and childbirth.
Highlights of Knitted Placenta Creations
- Realism: Some knitters have mastered the art of creating highly realistic placenta patterns, capturing every detail of the organ’s texture and form. These creations are often used in educational settings to help healthcare professionals better understand the placenta’s structure and function.
- Symbolism: Knitted placenta patterns can also be imbued with symbolic meaning. Some knitters choose to incorporate meaningful motifs or symbols into their designs, representing aspects of fertility, motherhood, or the connection between mother and child.
- Customizability: Knitted placenta patterns offer a unique opportunity for personalization. Knitters can tailor their creations to reflect the individual experiences and preferences of the expectant parents, resulting in a one-of-a-kind keepsake that holds deep sentimental value.
In conclusion, the world of knitted placenta creations is a testament to the boundless creativity and skill of knitters. These intricate and meaningful patterns not only showcase the beauty of the placenta as a natural wonder but also celebrate the journey of pregnancy and childbirth. Whether they are used for educational purposes, as symbolic art, or as cherished keepsakes, knitted placenta creations are a truly remarkable form of artistic expression.