
Knitting is a versatile craft that allows for endless creativity and the creation of unique and beautiful items. One such item that can be knitted is a butterfly, which can serve as a decorative element for a variety of purposes.
This knitting pattern for a butterfly is a fun and simple project that is suitable for knitters of all skill levels. The pattern includes step-by-step instructions and a list of materials needed to complete the project. Whether you are a beginner looking for a new challenge or an experienced knitter searching for a quick and satisfying project, this pattern is sure to delight.
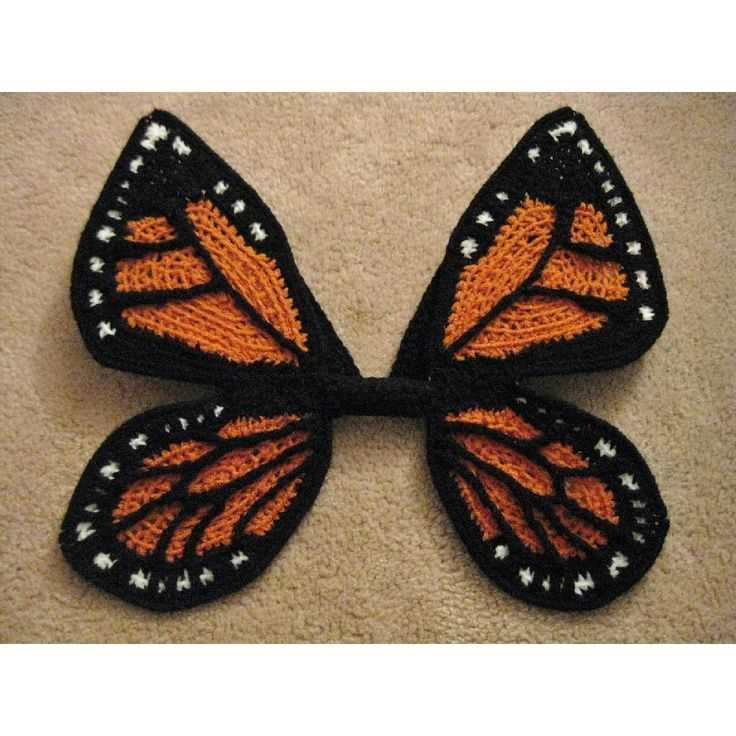
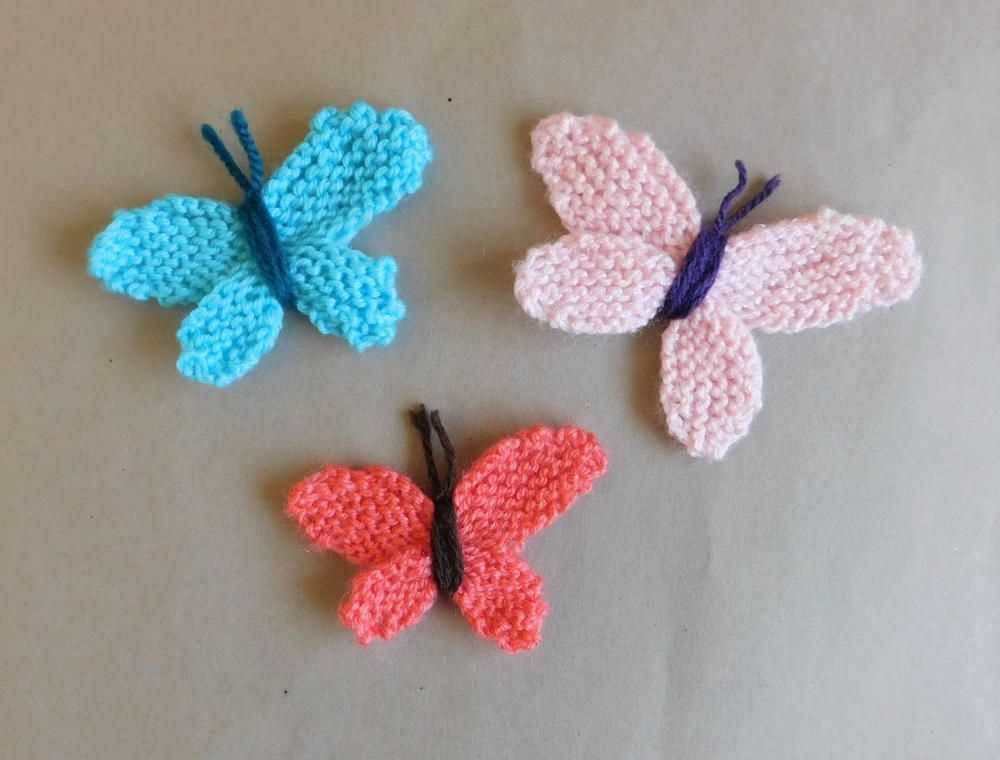
By following this knitting pattern, you will be able to create a charming butterfly that can be used as a brooch, a hair accessory, or as a cute embellishment for a hat or a scarf. The finished butterfly can also be gifted to a loved one, making it a thoughtful and heartfelt present. With its delicate and intricate design, the knitted butterfly is sure to capture the attention and admiration of all who see it.
Materials needed
To create the knitted butterfly, you will need a variety of materials. Here is a list of what you will need:
- Yarn: Choose a lightweight and colorful yarn for the butterfly’s wings. Pick colors that you like, such as vibrant blues, purples, or pinks.
- Knitting needles: Select the appropriate size knitting needles for your chosen yarn. This will ensure that your stitches are the correct size to create the desired shape of the butterfly.
- Tapestry needle: This needle will be used to weave in the ends of the yarn and sew any necessary parts together.
- Scissors: A pair of sharp scissors will be needed to cut the yarn at various stages during the knitting process.
- Stuffing: To give the butterfly body some shape, you will need some stuffing material, such as polyester fiberfill or cotton.
- Buttons or beads: These can be used to embellish the butterfly’s body or add extra details to the wings.
- Pins: Pins can be useful for holding pieces together while sewing or for marking certain areas on the knitting pattern.
- Knitting pattern: Make sure to have a printed or digital copy of the knitting pattern you will be using. This will provide you with the instructions and stitch counts needed to create the butterfly.
Gather these materials before you begin your knitting project to ensure a smooth and enjoyable knitting experience. Once you have everything ready, you can start creating your beautiful knitted butterfly!
Beginner-friendly butterfly knitting pattern
If you are a beginner knitter looking for a fun and quick project, this beginner-friendly butterfly knitting pattern is perfect for you! Whether you want to practice your basic knitting stitches or create a cute accessory, this pattern is easy to follow and produces beautiful results.
Materials:
- Yarn in your choice of colors
- Knitting needles (size will depend on your yarn weight)
- Scissors
- Yarn needle
Instructions:
- Start by casting on 12 stitches.
- Knit the first row.
- Purl the second row.
- Repeat these two rows until your piece measures approximately 6 inches in length.
- Bind off all stitches.
- Using the same yarn or a contrasting color, create a small rectangle by knitting a few rows and then binding off.
- Fold the rectangle in half lengthwise.
- Thread a yarn needle with a long piece of yarn, and use it to stitch the folded rectangle onto the middle section of the knitted piece, creating the butterfly’s body.
- Using a different color of yarn, create two small circles by knitting in the round and then binding off. These will be the butterfly’s eyes.
- Sew the eyes onto the top section of the knitted piece, near the body.
- Finally, attach a length of yarn to the top of the butterfly’s body to create a hanging loop if desired.
This beginner-friendly butterfly knitting pattern is a great way to practice your knitting skills and create a cute and colorful accessory. Feel free to experiment with different yarn colors and sizes to make your butterfly unique.
Step-by-step instructions
If you are interested in knitting a butterfly, here are some step-by-step instructions to guide you through the process:
Materials needed:

- Yarn: Choose a color that you want your butterfly to be. You can also use multiple colors for a more vibrant result.
- Knitting needles: Use the appropriate size needles for your chosen yarn. The pattern will usually specify the recommended needle size.
- Tapestry needle: This will be used to weave in loose ends and sew the different parts of the butterfly together.
- Scissors: You’ll need these to cut the yarn and trim any excess.
Step 1: Cast on

Cast on is the term used to get your yarn onto the knitting needles to start your project. Follow the pattern instructions for the required number of stitches, making sure to leave a long enough tail for weaving in later.
Step 2: Knit the body
Start knitting the body of the butterfly according to the pattern. This may involve a combination of knit and purl stitches, as well as increases and decreases to shape the body.
Step 3: Knit the wings
Once the body is complete, it’s time to knit the wings. This may involve knitting separate pieces for each wing or knitting them directly onto the body. Follow the pattern instructions carefully to achieve the desired shape and size.
Step 4: Finishing touches

Once all the knitting is done, it’s time to finish off your butterfly. This may involve sewing the wings onto the body, weaving in any loose ends, and trimming any excess yarn. Take your time to make sure everything is secure and neat.
Step 5: Block your butterfly
Blocking is the process of shaping and gently stretching your knitted piece to give it a more polished appearance. Depending on the yarn used, this may involve wetting the butterfly and pinning it into shape. Follow the yarn label instructions for blocking.
And there you have it! By following these step-by-step instructions, you’ll be able to create a beautiful knitted butterfly. Enjoy the process and have fun experimenting with colors and patterns!
Choosing the right yarn and needle size
When it comes to knitting a butterfly, choosing the right yarn and needle size is crucial to achieve the desired results.
Yarn: The type of yarn you choose will greatly affect the final look and feel of your butterfly. For a more delicate and lacy appearance, opt for a lightweight yarn such as lace or fingering weight. These yarns typically have a higher yardage and are made from finer fibers, allowing for finer stitch definition and drape. If you prefer a thicker and more substantial butterfly, then a yarn with a heavier weight such as sport or worsted weight would be more suitable. These yarns will provide a more solid and dense look to your butterfly.
Needle size: The needle size you use will also impact the overall outcome of your butterfly. For a delicate and lacy look, choose a smaller needle size such as 2.25mm or 3.00mm. These smaller needles will create smaller stitches, allowing for finer details and a more delicate appearance. On the other hand, if you prefer a bolder and more solid butterfly, opt for larger needles such as 4.00mm or 5.00mm. These larger needles will create bigger stitches and give your butterfly a more robust and eye-catching look.
- For a lace or fingering weight yarn, consider using a smaller needle size to create finer stitches and enhance the lacy appearance.
- If using a thicker yarn, choose a larger needle size to create bigger stitches and give your butterfly a more substantial look.
- Experiment with different yarn and needle combinations to find the perfect match for the butterfly design you have in mind.
In conclusion, the yarn and needle size you choose will significantly impact the final look of your knitted butterfly. Consider the desired outcome and the type of design you are going for when selecting the yarn weight and needle size. Don’t be afraid to experiment and try different combinations to achieve the perfect look for your butterfly.
Creating the body of the butterfly
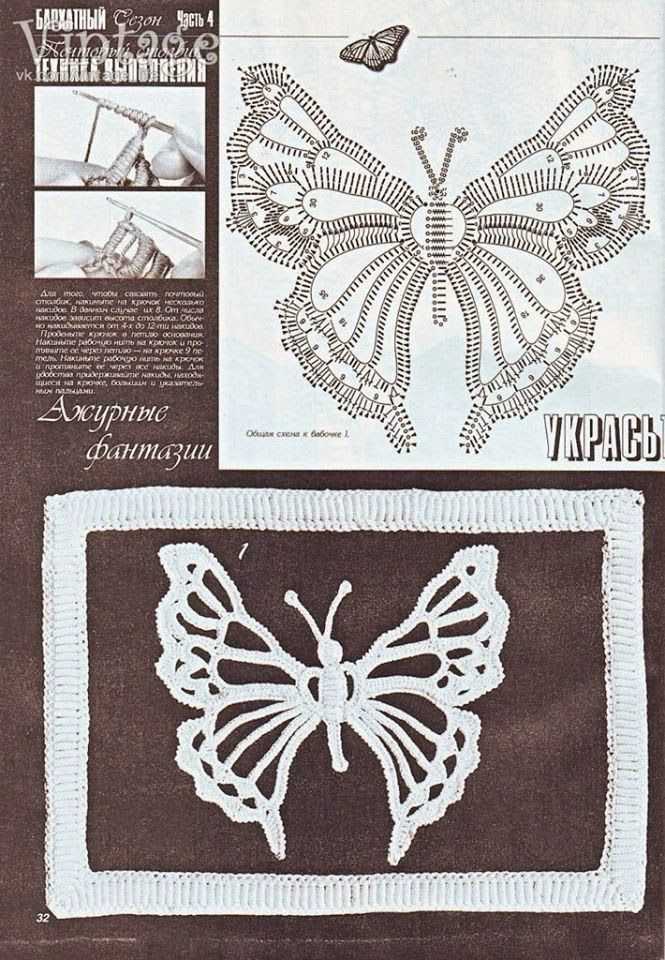
When it comes to creating the body of the butterfly, there are a few different techniques you can try. One option is to use a simple crochet stitch, such as a single crochet or double crochet, to create a long, straight body. This can be done using a thin yarn in a color that matches or complements the wings.
If you prefer a more textured body, you can use a technique called the bobble stitch. This stitch creates small, raised bumps on the fabric, giving the body a realistic appearance. To create the bobble stitch, you will need to work multiple stitches into the same stitch and then work them together into one stitch to create the bump.
Another option for creating the body of the butterfly is to use a combination of knitting and crochet. You can knit a long, thin piece for the body using a simple stitch pattern, such as garter stitch or stockinette stitch. Then, you can use crochet to add details, such as bumps or stripes, to give the body more dimension.
Once you have created the body, you can attach it to the wings using a yarn needle or by sewing it on with a needle and thread. Make sure to secure it well so that it doesn’t come loose while you are working on the rest of the butterfly. With the body complete, you can move on to adding the antennae and any other finishing touches to bring your butterfly to life.
Knitting the wings

Step 1: Start by casting on the required number of stitches for the butterfly wing pattern. This will depend on the size of the butterfly you want to create. Follow the instructions provided in the knitting pattern you are using to determine the correct number of stitches to cast on.
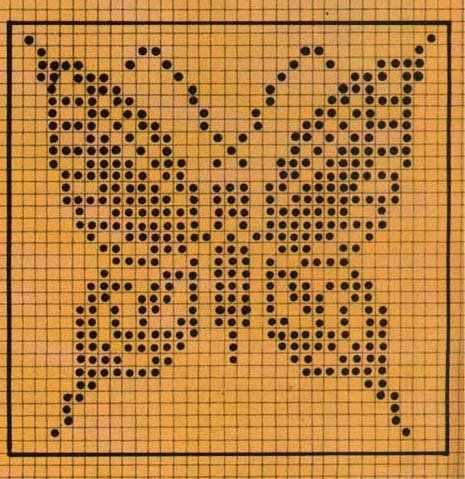
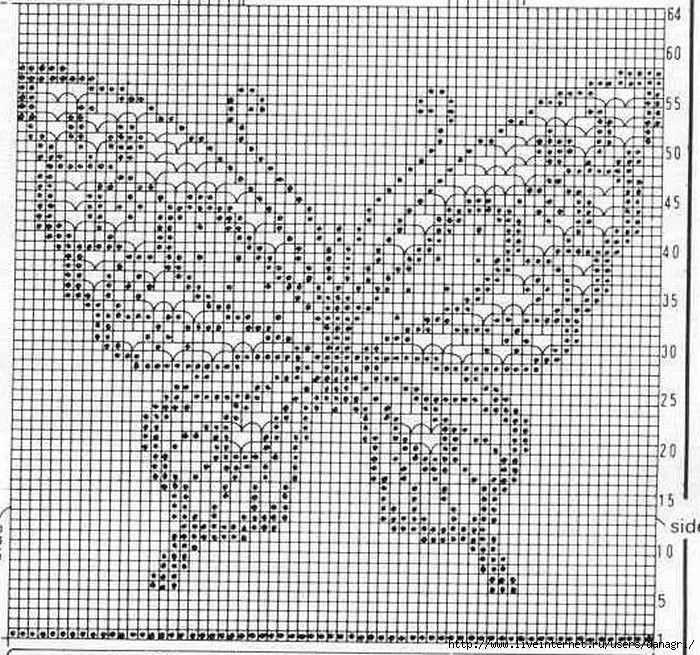
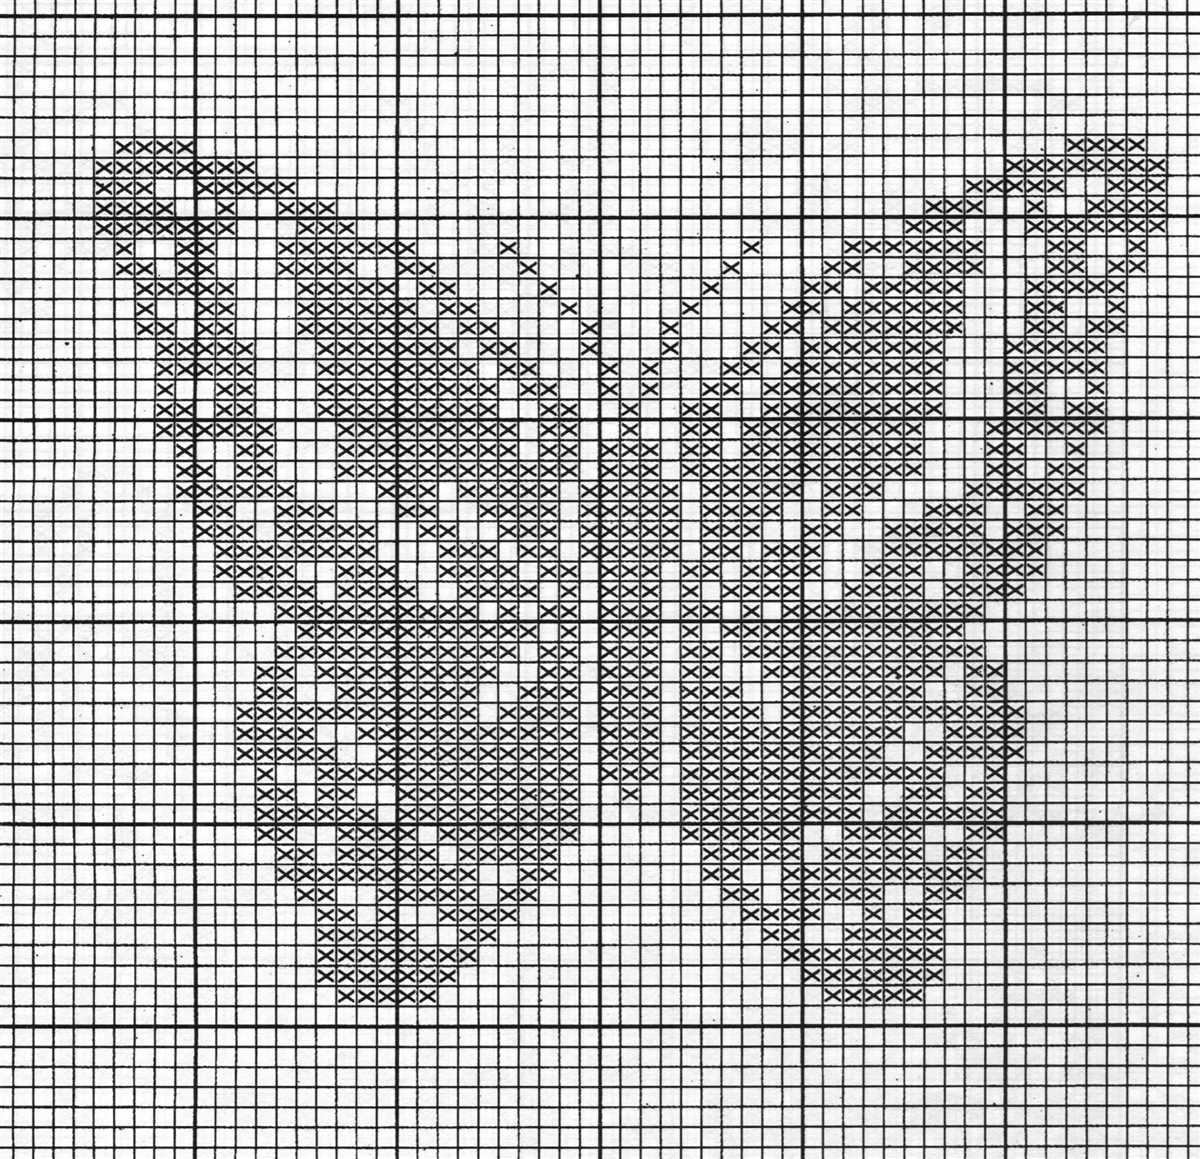
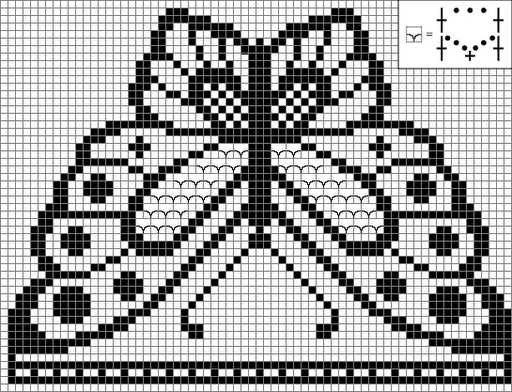
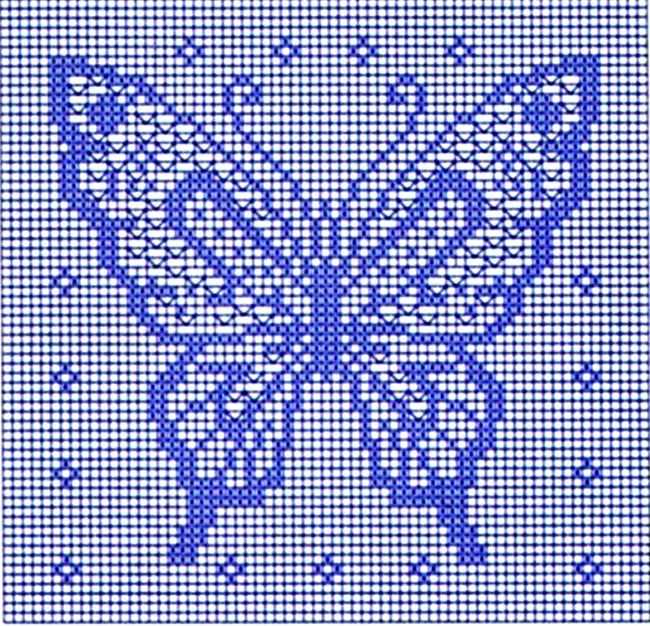
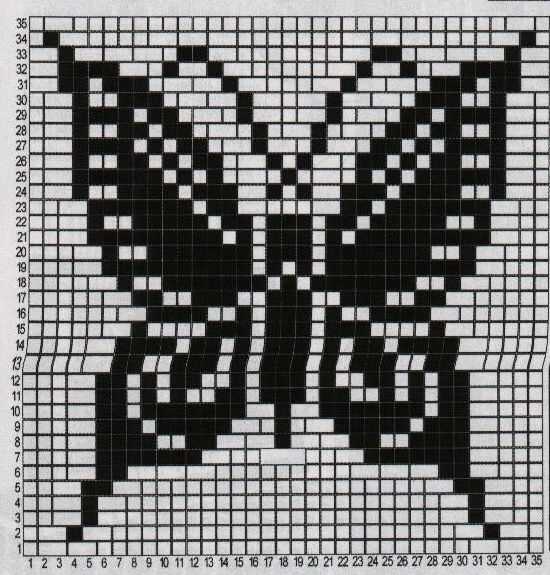
Step 2: Once you have cast on the stitches, begin working the stitch pattern for the wings. This may involve knitting or purling certain rows, using different stitch combinations, or following a specific chart or pattern. Make sure to carefully read and understand the instructions provided in the knitting pattern before starting to work on the wings.
Step 3: Continue knitting the wings, following the pattern instructions and repeating the required stitch pattern for the specified number of rows or until the wings reach the desired length. Pay attention to any shaping instructions, such as increasing or decreasing stitches, as indicated in the pattern.
Step 4: After completing the wing section as specified in the pattern, you may need to bind off the stitches. Follow the instructions provided in the knitting pattern to determine the correct method of binding off to ensure the wings have a finished edge.
Step 5: Repeat the knitting process to create the second wing, following the same instructions and stitch pattern as used for the first wing. Make sure to match the number of rows and stitches exactly to ensure both wings are symmetrical.
Step 6: Once both wings are completed, you can sew them together at the center to create the butterfly shape. Use a tapestry needle and matching yarn to sew the wings together, following the instructions provided in the knitting pattern. Make sure to leave an opening at the center for attaching the body of the butterfly.
Step 7: Finally, finish off the wings by blocking them. Wet the wings and gently stretch them to the desired shape and size. Pin them in place on a blocking board or mat and allow them to dry completely before attaching them to the body of the butterfly.
Adding details to the wings

When knitting a butterfly, adding details to the wings is crucial to achieve a realistic and captivating effect. There are several techniques you can use to make the wings truly come to life and stand out.
1. Embroidery: Embroidery is a popular method for adding intricate details to the butterfly wings. You can use different stitches, such as satin stitch or chain stitch, to create patterns, lines, and textures. Embroidering small dots or French knots can also mimic the appearance of scales and give the wings a textured look.
2. Beading: Adding beads to the butterfly wings can create a beautiful shimmering effect. You can use small seed beads or larger beads to embellish the wings. Sew the beads onto the wings, following the desired pattern or in a scattered arrangement to mimic the natural colors and patterns of real butterfly wings.
3. Lace knitting: Lace knitting is another technique that can add delicate and intricate details to the butterfly wings. By using different lace stitches, such as yarn-overs and decreases, you can create openwork patterns that resemble the delicate veins and patterns found in butterfly wings.
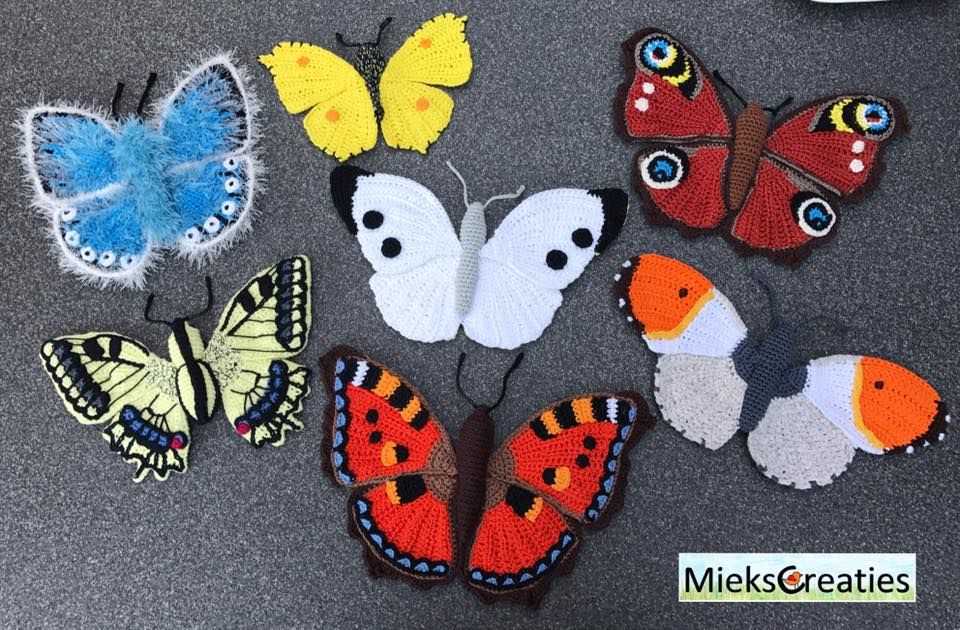
4. Intarsia or colorwork: Intarsia or colorwork techniques allow you to incorporate different colors into the butterfly wings. You can create vibrant and eye-catching patterns by knitting with multiple strands of yarn or using different colors within the same row or round. This technique is ideal for creating bold and contrasting patterns on the wings.
By utilizing these techniques, you can elevate your knitted butterfly to the next level by adding intricate and realistic details to the wings. Whether you choose to embroider, bead, use lace knitting, or incorporate colorwork, the result will be a unique and visually stunning butterfly creation.
Assembling the butterfly
Once you have completed all the necessary parts of the butterfly, it’s time to assemble them into the final product. Follow these simple steps to put everything together:
- Attach the wings to the body: Start by placing the body piece on a flat surface. Take the two wing pieces and position them on each side of the body, aligning the edges. Use a needle and thread to sew the wings onto the body, making sure to secure them tightly.
- Add the antenna: Take the two antenna pieces and fold them in half lengthwise. Position one piece on top of the other, with the folded edges aligned. Sew the folded edges together, leaving a small opening at the bottom to insert a pipe cleaner or wire. Insert the pipe cleaner or wire into the opening and sew it closed to secure it in place.
- Attach the antenna to the body: Position the antenna on top of the body, between the wings. Use a needle and thread to sew the bottom part of the antenna onto the body, making sure it is securely attached.
- Add any additional embellishments: If desired, you can add additional embellishments to your butterfly, such as sequins, beads, or embroidery. Sew or glue these onto the wings or body as desired, making sure they are securely attached.
Once you have completed these steps, your butterfly is now assembled and ready to be displayed or used as desired. Enjoy your beautiful creation!
Adding a pin or clip to use as an accessory
If you want to take your knitted butterfly to the next level, you can easily add a pin or clip to it and use it as an accessory. This will allow you to wear your butterfly on your clothing or attach it to your bag, hat, or even your shoes.
To add a pin or clip to your knitted butterfly, you will need a few simple supplies. First, choose a pin or clip that matches the style and color of your butterfly. You can find these accessories at craft stores or online.
- Add a pin: If you choose to add a pin, start by sewing a small piece of felt or fabric to the back of your knitted butterfly. This will create a sturdy base for the pin. Then, stitch the pin to the felt or fabric, making sure it is securely attached. You can then pin your butterfly to any item of clothing or accessory you like.
- Add a clip: If you prefer to use a clip, you can follow a similar process as adding a pin. Instead of sewing a piece of fabric, attach a small piece of felt to the back of your butterfly using fabric glue. Once the glue is dry, attach the clip to the felt using strong adhesive. This will allow you to easily clip your butterfly onto any fabric surface.
With a pin or clip added, your knitted butterfly can become a versatile accessory that can be worn in different ways. You can also create multiple butterflies in different colors and attach them to different items for a fun and unique look. Experiment with different styles and placements to find the perfect way to showcase your knitted butterfly as a stylish accessory.
Tips and Tricks for Perfecting Your Butterfly Knitting Skills
Knitting a butterfly pattern can be a fun and enjoyable project for both beginners and experienced knitters. To help you create the perfect butterfly, here are some tips and tricks to keep in mind:
1. Choose the Right Yarn

When knitting a butterfly, it’s important to choose the right yarn. Opt for a lightweight and fine yarn, such as fingering or lace weight, to ensure that the details of the butterfly’s wings are visible. Select a yarn that has a smooth texture to make knitting and shaping easier.
2. Use Stitch Markers
Stitch markers can be incredibly helpful when knitting a butterfly pattern. Use them to mark important points or sections in the pattern, such as the starting point for the butterfly’s body or the center of its wings. This will help you keep track of your progress and ensure that your stitches are in the right place.
3. Knit Tightly
To achieve a neat and defined butterfly shape, it’s important to knit tightly. This will help prevent any gaps or holes in your knitting and give your butterfly a more professional finish. If you tend to have loose tension, consider using smaller needles or adjusting your knitting style to create tighter stitches.
4. Pay Attention to Shaping

When knitting the wings of the butterfly, pay close attention to the shaping instructions. Take your time to carefully follow the pattern and make any necessary increases or decreases at the specified points. This will ensure that your butterfly’s wings are symmetrical and have the desired shape.
5. Block Your Finished Butterfly
Once you have completed your butterfly knitting project, it’s important to block it. Blocking involves wetting the knitted piece and shaping it to the desired dimensions. This will help even out any uneven stitches and give your butterfly a polished and professional appearance.
By following these tips and tricks, you’ll be well on your way to creating beautiful and intricate butterfly knitting projects. Remember to practice and have fun with your knitting, and soon you’ll be able to create stunning butterflies that will impress everyone!
Q&A:
Where can I find a knitting pattern for a butterfly?
You can find knitting patterns for butterflies on various websites and online knitting communities. Some popular sources include Ravelry, Knitty, and Etsy. Additionally, you can also search for knitting books that feature butterfly patterns.
What skills do I need to knit a butterfly?
To knit a butterfly, you would typically need to have basic knitting skills, including being able to cast on, knit, purl, and bind off. Depending on the pattern you choose, you may also need to know how to increase and decrease stitches, as well as how to follow a color chart or charted instructions.
What materials do I need to knit a butterfly?
The materials required to knit a butterfly can vary depending on the pattern you choose and the desired finished size. Generally, you will need knitting needles in the appropriate size for your chosen yarn and a suitable yarn in the color(s) you want for your butterfly. Other common materials include a tapestry needle for stitching the parts together, stuffing or wire for shaping the wings, and any additional embellishments or beads you may want to add.
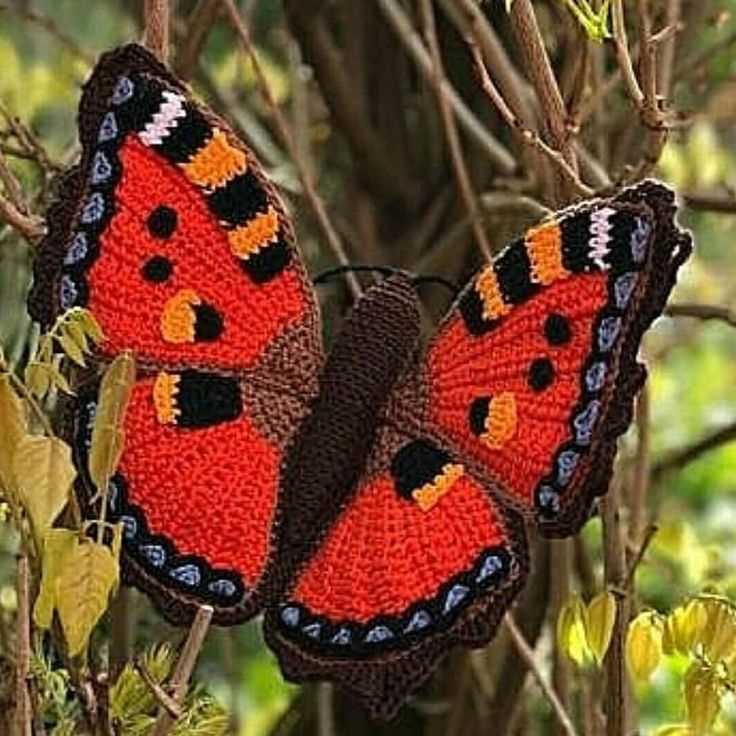
Are there different styles of butterfly knitting patterns available?
Yes, there are many different styles of butterfly knitting patterns available. Some patterns may create a more realistic-looking butterfly, while others may be more whimsical or stylized. The style of the butterfly can be influenced by the shape and size of the wings, as well as any additional details or stitches used in the pattern.
Can I modify a butterfly knitting pattern to make it bigger or smaller?
Yes, it is often possible to modify a butterfly knitting pattern to make it bigger or smaller. To do this, you would typically adjust the number of stitches and rows used in each section of the pattern. However, keep in mind that modifying a pattern can sometimes require more advanced knitting skills and may also affect the overall shape and proportions of the finished butterfly.