
When the weather turns colder, there’s nothing better than slipping on a cozy pair of gloves to keep your hands warm. If you’re an avid knitter or just starting out, learning how to knit gloves can be a rewarding and satisfying project. With a few basic knitting skills, you can create beautiful gloves that are both stylish and functional.
One of the best things about knitting gloves is that there are so many easy patterns available. Whether you prefer fingerless gloves, traditional mittens, or trendy convertible gloves, there’s a pattern out there for you. These easy patterns are perfect for beginners who are still learning the basics of knitting. They often use simple stitch patterns and require minimal shaping, making them a great way to practice your knitting skills.
Knitting your own gloves also allows you to customize the fit and style to your liking. You can choose the perfect yarn color and weight, as well as add personalized touches like cables or lace patterns. Plus, knitting gloves is a portable project that you can take with you on the go. Whether you’re commuting to work or enjoying a cozy night in, knitting gloves is a great way to relax and unwind while creating something useful.
So if you’re ready to take your knitting skills to the next level, why not try knitting your own gloves? With easy patterns and endless customization options, you’ll have a cozy pair of gloves in no time. Whether you’re knitting for yourself or as a gift for someone else, these gloves are sure to be a hit.
Knitting Patterns Gloves Easy

Knitting patterns for gloves can be a fun and rewarding project for both beginners and experienced knitters. Whether you’re looking to knit gloves for yourself or as a gift, there are plenty of easy patterns available that can help you create a cozy and stylish accessory.
If you’re new to knitting gloves, it’s a good idea to start with an easy pattern that uses basic stitches and techniques. Look for patterns that provide clear instructions and illustrations to guide you through the knitting process. These patterns typically use simple ribbing or stockinette stitch for the cuffs and palms, and may include a simple cable or lace pattern for added detail.
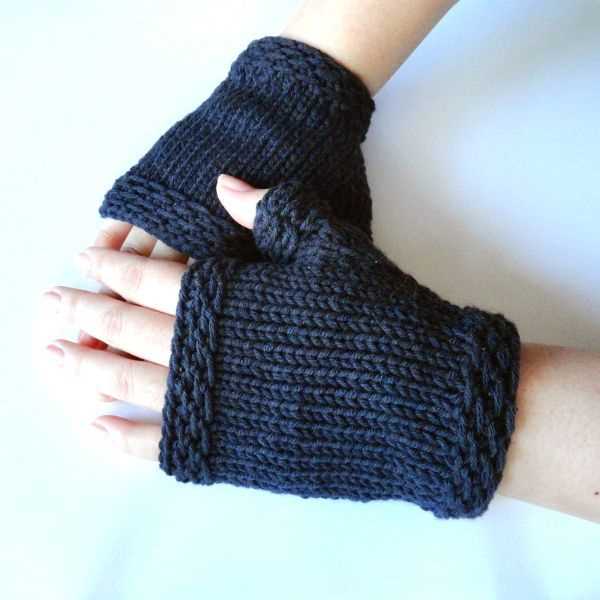
One popular easy knitting pattern for gloves is the “fingerless gloves” pattern. These gloves are perfect for keeping your hands warm while allowing your fingers to remain free for typing, texting, or other activities that require dexterity. The pattern usually involves knitting in the round and may include a thumb gusset for a better fit. Fingerless gloves are a great way to practice basic glove construction and can be customized with different yarns and stitch patterns.
Materials and Tools
When knitting gloves, you’ll need a few basic materials and tools. Most patterns will require a set of double-pointed needles or circular needles in the appropriate size, usually around US size 6 to 8. You’ll also need a stitch marker to keep track of your rounds and a tapestry needle for weaving in ends. As for yarn, choose a soft and warm yarn that is suitable for gloves, such as wool or a wool-blend. Make sure to check the pattern for the recommended yarn weight and yardage.
Conclusion: Knitting patterns for gloves can be a great way to practice your knitting skills and create cozy accessories. With easy patterns, you can knit gloves for yourself or as thoughtful gifts for friends and family. Start with simple designs and gradually explore more complex patterns as you gain confidence in knitting gloves. Remember to choose the right materials and tools for the pattern, and enjoy the process of creating beautiful and functional gloves to keep your hands warm.
Basic Glove Knitting Techniques
Gloves are a popular knitting project for beginners and experienced knitters alike. They are functional and make great gifts. To create a pair of gloves, you will need to be familiar with some basic knitting techniques.
Casting on: The first step in knitting gloves is to cast on the desired number of stitches. This will create the cuff of the glove. You can use the long-tail cast-on method or any other cast-on method you prefer.
Ribbing: After casting on, you will typically start with a few rows of ribbing, which gives the glove a snug fit at the cuff. Ribbing is usually done in a combination of knit and purl stitches, such as k2, p2 or k1, p1.
Shaping the hand: Once you have completed the ribbing, you will begin shaping the hand section of the glove. This involves increasing or decreasing stitches to create the desired width and shape. You may also need to work thumb gussets or finger shaping depending on the style of glove you are knitting.
Thumb opening: If you are knitting fingerless gloves, you will need to create an opening for the thumb. This can be done by placing a designated number of stitches on a stitch holder or waste yarn and then joining the yarn for the rest of the glove.
Finger shaping: For gloves with individual finger sections, you will need to shape each finger. This is typically done by decreasing stitches evenly over several rows until you reach the desired finger length.
Binding off: Once the glove is complete, you will need to bind off the stitches to secure them. You can use a standard bind-off method or a stretchy bind-off if you want the cuff to be more flexible.
With these basic techniques, you will be able to knit a pair of gloves with ease. Experiment with different patterns and styles to create unique and personalized gloves for yourself or your loved ones.
Top 10 Easy Knitting Patterns for Gloves
Knitting gloves can be a fun and rewarding project for knitters of all skill levels. Whether you’re a beginner or an experienced knitter, there are plenty of easy glove patterns available. Here are ten of the best options to get you started on your knitting journey.
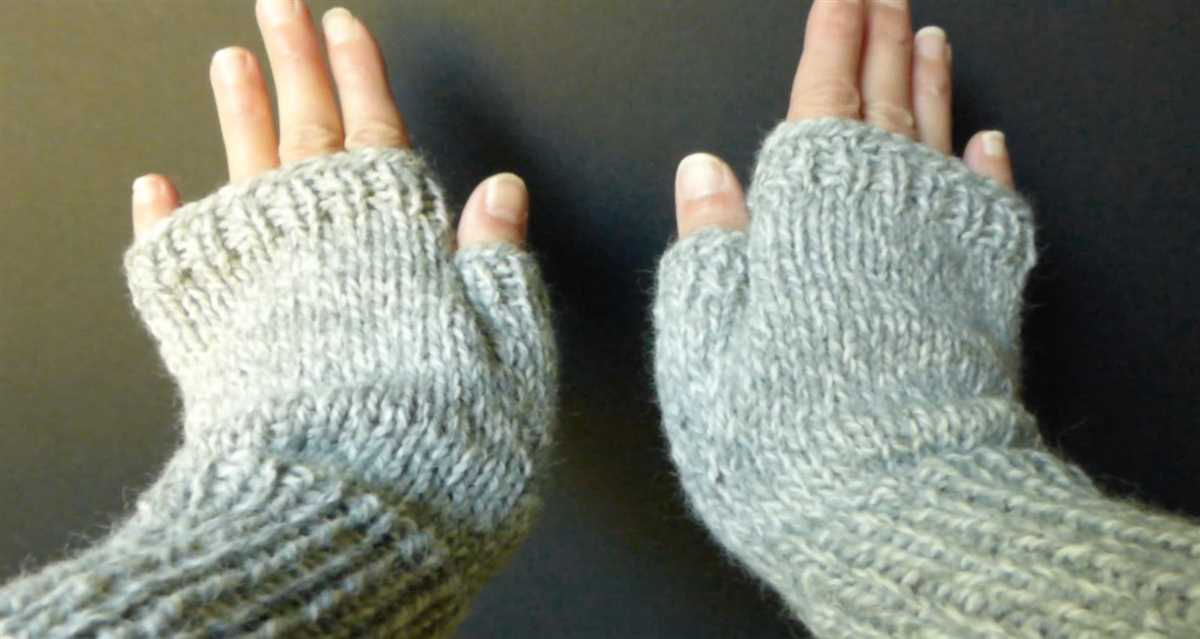
1. Basic Fingerless Gloves
This is the perfect project for beginners who want to knit gloves. With basic stitches and a simple construction, these fingerless gloves are great for keeping your hands warm without sacrificing dexterity. They can be personalized with different colors or added embellishments.
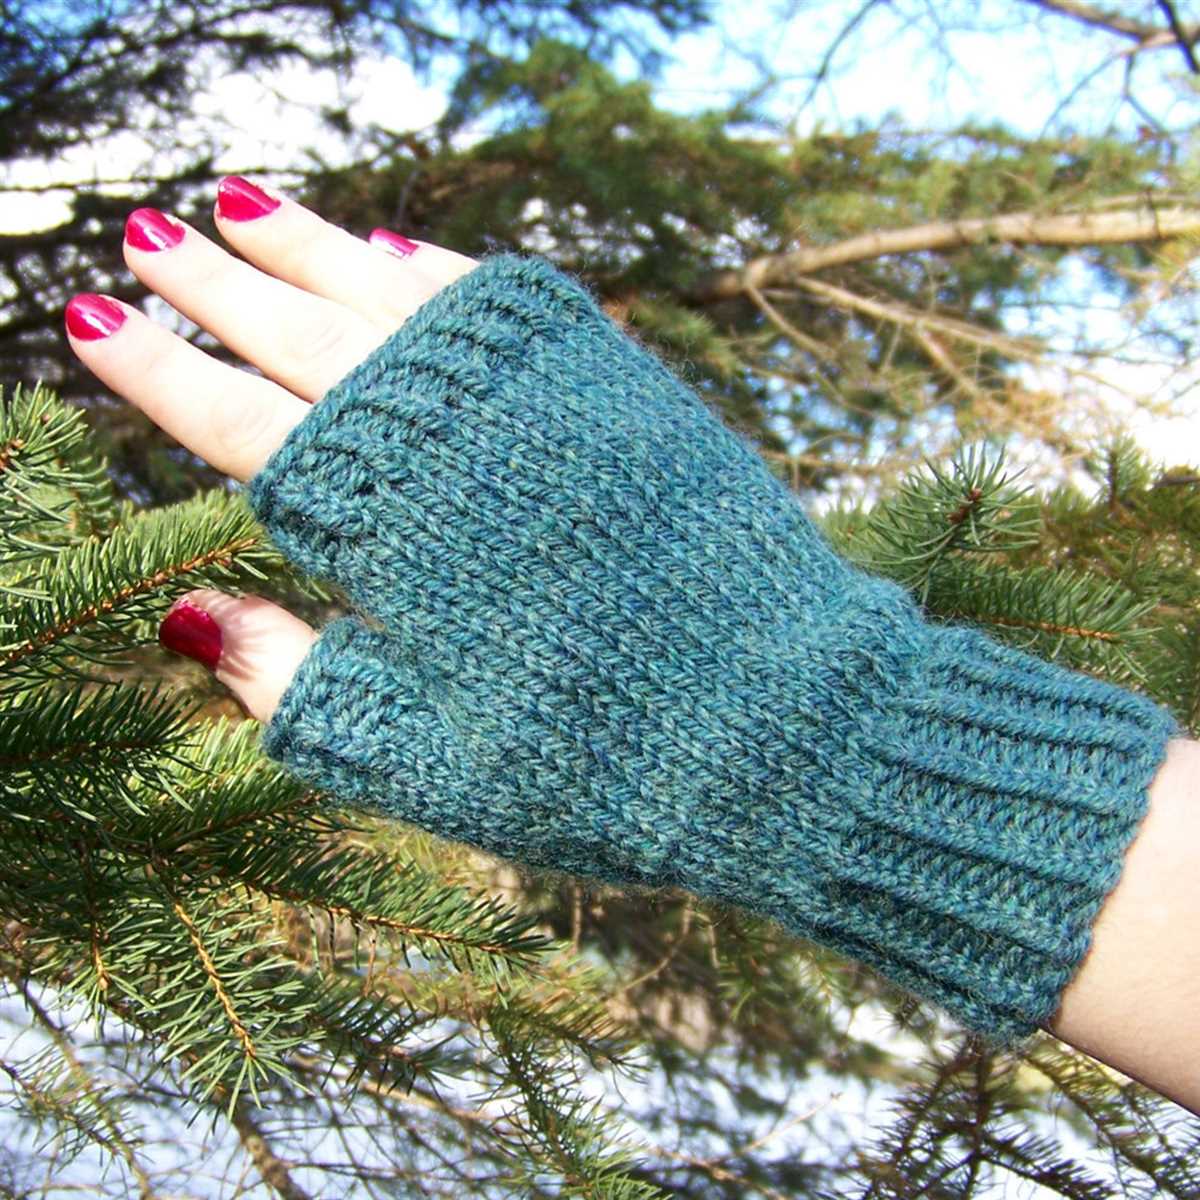
2. Ribbed Fingerless Gloves
Add some texture to your fingerless gloves with a ribbed pattern. The ribbed design provides extra stretch and comfort, making these gloves suitable for hands of all sizes. The pattern is easy to follow and can be customized with different yarn types.
3. Striped Mittens
If you’re ready to venture into full finger coverage, try knitting a pair of striped mittens. This pattern allows you to experiment with different color combinations and create unique designs. The striped pattern adds a playful touch to these cozy winter accessories.
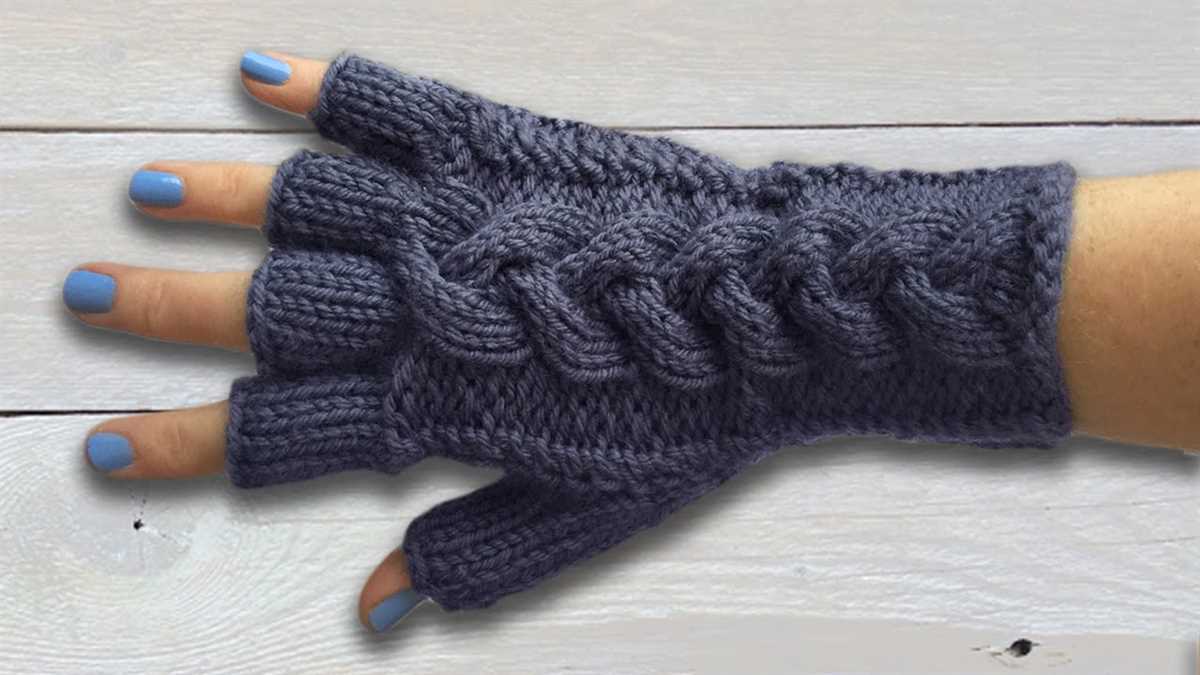
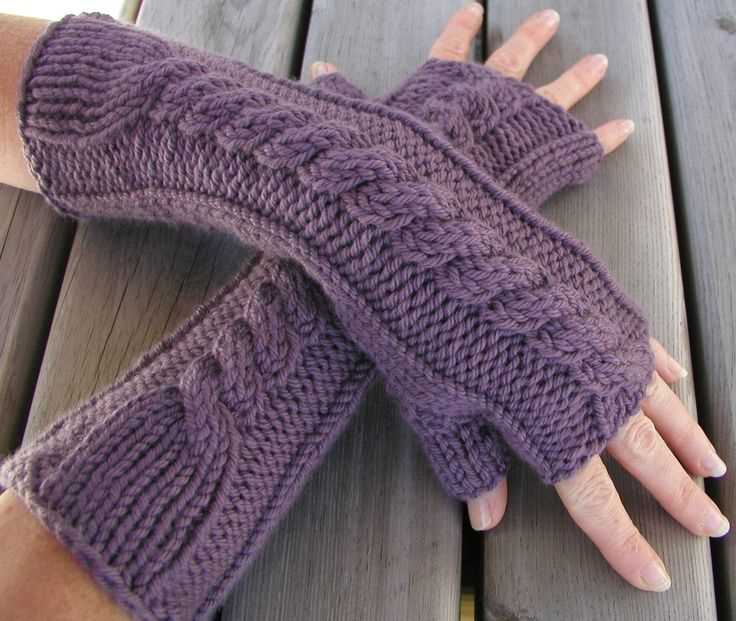
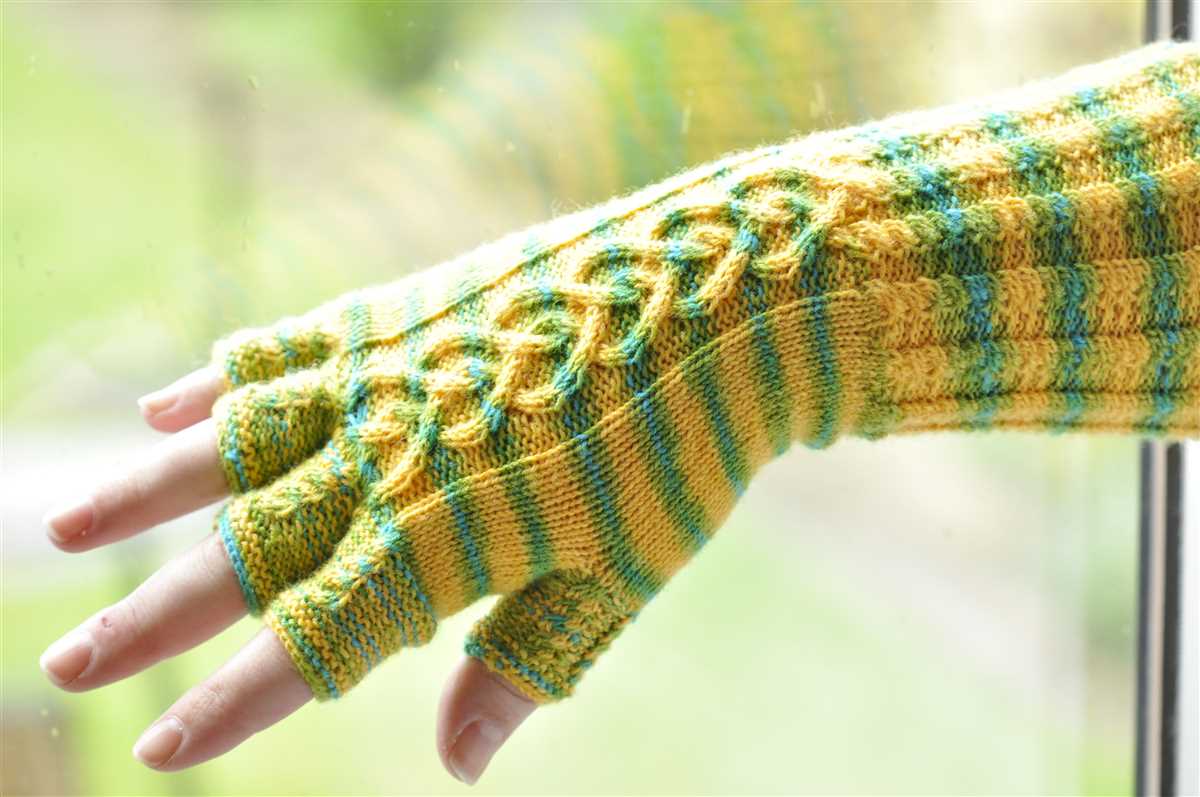
4. Cable-Knit Gloves
Add some elegance to your glove collection with cable-knit gloves. The intricate cable pattern elevates the look of these gloves, making them a stylish accessory for any outfit. The pattern may require some practice, but the end result is well worth the effort.
5. Fair Isle Gloves
Show off your colorwork skills with a pair of Fair Isle gloves. These gloves feature traditional Fair Isle knitting techniques, creating beautiful patterns using multiple colors. The pattern may seem challenging at first, but with practice, you’ll be able to create stunning gloves that are sure to impress.
6. Lace Gloves
Add a touch of femininity to your glove collection with lace gloves. These delicate gloves feature intricate lace patterns that enhance their beauty. The pattern may require some additional attention and concentration, but the end result is sure to be worth it.
7. Textured Gloves
Add some texture to your gloves with a pattern that incorporates interesting stitches or techniques. From cables to seed stitch, there are many ways to create textured gloves. The pattern may require some intermediate knitting skills, but the finished gloves will be unique and eye-catching.
8. Chunky Hand Warmers
For a quick and easy knitting project, consider making chunky hand warmers. These gloves are knit with thick yarn and large needles, making them perfect for beginners or knitters who want a fast project. The chunky texture adds warmth and coziness to these hand warmers.
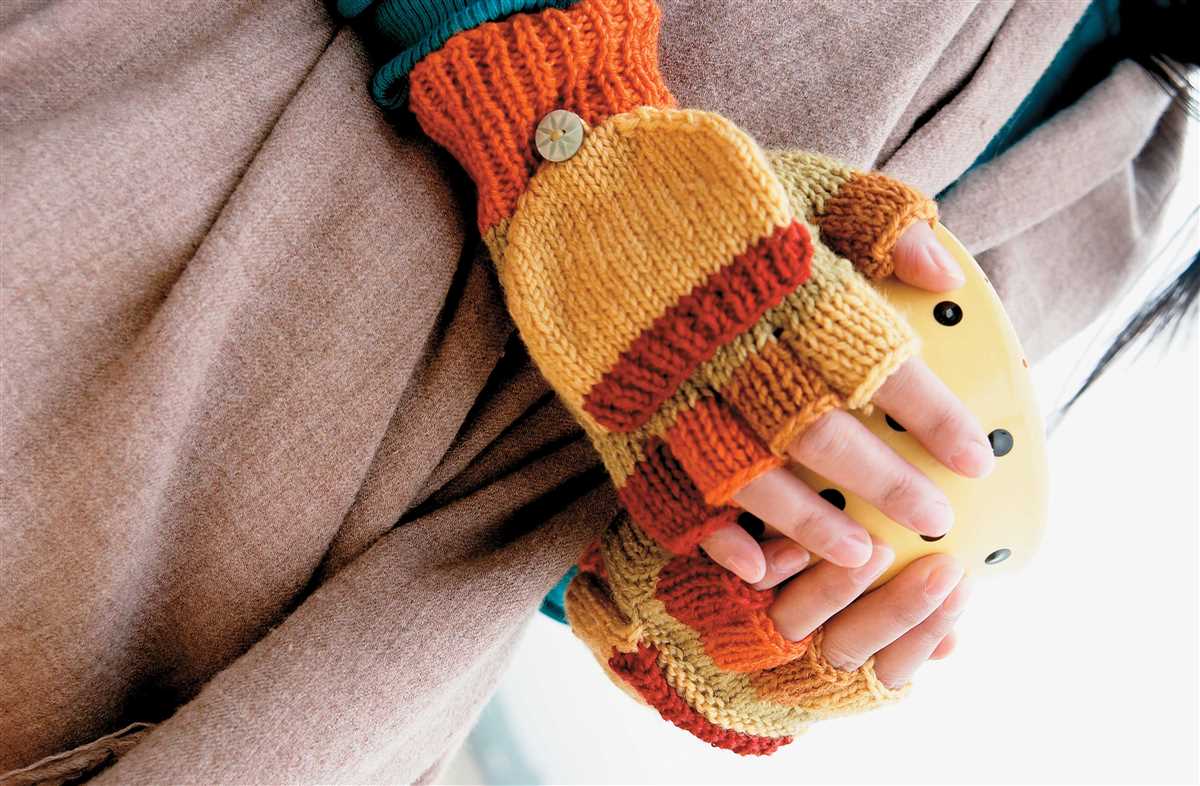
9. Convertible Gloves
If you want gloves that can adapt to different temperatures, try knitting a pair of convertible gloves. These gloves have a flap that can be folded over to cover the fingers or kept open to expose them. They’re a versatile option that allows you to adjust the level of warmth as needed.
10. Faux Fur Trimmed Gloves
Add a touch of luxury to your gloves by knitting a pair with faux fur trim. The faux fur creates a stylish and glamorous look, making these gloves perfect for special occasions. The pattern may require some additional sewing skills to attach the fur trim, but it’s a fun and rewarding project.
How to Choose the Right Yarn for Knitting Gloves
When it comes to knitting gloves, choosing the right yarn is crucial for achieving the desired results. The yarn you select will not only determine the overall look and feel of the gloves but also affect their functionality and durability. Here are some important factors to consider when choosing yarn for knitting gloves.
Fiber Content
The fiber content of the yarn plays a significant role in determining the characteristics of the finished gloves. Wool is a popular choice for knitting gloves as it is warm, breathable, and can retain its shape well. It is a great option for cold weather gloves. Other natural fibers like alpaca and cashmere can also provide warmth and softness. If you prefer vegan or cruelty-free options, consider synthetic fibers such as acrylic or bamboo-based yarns.
Weight and Thickness
The weight and thickness of the yarn are important considerations for knitting gloves. Thicker yarns will result in bulkier gloves, while finer yarns will create gloves with a more delicate and lightweight feel. Consider the intended use of the gloves and the level of warmth required when selecting the yarn weight. For warmer weather gloves, a lighter-weight yarn may be more suitable, while for winter gloves, a thicker yarn will provide the necessary insulation.
Elasticity and Stretch
When knitting gloves, it is important to choose a yarn with good elasticity and stretch. This will ensure that the gloves fit snugly and comfortably on the hands. Yarns with a blend of fibers, such as wool and nylon, or those with added elastic content, can provide the necessary stretch and ensure a good fit. Avoid yarns that are too stiff or have low elasticity, as they may result in gloves that are too tight or restrictive.
Durability
Gloves are typically subjected to a lot of wear and tear, so it is important to choose a yarn that is durable and can withstand frequent use. Look for yarns that have good stitch definition and are resistant to pilling and fading. Consider yarns that have been treated for increased durability, such as those with reinforced or nylon content. Additionally, consider the care instructions for the yarn and whether it can withstand machine washing or if it requires special care.
By considering these factors, you can choose the right yarn for your knitting gloves and ensure that they are not only aesthetically pleasing but also functional and long-lasting.
Step-by-Step Guide: Knitting Fingerless Gloves
Knitting fingerless gloves is a great project for both beginners and experienced knitters. Not only are fingerless gloves stylish and functional, but they are also a quick and enjoyable knit. Follow this step-by-step guide to create your own pair of fingerless gloves.
Materials:
- Yarn: Choose a soft and warm yarn in your preferred color. Worsted weight yarn is recommended.
- Needles: Use size 7 (4.5mm) double-pointed needles. You will need a set of 4.
- Stitch markers
- Tapestry needle
- Scissors
Step 1: Cast On
Start by casting on 36 stitches onto one of your double-pointed needles. Divide the stitches evenly onto 3 needles (12 stitches on each needle) and join in the round, being careful not to twist your stitches.
Step 2: Ribbing
Begin the ribbing by knitting 2 stitches, then purling 2 stitches. Repeat this ribbing pattern until the gloves reach your desired length for the cuff. A cuff length of 2-3 inches is typical.
Step 3: Main Glove
Switch to knitting in stockinette stitch (knit every round) for the main part of the glove. Continue knitting rounds until the glove measures approximately 6 inches in length from the cuff.
Step 4: Thumbhole
To create the thumbhole, begin by knitting the first 15 stitches of the round onto one needle. Slip the remaining stitches onto a stitch holder or spare yarn to be worked later for the thumb.
Step 5: Hand Section
Continue knitting the 15 stitches for the hand section until the glove reaches the desired length. This length will depend on the size of your hand, typically around 4-6 inches measuring from the base of your thumb to your knuckles.
Step 6: Finishing
Bind off all stitches and weave in any loose ends using a tapestry needle. Repeat the same steps to create the second glove, making sure to create the thumbhole on the opposite side.
Now you have your very own pair of fingerless gloves! Experiment with different yarn colors and stitch patterns to customize your gloves and create unique designs. Happy knitting!
Knitting Gloves on Double-Pointed Needles
If you’re a knitter looking for a fun and challenging project, knitting gloves on double-pointed needles is a great option. It may seem daunting at first, but with some practice and patience, you’ll be able to create cozy and stylish gloves for yourself or your loved ones.
Materials: To knit gloves on double-pointed needles, you’ll need a few materials. First, you’ll need a set of double-pointed needles in the appropriate size for your yarn. You’ll also need a skein of yarn in the color and weight of your choice. Finally, you’ll need a tapestry needle for weaving in ends and a stitch marker to keep track of your rounds.
Pattern: Start by finding a glove pattern that suits your skill level and the style of gloves you want to make. There are many free glove patterns available online that range from simple and basic to intricate and detailed. Look for one that provides instructions for knitting gloves on double-pointed needles.
Techniques: Knitting gloves on double-pointed needles requires knowledge of basic knitting techniques such as casting on, knitting, purling, increasing, decreasing, and binding off. You’ll also need to know how to join in the round and how to read a pattern. If you’re new to knitting or need a refresher, there are plenty of online tutorials and resources available to help you learn these techniques.
Tips: When knitting gloves on double-pointed needles, it’s important to keep a few tips in mind. First, make sure to use stitch markers to mark the beginning of each round. This will help you keep track of your progress and ensure your glove is coming together correctly. Second, always check your gauge before starting the project. This will ensure that your gloves fit properly. Finally, don’t be afraid to ask for help if you’re struggling. Knitting communities online or at your local yarn store can be a great resource for tips and advice.
With some practice and dedication, you’ll soon be able to knit gorgeous gloves on double-pointed needles. Whether you’re knitting them as a gift or for yourself, the satisfaction of creating something beautiful and functional with your own hands is truly rewarding.
Tips and Tricks for Knitting Gloves in the Round
Knitting gloves can be a fun and rewarding project, but it can also be a bit challenging, especially when it comes to knitting them in the round. However, with a few tips and tricks, you can make the process easier and achieve beautiful results.
1. Choose the Right Needles:
When knitting gloves in the round, it’s important to choose the right needles for the job. Circular needles or double-pointed needles (DPNs) are the most commonly used tools for this project. Circular needles are great for beginners as they help distribute the weight of the stitches more evenly, while DPNs are ideal for experienced knitters who prefer working with smaller sections at a time.
2. Divide Stitches Evenly:
One of the challenges when knitting gloves in the round is distributing the stitches evenly. To achieve this, it’s helpful to use stitch markers to mark the beginning and end of the round, as well as any stitch pattern repeats. This will help you keep track of your progress and ensure that your stitch count remains consistent throughout the project.
3. Pay Attention to Gauge:
Gauge is crucial when knitting gloves in order to achieve the right fit. Be sure to swatch and measure your gauge before starting the project. If your gauge doesn’t match the pattern, you may need to adjust your needle size to achieve the desired fit. Remember, a little extra time spent on gauge swatching can save you a lot of frustration later on.
4. Use Stitch Holders or Waste Yarn:
When knitting gloves, you will often need to put some stitches on hold or create a gap for the thumb. To do this, you can use stitch holders or simply a piece of waste yarn. Both methods allow you to easily pick up and continue working on these stitches later in the project.
5. Finishing Touches:
When you finish knitting the glove, you may need to add some additional details, such as ribbing at the cuff or a decorative stitch pattern. Make sure to follow the pattern instructions carefully and take the time to block your finished gloves to give them a professional and polished look.
With these tips and tricks in mind, you’ll be well-equipped to tackle knitting gloves in the round. Remember to take your time, stay patient, and enjoy the process. Soon, you’ll have a cozy pair of gloves that you can wear or gift with pride!
Knitting Gloves for Beginners: Easy Stitches and Techniques
Knitting gloves can be a fun and rewarding project for beginners looking to expand their knitting skills. While gloves may seem daunting at first, there are many easy stitches and techniques that can make the process more approachable.
1. Basic gloves pattern: Start with a basic gloves pattern that includes simple instructions for the cuff, hand, and fingertips. This will help you understand the structure of gloves and get familiar with the different sections.
2. Stockinette stitch: The stockinette stitch is a great stitch for gloves as it creates a smooth and stretchy fabric. Knit the stitches on the right side of the gloves and purl on the wrong side for a classic stockinette effect.
3. Ribbing: Ribbing is often used for cuffs and can add elasticity to your gloves. Common ribbing patterns include the 1×1 rib (alternating knit and purl stitches) or the 2×2 rib (alternating two knit stitches and two purl stitches).
4. Thumb gusset: Many gloves have a thumb gusset, which allows for extra mobility and comfort. The gusset is created by increasing stitches at the sides of the thumb section, gradually shaping it.
5. Transition stitches: When transitioning from the cuff to the hand section, it’s important to maintain a consistent stitch pattern. This can be done by picking up stitches along the edge of the cuff and using the same stitch pattern as the hand section.
6. Finger shaping: To shape the fingers, you can use simple decreases to create a tapered effect. Decrease stitches on each side of the finger section until you reach the desired width for each finger.
7. Finishing touches: Once the gloves are knitted, make sure to weave in any loose ends, sew up any gaps in the seams, and block the gloves to give them a polished and professional finish.
With these easy stitches and techniques, beginners can confidently take on knitting gloves and create cozy and stylish accessories. Practice makes perfect, and with each pair of gloves, you’ll gain more experience and confidence in your knitting abilities.
Knitting Gloves for Kids: Fun and Simple Patterns
Knitting gloves for kids can be a fun and rewarding project. Not only does it allow you to make something unique and special for your child, but it also provides an opportunity to teach them a valuable skill. With a few basic knitting techniques and some simple patterns, you can create gloves that are both functional and stylish. Whether you’re a beginner or an experienced knitter, there are plenty of options available to suit your skill level and your child’s taste.
Easy fingerless gloves: Fingerless gloves are a great option for kids as they provide warmth while still allowing for dexterity. They are also relatively quick and easy to make, making them an ideal project for beginners. You can use a simple rib stitch pattern or experiment with different colors to create a unique design. Fingerless gloves can be worn on their own or layered under mittens for extra warmth.
Basic mittens: If you’re looking to make a more traditional pair of gloves, basic mittens are a good choice. The pattern usually involves knitting in the round and shaping the thumb. You can customize the design by adding stripes, using different yarns, or incorporating a small decorative element like a button or a pom-pom. With some practice, you’ll be able to whip up a pair of mittens in no time.
Materials and tools:
- Yarn of your choice
- Knitting needles in the appropriate size
- Stitch markers
- Tapestry needle
- Scissors
Instructions:
- Choose a pattern and gather your materials.
- Follow the pattern instructions to cast on and begin knitting.
- Continue knitting according to the pattern, making any necessary increases or decreases as indicated.
- Shape the thumb for mittens or skip this step for fingerless gloves.
- Continue knitting until you reach the desired length.
- Bind off and weave in any loose ends.
Remember to take your child’s measurements before starting the project to ensure the gloves will fit properly. Also, don’t be afraid to get creative and add your own personal touches to the design. Knitting gloves for kids is a fun and enjoyable way to create something special while teaching a valuable skill that they can enjoy for years to come.
How to Customize Knitted Gloves to Fit Your Hands
When it comes to knitting gloves, it’s important to ensure a perfect fit. Every hand is unique, and by customizing your gloves, you can create a comfortable and snug fit that suits your individual needs. Here are some tips on how to customize knitted gloves to fit your hands.
1. Measure your hand
Before you start knitting your gloves, it’s essential to measure your hand to determine the size you need. Measure the circumference of your hand around the widest part, usually across the knuckles, and measure the length from the base of your palm to the tip of your middle finger. Use these measurements as a reference when following a knitting pattern or adjusting the size.
2. Make a gauge swatch
A gauge swatch is a small sample of knitting that helps you determine the number of stitches and rows per inch in your pattern. By making a gauge swatch using the yarn and needles you plan to use for your gloves, you can ensure that your gloves will fit correctly. Follow the pattern instructions to create a swatch, and measure it to compare against the gauge specified in the pattern. If your gauge is different, you can adjust the size of your gloves accordingly.
3. Adjust the pattern
If the pattern you’re using doesn’t match your measurements or gauge, don’t worry! Knitting patterns are flexible and can be easily adjusted. You can customize the size by adding or subtracting stitches or rows, depending on your needs. Consult a knitting reference book or website for guidance on how to modify patterns to fit your measurements. It’s important to keep track of the changes you make, so you can replicate them for the second glove.
4. Try on as you go
During the knitting process, it’s helpful to try on the glove as you work on it to ensure the fit is accurate. Slip the stitches onto a spare piece of yarn or a stitch holder and try it on your hand. Pay attention to how the glove feels and make any necessary adjustments while you’re still knitting. This way, you can avoid ending up with gloves that are too tight or too loose.
5. Customize finger lengths
To further customize your gloves, you can adjust the lengths of the fingers. Some people have longer or shorter fingers than the average, and by measuring each finger individually, you can create gloves that fit perfectly. You may need to add or subtract rows in certain areas to achieve the desired length. Keep in mind that fingers should be tapered gradually to maintain a comfortable fit.
By following these steps and customizing your knitted gloves, you can create a cozy, well-fitted accessory that will keep your hands warm and stylish. Experiment with different techniques and patterns to find the best fit for you and enjoy the process of creating your own personalized gloves.
Knitting Gloves with Cable Patterns
If you’re looking to add some texture and interest to your knitted gloves, cable patterns are a great option. Cable patterns create beautiful raised designs that can make your gloves stand out. Knitting gloves with cable patterns is a fun and rewarding project that allows you to showcase your knitting skills. Whether you want to make gloves for yourself or as a gift, here are some tips to help you get started.
Choose a cable pattern: There are countless cable patterns available, ranging from simple to intricate. Look for patterns that are specifically designed for gloves, as they will provide instructions for the thumb and finger openings. If you’re new to cables, start with a simple pattern that only has a few twists. As you gain confidence and experience, you can try more complex designs.
Gauge swatch: Before starting your gloves, it’s important to make a gauge swatch to ensure that your knitting meets the required measurements. Cable patterns can affect the stretchiness of the fabric, so it’s crucial to get your gauge right. Use the recommended needle size and yarn, and follow the pattern’s instructions for measuring your gauge swatch. Adjust your needle size if necessary.
Thumb and finger openings: The cable pattern will typically be worked on the back of the hand, while the palm and thumb area will be in a plain knit or purl stitch. The pattern will provide instructions for creating the thumb and finger openings. Pay close attention to these instructions to ensure that your gloves fit properly. You may need to place stitches on holders or waste yarn for the openings.
Avoid twisting cables: When knitting cables, it’s important to keep an eye on the twists. Make sure that the stitches are crossing in the correct direction and are not twisted. Twisted cables can affect the overall appearance of your gloves and may make them uncomfortable to wear. Take your time and double-check your work as you go.
Finishing touches: Once you have completed the cable pattern and finished knitting the gloves, it’s time for the finishing touches. Weave in any loose ends, sew up any seams, and block your gloves to give them a professional finish. Blocking helps to even out the stitches and makes the cables pop. Follow the pattern’s instructions or your preferred blocking method.
Knitting gloves with cable patterns can be a fun and satisfying project. With the right pattern and techniques, you can create a pair of gloves that not only keep your hands warm but also show off your knitting skills. So grab your needles, choose a cable pattern, and start knitting!
Knitting Gloves with Lace Patterns
Knitting gloves with lace patterns can add a touch of elegance and femininity to your winter wardrobe. The delicate and intricate designs of lace can transform a simple pair of gloves into a stunning accessory that is sure to turn heads. Whether you are a beginner or an experienced knitter, there are plenty of easy lace patterns that you can try.
One of the easiest lace patterns for gloves is the diamond lace pattern. This pattern consists of a series of diagonal diamond shapes that create an airy and delicate look. To create this pattern, you will need basic knitting skills such as knitting, purling, and yarn over. Once you master these techniques, you can easily knit a pair of gloves with a beautiful diamond lace pattern.
To knit gloves with a diamond lace pattern, start by casting on the desired number of stitches and knit a few rows of ribbing for the cuff. Then, follow the lace pattern chart or written instructions to create the diamond lace pattern. Once you have completed the lace pattern, continue knitting the rest of the glove according to the pattern instructions.
- To make the glove more comfortable and functional, you can add a lining made of soft and warm materials such as fleece or cashmere.
- It is also important to choose the right yarn for your lace gloves. Lightweight and fine yarns, such as lace or fingering weight yarn, are best suited for lace patterns as they allow the delicate details of the lace to shine through.
- When knitting lace patterns, it is important to maintain consistent tension and use stitch markers to keep track of the lace pattern repeats.
In conclusion, knitting gloves with lace patterns can be a rewarding and enjoyable project. With a little patience and practice, you can create beautiful and unique gloves that showcase your knitting skills. So grab your knitting needles and start experimenting with lace patterns to create a stunning pair of gloves that will keep your hands warm and stylish all winter long!
Finishing Touches: Blocking and Sewing Gloves
Once you have finished knitting your gloves, it’s important to give them the final touches to make them look their best and ensure a perfect fit. This involves two main steps: blocking and sewing.
Blocking
Blocking is the process of shaping and stiffening the finished gloves. This helps to even out the stitches, open up any lace or cable patterns, and give the gloves a polished look. To block your gloves, follow these steps:
- Fill a basin with lukewarm water and add a small amount of mild soap or wool wash. Gently submerge the gloves in the water and press them down to remove any air bubbles.
- Let the gloves soak for about 10-15 minutes, then carefully remove them from the water.
- Gently squeeze out the excess water from the gloves, being careful not to wring or twist them.
- Lay a clean towel flat on a table or other flat surface. Place the gloves on the towel, shaping them into the desired size and position.
- Use rustproof pins to secure the gloves in shape. Pin along the edges and any other areas that need shaping, such as the fingers or cuff.
- Leave the gloves to dry completely, usually overnight or until they are no longer damp to the touch. Avoid direct sunlight or heat sources, as this can damage the yarn.
Sewing
Sewing is the final step to finish your gloves. This involves sewing the sides and fingers together to create the glove shape. Follow these simple steps to sew your gloves:
- Thread a tapestry needle with a length of the same yarn you used for knitting the gloves.
- Starting from the cuff, use a whip stitch or mattress stitch to sew the side seam of the glove. This creates a seamless finish.
- Sew the fingers together in the desired pattern, typically using a whip stitch or mattress stitch as well.
- Weave in any loose ends using the tapestry needle. Trim any excess yarn.
Once your gloves are blocked and sewn, they are ready to be worn or gifted. The finishing touches make a huge difference in the final appearance and fit of the gloves, so take the time to complete these steps for a professional-looking result. Enjoy your cozy and stylish hand-knitted gloves!