
Knitting is a timeless craft that allows you to create beautiful and functional items with just a pair of needles and some yarn. One popular item to knit is the mitten, a cozy and practical accessory for keeping hands warm in cold weather. If you’re looking to try a new knitting project, why not give the Nordic mittens a try?
Nordic mittens are known for their traditional Scandinavian designs, featuring geometric patterns and bright colors. These mittens are not only fashionable, but they also provide excellent insulation and durability. Whether you’re a beginner or an experienced knitter, this pattern is sure to challenge and inspire you.
To start knitting your own pair of Nordic mittens, you’ll need a few supplies. First, choose a soft and warm yarn in the colors of your choice. You’ll also need a set of double-pointed knitting needles in the appropriate size for your yarn. Additionally, you may want to have a stitch marker, tapestry needle, and scissors on hand.
Nordic Mittens Knitting Pattern
Nordic mittens are a classic design that originated in the Nordic countries and have become popular around the world for their cozy and stylish appearance. These mittens are typically knit using traditional Fair Isle or stranded colorwork techniques, which create intricate patterns and motifs.
To knit Nordic mittens, you will need a set of double-pointed knitting needles and two contrasting colors of yarn. The pattern usually consists of a ribbed cuff, followed by a main body section with the traditional Nordic motifs, and ending with a thumb gusset and a thumb. The mittens are typically worked in the round, using the stranded colorwork technique to create the intricate designs.
One popular Nordic mittens knitting pattern is the “Selbu Mittens” pattern, which originates from the town of Selbu in Norway. The Selbu mittens feature a beautiful star motif and are knit using two colors of yarn. The pattern includes charts to help you follow the colorwork design and create the intricate patterns.
Another popular Nordic mittens knitting pattern is the “Lusekofte Mittens” pattern. Lusekofte is a Norwegian word that refers to a traditional pattern used in Norwegian knitting. The Lusekofte mittens feature a geometric pattern and are often knit using three colors of yarn. The pattern includes instructions for the colorwork design and tips for achieving even tension in the stranded knitting.
Nordic mittens are not only a practical accessory for keeping your hands warm, but they are also a great way to showcase your knitting skills and add a touch of Scandinavian style to your winter wardrobe. Whether you choose to knit a classic pattern or create your own unique design, Nordic mittens are sure to be a cozy and stylish addition to your winter accessories collection.
History of Nordic Mittens
Nordic mittens, also known as Scandinavian mittens, have a rich history and have been a staple in Nordic culture for centuries. These traditional woolen mittens were originally hand-knitted by women in the Nordic countries, such as Norway, Sweden, Finland, and Iceland, to provide warmth and protection against the harsh winter weather.
It is believed that the origins of Nordic mittens date back to the Viking Age, around the 9th or 10th century. The Vikings were known for their seafaring expeditions and their intricate textile work, including knitting. They used wool from their sheep to create garments that would shield them from the cold, and mittens were an essential part of their winter attire.
One of the distinctive features of Nordic mittens is the intricate patterns and motifs that adorn them. These patterns were not only decorative but also served a practical purpose. Each pattern had a specific meaning and symbolized different aspects of Nordic mythology, folklore, or nature. The use of these symbols allowed people to express their cultural identity and pass down traditions from one generation to the next.
Nordic mittens gained popularity outside of the Nordic countries during the 19th and 20th centuries, as more people began to appreciate their beauty and craftsmanship. Knitting patterns for Nordic mittens started to emerge, enabling individuals from different parts of the world to create their own unique pairs of mittens.
Today, Nordic mittens continue to be treasured for their warmth, durability, and intricate designs. They are not only practical winter accessories but also a way to connect with the rich cultural heritage of the Nordic countries. Whether hand-knitted or commercially produced, these mittens are a testament to the skill and creativity of Nordic artisans and the enduring appeal of traditional craftsmanship.
Materials Needed for Knitting Nordic Mittens
Knitting Nordic mittens is a popular winter pastime that allows you to create cozy and stylish hand warmers. To start this project, you will need the following materials:
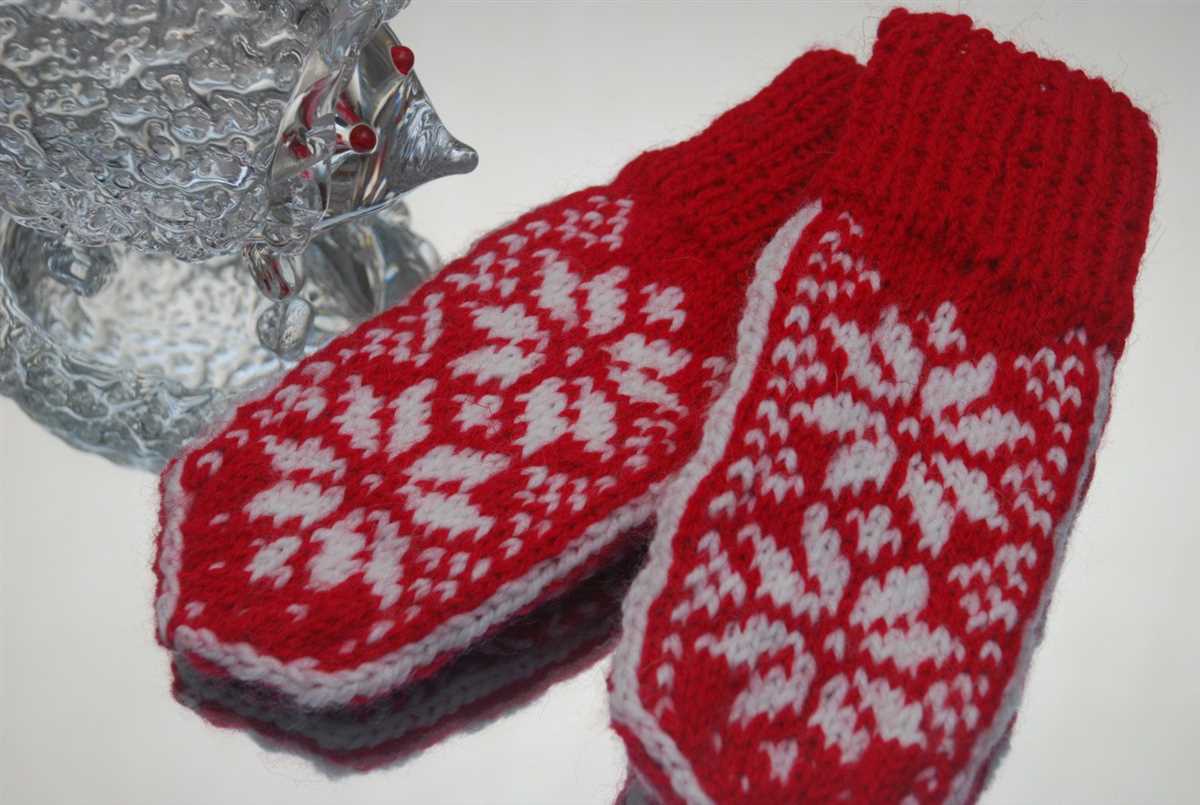
- Yarn: Choose a medium weight wool or wool blend yarn in the colors of your choice. Nordic designs typically feature a combination of colors such as red, white, and blue.
- Knitting Needles: Use a pair of double-pointed knitting needles in the appropriate size for your yarn. These needles are essential for knitting in the round and creating the seamless construction of the mittens.
- Stitch Markers: These small plastic or metal rings are used to mark the beginning of a round or any other specific point in your knitting. They are helpful for keeping track of your progress and pattern repeats.
- Tapestry Needle: This large-eyed needle with a blunt tip is used for weaving in ends and sewing up any seams that may be required in the pattern.
- Scissors: A sharp pair of scissors is essential for cutting your yarn and trimming any excess ends.
- Pattern: Find a Nordic mittens knitting pattern that fits your skill level and desired design. There are many resources available online and in knitting books to choose from.
Once you have gathered these materials, you will be ready to dive into the world of knitting Nordic mittens. Enjoy the process of creating a warm and fashionable accessory that will keep your hands cozy during the winter months!
Choosing the Right Yarn for Nordic Mittens
When knitting Nordic mittens, it is important to choose the right yarn to ensure that your finished project is not only beautiful, but also functional and warm. The yarn you choose will determine the overall look and feel of your mittens, as well as their durability and ability to withstand cold temperatures.
One key factor to consider when selecting yarn for Nordic mittens is the fiber content. Traditional Nordic mittens often feature wool yarn, as wool is naturally insulating and retains warmth even when wet. Look for yarn labeled as “wool,” “wool blend,” or “superwash wool” for the best results. Additionally, yarns with added fibers such as cashmere or alpaca can provide extra softness and warmth.
Weight and gauge are also important factors to consider when choosing yarn for Nordic mittens. The weight of the yarn will determine the thickness of the mittens and how warm they will be. Most Nordic mittens patterns will recommend a specific yarn weight, such as DK or worsted weight. Be sure to check the pattern for gauge information to ensure that your chosen yarn will create the proper tension and fit.
When selecting colors for your Nordic mittens, you may want to stick to traditional Nordic colorwork motifs, such as red, white, and blue or black and white. Look for yarns that offer a range of colors that coordinate well together and reflect the Nordic style. It’s also important to choose a yarn that is easy to work with and doesn’t split or snag easily, as this can make the colorwork process more challenging.
In summary, when choosing yarn for Nordic mittens, consider the fiber content, weight, gauge, and color options. By selecting a yarn that is warm, durable, and easy to work with, you’ll be on your way to creating a pair of beautiful Nordic mittens that are both stylish and functional.
Knitting Nordic mittens is a craft that requires a solid understanding of essential knitting techniques. By mastering these techniques, you will be able to create beautiful and functional mittens that are perfect for cold winter months.
Circular Knitting: One of the key techniques used in knitting Nordic mittens is circular knitting. This method involves using circular needles or double pointed needles to create a seamless tube of knitting. Circular knitting allows you to easily knit in the round, which is essential for creating the shape and structure of mittens.
Stranded Colorwork:

Another vital technique for knitting Nordic mittens is stranded colorwork. This technique involves knitting with two or more colors of yarn at the same time to create intricate color patterns. Stranded colorwork is commonly used in Nordic designs to create beautiful motifs and patterns that are synonymous with traditional Nordic style.
- Increase and Decrease: Increase and decrease techniques are essential for shaping the thumb and top of the mitten. These techniques allow you to add or remove stitches to create a tailored fit.
- Reading Charts: Many Nordic mittens patterns use knitting charts to represent complex color patterns. Being able to read and understand these charts is crucial for successfully knitting Nordic mittens.
- Blocking: Blocking is the process of shaping and stretching knitted fabric to its intended size and shape. It is an important final step in knitting Nordic mittens to ensure that they have a professional finish and fit properly.
By mastering these essential knitting techniques, you will be well-equipped to tackle any Nordic mittens pattern and create beautiful, cozy mittens that will keep your hands warm in style.
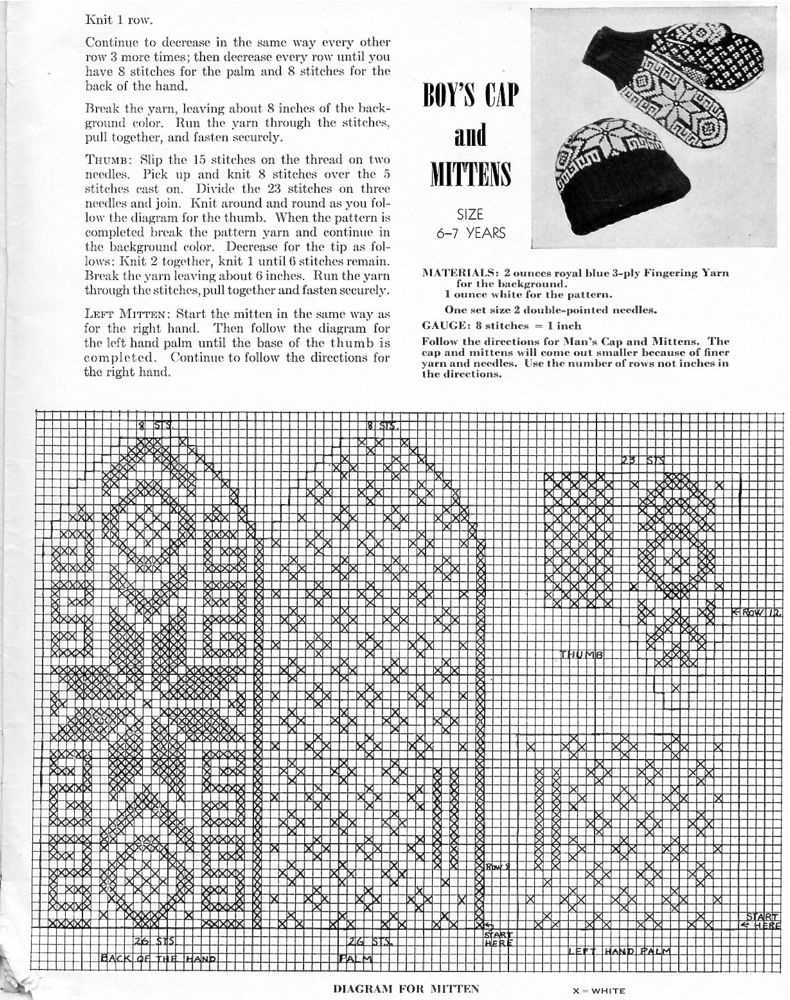
Understanding the Nordic Mittens Knitting Chart
When it comes to knitting Nordic mittens, understanding the knitting chart is essential. The chart is a visual representation of the pattern, showing each stitch and color change. It allows knitters to follow along and create the intricate designs that are characteristic of Nordic mittens.
Key Symbols:
- X: This symbol represents a knit stitch.
- O: This symbol represents a purl stitch.
- /: This symbol represents a yarn over.
- : This symbol represents a knit two together decrease.
- [ ]: This symbol represents a repeat section of the pattern.
- ( ): This symbol represents a stitch count.
Color Changes:
In addition to the stitch symbols, the chart also indicates when to change colors. Each color is assigned a different symbol or number, allowing knitters to easily keep track of which color to use. For example, a “+” symbol might indicate a color change, or a number “1” could represent the first color, and “2” the second color.
Using the Chart:
To use the chart, start at the bottom right corner and work your way from right to left for each row. Follow the symbols and color changes as indicated, knitting or purling each stitch accordingly. Repeat any sections indicated by the repeat symbols “[ ]” until you reach the end of the row.
By understanding and following the knitting chart, you’ll be able to create beautiful Nordic mittens with intricate designs. Happy knitting!
Step-by-Step Guide to Knitting Nordic Mittens
If you’re looking to try your hand at knitting Nordic mittens, you’re in for a treat! These cozy and stylish accessories are perfect for keeping your hands warm during the cold winter months. In this step-by-step guide, we’ll walk you through the process of knitting your own Nordic mittens. So grab your knitting needles and let’s get started!
Materials You’ll Need
Before you begin, gather the following materials:
- Yarn: Choose a bulky weight yarn in your favorite color or a traditional Nordic pattern.
- Knitting Needles: You’ll need a set of double-pointed needles in a size that works well with your chosen yarn.
- Tapestry Needle: This will be used for weaving in ends and finishing touches.
- Stitch Markers: These will help you keep track of your stitches and pattern repeats.
- Pattern: Find a Nordic mitten knitting pattern that suits your skill level and desired style.
Casting On and Ribbing
Start by casting on the required number of stitches as specified in your pattern. Typically, Nordic mittens require a smaller circumference at the wrist and a larger circumference at the hand. Once you have your stitches cast on, join in the round using the magic loop method or by dividing your stitches evenly across double-pointed needles.
Next, you’ll begin working the ribbing for the cuff of the mitten. Follow your pattern’s instructions for the desired ribbing pattern, which is usually knit 2 stitches, purl 2 stitches. Continue working the ribbing until you reach the desired length for your cuff.
Knitting the Body of the Mitten
Once the ribbing is complete, it’s time to move on to the body of the mitten. This is where you’ll create the intricate Nordic patterns that are a characteristic of these mittens. Follow your pattern’s instructions for knitting the body, using color changes and different stitch patterns as indicated.
Pay close attention to pattern repeats and stitch counts to ensure that your mittens turn out symmetrical. Use stitch markers to mark the beginning of rounds and any important pattern repeats.
Shaping the Thumb
After knitting the body of the mitten to the desired length, it’s time to shape the thumb. This involves creating a hole in the knitting and working the thumb stitches on waste yarn to be picked up later.
Follow your pattern’s instructions for shaping the thumb, which will usually involve knitting a certain number of stitches and then turning your work. Work the thumb stitches on waste yarn and continue knitting the remaining stitches of the mitten.
Finishing and Blocking
Once you’ve completed the body of the mitten and shaped the thumb, it’s time to finish off your knitting. Cut the yarn, leaving a long tail for weaving in the ends. Use a tapestry needle to weave in any loose ends and secure them.
Finally, block your completed mittens to help even out the stitches and give them a polished look. Wet blocking is usually recommended for woolen mittens. Gently soak your mittens in lukewarm water, then reshape them and lay them flat to dry.
And there you have it – a step-by-step guide to knitting Nordic mittens! With a little patience and practice, you’ll soon have a cozy pair of mittens to keep your hands warm all winter long.
Tips for Customizing Your Nordic Mittens
When knitting Nordic mittens, one of the exciting aspects is the opportunity to customize them according to your personal style and preferences. By tweaking certain elements of the pattern, such as color combinations, stitch patterns, and sizing, you can create unique and personalized mittens that perfectly reflect your individuality. Here are some tips to help you customize your Nordic mittens:
1. Play with colors
Color choice is a crucial aspect of Nordic mittens. Experiment with different color combinations to create a design that stands out. You can go for traditional Nordic colors like red, white, and blue, or opt for more modern and vibrant hues. Consider using contrasting colors for the main body and the cuffs or try a gradient effect by using shades of the same color. Remember to choose colors that complement each other well to achieve a visually pleasing result.
2. Try different stitch patterns
Another way to customize your Nordic mittens is by experimenting with different stitch patterns. While the traditional Nordic mittens often feature stranded colorwork, you can add your own twist by incorporating various texture stitches, cables, or lace patterns. These embellishments can give your mittens a unique and visually appealing look. Just make sure to choose stitch patterns that are compatible with the mitten’s gauge and keep in mind the overall design aesthetic you want to achieve.
3. Adjust the sizing

To ensure a perfect fit, consider adjusting the sizing of your Nordic mittens. You can easily modify the circumference and length of the mittens to accommodate your hand size. Measure your hand and compare it to the pattern’s size specifications. If needed, you can add or subtract stitches to achieve the desired fit. Remember that the thickness of the yarn you use will also affect the size, so make sure to take that into consideration when making adjustments.
4. Add personalized touches

Don’t be afraid to add personalized touches to your Nordic mittens to make them truly unique. You can incorporate initial or monogram motifs, animal or nature-inspired designs, or even small embroidered details. These personalizations can add a touch of individuality and make your mittens even more special.
With these tips in mind, you can confidently customize your Nordic mittens to create a one-of-a-kind accessory that reflects your personal style and knitting skills. Take your time to experiment, have fun, and let your creativity shine through!
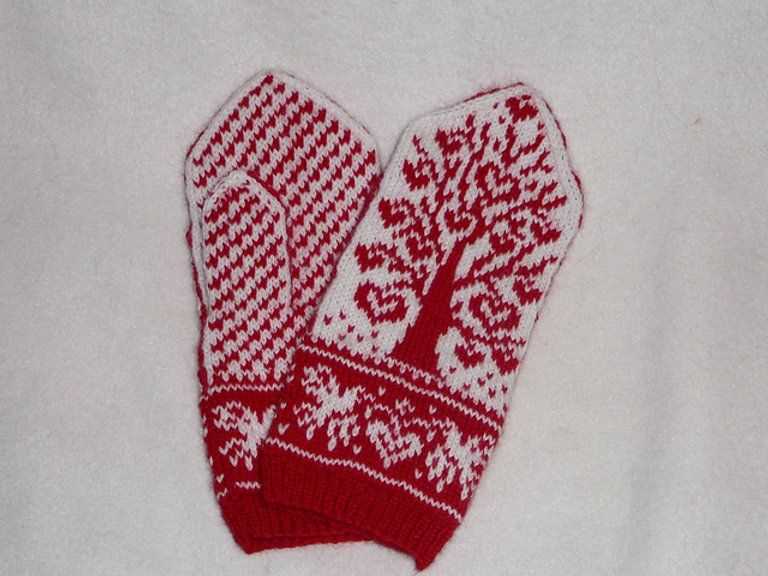
Adding Embellishments to Your Nordic Mittens
When knitting Nordic mittens, adding embellishments can take your project to the next level. Not only do these extra details make your mittens more visually appealing, but they can also add warmth and functionality. Here are some ideas for embellishing your Nordic mittens:
Fair Isle Knitting
One popular way to embellish Nordic mittens is through Fair Isle knitting. This technique involves using multiple colors in a single row to create intricate patterns. You can incorporate traditional Nordic motifs, such as snowflakes, reindeer, or geometric designs. By choosing contrasting colors, your Fair Isle pattern will stand out beautifully.
Embroidery
Another way to add embellishments to your Nordic mittens is through embroidery. After completing your mitten knitting, you can use embroidery floss or yarn to stitch additional details onto the surface. This could include adding flowers, hearts, or other decorative elements. Embroidery not only enhances the aesthetics of your mittens but also provides a textured surface that can trap more warmth.
Nordic Braids or Cables
Adding braids or cables to your Nordic mittens can create a unique and eye-catching effect. Nordic braids are formed by crossing stitches over each other, creating a woven pattern. Cables, on the other hand, involve knitting specific stitches out of order to create a twist. Both techniques add depth and dimension to your mittens, giving them a more intricate and professional look.
Button Accents
Incorporating buttons as embellishments can add a touch of elegance to your Nordic mittens. You can sew buttons along the cuff or use them to fasten a fold-back flap. Choose buttons that match the color scheme or theme of your mittens for a cohesive and stylish finish.
With these ideas in mind, you can now explore various ways to embellish your Nordic mittens. Whether you prefer colorful Fair Isle patterns, delicate embroidery, braids or cables, or button accents, the possibilities are endless. Get creative and give your mittens a personal touch that reflects your style and passion for knitting!
Caring for Your Nordic Mittens
Your Nordic mittens are not only a stylish accessory but also a cozy and practical item to keep your hands warm during the cold winter months. To ensure that your mittens stay in good condition and last for years to come, here are some care tips to keep in mind:
Handwashing is key
Due to the delicate nature of the yarn and intricate knitting patterns, it is best to handwash your Nordic mittens. Fill a basin with lukewarm water and add a mild detergent specifically designed for wool or delicates. Gently agitate the water to create some soapy suds. Then, submerge the mittens and swirl them around in the water, making sure to pay extra attention to any stained or soiled areas. Rinse the mittens thoroughly in cool water and gently squeeze out any excess moisture. Avoid wringing or twisting the mittens, as this can cause damage to the shape and structure.
Drying with care
After washing, lay your mittens flat on a clean, dry towel and gently reshape them to their original shape and size. It is crucial to avoid hanging the mittens to dry, as this can cause them to stretch or lose their shape. Instead, leave them to air dry in a cool, well-ventilated area. Avoid using direct heat or sunlight, as this can cause the colors to fade or the yarn to become brittle. Once the mittens are completely dry, you can gently fluff them up by lightly patting them with your hands.
Storage precautions
When not in use, it is essential to store your Nordic mittens properly to prevent any damage. Avoid folding or bending them, as this can create permanent creases. Instead, roll the mittens up and place them in a clean, dry storage bag or container. You can also opt to store them in a drawer lined with acid-free tissue paper to protect them from dust and moisture. If storing for an extended period, it is a good idea to add a sachet of lavender or other natural moth deterrents to keep pests away.
By following these care tips, you can ensure that your Nordic mittens stay in excellent condition and continue to bring you warmth and style for years to come.
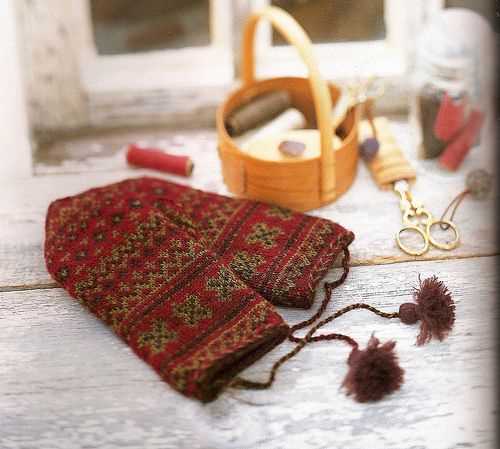
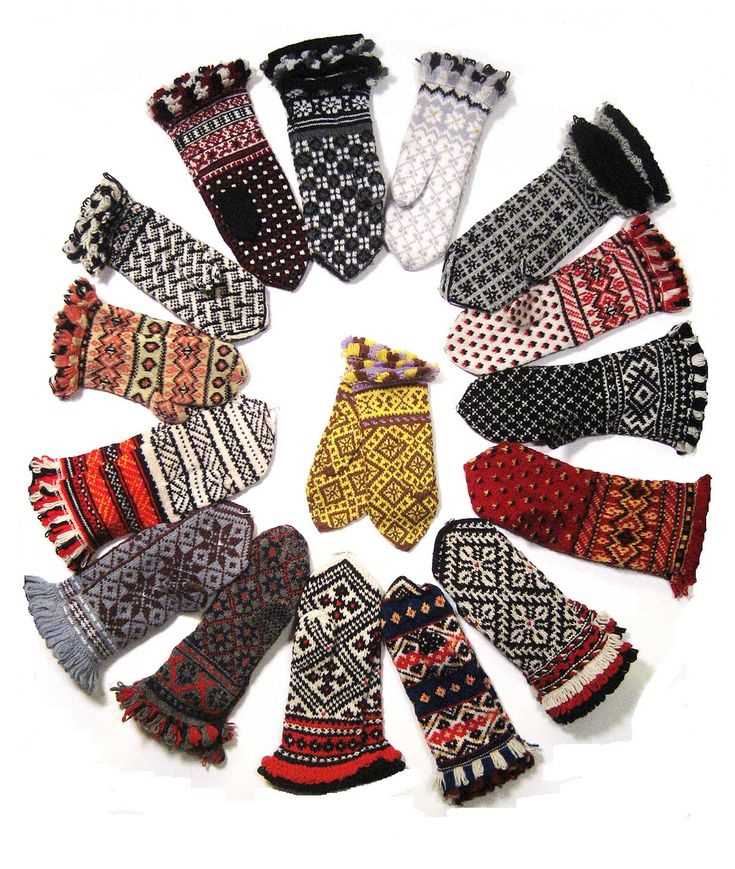
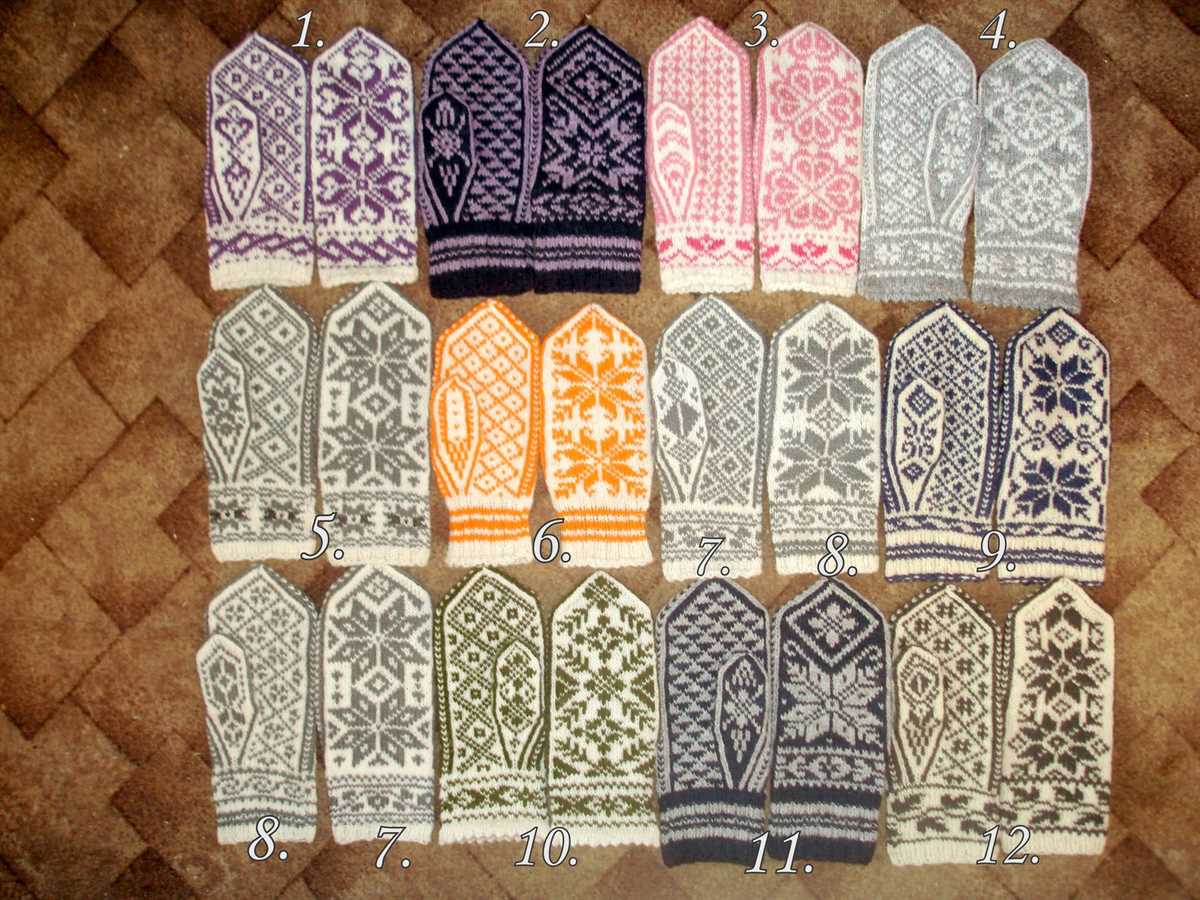
Variations of Nordic Mittens Patterns
When it comes to Nordic mittens knitting patterns, the possibilities for variation are endless. These patterns often feature traditional Scandinavian designs, with intricate motifs inspired by nature, history, and cultural symbolism. Crafters can experiment with different color combinations, stitch patterns, and embellishments to create unique and personalized mittens.
One popular variation is the use of different color palettes. While traditional Nordic mittens commonly feature bold and contrasting colors, crafters can choose to use softer and more subtle hues for a more modern look. Pastel shades or monochromatic color schemes can create a sophisticated and elegant aesthetic.
Another variation is incorporating different stitch patterns. Nordic mittens often showcase the Fair Isle technique, which involves knitting with two colors in each row to create intricate stranded patterns. However, crafters can experiment with cable stitches, lace patterns, or even create their own unique stitch motifs to add a personal touch to their mittens.
Embellishments are also a way to add variation to Nordic mittens. Some crafters may choose to add buttons, beads, or embroidery to their mittens to enhance the overall design. These embellishments can create texture and depth, making the mittens even more eye-catching and unique.
Overall, the variations of Nordic mittens patterns allow knitters to showcase their creativity and express their personal style. Whether through color, stitch patterns, or embellishments, each pair of mittens can truly become a work of art, inspired by the rich traditions and beauty of Nordic design.
Frequently Asked Questions about Knitting Nordic Mittens
Are Nordic mittens difficult to knit?
Knitting Nordic mittens can be a bit challenging, especially if you are new to stranded colorwork and working with multiple yarn colors. However, with some practice and patience, you can definitely master the technique and create beautiful mittens.
What supplies do I need to knit Nordic mittens?
- Yarn: You will need two or more colors of yarn, typically wool or a wool blend, in the appropriate weight for your desired mitten size.
- Knitting needles: Choose a set of needles in the recommended size for your yarn, typically circular or double-pointed needles.
- Stitch markers: These are helpful for keeping track of your stitches and pattern repeat.
- Tapestry needle: You will use this to weave in ends and sew any seams.
- Pattern: Find a Nordic mittens knitting pattern that suits your skill level and style.
Can I modify the Nordic mittens knitting pattern?
Absolutely! Many knitters enjoy customizing their mittens to add personal touches. You can modify the color scheme, adjust the size, or even incorporate different stitch patterns into the design. Just keep in mind that making significant changes may require some adjustments to the pattern instructions.
How long does it take to knit a pair of Nordic mittens?
The time it takes to knit a pair of Nordic mittens can vary depending on your knitting speed and the complexity of the pattern. On average, it may take several days to a couple of weeks to complete a pair. However, this can also depend on how much time you have available to dedicate to knitting each day.
What are some tips for knitting Nordic mittens?
- Practice your tension: Stranded colorwork can sometimes result in uneven tension. To achieve an even tension, practice knitting with both yarn colors evenly throughout your work.
- Use a lifeline: If you’re worried about making mistakes, consider using a lifeline. This involves threading a contrasting yarn through your active stitches every few rows, making it easier to unravel and fix any errors.
- Take breaks: Knitting for long periods of time can cause hand fatigue. Take breaks frequently to rest your hands and prevent strain.
- Block your mittens: Blocking is an important step to shape your finished mittens and even out any minor inconsistencies. Follow the blocking instructions in your pattern for best results.
Can I sell mittens made from a Nordic mittens knitting pattern?
In most cases, yes! However, it’s always a good idea to check the specific pattern’s terms of use or copyrights to ensure that selling finished mittens is permitted. Some patterns may have restrictions or require attribution.
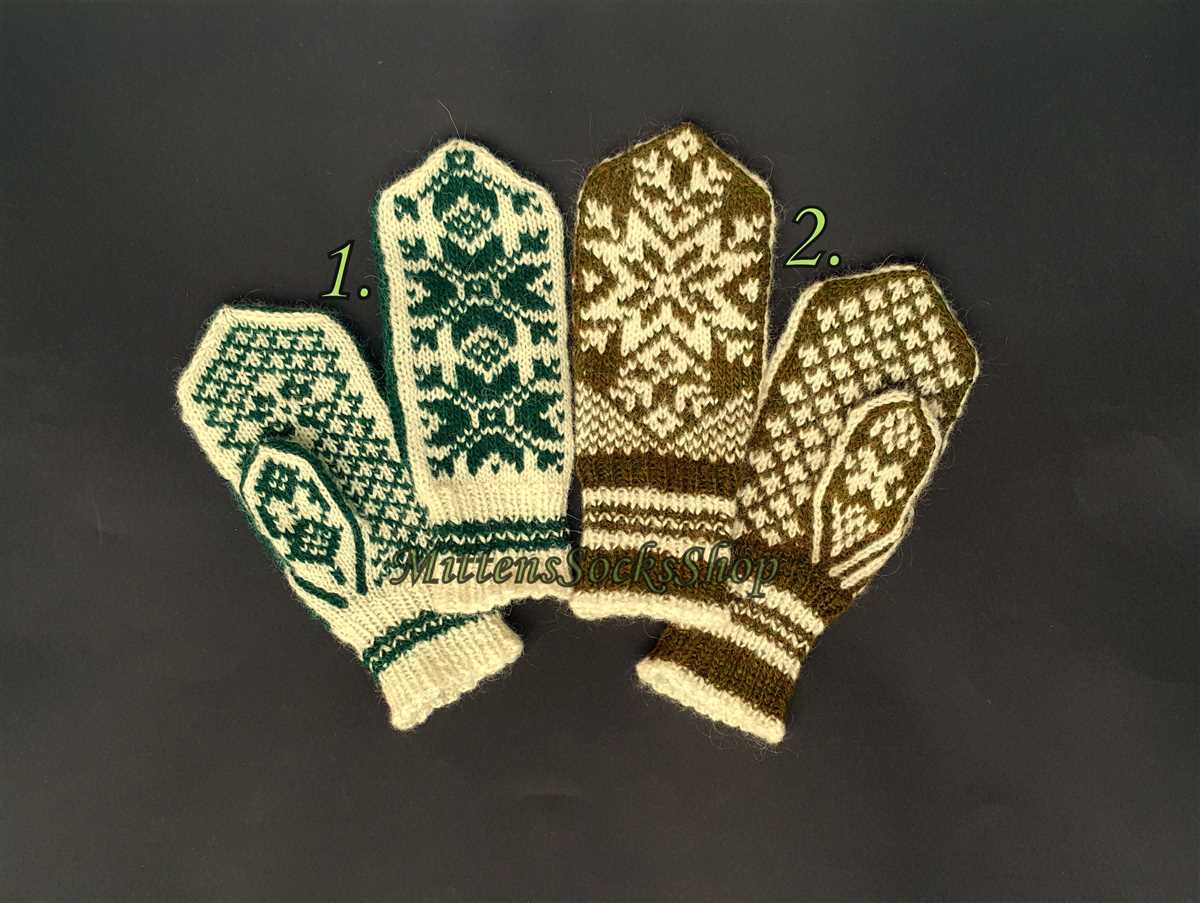
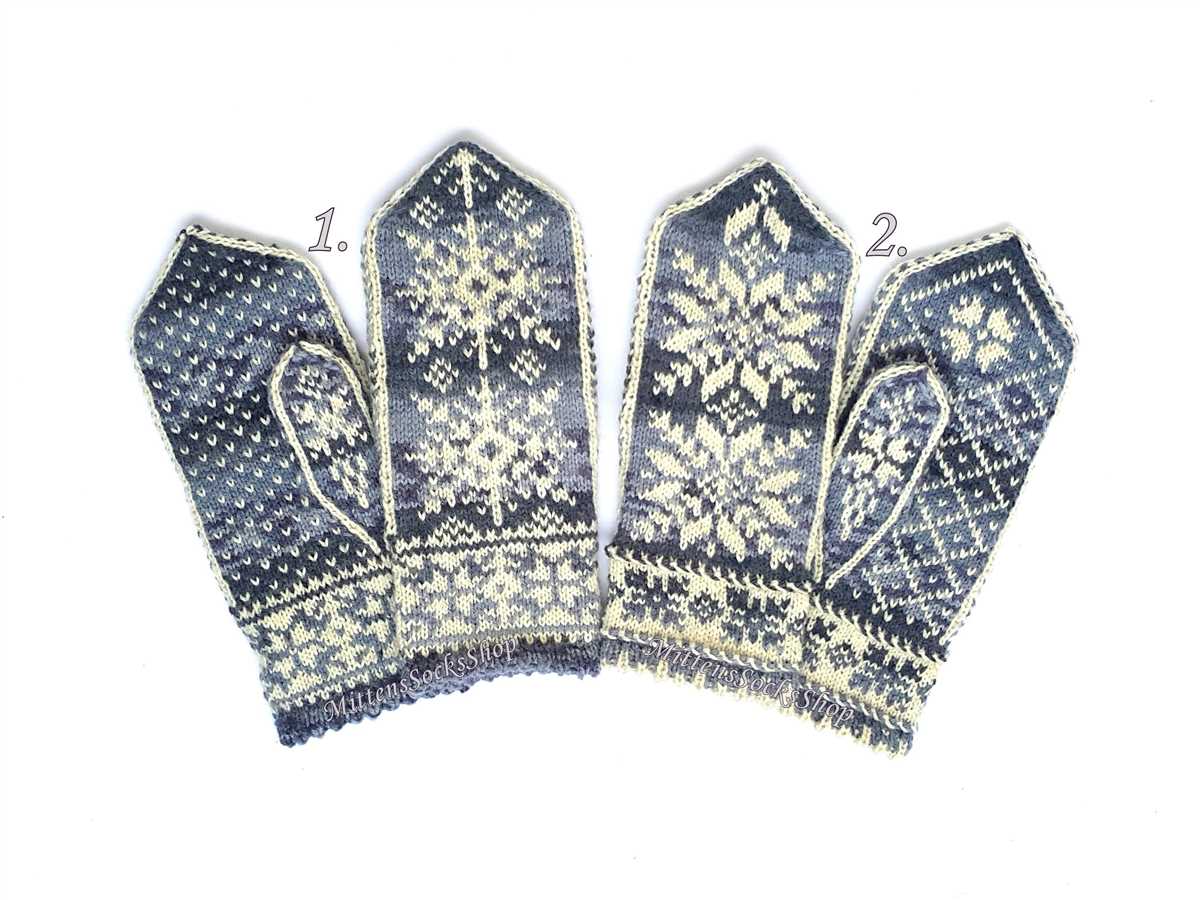
Inspiration for Different Nordic Mittens Designs
Looking for some inspiration for your next knitting project? Look no further! Here are some ideas for different Nordic mittens designs that you can try. Whether you’re a beginner or an experienced knitter, these patterns will surely pique your interest.
If you’re new to knitting or just want to keep it simple, consider trying a classic Fair Isle design. This traditional technique involves using multiple colors to create intricate patterns. You can choose from a variety of motifs such as snowflakes, reindeer, or geometric shapes. Fair Isle mittens are not only beautiful but also warm and cozy, making them perfect for cold winter days.
If you’re looking to challenge yourself and try something more advanced, consider knitting mittens with a traditional Selbu pattern. Selbu is a small village in Norway known for its intricate knitting designs. Selbu mittens often feature beautiful floral motifs and use intricate colorwork techniques. Knitting a pair of Selbu mittens is a true labor of love, but the end result is absolutely stunning.
If you’re feeling adventurous and want to experiment with different textures, you can try knitting some mittens with a stranded knitting technique. Stranded knitting involves knitting with two or more colors in each row, creating a thick, warm fabric. You can create interesting textures and patterns by alternating between different colors and stitches. The possibilities are endless!
Summary:
There are countless options for Nordic mittens designs, whether you prefer a classic Fair Isle pattern, a traditional Selbu design, or want to experiment with stranded knitting. The key is to find a pattern that matches your skill level and personal style. So grab your needles, pick your yarn, and start knitting your own pair of cozy Nordic mittens!