
Knitting is an ancient craft that has been passed down through generations, and one of the most popular knitted items is the Fisherman’s kep. The Fisherman’s kep is a traditional Scottish hat that is designed to keep the fisherman’s head warm and dry while out at sea. This unique hat is not only functional but also has a beautiful and intricate design.
The Fisherman’s kep knitting pattern is a challenging project that requires intermediate to advanced knitting skills. It involves working with multiple yarn colors and using fair isle knitting techniques to create the intricate pattern. The pattern typically starts at the brim and works its way up to the crown of the hat.
To start knitting the Fisherman’s kep, you will need a set of double-pointed knitting needles, a circular needle, and the desired yarn colors. The pattern usually incorporates a combination of traditional fair isle motifs, such as waves, diamonds, and cables. The result is a stunning hat that is both warm and stylish.
Fisherman’s kep knitting pattern

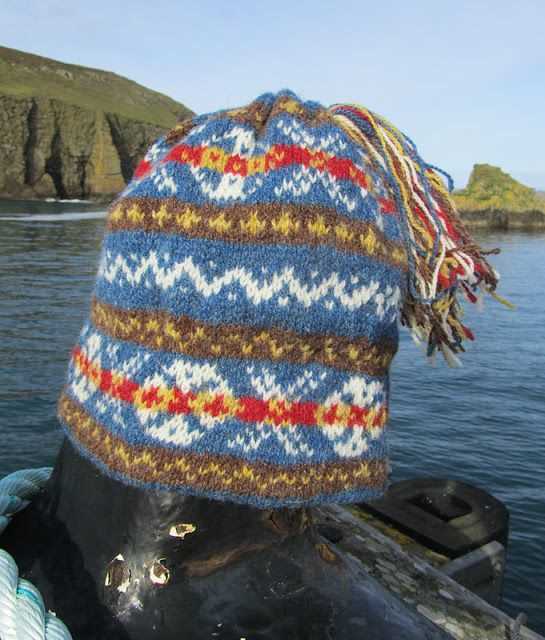
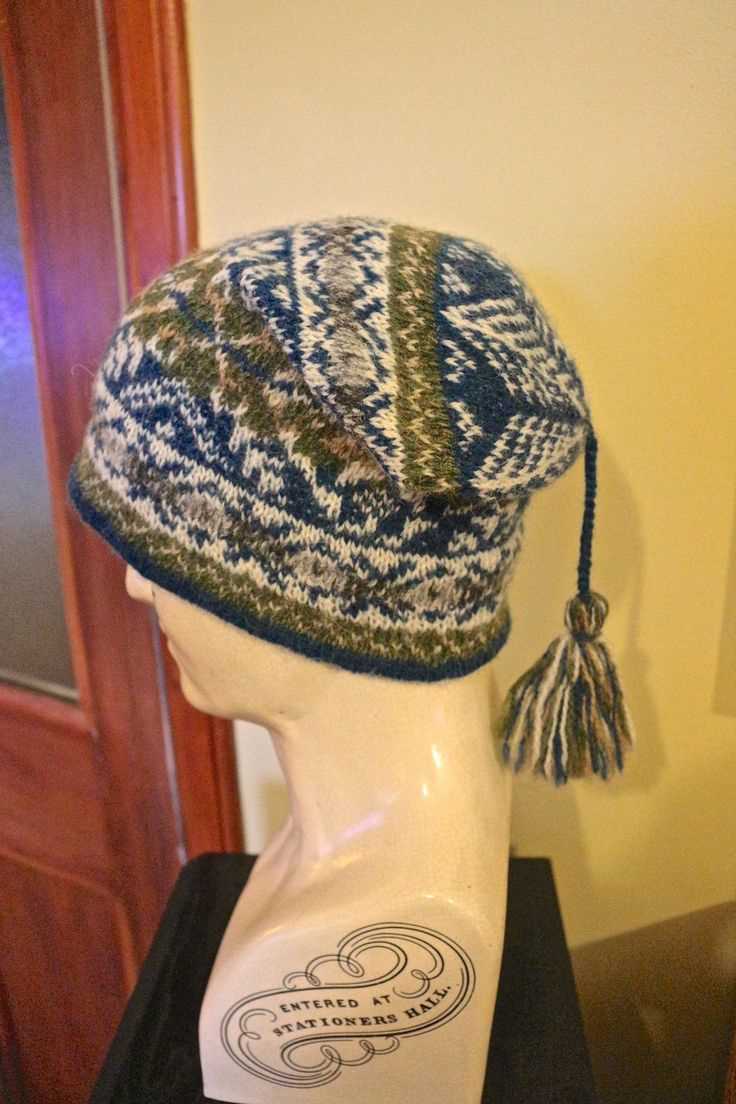
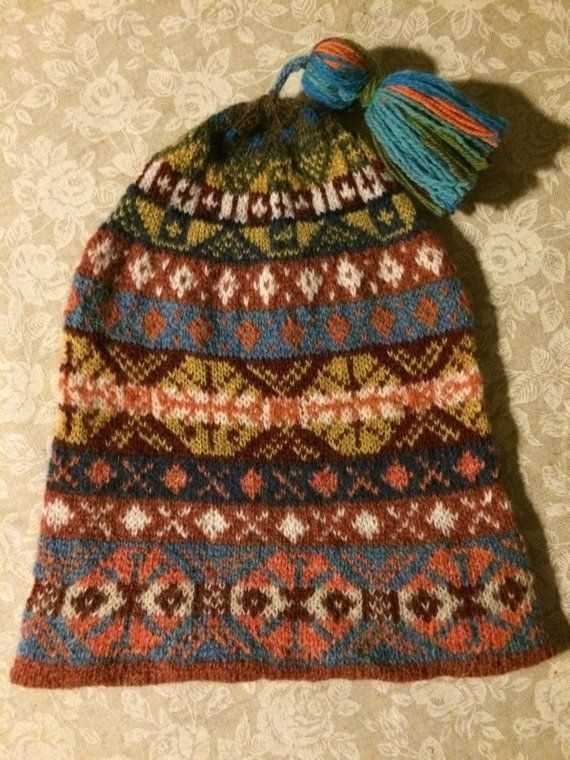
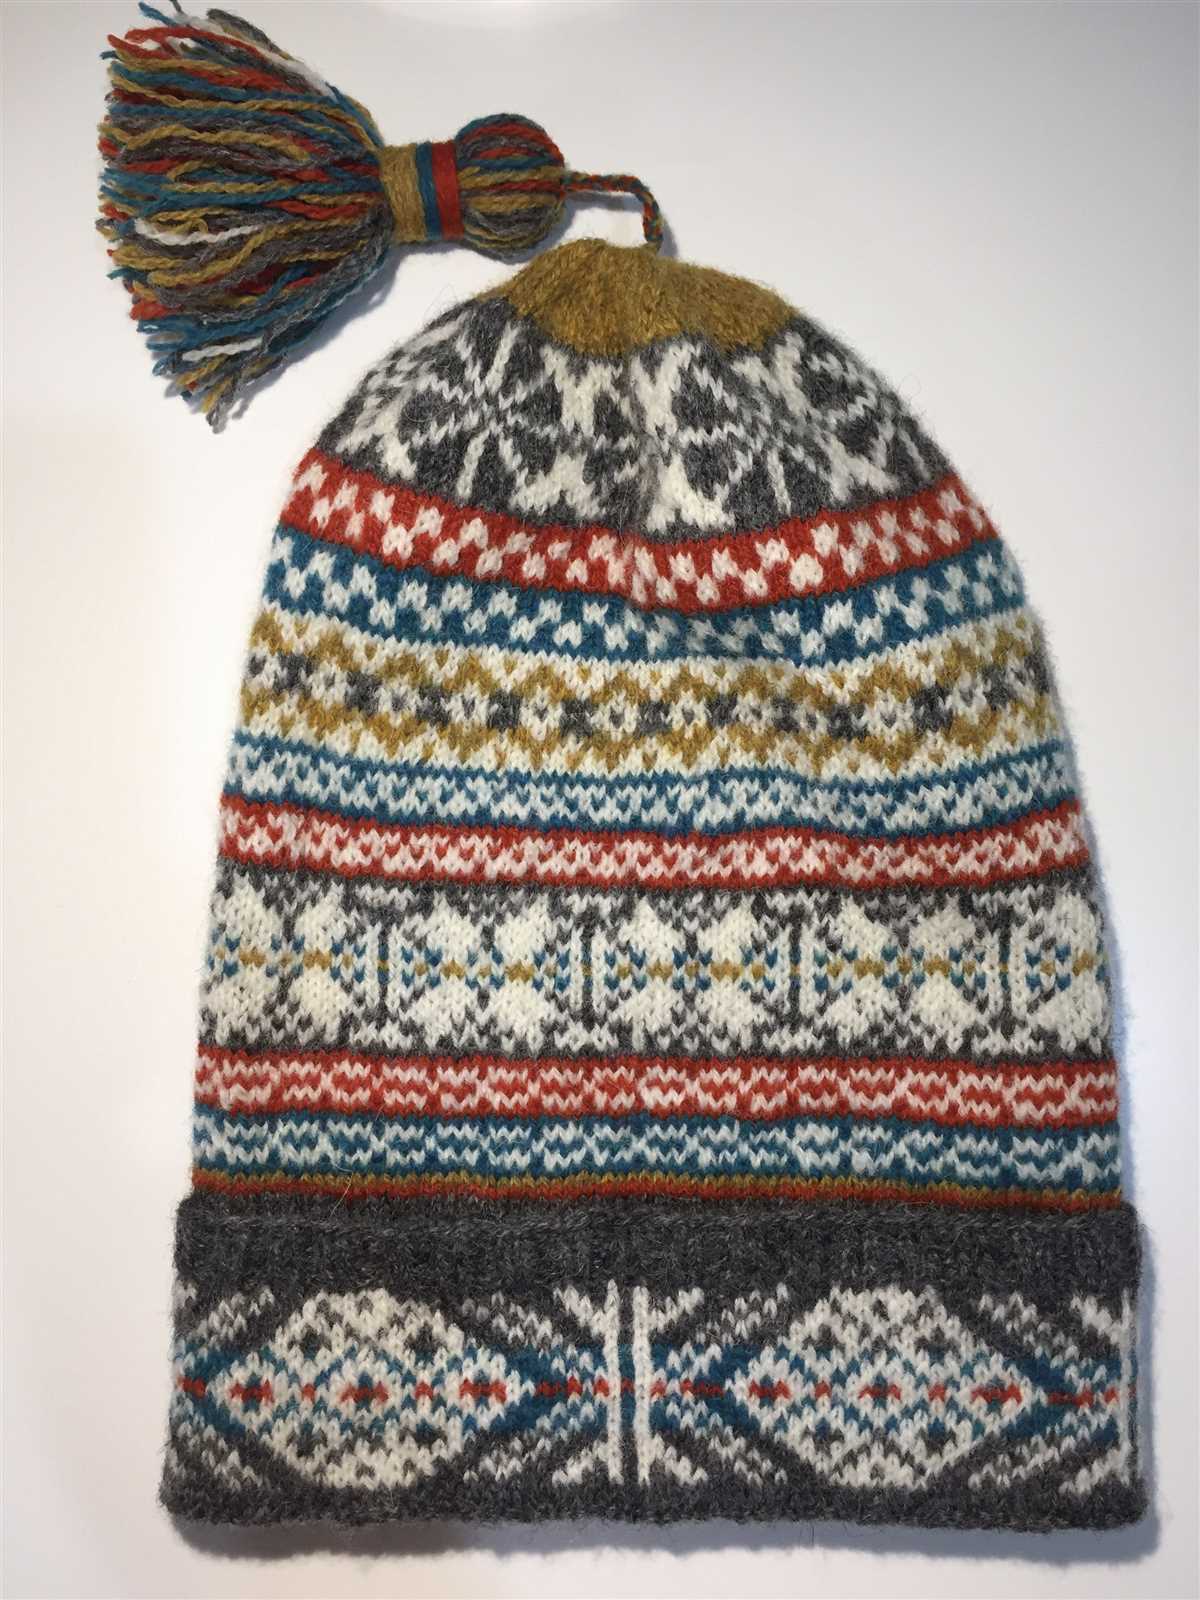
A Fisherman’s kep is a traditional style of knitted hat that originated from the fishing communities in Scotland. It is characterized by its distinctive shape and intricate Fair Isle or Shetland lace patterns. The kep is designed to provide warmth and protection from the elements, making it an essential accessory for fishermen working in the harsh conditions of the North Sea.
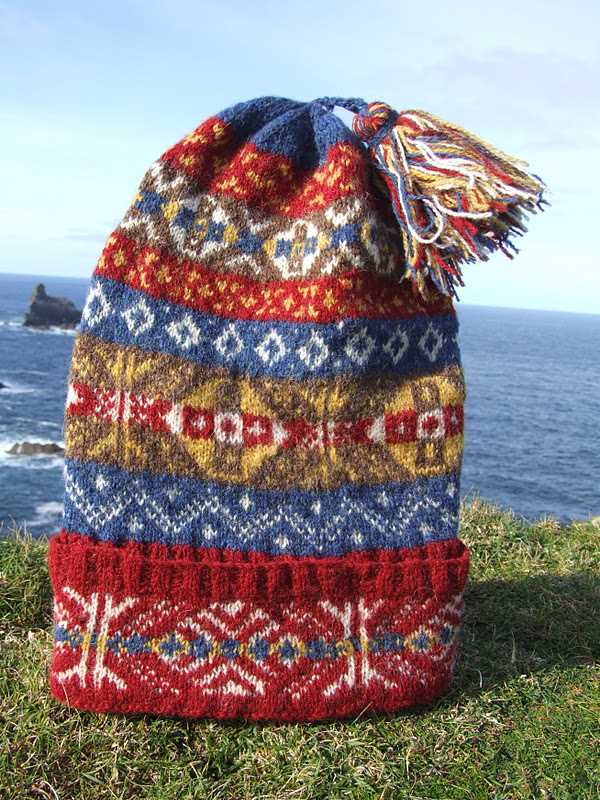
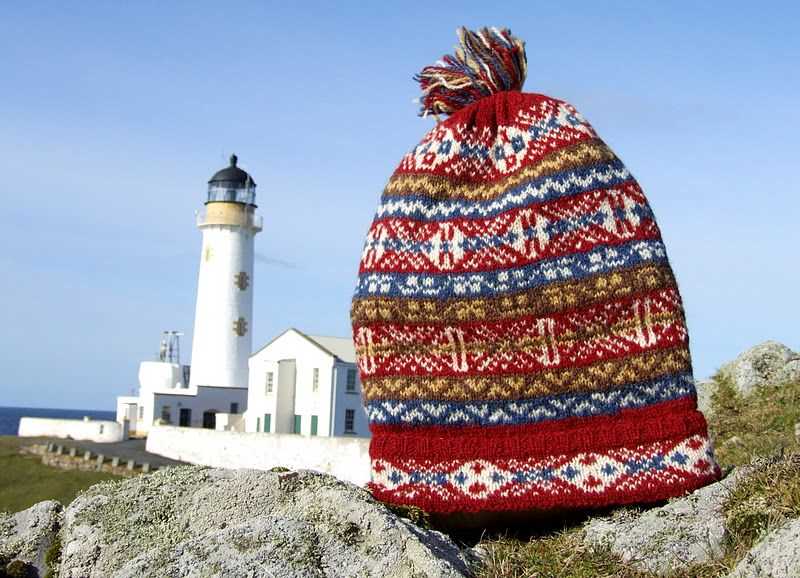
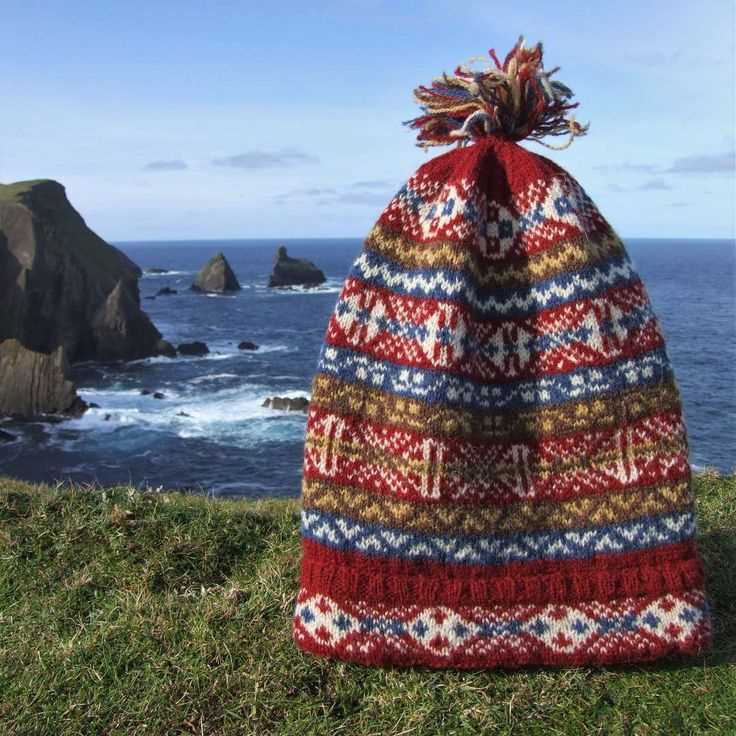
The Fisherman’s kep typically features a fold-over brim that can be adjusted to cover the ears for added insulation. The crown of the hat is usually adorned with a decorative pompom or tassel. The intricate patterns knitted into the kep often incorporate traditional motifs such as waves, anchors, or fish, reflecting the hat’s maritime heritage.
The Fisherman’s kep knitting pattern is highly sought after by knitting enthusiasts due to its rich history and challenging techniques. Knitting a kep requires advanced skills in colorwork and chart reading, as the patterns can be quite complex. However, the end result is a beautifully crafted hat that embodies the tradition and craftsmanship of the fishing communities.
To create a Fisherman’s kep, knitters typically use fine wool or Shetland yarn in a range of colors to achieve the intricate Fair Isle or Shetland lace patterns. The hat is knit in the round using double-pointed needles or a circular needle, allowing for a seamless finish. The pattern may include decreases and increases to shape the crown, as well as specific instructions for the brim and decorative embellishments.
Overall, the Fisherman’s kep is both a functional and fashionable accessory that pays homage to the rich heritage of the Scottish fishing communities. Its intricate patterns and timeless design make it a beloved knitting project for those who appreciate traditional craftmanship.
The History of the Fisherman’s kep Knitting Pattern
The Fisherman’s kep knitting pattern, also known as the Norwegian kep, is a traditional knitting pattern that has its roots in the fishing communities of Northern Europe. It is a distinctive style of hat that is often associated with fishermen and sailors, known for its intricate colorwork and intricate designs.
The history of the Fisherman’s kep dates back to the 19th century when it was first developed by fishermen and their families as a way to keep warm during the harsh winters at sea. The kep was originally knitted using locally sourced wool and featured designs that were unique to each fishing community, serving as a way to identify the wearer’s origin.
Over time, the Fisherman’s kep became more than just a practical piece of clothing. It became a symbol of the fishing communities’ identity and their way of life. The intricate colorwork and designs of the kep reflected the natural surroundings and the seafaring traditions of the fishermen, with patterns often featuring elements such as waves, fish, and boats.
Today, the Fisherman’s kep knitting pattern has gained popularity beyond the fishing communities and has become a beloved design in the world of knitting. Knitters from all over the world now enjoy creating their own versions of the kep, experimenting with different colors and patterns. It is a testament to the enduring appeal of this traditional knitting pattern and its ability to connect people to their maritime heritage.
Materials needed

In order to knit the Fisherman’s kep, you will need the following materials:
- Yarn: It is recommended to use a 100% wool yarn in a DK or worsted weight. You will need approximately 200-250 grams of yarn for this project.
- Needles: You will need a set of double-pointed needles (DPNs) and a circular needle in a size appropriate for your yarn. The size will depend on your gauge and the desired fit of the kep.
- Tapestry needle: This will be used for weaving in ends and finishing the project.
- Stitch markers: These will help you keep track of your stitches and rounds while knitting the kep.
- Scissors: You will need a pair of scissors to cut the yarn after finishing the project.
Additionally, you may want to have the following optional materials:
- Pom pom maker: If you wish to add a pom pom to the top of the kep, a pom pom maker can make the process easier.
- Row counter: This will help you keep track of your rows and ensure that you are following the pattern correctly.
- Blocking tools: If you want to block your kep for a neater finish, you may need blocking mats or pins.
How to Choose the Right Knitting Needles
Knitting needles come in various shapes, sizes, and materials, and choosing the right ones for your project can make a significant difference in your knitting experience. Here are some factors to consider when selecting knitting needles:
1. Needle Material
The material of the knitting needles can affect the overall feel and performance of your knitting. Common needle materials include metal, wood, and plastic. Metal needles are durable and slick, making them ideal for working with slippery yarns. Wood needles offer a warm feel and are perfect for those who prefer a slower knitting pace. Plastic needles are lightweight and affordable, but they may not be as smooth as metal or wood.
2. Needle Size
Needle size is an important consideration as it determines the tension and gauge of your knitting project. The size of the needles should match the recommended size specified in your knitting pattern. Always check the gauge swatch to ensure you are using the correct needle size to achieve the desired results. Remember, needle sizes can vary between brands, so it’s crucial to compare the actual measurements and not rely solely on the size label.
3. Needle Length and Type
The length and type of needles you choose depend on the type of knitting project you are working on. For small or narrow projects, like socks or sleeves, circular needles or double-pointed needles (DPNs) are the best options. Circular needles can also be used for flat knitting by working back and forth. Straight needles are suitable for larger flat projects, such as scarves or blankets. Consider the length of the needle when working on larger projects to ensure stitches don’t slide off the needles.
4. Comfort and Personal Preference
Ultimately, the comfort and personal preference of the knitter play a significant role in choosing the right knitting needles. Some knitters prefer the flexibility of circular needles, while others enjoy working with the traditional straight needles. Consider factors such as weight, grip, and ease of use when making your decision. If possible, try out different types of needles to determine which feels most comfortable in your hands.
- Consider the material of the knitting needles – metal, wood, or plastic.
- Choose the needle size that matches the recommended size in your pattern.
- Select the appropriate length and type of needles based on your project.
- Consider your personal comfort and preference when choosing knitting needles.
Step-by-step instructions: casting on
In order to begin knitting the Fisherman’s kep pattern, you will first need to cast on your stitches. Casting on is the process of creating the foundation row of stitches on your knitting needle. Here is a step-by-step guide on how to cast on for this pattern:
1. Slipknot

To start, create a slipknot by making a loop with your yarn. Insert the working end of the yarn through the loop, and pull it tight to create the slipknot. Place the slipknot onto your knitting needle, and tighten it so it fits snugly.
2. Make the first stitch
Hold the knitting needle with the slipknot in your right hand, and the working end of the yarn in your left hand. Insert the right needle into the slipknot from front to back, and wrap the working end of the yarn around the right needle in a counterclockwise direction.
Key phrase: Hold the knitting needle with the slipknot in your right hand.
3. Create more stitches
Using the right needle, pull the yarn through the slipknot to create a new stitch. Slide this stitch onto the left needle, and tighten it slightly. Repeat this process until you have cast on the required number of stitches for your pattern.
Key phrase: Repeat this process until you have cast on the required number of stitches.
Once you have completed the casting on process, you are ready to begin knitting the Fisherman’s kep pattern. Ensure that your stitches are evenly distributed on the needle, and proceed to the next step of the pattern.
Step-by-step instructions: knitting the body

Once you have completed the ribbing for the brim of the Fisherman’s kep, it’s time to start knitting the main body of the hat. Here are the step-by-step instructions to help you knit the body:
1. Prepare your knitting needles and yarn
Make sure you have the correct size of knitting needles and the appropriate yarn for the pattern. The Fisherman’s kep usually requires a medium-weight yarn and size 8 or 9 knitting needles. Gather all your materials before you begin.
2. Start with a knit stitch

Begin by knitting the first stitch of the row. Insert the right needle into the first stitch from left to right, bring the yarn over the right needle, and pull it through the stitch. This creates a new stitch on the right needle.
3. Continue knitting in the round
Once you have completed the first stitch, continue knitting in the round. Insert the right needle into the next stitch, bring the yarn over the right needle, and pull it through to create a new stitch. Repeat this process for each stitch until you have reached the end of the round.
4. Repeat the previous step for multiple rounds
Keep knitting in the round using the knit stitch for multiple rounds until you have reached the desired length for the body of the hat. This will depend on the size and style you prefer.
5. Check your gauge
Take periodic breaks to check your gauge. Measure the number of stitches per inch and compare it to the gauge recommended in the pattern. Adjust your knitting tension as needed to ensure the hat fits correctly.
By following these step-by-step instructions, you will be able to knit the body of the Fisherman’s kep with ease. Take your time and enjoy the process of creating this classic and cozy hat!
Step-by-step instructions: shaping the crown
To shape the crown of the Fisherman’s kep knitting pattern, follow the steps below:
1. Decrease Rows

Begin by knitting the hat as specified in the pattern until you reach the desired length. Once you have reached the desired length, it is time to start decreasing the number of stitches to shape the crown.
For the first decrease row, knit the specified number of stitches according to the pattern, then knit two stitches together. Repeat this pattern until the end of the row. This will reduce the number of stitches by half.
Continue knitting the specified number of stitches for each decrease row, gradually decreasing the number of stitches by knitting two stitches together. Repeat these decrease rows until the required number of stitches is reached.
2. Finishing the Crown
After completing the decrease rows, you will have a smaller number of stitches left on your knitting needles. Cut the yarn, leaving a tail long enough to weave in later.
Thread the tail of yarn onto a yarn needle and insert it through the remaining stitches, removing them from the knitting needle. Pull the yarn tight to close the top of the hat and secure it in place by weaving the tail in and out of the closed stitches.
Finally, weave in any remaining yarn tails and block the finished Fisherman’s kep hat to shape. This will help the hat retain its shape and give it a more polished appearance.
Follow these step-by-step instructions to shape the crown of your Fisherman’s kep knitting pattern and complete your cozy hat.
Finishing touches: adding a pom-pom

Once you have completed knitting your Fisherman’s kep, you can add a fun and stylish finishing touch by attaching a pom-pom to the top of the hat. The pom-pom adds an extra element of warmth and coziness to the hat, as well as a playful and fashionable detail.
To create a pom-pom, you will need a pom-pom maker or a set of cardboard circles. Start by wrapping yarn around the pom-pom maker or the cardboard circles until you achieve the desired fullness. Make sure to use the same yarn color as the hat for a cohesive look. Once you have wrapped enough yarn, carefully cut the yarn along the edges of the pom-pom maker or circles. Take a separate piece of yarn and thread it between the two layers of the pom-pom, tying it tightly to secure the strands together. Trim any excess yarn to achieve a neat and round shape.
After creating the pom-pom, you can attach it to the top of the Fisherman’s kep. Use a yarn needle to sew the pom-pom securely onto the hat. You can reinforce the attachment by sewing through the base of the pom-pom a few times. Make sure to evenly distribute the stitches to ensure that the pom-pom is securely attached. Once the pom-pom is in place, give it a gentle fluff to make it appear full and fluffy.
Choosing the right yarn for your Fisherman’s kep
When it comes to knitting the perfect Fisherman’s kep, choosing the right yarn is crucial. The texture, weight, and fiber content of the yarn can greatly influence the final look and feel of your finished hat. You want a yarn that is both durable and soft, ensuring that your kep will stand the test of time while still providing comfort and warmth.
1. Traditional Yarns: For an authentic Fisherman’s kep, you may want to consider using traditional yarns that were historically used in the making of these hats. These yarns are typically pure wool or a wool blend, providing excellent insulation and moisture-wicking properties. Look for yarns that have a rustic, tweed-like appearance to add to the traditional aesthetic of the kep.
2. Aran Weight Yarns: The Fisherman’s kep is typically a chunky hat, so using an Aran weight yarn is a great option. Aran weight yarns are thicker and warmer than lighter weight yarns, making them perfect for cold weather accessories. Make sure to choose a yarn that has good stitch definition, as the Fisherman’s kep pattern often features intricate cables and textured stitches.
3. Soft and Durable Fibers: While traditional wool yarns are a popular choice for the Fisherman’s kep, you may also consider using yarns that incorporate other soft and durable fibers. Merino wool blends or acrylic blends can provide the same warmth and insulation as pure wool, while also offering a softer touch against the skin. This is especially important if you or the recipient of the hat has sensitive skin.
4. Color Selection: The Fisherman’s kep traditionally features a natural, earthy color palette, with shades of gray, cream, and brown being the most common. However, this doesn’t mean you can’t experiment with other colors if you prefer. Consider selecting yarns in different shades of blue, green, or even vibrant reds and oranges to give your kep a unique and personal touch.
In conclusion, the choice of yarn is an important decision when knitting your Fisherman’s kep. Consider the texture, weight, and fiber content of the yarn, as well as your personal preferences for color and sustainability. By selecting the right yarn, you can ensure that your Fisherman’s kep is not only a functional accessory for cold weather, but also a beautiful and timeless piece of knitting art.
Tips and tricks for beginners
Knitting can be a fun and rewarding hobby, but it can also be quite challenging for beginners. However, with a bit of practice and some helpful tips and tricks, anyone can master the art of knitting. Whether you’re a complete beginner or just looking to improve your skills, here are some useful tips to get you started.
1. Start with simple projects
When first starting out, it’s best to begin with simple knitting projects such as scarves or dishcloths. These projects typically involve basic stitch patterns and can help you practice your tension and rhythm. As you gain more confidence and skill, you can gradually move on to more complex projects.
2. Choose the right tools and materials
Having the right knitting tools and materials can make a big difference in your knitting experience. Start with a pair of medium-sized knitting needles and a smooth, light-colored yarn. As you become more proficient, you can experiment with different types of needles and yarns to see which ones you prefer.
3. Learn the basic stitches
Understanding the basic knitting stitches is essential for any beginner. Start by learning the knit stitch and the purl stitch, as these are the foundation for all knitting patterns. Once you’ve mastered these stitches, you can start exploring different stitch patterns and techniques.
4. Practice proper tension
Tension is one of the most important aspects of knitting. Proper tension ensures that your stitches are even and consistent, resulting in a professional-looking finished project. Practice holding the yarn and needles in a way that feels comfortable for you, and try to maintain an even tension throughout your knitting.
5. Don’t be afraid to make mistakes
Everyone makes mistakes when they first start knitting, and that’s okay! Don’t be afraid to tink (undo) your stitches or start over if you make a mistake. Mistakes are a natural part of the learning process, and they can actually help you improve your skills. Embrace the learning experience and don’t get discouraged.
6. Take breaks and relax
Knitting can be a relaxing and meditative activity, but it’s also important to take breaks and give your hands and wrists a rest. Stretching and taking breaks can help prevent hand fatigue and injury, allowing you to enjoy knitting for longer periods of time.
- Start with simple projects
- Choose the right tools and materials
- Learn the basic stitches
- Practice proper tension
- Don’t be afraid to make mistakes
- Take breaks and relax
Fisherman’s kep variations
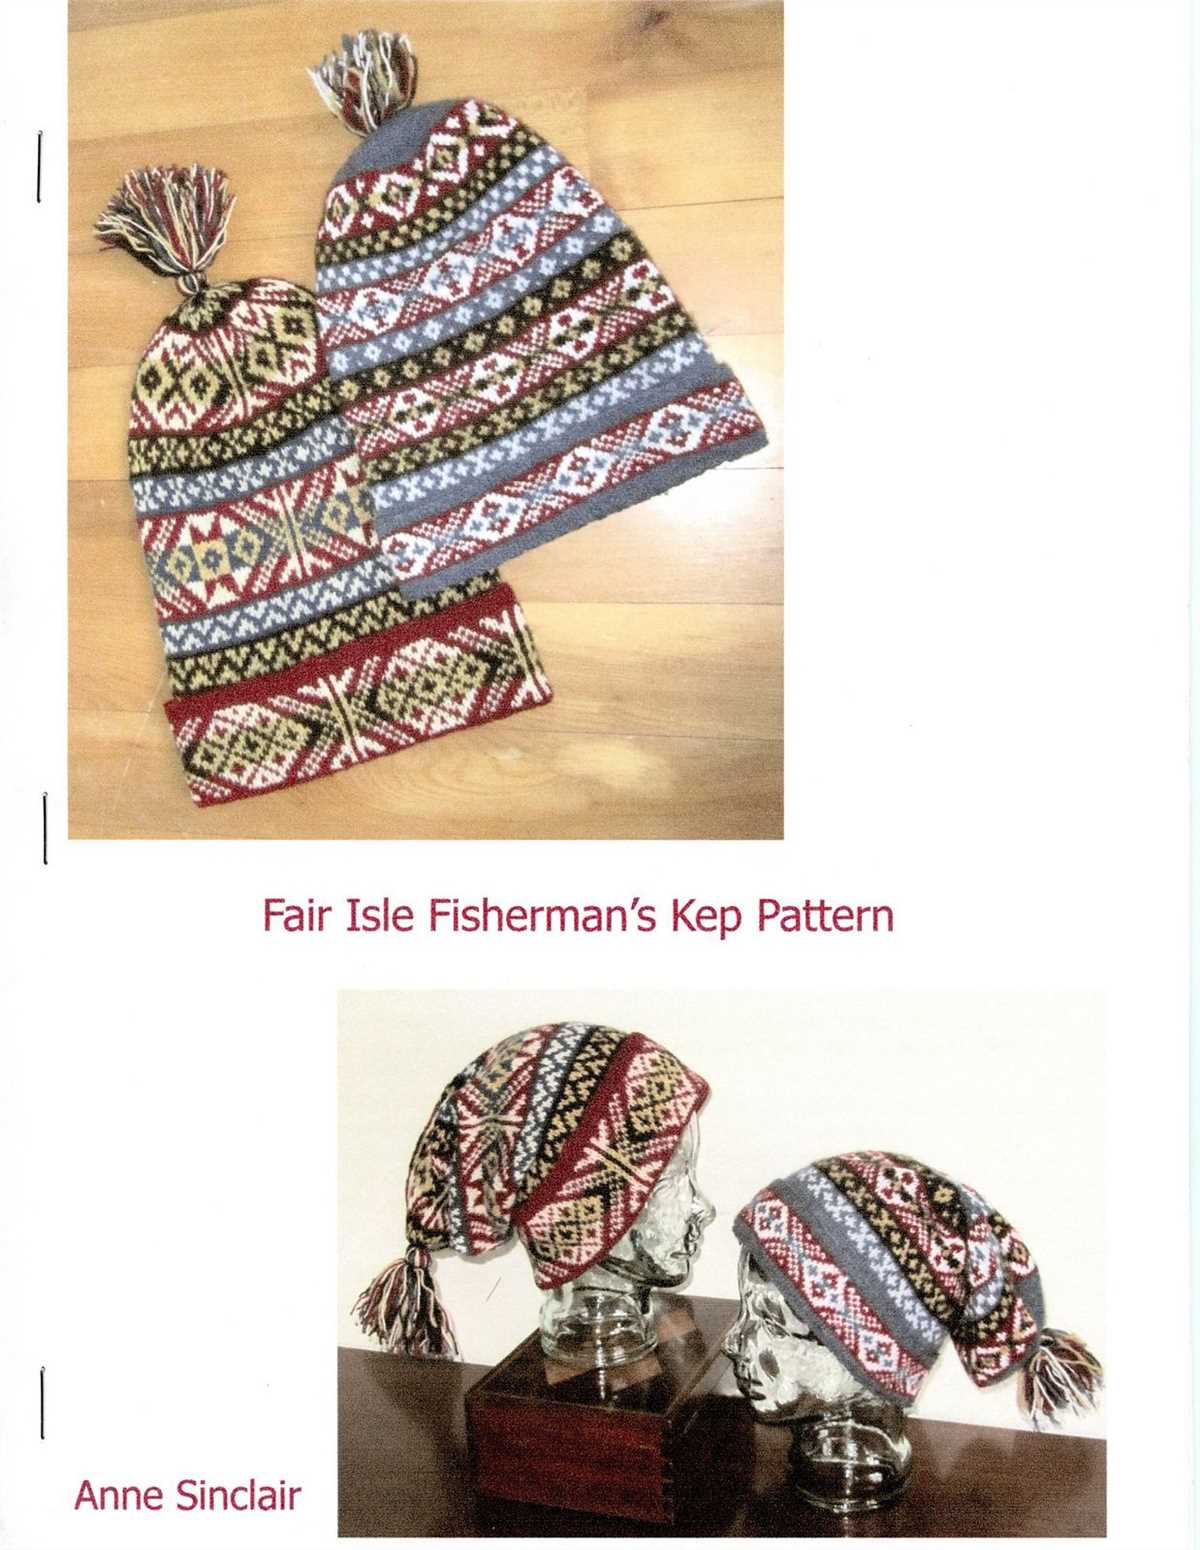
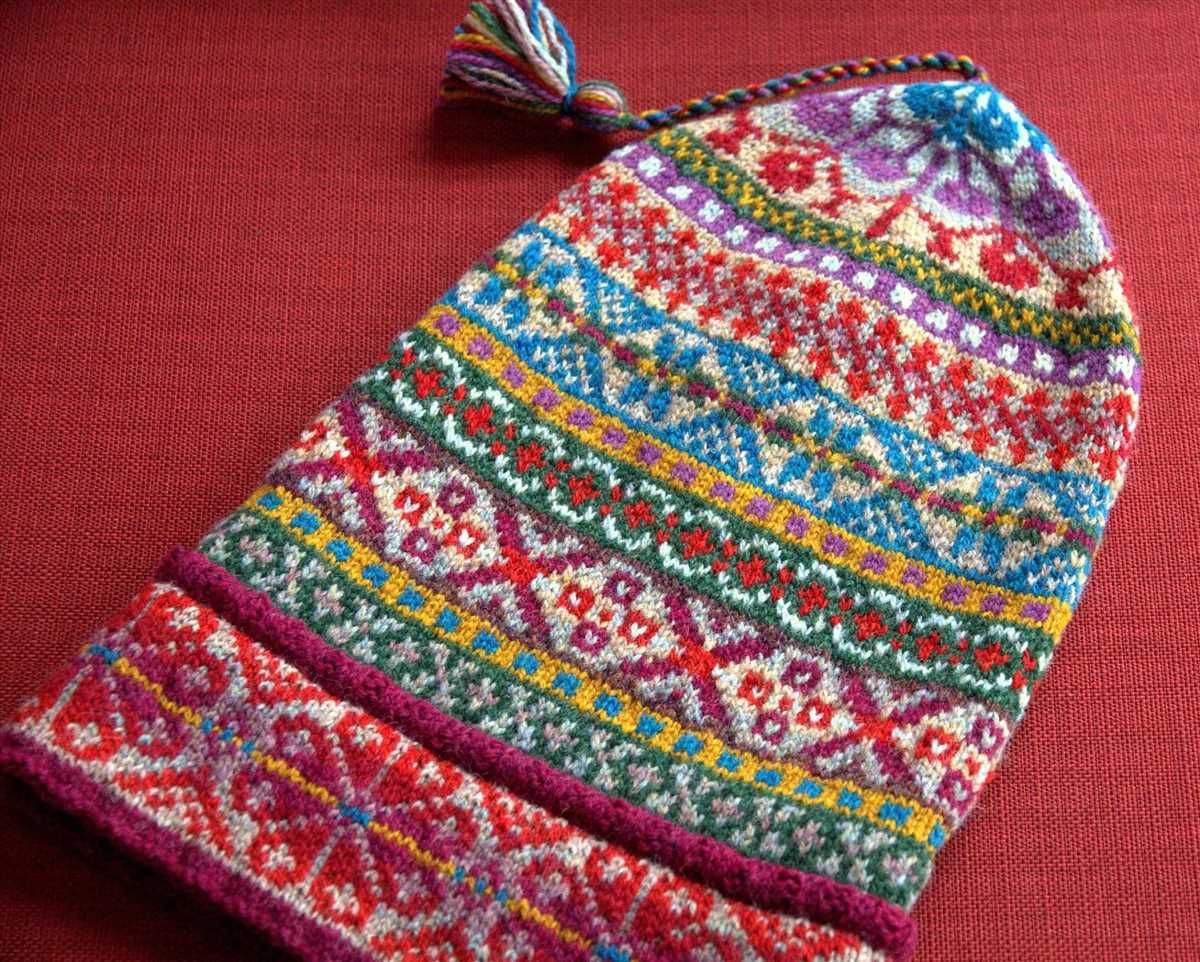
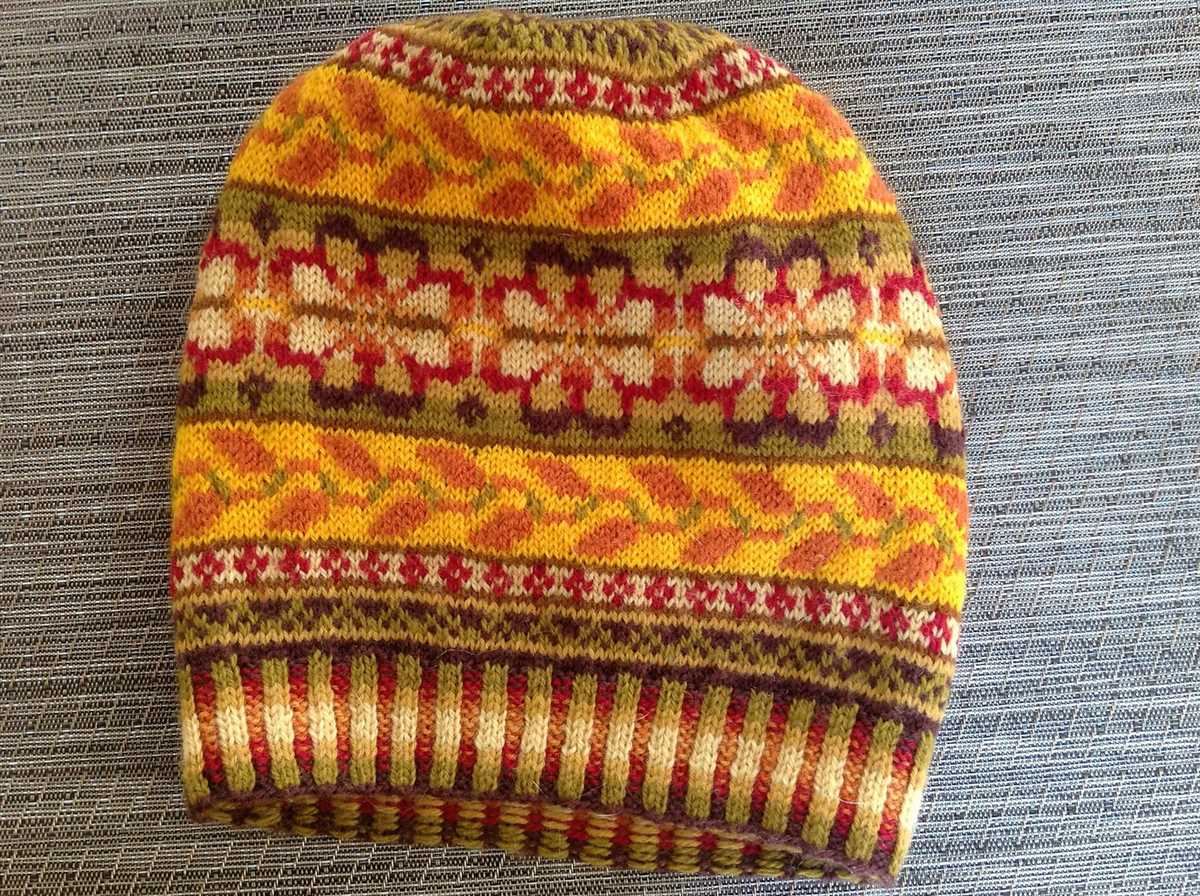
The Fisherman’s kep is a traditional style of knitted cap that originated in the Shetland Islands. It is typically characterized by its distinctive fair isle patterns and pom-pom decoration. While the basic design remains the same, there are many variations of the Fisherman’s kep that incorporate different color schemes, patterns, and embellishments.
One popular variation of the Fisherman’s kep is the use of bold and vibrant colors. Instead of the traditional muted tones, this variation incorporates bright reds, blues, yellows, and greens. The result is a hat that is eye-catching and modern, while still maintaining the traditional fair isle pattern.
Embellishments and adaptations
- Another variation of the Fisherman’s kep involves adding additional embellishments, such as beads or embroidery, to the fair isle pattern. This adds a touch of elegance and individuality to the hat.
- Some knitters have also adapted the Fisherman’s kep to include a brim, similar to that of a beanie. This creates a more structured look and provides added warmth and protection from the elements.
- Others have incorporated cables into the fair isle pattern, adding an intricate and textured twist to the traditional design.
Unconventional materials and techniques
In addition to variations in color and design, some knitters have experimented with different materials and techniques to create unique Fisherman’s keps. For example, using a chunky yarn and larger needles can result in a larger, more slouchy hat. Alternatively, using a finer yarn and smaller needles can create a more delicate and lightweight hat.
Overall, the Fisherman’s kep offers endless possibilities for variations and adaptations. Whether you choose to incorporate bold colors, intricate embellishments, or unconventional materials, the result is always a unique and personal piece of knitwear that pays homage to the rich tradition of the Shetland Islands.
How to care for your finished kep
After you have completed your Fisherman’s kep knitting pattern, it’s important to properly care for your finished kep to ensure it lasts for a long time. Follow these care instructions to keep your kep looking its best:
Hand washing:
- Fill a sink or basin with lukewarm water and add a small amount of mild liquid detergent.
- Gently agitate the water to create suds.
- Submerge the kep in the soapy water and gently squeeze it to remove any dirt or debris.
- Rinse the kep with clean water until no detergent remains.
- Press the water out of the kep without wringing or twisting.
- Spread a clean towel on a flat surface and place the kep on it, gently shaping it to its original form.
- Allow the kep to air dry, avoiding direct sunlight or heat sources.
Storing:
- Fold the kep neatly, taking care not to crease or twist it.
- Place the kep in a breathable storage bag or drawer to protect it from dust and dirt.
- Avoid storing the kep in a location where it may be exposed to moisture or pests.
- Consider placing a sachet of lavender or other natural moth repellent near the kep to deter insects.
By following these care instructions, your Fisherman’s kep will remain in excellent condition and can be enjoyed for years to come.
