
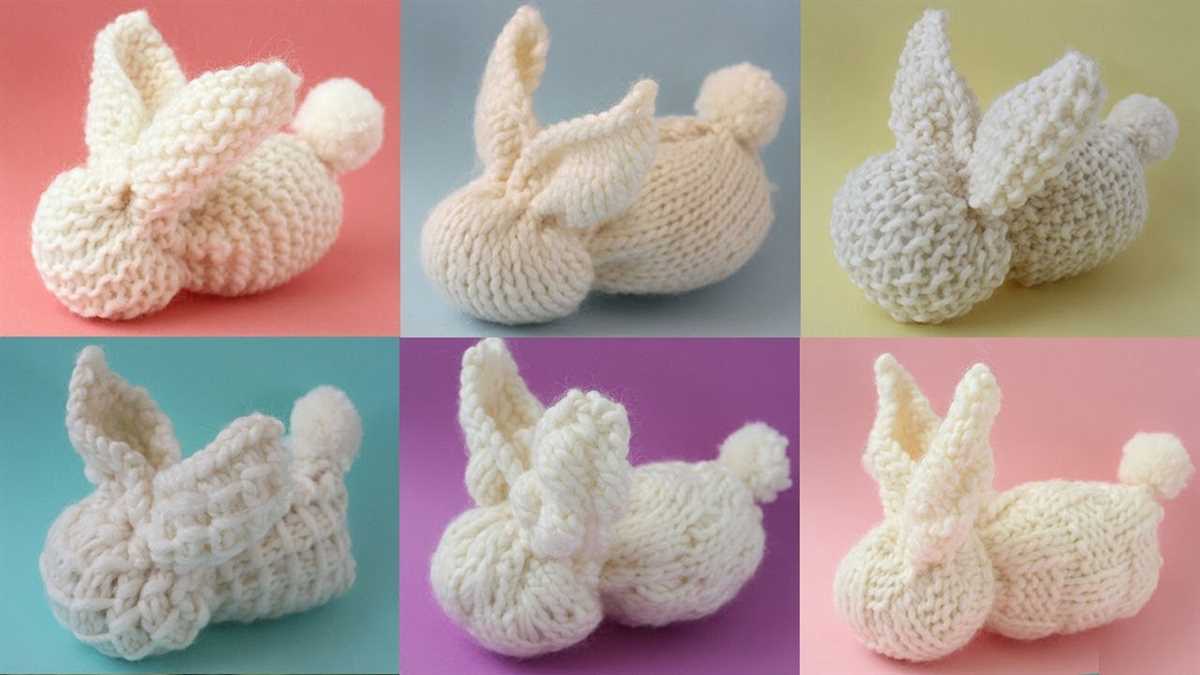
Looking for a cute and simple knitting project? Look no further than the knit square bunny pattern! This pattern is perfect for beginners and experienced knitters alike, and it makes for a great gift or toy for little ones. The best part? The bunny is made from just one square of knitting, making it a quick and easy project.
To get started, all you’ll need is some yarn, knitting needles, and a basic understanding of knitting stitches. The pattern is designed to be knit flat, so you won’t need any fancy circular needles or double-pointed needles. Plus, the pattern uses basic knit and purl stitches, so you won’t need to worry about any complex techniques.
The knit square bunny pattern is also customizable, so you can choose your own colors and embellishments to make it unique. Add a cute little bow tie, or use different colors for the bunny’s body and ears. The possibilities are endless! Whether you’re knitting for yourself or making a gift for someone else, this pattern is sure to bring a smile to anyone’s face.
Knit Square Bunny Pattern

If you are looking for a cute and cuddly toy to knit, then the Square Bunny pattern is perfect for you! This pattern is easy to follow, even for beginners, and creates an adorable bunny toy that can be enjoyed by children of all ages.
To start knitting the Square Bunny, you will need some basic knitting skills and a few materials. You will need yarn in your desired bunny color, knitting needles, stuffing, and a yarn needle for sewing. Once you have gathered all of your materials, you can begin knitting the bunny.
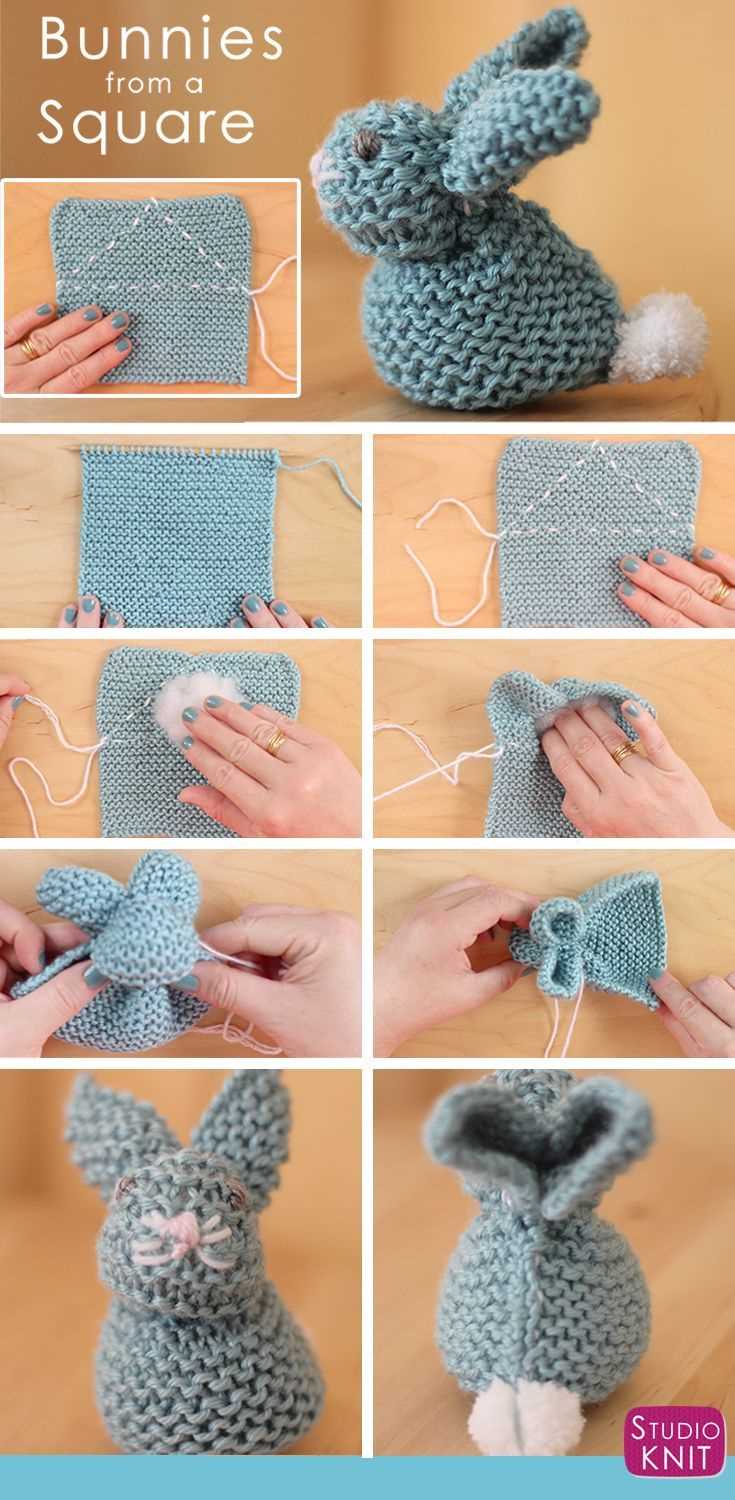
The pattern consists of knitting a square, which will later be folded and sewn to create the bunny shape. To knit the square, you will need to cast on the desired number of stitches and knit in stockinette stitch until you reach the desired length. Once you have finished knitting the square, you can bind off and cut the yarn, leaving a long tail for sewing.
Now it’s time to assemble the bunny! Fold the square in half, making sure the right sides are facing each other. Use the long tail of yarn and a yarn needle to sew the two sides together, leaving a small opening for stuffing. Once the bunny is stuffed, sew the opening closed, and your Square Bunny is complete!
This adorable knit toy is perfect for Easter, as a baby shower gift, or simply as a fun project to brighten someone’s day. With its simple design and cute bunny shape, the Square Bunny pattern is sure to be a hit!
Materials Needed
To make the knit square bunny, you will need the following materials:
- Yarn: You will need a soft, medium weight yarn in your desired color for the bunny body.
- Knitting Needles: Use size 4 or 5 knitting needles to achieve the desired gauge for your bunny.
- Stuffing: To fill the bunny and give it a nice, plush shape, you will need a polyester stuffing material.
- Embroidery floss: Choose a coordinating color of embroidery floss to sew the facial features onto the bunny.
- Yarn Needle: A large-eye yarn needle will be needed to sew the bunny together.
- Scissors: You will need a pair of scissors to cut the yarn and embroidery floss.
These are the basic materials you will need to get started on your knit square bunny. Once you have gathered all of these supplies, you will be ready to begin knitting and assembling your adorable bunny companion!
Getting Started

In order to knit a square bunny, you will need a few materials. Firstly, you will need some knitting needles, preferably in a size 7 or 8. These needles will allow you to create the right tension for your bunny. You will also need some yarn, preferably in a soft and fluffy texture. This will give your bunny a cozy and cuddly feel.
Once you have gathered your materials, you can begin by casting on. To do this, make a slip knot at the end of your yarn and slide it onto one of your knitting needles. Then, holding the knitting needle in your right hand, use your left hand to create a loop with the yarn. Insert the needle through the loop and pull the yarn tight to secure the stitch. Repeat this process until you have cast on the desired number of stitches.
Next, you will need to start knitting the body of the bunny. To do this, follow the pattern instructions for each row. This may involve knitting, purling, increasing, or decreasing stitches. As you work through the rows, make sure to keep track of your stitch count and any changes in the pattern.
Once you have finished knitting the body, it’s time to shape the bunny’s head. This may involve decreasing stitches to create a tapered shape. Follow the pattern instructions carefully to achieve the desired shape.
Finally, you will need to cast off to finish your bunny. To do this, knit two stitches, then use your left-hand needle to lift the first stitch over the second stitch and off the needle. Continue this process until you have one stitch remaining. Cut the yarn, leaving a long tail, and pull it through the final stitch to secure it.
Now that you have completed the knitting portion, you can sew up any seams and add any additional details, such as eyes, nose, and ears, using embroidery thread or yarn. Your square bunny is now ready for cuddling or gifting to a loved one!
Casting On
Casting on is the first step in starting any knitting project, including the knit square bunny pattern. It is the process of creating the initial row of stitches on the knitting needle before you begin the actual knitting. There are different methods of casting on, but for this pattern, we will use the long-tail cast on method.
The long-tail cast on method is a versatile and commonly used technique in knitting. To cast on using this method, you will need to estimate the length of yarn you need for your initial row of stitches. This estimation can be done by leaving a long enough tail of yarn before making the slipknot. The length of the tail should be about three times the width of the knitting project you are working on.
Once you have estimated the length of yarn, you can make a slipknot and place it on your knitting needle. Hold the needle in your right hand and the yarn in your left hand. Insert the needle inside the slipknot from left to right and pull the yarn to tighten the stitch. This forms your first stitch.
To create subsequent stitches, insert the needle into the loop on your left-hand needle, going from left to right. With your right hand, grab the working yarn and pull it through the loop, creating a new stitch. Repeat this process until you have cast on the required number of stitches for your project.
Knitting the Body
The body of the knitted square bunny is the main part of the toy and provides the cuddly and soft texture that makes it adorable. To start knitting the body, you will need to cast on the required number of stitches, as mentioned in the pattern. It is important to ensure an even tension in your knitting, as this will result in a more uniform and professional-looking finish.
Once you have cast on the stitches, you can begin knitting the body in the stitch pattern specified in the pattern. This could be a simple stockinette stitch or any other stitch pattern of your choice. Knitting the body is usually done by knitting in rounds or rows, depending on the desired shape and size of the toy.
Important tip: When knitting the body of the bunny, make sure to leave a long tail of yarn at the beginning and end of each round or row. This will be used later to sew the body together and attach the head and limbs.
As you progress with knitting the body, it is important to periodically check the gauge to ensure that you are knitting to the correct size as specified in the pattern. Adjustments may be necessary if your gauge does not match the pattern’s gauge. To check the gauge, measure a square of fabric and compare it to the gauge specified in the pattern.
Tip: If you want to add some personalized touches to your knitted bunny, you can experiment with different colors or add embellishments like buttons or bows. This will make your bunny unique and special.
Shaping the Head

In order to create the head of the knit square bunny, you will need to follow a specific shaping technique. This will involve increasing and decreasing stitches to achieve the desired shape.
To begin, you will start with a certain number of stitches that will form the base of the head. As you work on the pattern, you will gradually increase stitches to shape the head. This can be done by adding stitches in specific rows or rounds. It is important to follow the pattern instructions carefully to ensure that the increases are placed correctly.
Once you have reached the desired width of the head, you can then start decreasing stitches to shape the top. This will involve knitting or purling stitches together or skipping stitches to create a tapered effect. Again, it is crucial to refer to the pattern instructions to know when and how to decrease stitches.
Throughout the shaping process, it is essential to maintain an even tension in your knitting to ensure that the head is symmetrical and well-proportioned. Taking regular breaks to check the shape of the head and make any adjustments if needed is also recommended.
By following the shaping techniques outlined in the pattern, you will be able to create a cute and neatly formed head for your knit square bunny. These techniques can be applied to other knit projects as well, giving you the skills and knowledge to shape various knitted items.
Adding the Face Details

After completing the knitting of the bunny square, it’s time to add the face details to give it a cute and adorable look. The face details include the eyes, nose, and mouth.
To start, you will need black yarn or embroidery floss to embroider the eyes. Use a embroidery needle to carefully sew two small round eyes on the bunny’s face. Place them slightly above the center of the square, making sure they are evenly spaced apart.
Next, use pink yarn or embroidery floss to create the bunny’s nose. Thread a needle with the pink yarn and stitch a small triangle shape in the center of the square, just below the eyes. Make sure the stitches are tight and secure to prevent them from coming loose.
You can also add a cute smile to your bunny by using black yarn or embroidery floss. Start by threading the needle with the black yarn and positioning it at one side of the bunny’s nose. Create a curved line for the smile, stitching it carefully along the bottom edge of the nose and curving upwards towards the opposite side of the nose. Repeat the stitching process on the other side to complete the smile.
Once you have finished embroidering the face details, make sure to secure the yarn ends on the back of the square. You can do this by knotting the ends or weaving them in with a tapestry needle. This will ensure that the face details are securely attached and will not come loose during use or washing.
Knitting the Ears

When knitting the ears for the square bunny, there are a few key steps to follow to ensure they turn out just right. Start by casting on the required number of stitches, as specified in the pattern. This will determine the width of the ears. Then, work in the specified stitch pattern, whether it’s garter stitch, stockinette stitch, or something else. Keep in mind that the stitch pattern may differ for the front and back of the ear.
As you work, don’t forget to shape the ear by decreasing stitches at the appropriate points. Typically, this is done by knitting two stitches together (k2tog) or using a slip-slip-knit (ssk) decrease. Follow the pattern’s instructions for the exact decreases to use and how often to make them. These decreases will give the ear its distinctive tapering shape.
After completing the main ear section, it’s time to finish off the ear. This may involve binding off stitches, cutting the yarn and securing the end, or another method specified in the pattern. Take care to neatly finish the ear so that it looks polished and professional.
Finally, repeat these steps to knit the second ear. It’s important to pay attention to matching the size and shape of both ears to ensure symmetry when attaching them to the bunny’s head. Once both ears are finished, they can be sewn or attached to the bunny according to the pattern’s instructions.
Finishing Touches

Once you have finished knitting your square bunny, it’s time to add the finishing touches to bring your creation to life. These final steps will give your bunny its personality and make it truly unique.
Embroider the face: Use embroidery floss or yarn in a contrasting color to embroider the bunny’s eyes, nose, and mouth. You can use a simple satin stitch for the eyes and a straight stitch or a cross stitch for the nose and mouth. Take your time and make sure the stitches are even and secure.
Attach the ears: Position the ears on the top of the bunny’s head and use a needle and thread to secure them in place. You can also sew a few stitches to fold and shape the ears, giving them a realistic look.
Add a pom-pom tail: To create a fluffy tail, make a small pom-pom using yarn in a matching or contrasting color. Attach the pom-pom to the back of the bunny by sewing it securely in place. Fluff the pom-pom by gently pulling the yarn strands apart.
Give your bunny a bow or collar: To add an extra touch of cuteness, tie a small ribbon or piece of fabric around the bunny’s neck to create a bow or a collar. You can choose a color that complements the bunny’s fur or opt for a contrasting color for a pop of color.
Make accessories: If you want to take your bunny to the next level, you can knit or crochet accessories like a miniature scarf, hat, or even a tiny backpack. These accessories will add an extra layer of detail and make your bunny even more adorable.
With these finishing touches, your square bunny will be ready for cuddles and playtime. Enjoy the process of bringing your creation to life and don’t forget to share your finished bunny with others to spread the joy of knitting.
Adding the Stuffing

After you have finished knitting your bunny square, it’s time to add the stuffing to give your bunny its soft and cuddly shape. Here are the steps to follow:
- Prepare the stuffing: Make sure you have enough polyester fiberfill or any other stuffing material of your choice. Fluff it up to ensure it is soft and pliable.
- Choose an opening: Decide where you want to leave an opening for adding the stuffing. This could be a small section on the side or at the bottom of the bunny square. It should be large enough for you to easily insert your hand and the stuffing.
- Start filling: Begin by taking small handfuls of the stuffing material and gently push it into the bunny square through the opening. Be careful not to overstuff, as it may distort the shape of your bunny.
- Even out the stuffing: As you fill the bunny square, use your fingers to gently distribute the stuffing evenly. This will help ensure that the bunny is uniformly plush and not lumpy in certain areas.
- Closing the opening: Once you are satisfied with the amount of stuffing, carefully close the opening using a needle and thread. Make small stitches to secure the edges and ensure the stuffing stays inside.
And there you have it – your adorable knitted square bunny is now complete! It’s ready to be hugged and loved or given as a handmade gift. Have fun creating a whole family of bunnies using this pattern!