
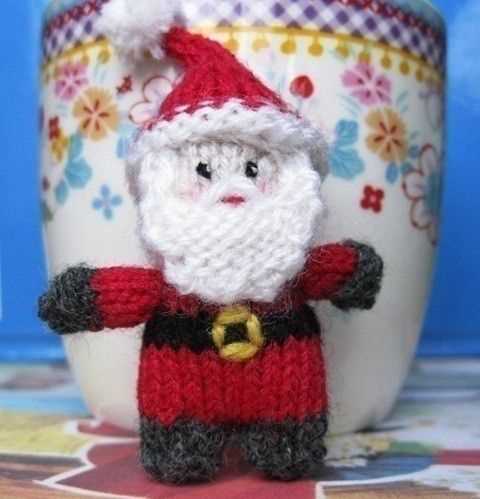
Are you looking to add some festive cheer to your holiday décor? Look no further than our free knitting pattern for Santa Claus! This jolly little fellow is the perfect addition to your Christmas decorations, and he’s a great project for knitters of all skill levels.
With this pattern, you can create your very own Santa Claus doll using just a few basic knitting techniques. From his rosy cheeks to his fluffy white beard, every detail of this jolly character is lovingly crafted with yarn and needles. Whether you’re a seasoned knitter or new to the craft, this pattern offers a fun and rewarding project that will bring a smile to your face.
You can use any yarn and needles you have on hand to create your Santa Claus doll. Whether you prefer a traditional or whimsical look, the choice is yours. This pattern allows you to get creative with your color choices and embellishments, so feel free to give your Santa Claus his own unique personality!
So grab your knitting needles, get cozy by the fire, and let’s start knitting up some holiday magic with our free pattern for Santa Claus!
Free Knitting Pattern for Santa Claus
If you’re looking for a cute and festive knitting project, look no further than this free knitting pattern for Santa Claus. Whether you want to decorate your home or surprise someone with a handmade gift, this pattern is perfect for spreading holiday cheer.
This Santa Claus knitting pattern is suitable for knitters of all skill levels. The pattern includes step-by-step instructions and detailed photos to guide you through the process. With a little patience and some yarn, you’ll have your own adorable Santa Claus in no time.
Materials Needed:
- Red and white yarn
- Size 4.5mm knitting needles
- Black and white felt
- Small amount of polyester fiberfill
- Tapestry needle
- Scissors
Start by knitting the body of the Santa Claus. Use the red yarn to knit a basic rectangle, making sure to leave a small opening for stuffing. Once the body is complete, stuff it with polyester fiberfill to give it a plump shape.
Next, knit the arms and legs using the white yarn. Attach them to the body by sewing them in place with a tapestry needle. To create Santa’s face, cut out small circles from the black and white felt and use a tapestry needle to sew them onto the body.
Finally, add the finishing touches to your Santa Claus. Use the red yarn to knit a hat and attach it to his head. You can also knit a small bag or sack and attach it to Santa’s hands. Get creative with your decorations and personalize your Santa Claus however you like.
Once you’ve completed your Santa Claus, you can display him proudly in your home or give him as a thoughtful gift. This free knitting pattern allows you to create a festive and charming Santa Claus that will bring joy wherever he goes.
Materials

Before you start knitting your Santa Claus, make sure you have all the necessary materials on hand. Here is a list of what you will need:
- Yarn: Choose a soft and thick yarn in traditional Santa Claus colors such as red, white, and black. You can also opt for metallic or glitter yarn for a festive touch.
- Knitting Needles: Use knitting needles that are appropriate for the thickness of your yarn. Generally, a size 8 or 9 needle will work well.
- Scissors: You will need a pair of sharp scissors to cut the yarn and trim any loose ends.
- Tapestry Needle: A tapestry needle with a large eye will be useful for sewing and weaving in loose ends.
- Stuffing: To give your Santa Claus a nice shape and a bit of softness, you will need stuffing material such as polyester fiberfill or cotton batting.
- Black Embroidery Thread: You will need black embroidery thread for embroidering the eyes and other facial features of your Santa Claus.
- Other Accessories: Depending on the design of your Santa Claus, you may also need additional materials such as buttons, ribbons, and bells for embellishments.
Gather these materials before you begin your knitting project, and you’ll be ready to create your very own festive Santa Claus decoration!
Gauge

The gauge in knitting refers to the number of stitches and rows per inch or centimeter that is achieved with a specific needle size and yarn. It is an important factor in knitting, as it determines the finished size and fit of the project. Achieving the correct gauge is crucial to ensuring that the final piece matches the measurements provided in the pattern.
To determine the gauge for a particular project, it is recommended to create a gauge swatch. A gauge swatch is a small sample of knitting worked with the specified needles and yarn. The swatch is then washed and blocked to simulate how the finished project will look and feel. By measuring the number of stitches and rows within a certain measurement on the swatch, the gauge can be determined.
It is important to note that different knitters may have different gauges, even when using the same needles and yarn. Factors that can affect gauge include knitting tension, the yarn used, and the individual’s knitting style. Therefore, it is essential for each knitter to create their own gauge swatch and adjust the needle size if necessary to achieve the correct gauge.
How to measure gauge:
- Cast on an appropriate number of stitches using the specified needles and yarn.
- Work a few rows in the desired stitch pattern.
- Measure the width and height of the swatch, making sure to exclude any edges that may have curled or distorted.
- Count the number of stitches and rows within a specified measurement, usually 4 inches or 10 centimeters.
- Compare the measured stitches and rows to the gauge provided in the pattern. Adjust needle size if necessary to obtain the correct gauge.
Gauge is an important aspect of knitting that should not be overlooked. Taking the time to create a gauge swatch and adjust the needle size if necessary will help to ensure that the finished project turns out as intended.
Abbreviations
When working on a knitting pattern, it is important to familiarize yourself with the various abbreviations that may be used. These abbreviations are shortcuts for different knitting techniques and stitches, and understanding them will help you follow the instructions more easily. Here are some common abbreviations you may come across:
- K: Knit
- P: Purl
- RS: Right side
- WS: Wrong side
- YO: Yarn over
- K2tog: Knit two stitches together
- P2tog: Purl two stitches together
- St(s): Stitch(es)
- Rep: Repeat
- Inc: Increase
- Dec: Decrease
These abbreviations are commonly used in knitting patterns and understanding their meaning will make it easier for you to follow the pattern. Keep a reference guide handy or make a note of the abbreviations used in each pattern to help you remember what they mean. With practice, you will become familiar with the most commonly used abbreviations and be able to read knitting patterns more fluently.
Body
The body of the Santa Claus is an important part of the knitted doll. It is the main structure that holds everything together and gives the doll its shape.
To create the body, you will need to knit a tube using the desired yarn and needle size. You can start by casting on the desired number of stitches, typically around 30 or more, depending on the size of the Santa Claus doll you want to create.
You can then work in the round, using either circular needles or double-pointed needles, to create the tube. You can choose any stitch pattern you like, such as stockinette stitch or ribbing, to give the body some texture and interest.
Materials:
- Yarn in the color of your choice
- Knitting needles in the appropriate size for your yarn
- Stitch markers
- Yarn needle for weaving in ends
As you work on the body, make sure to use stitch markers to keep track of your rounds and to mark any shaping or increases that may be required. This will help you keep your knitting organized and ensure that you create a symmetrical and well-shaped body for your Santa Claus doll.
Once the body is complete, you can stuff it lightly with fiberfill or other stuffing material to give it some volume and shape. Make sure not to overstuff the body, as this can distort the shape or make the doll too rigid.
After stuffing, you can close the bottom of the body by either sewing it shut or grafting the stitches together. This will give the doll a finished and polished look.
Once the body is ready, you can then move on to knitting the other parts of the Santa Claus doll, such as the head, arms, and legs, and then assemble everything together to create your finished knitted Santa Claus doll.
Arms

Arms are an important part of any Santa Claus knitting pattern. They add a playful touch to the finished toy and allow for various posing options. When knitting the arms, it’s essential to pay attention to the size and proportions to ensure they match the overall design.
Materials needed:
- Double-pointed knitting needles in the appropriate size
- Yarn in the desired color
- Tapestry needle for weaving in ends
Instructions:
- Using the double-pointed needles, cast on the desired number of stitches. This will depend on the size and thickness of the arms you want.
- Knit in the round, following the pattern instructions, until the desired length is reached. You may need to decrease or increase stitches along the way to maintain the desired shape.
- Once the desired length is reached, bind off the stitches and cut the yarn, leaving a long tail for sewing.
- Using the tapestry needle, sew the arms onto the body of the Santa Claus toy. Make sure to position them symmetrically and secure them tightly.
Feel free to experiment with different stitch patterns or add small embellishments, such as tiny mittens or cuffs, to make the arms even more festive. Remember to always check your gauge before starting the project and adjust the needle size accordingly.
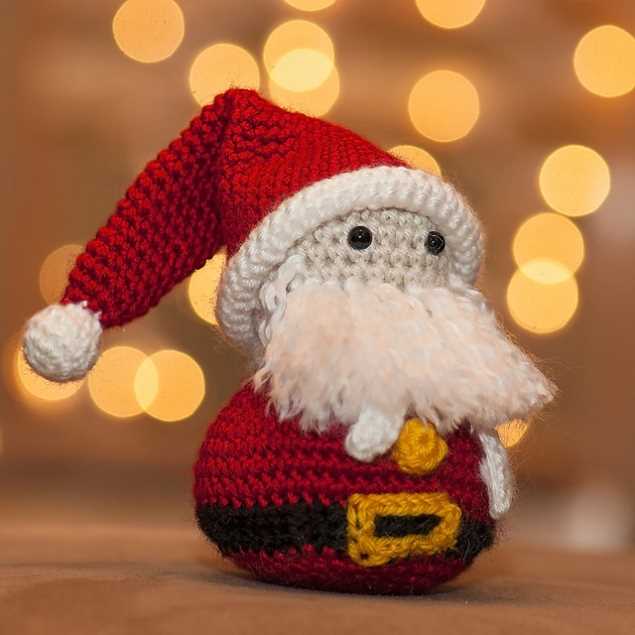
Hat

One of the most important accessories for Santa Claus is his signature red hat. It is an essential part of his outfit, completing the iconic look that we all recognize. The hat is typically made of a soft and warm material, such as wool, to ensure Santa stays cozy during his long journey delivering gifts on Christmas Eve.
The hat is usually cone-shaped, with a long point at the top and a wide brim that folds up at the bottom. The brim of the hat often has a white fur trim, adding an extra touch of festive flair. It is typically red in color, although variations in shade can be seen. Some Santa hats even have a white pom-pom on the end of the long point, adding a playful touch to the design.
A popular knitting pattern for Santa hats is the classic “Stocking Stitch Santa Hat.” This pattern uses simple knitting techniques to create a hat that perfectly captures the essence of Santa Claus. The brim of the hat is created using ribbing, which gives it a snug fit and ensures it stays in place. The body of the hat is then worked in stocking stitch, creating a smooth and seamless finish.
The “Stocking Stitch Santa Hat” pattern is a great choice for knitters of all skill levels. It can be easily customized to fit different head sizes, and the color options are endless. Whether you prefer a traditional red Santa hat or want to get creative with different color combinations, this pattern allows you to let your imagination run wild. Knitting a Santa hat is not only a fun project, but it also makes for a fantastic gift or festive decoration.
So, grab your needles, some red yarn, and get ready to bring the magic of Santa Claus to life with your very own hand-knitted Santa hat! Whether you’re wearing it yourself or gifting it to someone special, this iconic accessory is sure to spread holiday cheer wherever it goes.
Beard

In the realm of Santa Claus knitting patterns, one of the most iconic features of his appearance is undoubtedly the beard. The long, white, fluffy beard is what instantly identifies him as jolly old St. Nick. It’s a key element in creating a perfect Santa Claus costume or toy.
Materials:
- White yarn
- Knitting needles
- Darning needle
Instructions:
- Cast on the desired number of stitches to create the width of the beard. This can vary depending on the size of the project.
- Knit in the garter stitch pattern until the desired length of the beard is achieved. This stitch pattern creates a textured look that resembles the curls of a real beard.
- Bind off the stitches to secure the end of the beard.
- Using a darning needle, weave in any loose ends of yarn.
Note: To create a more lifelike beard, you can also add additional details such as stray strands of yarn or even sew on individual yarn tendrils to mimic the appearance of a real beard.
With these simple instructions, you can create a beautiful and authentic-looking Santa Claus beard for your knitting project. Whether you’re making a Santa Claus costume, a holiday decoration, or a toy, this beard pattern will add the perfect finishing touch and bring the character of Santa Claus to life.
Eyes
Eyes are an essential part of any Santa Claus knitting pattern. They bring the character to life and add a touch of personality to the finished toy. Whether you prefer to use buttons, safety eyes, or embroidered stitches, there are countless options for creating the perfect set of eyes for your Santa Claus.
Button Eyes: Sewing on a pair of buttons is a classic choice for giving your Santa Claus a whimsical look. Choose buttons in contrasting colors or festive designs to add an extra element of fun. Make sure to secure them tightly with strong thread to ensure they stay in place, especially if the toy will be played with by children.
Safety Eyes: Safety eyes are another popular option for adding eyes to your Santa Claus toy. These eyes are typically made of plastic and come with a built-in washer to securely attach them to the knitting. They are available in various sizes and colors, allowing you to choose the perfect match for your Santa Claus design.
Embroidered Eyes: If you prefer a more traditional and handmade look, embroidered eyes are a great choice. Using embroidery floss or yarn, you can create eyes in any shape and size you desire. This technique allows for more customization and flexibility in terms of the expression and style of your Santa Claus.
Regardless of the method you choose, it is important to consider safety when adding eyes to your Santa Claus knitting pattern. Make sure they are securely attached and won’t pose a choking hazard if the toy is intended for young children. Also, take into account the overall aesthetic of your project and choose eyes that complement the style and character of your Santa Claus design.
The Importance of the Nose in Santa Claus Knitting Patterns

When it comes to knitting a Santa Claus doll, one of the most important features is the nose. The nose is what brings the character to life, giving it a jolly and cheerful appearance. Whether you’re following a free knitting pattern or designing your own, the nose plays a crucial part in capturing the essence of Santa Claus.
The Shape and Color: In most Santa Claus knitting patterns, the nose is depicted as a prominent, rounded shape. It is often red, mimicking the iconic image of Santa Claus with his rosy cheeks and red outfit. The red color adds a pop of vibrant color to the doll and symbolizes warmth and joy.
The Materials: The choice of materials for the nose also plays a role in the overall look and feel of the Santa Claus doll. Many knitters opt for yarn or felt to create the nose, as these materials are soft and pliable, allowing for easy shaping and attachment to the doll’s face. Some knitters may also choose to use safety eyes or beads to add an extra touch of realism to the nose.
The Placement: Another important aspect to consider when knitting a Santa Claus doll is the placement of the nose. Typically, the nose is positioned in the center of the face, slightly below the eyes. This gives the doll a friendly and approachable expression, inviting children and adults alike to smile when they see it.
The Finishing Touch: Once the nose is securely attached to the Santa Claus doll, it’s time to add the finishing touch. Some knitters may choose to highlight the nose with a few stitches or embroidery to create texture and dimension. Others may apply a small amount of blush or powder to give the nose a more realistic appearance.
Overall, the nose is a crucial element in creating a Santa Claus knitting pattern. It brings the character to life and adds charm and personality to the doll. Whether you’re a seasoned knitter or just starting out, paying attention to the details of the nose will ensure that your Santa Claus doll is a delightful addition to your holiday decorations.
Belt
When making a Santa Claus doll for your Christmas decorations, one of the essential elements is the belt. The belt adds a finishing touch to the overall look and helps define the waist of the Santa Claus doll.
The belt can be made using a thick black yarn or ribbon. It should be long enough to wrap around the Santa Claus doll’s waist and have some excess length for the buckle. You can also use a contrasting color for the belt to make it stand out more.
To create the buckle, you can sew on a rectangular piece of gold or silver fabric or use a small decorative buckle from a craft store. This will give the impression of a real belt buckle and make your Santa Claus doll look more authentic.
When attaching the belt, make sure it is securely fastened around the waist of the doll. You can use a few stitches to hold the belt in place or opt for a hook and loop closure for easier removal.
In conclusion, the belt is an important component of a Santa Claus doll, adding a touch of realism and completing the overall look. By choosing the right materials and securely attaching it, you can create a beautiful and festive decoration for your home during the holiday season.
Finishing
After completing all the knitting, it’s time to finish off your Santa Claus! Follow these steps to give your Santa Claus the perfect finishing touches:
1. Sew the seams:

Using a yarn needle and the same yarn you used for knitting, sew the seams of your Santa Claus together. Start with the back seam, sewing from the bottom of the body up to the head. Then, sew the side seams of the body and the arms. Make sure to leave an opening for stuffing the Santa Claus.
2. Stuff the Santa Claus:
Take polyester fiberfill or any other stuffing material of your choice and stuff the Santa Claus through the opening. Fill the body and the head firmly, but be careful not to overstuff and distort the shape. Use a knitting needle or a chopstick to push the stuffing into the corners and difficult-to-reach areas.
3. Close the opening:
After stuffing, sew the opening closed using the same yarn and needle. Make sure the seam is secure and tight so that the stuffing doesn’t poke out. You can also use a slip stitch to close the opening neatly.
4. Attach the finishing details:
Add the final details to your Santa Claus to bring him to life. Sew on the eyes using black embroidery thread or small beads. Embroider the mouth using red or pink embroidery thread. Attach a small pom-pom or a piece of cotton as the nose. Sew on the white beard and mustache using white yarn or faux fur. You can also add small buttons or beads for the buttons on the coat.
Once all the finishing touches are complete, your Santa Claus is ready to spread holiday cheer! Display him on a mantel, give him as a gift, or use him as a festive decoration.
Final Thoughts
Knitting a Santa Claus doll can be a fun and creative project for knitters of all skill levels. Whether you are looking to decorate your home for the holidays or give a unique handmade gift, this free knitting pattern for Santa Claus is a great option. With clear instructions and detailed photos, you can easily follow along and create your own festive Santa Claus doll.
Not only is this pattern free, but it also allows you to customize your Santa Claus doll to your preference. You can choose different colors of yarn, add accessories like a hat or a bag of presents, or even make miniature versions to hang on your Christmas tree. The possibilities are endless!
So why not give it a try? Knitting this Santa Claus doll can bring joy and holiday spirit to your knitting projects. Whether you are an experienced knitter or a beginner, this pattern is accessible to all. So gather your knitting needles, pick out some yarn, and get ready to create your very own Santa Claus doll!
Q&A:
Where can I find a free knitting pattern for Santa Claus?
You can find free knitting patterns for Santa Claus on various websites dedicated to knitting and crafts. Some popular websites that offer free knitting patterns include Ravelry, LoveKnitting, and KnittingPatternCentral.
What materials will I need to knit a Santa Claus?
You will need red and white yarn, knitting needles, a tapestry needle, stuffing for the body, and any additional materials for embellishments such as a small bell or buttons for the eyes. The specific materials may vary depending on the pattern you choose to use.
Are there beginner-friendly knitting patterns for Santa Claus?
Yes, there are beginner-friendly knitting patterns available for Santa Claus. These patterns often use simple stitches and have easy-to-follow instructions. Look for patterns labeled as suitable for beginners or with a low difficulty level.
Can I modify the knitting pattern to make a different size Santa Claus?
Yes, you can modify the knitting pattern to make a different size Santa Claus. To do this, you will need to adjust the number of stitches and rows in the pattern. You may also need to use different sizes of knitting needles and adjust the tension of your knitting. It is helpful to have some experience with knitting and pattern modifications to successfully resize a pattern.