
Looking for a stylish and cozy accessory to complement your winter wardrobe? Look no further than the Wednesday Snood knitting pattern! This pattern is perfect for beginners and experienced knitters alike, providing a fun and rewarding project to keep you warm throughout the colder months.
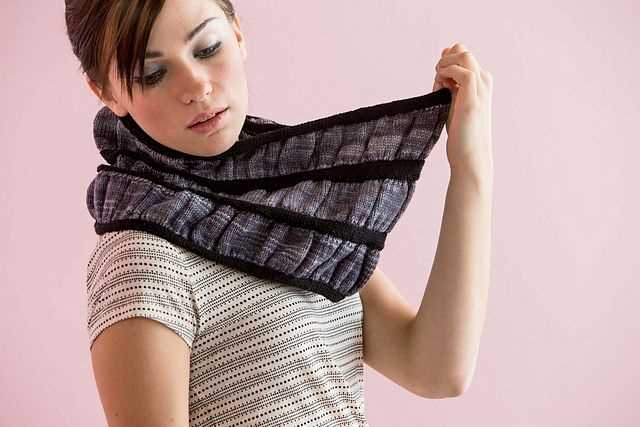
The Wednesday Snood is a versatile and practical accessory that can be worn in a variety of ways. Whether you prefer to drape it loosely around your neck or pull it up over your head to keep your ears warm, this snood will add an extra layer of warmth and style to any outfit.
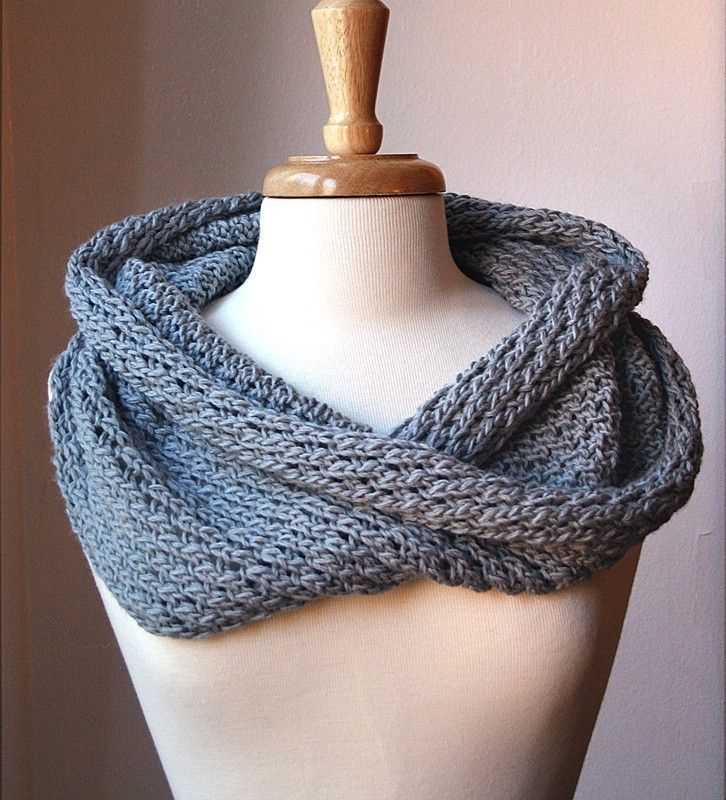
What sets the Wednesday Snood knitting pattern apart from other patterns is its unique design. With a combination of knits and purls, this pattern creates a textured and chunky appearance that is both trendy and timeless. The snood is also knit in the round, eliminating the need for sewing or seaming, making it a quick and easy project to complete.
So, grab your knitting needles and some cozy yarn and get ready to create your own Wednesday Snood. Whether you’re a beginner knitter or an experienced pro, this pattern is sure to become a staple in your winter wardrobe.
Wednesday Snood Knitting Pattern

A snood is a versatile and fashionable accessory that can keep you warm and stylish during the colder months. The Wednesday Snood Knitting Pattern is a popular choice among knitters, as it is a simple yet chic design that can be easily customized to suit your personal style.
To start knitting the Wednesday Snood, you will need a pair of knitting needles and a skein of your favorite yarn. Begin by casting on a multiple of stitches, depending on the desired width of your snood. The pattern recommends using a chunky or super bulky yarn for a cozy and warm result.
Once you have cast on the stitches, you can begin knitting in the round. The pattern suggests using a rib stitch pattern, alternating between knit and purl stitches, to create a stretchy and textured fabric. This stitch pattern also helps to prevent curling at the edges of the snood.
As you continue knitting, you can easily customize the length of the snood to your preference. If you prefer a longer snood, simply knit more rounds. For a shorter snood, knit fewer rounds. The pattern suggests knitting until the snood reaches your desired length, and then binding off the stitches.
When you have finished knitting the Wednesday Snood, you can lightly block it to help the stitches relax and the fabric to lay flat. This will give your snood a polished and professional finish.
Overall, the Wednesday Snood Knitting Pattern is a versatile and stylish project that can be completed by knitters of all skill levels. Whether you’re a beginner or an experienced knitter, this pattern is a great choice for creating a cozy and fashionable accessory to keep you warm during the colder months.
Happy knitting!
Overview

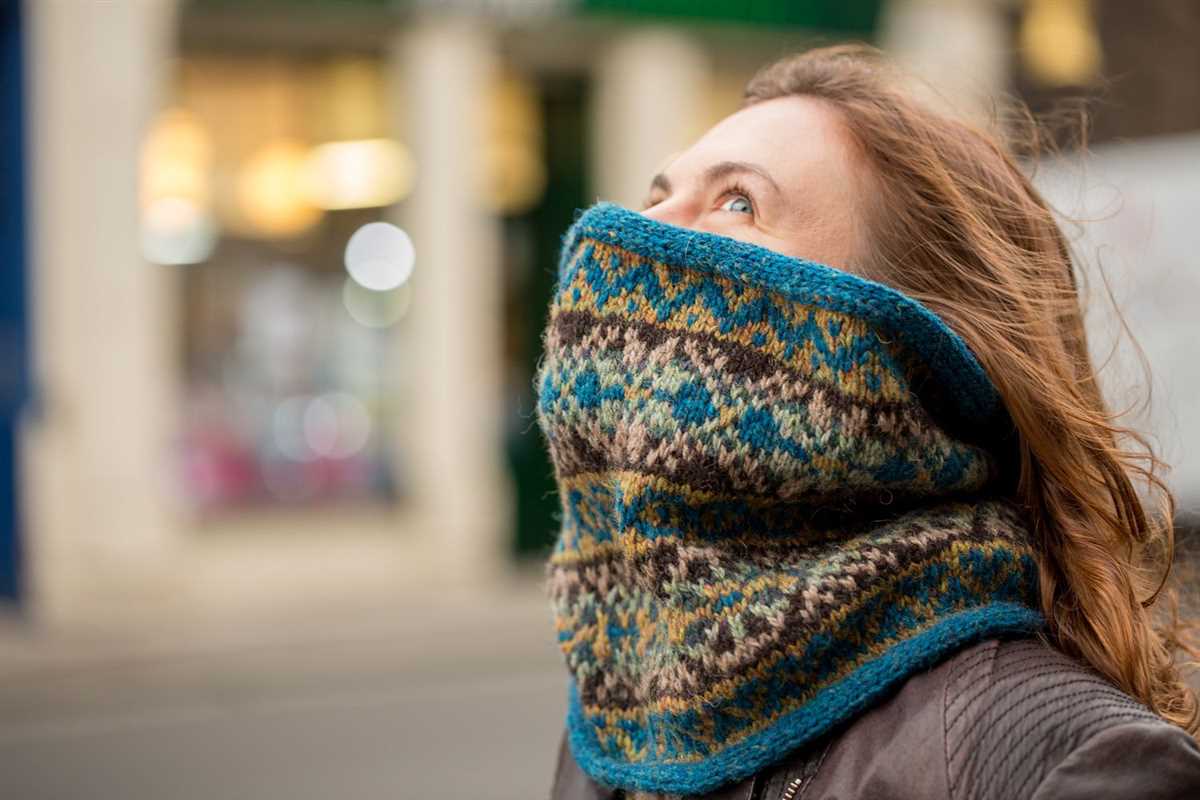
The Wednesday snood knitting pattern is a versatile and stylish accessory that is perfect for keeping warm during the colder months. Snoods are typically worn around the neck and can be made from a variety of materials, including wool, acrylic, or a blend of both. This pattern is designed for intermediate knitters and can be customized to fit any size or style preference.
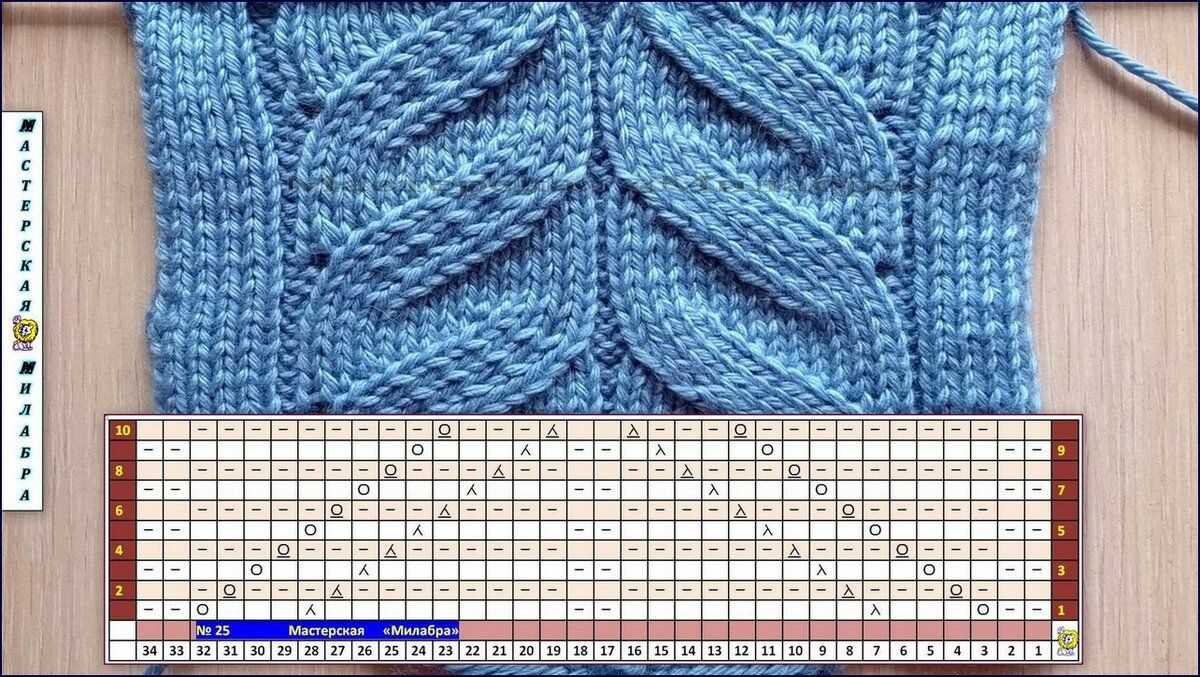
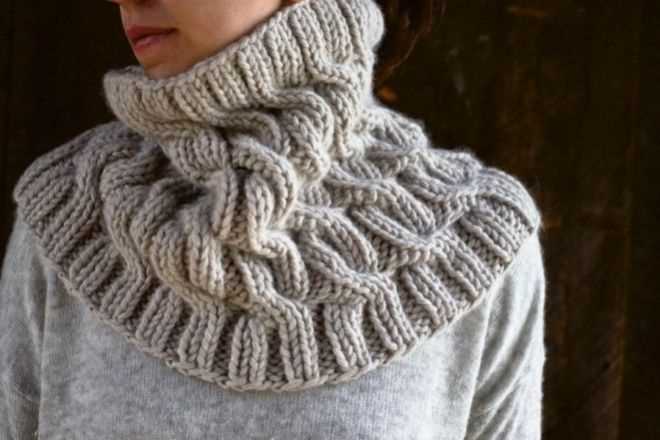
Knitting a snood is a fun and rewarding project that allows knitters to showcase their skills and creativity. The Wednesday snood pattern features a beautiful cable stitch design, which adds texture and visual interest to the finished piece. The pattern includes detailed instructions and a chart, making it easy to follow along and create a professional-looking snood.
Pattern Details

- Difficulty level: Intermediate
- Size: Customizable
- Materials needed: Knitting needles (size 8), yarn (worsted weight)
- Gauge: 18 stitches and 24 rows = 4 inches in cable pattern
- Estimated completion time: 10-12 hours
The Wednesday snood pattern is a unique and stylish accessory that can be worn with a variety of outfits. It can be paired with a coat or jacket for extra warmth, or worn indoors as a fashionable accessory. The cable stitch pattern adds an elegant touch to any look, making it perfect for both casual and formal occasions.
Whether you are an experienced knitter looking for a new project, or a beginner wanting to expand your skills, the Wednesday snood knitting pattern is a great choice. With its customizable size and beautiful cable stitch design, this snood is sure to become a staple in your winter wardrobe.
Materials
To make the Wednesday snood, you will need the following materials:
Yarn
- Main color: 2 skeins of medium weight yarn. This will be the color of your snood.
- Contrast color: 1 skein of medium weight yarn. This will be the color of the ribbed band at the top and bottom of the snood.
Knitting Needles
- Size 8 (5mm) straight knitting needles: These will be used to knit the main body of the snood.
- Size 7 (4.5mm) straight knitting needles: These will be used to knit the ribbed band.
Stitch Markers

- 6 stitch markers: These will be used to mark the beginning and end of the ribbed band, as well as the decreases for the crown shaping.
Tapestry Needle
- A tapestry needle with a large eye: This will be used to weave in the ends of the yarn and sew any seams if necessary.
Make sure you have all these materials on hand before you start knitting the Wednesday snood. Having everything you need organized and ready to go will help ensure a smooth and enjoyable knitting experience.
Gauge
In knitting, gauge refers to the number of stitches and rows in a specific measurement. It is an important factor in knitting projects as it helps to ensure that the finished item has the correct size and fit. To achieve the desired gauge, it is crucial to use the appropriate yarn weight, needle size, and tension.
Measuring Gauge
Measuring gauge involves creating a small swatch of fabric using the chosen yarn and needles, and then counting the number of stitches and rows within a certain measurement. The recommended gauge is usually provided in the knitting pattern or can be calculated based on the desired finished measurements. To obtain accurate measurements, it is important to wash and block the swatch before measuring.
Importance of Gauge
The gauge not only determines the size of the finished item but also affects the overall appearance, drape, and texture. If the gauge is too loose, the finished item may be too large and the stitches may appear sloppy. On the other hand, if the gauge is too tight, the item may be too small and the fabric may be stiff and rigid. It is essential to match the gauge specified in the pattern to ensure that the finished item turns out as intended.
Adjusting Gauge
If the gauge achieved is different from the one specified in the pattern, adjustments can be made by changing the needle size or yarn weight. If the gauge is too loose, using a smaller needle size or a heavier yarn can help achieve the desired measurements. Conversely, if the gauge is too tight, using a larger needle size or a lighter yarn can help loosen up the stitches. It is recommended to create multiple swatches and make adjustments until the correct gauge is obtained.
Conclusion
Gauge is an essential aspect of knitting that ensures the finished item has the correct size and fit. By measuring the number of stitches and rows within a specific measurement, and making necessary adjustments to the needle size or yarn weight, knitters can achieve the desired gauge and create beautiful, well-fitting garments and accessories.
Pattern Instructions
Knitting a Wednesday snood is a fun and rewarding project that will keep you cozy and stylish during the colder months. The snood is designed to be worn around the neck, providing warmth and protection from the elements. This pattern is suitable for intermediate knitters who are familiar with basic knitting techniques.
Materials:
- Size 8 (5mm) knitting needles
- 1 skein of worsted weight yarn (approximately 200 yards)
- Tapestry needle
- Scissors
Gauge:
Before starting the project, it is important to check your gauge to ensure that your snood will be the correct size. Knit a small swatch using the recommended needle size and yarn. Measure the number of stitches and rows per inch to compare with the gauge given in the pattern instructions. Adjust your needle size as necessary to match the gauge.
Instructions:
- Cast on 100 stitches using the long tail cast on method.
- Row 1: *Knit 2 stitches, purl 2 stitches; repeat from * to the end of the row.
- Row 2: *Purl 2 stitches, knit 2 stitches; repeat from * to the end of the row.
- Repeat Rows 1 and 2 until the snood measures approximately 12 inches from the cast on edge.
- Bind off all stitches in pattern.
- Weave in any loose ends using a tapestry needle.
Once you have finished knitting the snood, gently block it to give it a polished and even appearance. Lay the snood flat on a clean towel, shaping it into a rectangle, and allow it to air dry. Once dry, your Wednesday snood is ready to be worn or gifted to a lucky recipient!
Cast On

When starting your Wednesday snood knitting project, the first step is to cast on. Casting on is the process of creating the first row of stitches on your knitting needle. There are several different methods to cast on, but for this pattern, we will be using the long-tail cast on method.
The long-tail cast on is a versatile and commonly used method that creates a neat and elastic edge. To begin, you will need to estimate the length of yarn needed for the cast on. The general rule of thumb is to measure out a length of yarn that is approximately three times the width of your finished snood.
To start the long-tail cast on, make a slip knot with a long tail and place it on your knitting needle. Hold the tail, also known as the working yarn, in your right hand and the other end of the yarn in your left hand. Insert the right needle into the loop of the slip knot from left to right, and then bring the right needle over the left needle, forming a new loop on the right needle.
- With the right needle, go under the left needle and grab the yarn that is coming from the ball of yarn.
- Bring the right needle up and through the loop on the left needle, then drop the loop off the left needle.
- Repeat these steps until you have cast on the desired number of stitches.
Once you have cast on all the stitches, you can begin working the rest of the snood pattern. The cast-on edge will serve as the foundation for the rest of your knitting project, so it is important to take your time and ensure that the stitches are not too tight or too loose. Happy knitting!
Knit Body
The knit body of the Wednesday snood is the main part of the snood that wraps around your neck to keep you warm and cozy. It is knitted in a simple and straightforward pattern, making it an ideal project for knitters of all skill levels. The body is worked in the round, using circular knitting needles, which allows for seamless knitting without any unsightly seams or joins.
To begin knitting the body, cast on the required number of stitches onto your circular knitting needle. You can use any type of yarn and needle size that you prefer, depending on the desired thickness and drape of the snood. It is recommended to use a slightly larger needle size than usual to create a loose and comfortable fabric.
The body of the snood is worked in a basic knit stitch, also known as the stockinette stitch. This is achieved by knitting all stitches in every round, creating a smooth and uniform texture. The length of the body can be easily customized to your preference by knitting more or fewer rounds. It is important to keep track of the number of rounds you have knitted to ensure that both ends of the snood are equal in length.
Once you have reached the desired length for the body, you can finish off the knitting by binding off all stitches. This can be done using a regular bind off technique, such as the basic bind off or the stretchy bind off, depending on the desired edge finish. Make sure to bind off loosely to allow for flexibility and comfortable wear.
If desired, you can also add optional embellishments or details to the body of the snood, such as ribbing, cables, or lace patterns. These can add visual interest and texture to the snood, making it a unique and personalized accessory. Just make sure to adjust the stitch pattern accordingly and keep track of any changes in stitch count.
Tutorial: Decrease Rows for Wednesday Snood Knitting Pattern
In this tutorial, we will guide you through the process of adding decrease rows to your Wednesday snood knitting pattern. Decreasing stitches is an important technique that helps shape your snood and create a more fitted look. Let’s get started!
To begin, you will need to determine the number of stitches you want to decrease. This will depend on the size of your snood and the desired fit. In general, decreasing 2 stitches per decrease row is a common approach.
Step 1: Identify the stitches to decrease

First, you need to identify the stitches that will be decreased. These stitches are usually marked in the pattern or by using stitch markers. Pay close attention to the pattern instructions to ensure you are decreasing the correct stitches.
Step 2: Work the decrease stitches
Once you have identified the stitches to decrease, you can work the decrease stitches. There are different decrease techniques you can use, such as knit two together (K2tog) or slip, slip, knit (SSK). Follow the pattern instructions to determine the appropriate decrease technique.
Step 3: Repeat the decrease rows

To achieve the desired shaping, you will need to repeat the decrease rows. This means you will work the decrease stitches in the specified pattern rows until the instructed number of stitches remain. Make sure to follow the pattern instructions carefully to ensure the correct number of decrease rows.
By adding decrease rows to your Wednesday snood knitting pattern, you can create a more fitted and stylish accessory. Don’t be afraid to experiment with different decrease techniques to achieve your desired look. Happy knitting!
Attach the Snood

In order to complete your Wednesday snood, you will need to attach the different sections together. This will ensure that your snood is secure and comfortable to wear. Follow these instructions to properly attach the snood:
Step 1: Prepare the Snood Sections
- First, make sure that all your snood sections are finished and ready to be attached. This includes the main body of the snood and any additional embellishments or decorations you may have added.
- Check that the edges of each section are neat and even. Trim away any loose threads or excess yarn to create a clean edge.
Step 2: Position the Sections
- Lay out the main body of the snood on a flat surface, with the right side facing up.
- Position any additional sections, such as decorative panels or ribbed edging, on top of the main body, aligning them correctly.
- Use pins to hold the sections in place, ensuring they are evenly distributed and lie flat.
Step 3: Seam the Sections
- Thread a tapestry needle with a matching yarn color.
- Starting at one end, carefully sew the sections together using a whip stitch or a mattress stitch, depending on your preferred method.
- Ensure that your stitches are tight and secure, but not too tight that they distort the shape of the snood. Take care to match the stitch tension of the main body of the snood.
- Continue stitching along the entire length of the snood, securing all sections together.
Once you have completed these steps, your Wednesday snood will be ready to wear! Ensure that all the sections are securely attached and give your snood a final inspection to check for any loose threads or uneven stitching. Your snood is now complete and can be enjoyed during those colder autumn and winter days!
Finishing Touches

Once you have completed knitting your Wednesday snood, it’s time to add the finishing touches to make it truly special. Whether you’re giving it as a gift or keeping it for yourself, these final steps will ensure that your snood looks polished and professional.
1. Blocking: Before moving on to the remaining steps, it’s important to block your snood. Blocking helps to even out the stitches and gives your project a smooth and cohesive finish. To block your snood, soak it in lukewarm water with a mild detergent for about 15 minutes, then gently squeeze out the excess water. Lay it flat on a towel, shaping it into the desired size and dimensions. Leave it to dry completely before proceeding.
2. Weaving in the ends: After blocking, you’ll notice that there are a few yarn ends hanging from your snood. These ends are from the cast on and bind off edges, as well as any color changes or joins. Take a tapestry needle and weave these ends neatly into the fabric, making sure they are secure and do not unravel over time. This step will give your snood a neat and polished appearance.
3. Adding a decorative edge: If you want to add a decorative edge to your snood, now is the time to do it. You can choose to crochet a border, add a picot edge, or even attach a row of small buttons. This extra detail will make your snood stand out and showcase your personal style. Follow the instructions or pattern for your chosen decorative edge, and take your time to carefully attach it to your snood.
4. Final inspection: Before declaring your snood complete, take a moment to inspect it carefully. Check for any loose stitches, uneven tension, or other imperfections that may stand out. Use a crochet hook or tapestry needle to fix any issues you come across, ensuring that your snood looks flawless. This final step will give you peace of mind and guarantee that your finished project is of the highest quality.
By following these finishing touches, your Wednesday snood will be transformed from a simple knitted accessory to a stunning and fashionable piece that you can be proud of. Take your time and enjoy the process, knowing that these final steps will make all the difference in the final outcome.
Styling Suggestions

Once you have completed your snood using the Wednesday snood knitting pattern, it’s time to get creative with how you wear it. Here are some styling suggestions to help you make the most of your new accessory:
1. Classic Loop:
Create a classic loop by wrapping the snood around your neck once and letting the ends hang loose. This is a simple and timeless way to wear your snood and adds an extra layer of warmth to your outfit.
2. Double Wrap:
If you need extra warmth or want a more snug fit, try doubling up the snood by wrapping it around your neck twice. This will give you a cozier and more bundled up look.
3. Draped Over the Shoulders:
For a more relaxed and casual look, drape the snood over your shoulders like a shawl. This is a great way to show off the texture and pattern of the snood, and it adds a cozy touch to any outfit.
4. Belted Snood:
If you want to add a touch of chic to your outfit, try belting the snood around your waist. This creates a flattering and stylish silhouette and can be paired with dresses or long tops for a more polished look.
5. Head Covering:
If you’re looking for alternative ways to wear your snood, try pulling it up over your head and using it as a head covering. This can keep your head warm and protected from the cold, while also adding a unique and fashionable touch to your outfit.
With these styling suggestions, you can show off your Wednesday snood in a variety of ways to suit your personal style and outfit. Whether you want to keep it simple and classic or experiment with different looks, the snood is a versatile accessory that can add both warmth and style to your wardrobe.