
If you’re a beginner knitter looking for a project that is simple yet stylish, then this easy cowl knitting pattern is perfect for you. Cowls are a versatile accessory that can be worn in a variety of ways to keep you warm and cozy during the colder months. Whether you’re a seasoned knitter or just starting out, this pattern is quick and easy to follow, making it a great project for knitters of all skill levels.
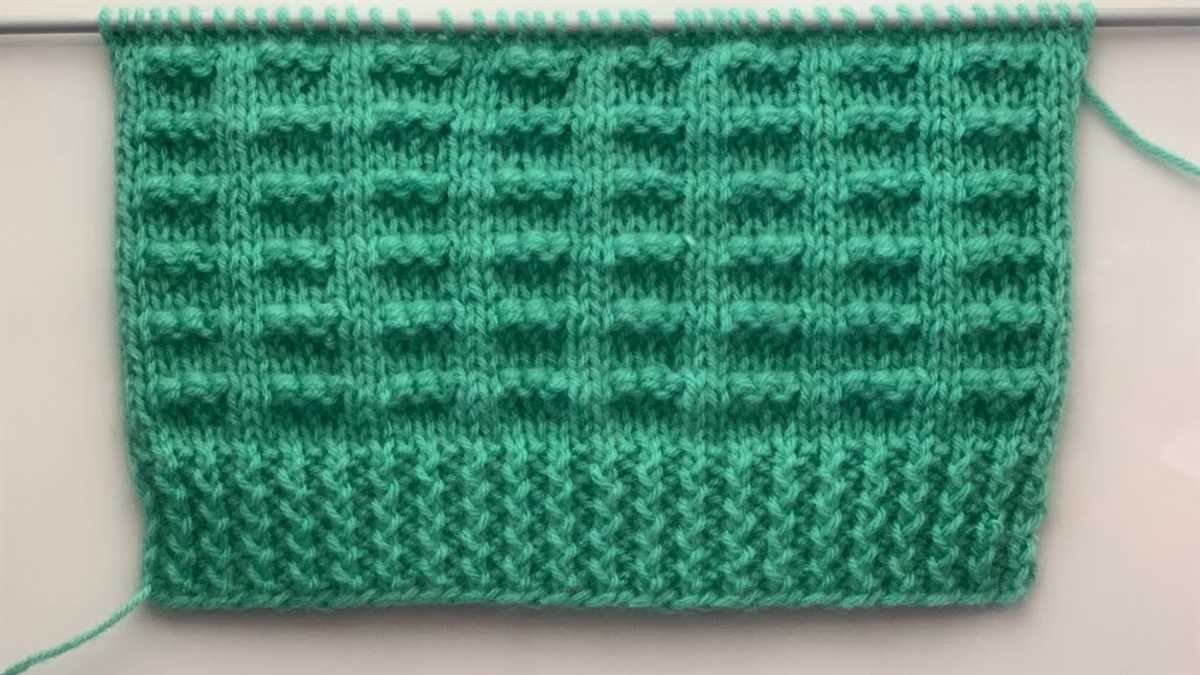
The best part about this cowl knitting pattern is that it only requires basic knitting stitches, so even if you’re new to knitting, you’ll be able to create a beautiful and functional accessory. The pattern uses a combination of knit and purl stitches, which are the foundation stitches of knitting. By repeating these stitches in a specific pattern, you’ll create a textured design that adds interest to the cowl.
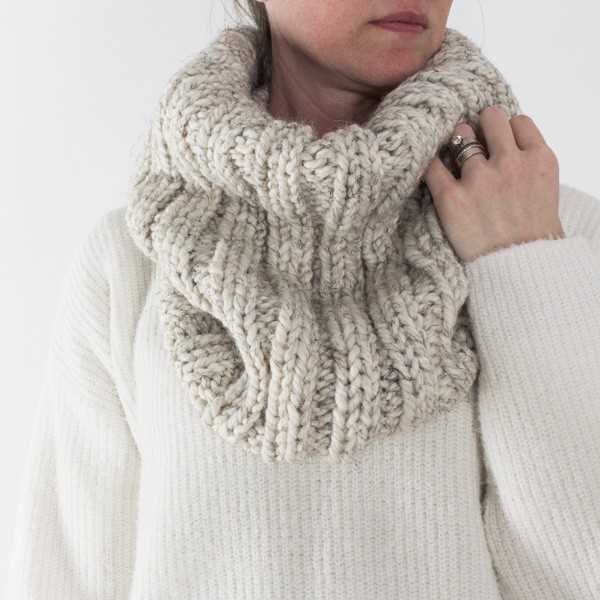
To make this cowl, all you’ll need is a pair of knitting needles and a skein of your favorite yarn. You can choose a bulky yarn for a chunky and cozy cowl, or opt for a lighter weight yarn for a more delicate and lightweight accessory. The choice is yours! With just a few hours of knitting, you’ll have a stylish cowl that you can wear with pride or give as a thoughtful handmade gift.
So why wait? Grab your knitting needles, choose your yarn, and get started on this easy cowl knitting pattern today. Before you know it, you’ll have a beautiful accessory that will keep you warm and stylish all winter long.
Easy Cowl Knitting Pattern
If you’re looking for a simple and quick knitting project, an easy cowl pattern is a great choice. Whether you’re a beginner or an experienced knitter, this pattern is perfect for creating a cozy and stylish accessory.
Start by selecting your favorite yarn and knitting needles. The size of the needles will depend on the weight of the yarn you choose. To keep it simple, opt for a thick and chunky yarn that will create a warm and cozy cowl.
Materials:
- Chunky yarn (approx. 200 yards)
- Knitting needles (size US 10 or size needed to obtain gauge)
- Yarn needle
- Scissors
Instructions:
- Cast on 80 stitches.
- Knit in a rib stitch pattern (knit 2, purl 2) for the desired length. A good length for a cowl is typically around 10-12 inches.
- Bind off all stitches.
- Use the yarn needle to weave in any loose ends.
- Optional: Add decorative touches such as pompoms or tassels to the ends of the cowl.
This easy cowl pattern is versatile and can be customized to your liking. Feel free to experiment with different stitch patterns or add additional embellishments to make it your own. Once you’ve finished knitting, you’ll have a cozy and fashionable accessory that’s perfect for keeping warm during the colder months.
Materials Needed
In order to knit your own easy cowl, you will need a few materials. Here is a list of items that you will need to gather before getting started:
- Yarn: Choose a soft and cozy yarn in the color of your choice. It is recommended to use a bulky or super bulky weight yarn for this project.
- Knitting Needles: You will need a pair of knitting needles in the appropriate size for your chosen yarn. Check the label on your yarn to determine the recommended needle size.
- Tape Measure: A tape measure will be helpful for measuring your progress and ensuring that your cowl is the desired size.
- Yarn Needle: A yarn needle with a large eye will be needed for weaving in the loose ends of your yarn once you have finished knitting your cowl.
- Stitch Markers: Stitch markers are optional, but they can be helpful for keeping track of your stitches and marking any special sections or increases/decreases in your pattern.
- Scissors: A pair of scissors will be needed for cutting your yarn at various points throughout the project.
Once you have gathered all of these materials, you will be ready to start knitting your easy cowl. Make sure to choose a quiet and comfortable space where you can focus on your knitting and enjoy the process.
Choosing the Right Yarn and Needle Size

When it comes to knitting a cowl, choosing the right yarn and needle size is crucial for achieving the desired results. The yarn and needle size will determine the overall look, feel, and drape of the finished cowl.
Yarn: When selecting the yarn for your cowl, it’s important to consider the desired texture, warmth, and color. Opt for a yarn that is soft and cozy, as the cowl will be worn directly against the skin. Additionally, consider the weight of the yarn. Bulky or chunky yarns are great for creating a thick and warm cowl, while lightweight and fingering weight yarns are better suited for a more delicate and drapey look.
Needle Size: The size of the needles you use will also impact the final outcome of your cowl. If you want a tight and dense fabric, choose smaller needles. Alternatively, if you prefer a looser and more open fabric, opt for larger needles. It’s important to check the gauge recommended on the yarn label and adjust your needle size accordingly to ensure that the finished cowl will be the correct size.
Tension: Another factor to consider is your tension or knitting style. If you tend to knit tightly, you may need to use larger needles to achieve the desired gauge and avoid a stiff cowl. Likewise, if you knit loosely, smaller needles may be necessary to ensure a snug and well-fitted cowl.
Experimentation: Don’t be afraid to experiment with different yarns and needle sizes until you find the perfect combination for your cowl. Swatching is a great way to test out different yarns and needles before committing to a project. By trying out different options, you can ensure that your cowl will have the desired look and feel.
- Choose a yarn that is soft and cozy, taking into consideration the desired texture, warmth, and color.
- Consider the weight of the yarn, as bulky yarns create a thicker and warmer cowl, while lighter weight yarns are better for a delicate and drapey look.
- Pay attention to the recommended gauge on the yarn label and adjust your needle size accordingly.
- Take into account your tension or knitting style – tighter knitters may require larger needles, while looser knitters may need to use smaller needles.
- Don’t be afraid to swatch and experiment with different yarns and needle sizes to find the perfect combination for your cowl.
Gauge and Measurements
Before starting your easy cowl knitting project, it is important to check your gauge. Gauge refers to the number of stitches and rows per inch in your knitting. To achieve the correct size and fit of your cowl, it is crucial to match the gauge specified in the pattern.
To measure your gauge, you can knit a swatch using the recommended yarn and needle size. The pattern will typically provide instructions on how many stitches and rows should be included in the swatch. Once you have completed the swatch, measure the number of stitches and rows within a 4-inch square using a ruler or a gauge tool.
Note: Ensure that you are knitting the swatch in the same stitch pattern as the pattern specifies, as different stitch patterns may result in different gauges.
Once you have measured your gauge, compare it to the gauge specified in the pattern. If your gauge matches, you can proceed with confidence and the knowledge that your cowl will turn out as expected. If your gauge does not match, you may need to adjust your needle size to achieve the correct gauge. A smaller needle size will result in more stitches per inch, while a larger needle size will result in fewer stitches per inch.
It is also important to take accurate measurements before beginning your cowl project. The pattern will typically provide guidance on the finished measurements of the cowl, such as circumference and length. By taking measurements of your neck or using a measuring tape, you can ensure that your cowl will fit properly once it is completed.
Casting On
Casting on is the first step in knitting any project, including an easy cowl. It is the process of creating the foundation row of stitches on your knitting needle. There are several methods for casting on, but in this pattern, we will use the long-tail cast on method.
The long-tail cast on method is a versatile and commonly used technique. It provides a neat and flexible edge that is perfect for starting a cowl. To begin, you will need to estimate the tail length, which should be at least three times the width of your finished cowl. This extra length is necessary to create the loops for each stitch.
Once you have determined the tail length, you can begin casting on. To do this, hold the knitting needle in your right hand and create a slipknot at least 6 inches away from the end of the tail. Place the slipknot onto the needle and tighten it. Hold the needle and the tail of yarn in your right hand, and the working yarn in your left hand.
To begin the long-tail cast on, insert the tip of the right needle into the slipknot from front to back. With your left hand, bring the working yarn over the thumb and behind the needle, creating a loop around the thumb. With your right hand, bring the needle under the yarn loop on your thumb, then over the yarn loop on your index finger.
Next, use your right hand to pull the needle through the thumb loop, creating a new loop on the needle. Repeat this process for each stitch, making sure to maintain an even tension on the yarn. Continue until you have cast on the required number of stitches for your cowl.
Casting on can be an intimidating step for beginners, but with practice, it becomes easier. Take your time and remember to keep the tension even to ensure that your foundation row is consistent throughout. Once you have successfully cast on, you are ready to begin knitting your easy cowl.
Knitting the Body of the Cowl
Once you have cast on the desired number of stitches, it is time to start knitting the body of the cowl. Keep in mind that the number of stitches will vary depending on the pattern and the desired width of the cowl. Make sure to check the pattern instructions for the correct number of stitches to cast on.
Begin by knitting every stitch in the first row, also known as the right side row. This will create a row of knit stitches, which will form the basis of the cowl. After completing the first row, you can choose to either continue knitting every stitch in the following rows or switch to a different stitch pattern, such as a rib or seed stitch.
- If you decide to continue knitting every stitch, simply repeat the same process for each row until the desired length of the cowl is reached.
- If you want to add some texture or variety to the cowl, you can try different stitch patterns. For example, a rib stitch alternates between knit and purl stitches, creating a stretchy and textured fabric. A seed stitch alternates between knit and purl stitches within the same row, creating a bumpy texture.
Remember to always follow the pattern instructions and knit the correct number of rows or rounds to achieve the desired length. If you want to create a longer cowl, you can simply continue knitting until you reach the desired length. Once the body of the cowl is complete, you can move on to binding off and finishing the project.
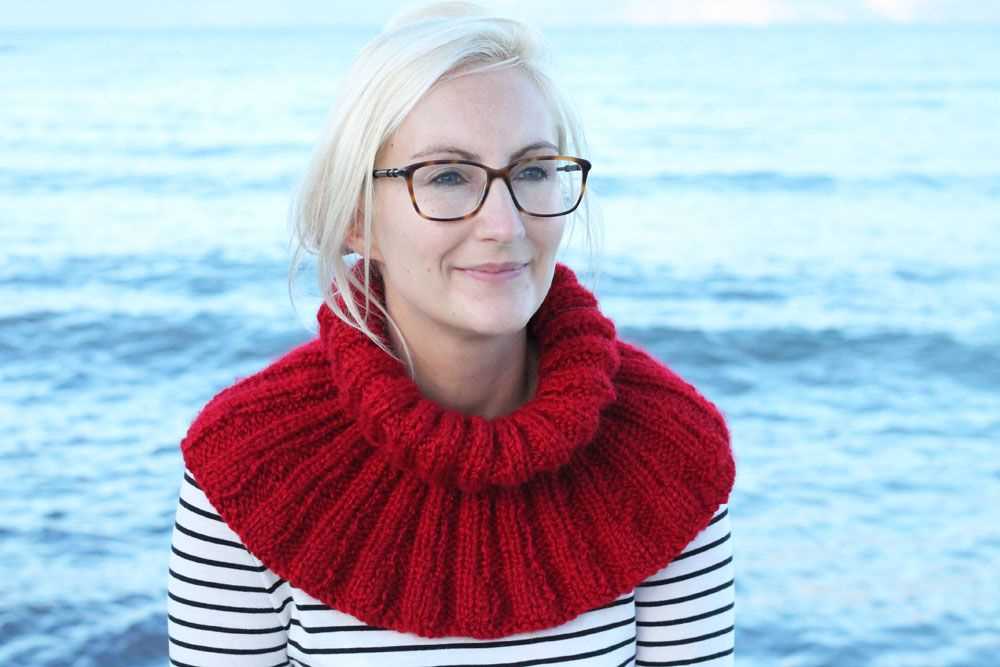
Adding a Ribbing or Border
Adding a ribbing or border to your cowl can give it a polished and finished look. It also adds structure and stability to the edges, preventing them from rolling or curling. Here are a few techniques you can use to add a ribbing or border to your cowl.
1. Knit Ribbing:
One option is to knit a ribbing at both ends of your cowl. This can be done by alternating between knitting and purling stitches in a specific pattern. For example, you could knit two stitches, purl two stitches, and repeat this pattern until you reach the desired length. This creates a stretchy and textured ribbing that adds visual interest to your cowl.
2. Garter Stitch Border:
Another option is to add a garter stitch border to your cowl. This is done by knitting every row, creating a ridged texture. You can choose to add a few rows of garter stitch at the beginning and end of your cowl, or you can create a wider border by knitting several inches of garter stitch. This gives your cowl a clean and simple finish.
3. Seed Stitch Border:
The seed stitch is a textured pattern created by alternating between knit and purl stitches in a specific pattern. Adding a seed stitch border to your cowl can create a beautiful and intricate look. You can choose to add a few rows of seed stitch at the beginning and end of your cowl, or you can create a wider border by knitting several inches of seed stitch. This adds depth and dimension to your cowl.
When adding a ribbing or border, it’s important to consider the overall design and style of your cowl. You want the ribbing or border to complement the main body of the cowl and enhance its overall appearance. Experiment with different stitches and patterns to find the one that best suits your cowl and gives it the desired look and feel.
Shaping the Cowl
When knitting a cowl, it is important to consider the shaping of the garment to ensure a comfortable fit around the neck. There are several techniques that can be used to shape a cowl, depending on the desired outcome and the skill level of the knitter.
1. Decreases: One common method of shaping a cowl is through decreases. By decreasing stitches at regular intervals, the cowl can be tapered toward the top or bottom, creating a more fitted shape. Common decrease techniques include knit two together (k2tog) and slip, slip, knit (ssk).
2. Increases: In contrast to decreases, increases can also be used to shape a cowl. By adding stitches at regular intervals, the cowl can be widened or flared, creating a more voluminous look. Common increase techniques include yarn over (yo) and make one (m1).
When shaping a cowl, it is important to consider the stitch pattern being used. Depending on the complexity of the pattern, it may be necessary to adjust the shaping technique to maintain the integrity of the design. Additionally, the desired drape and weight of the cowl should also be taken into account when choosing a shaping method.
- Tapered Cowl: To create a tapered cowl, decreases can be used at regular intervals. This shaping technique is often used for cowls that are designed to sit closer to the neck.
- Flared Cowl: To create a flared cowl, increases can be used at regular intervals. This shaping technique is often used for cowls that are meant to have a looser, more voluminous fit.
- Combined Shaping: Some cowls may require a combination of both increases and decreases to achieve the desired shape. For example, a cowl may be tapered at the top and flared at the bottom, creating a unique silhouette.
In conclusion, shaping a cowl can be achieved through various techniques such as decreases, increases, or a combination of both. The choice of shaping method will depend on the desired outcome, the stitch pattern being used, and the desired drape and weight of the cowl. By experimenting with different shaping techniques, knitters can create beautifully tailored cowls that are both stylish and comfortable to wear.
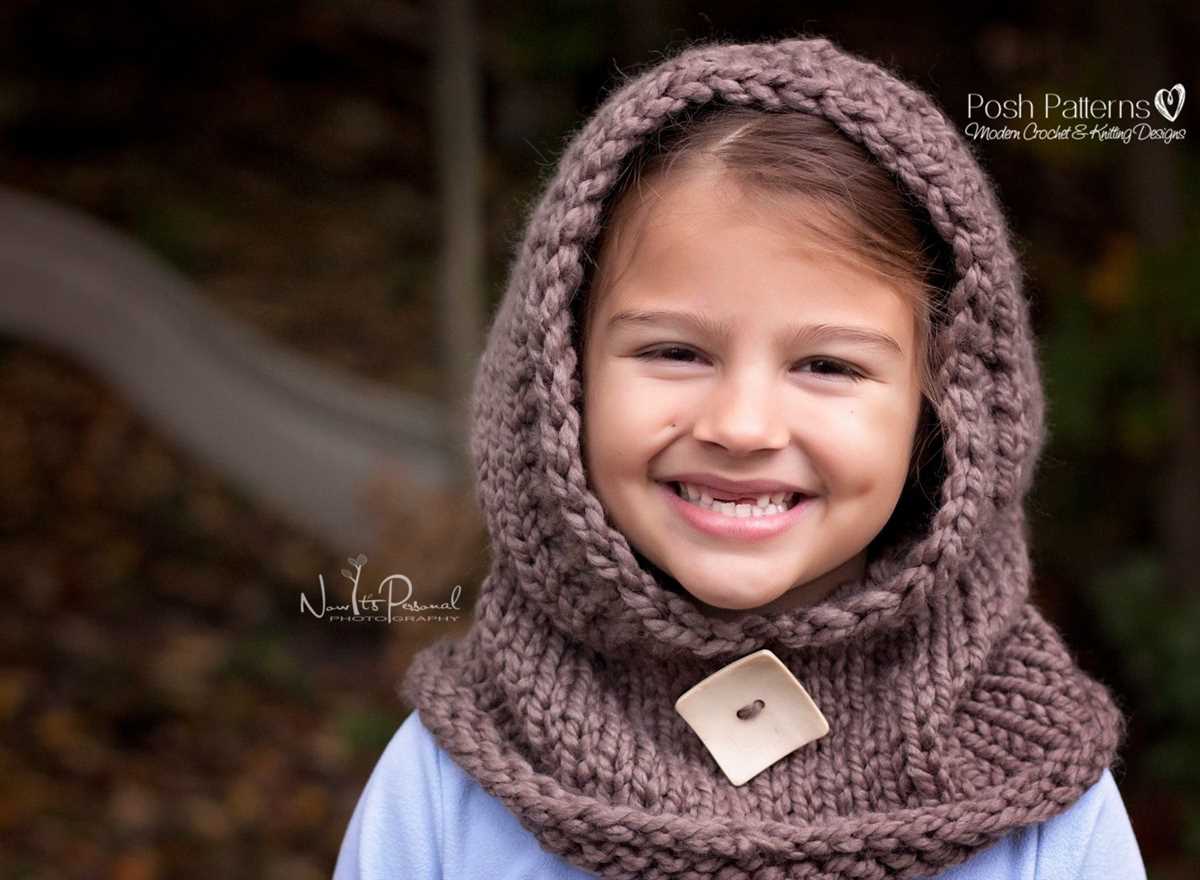
Creating a Buttonhole
When knitting a cowl, you may want to add a button closure to keep it securely in place. Creating a buttonhole is a simple technique that allows you to insert a button through the fabric. Here is a step-by-step guide on how to create a buttonhole.
Step 1: Determine the placement of your buttonhole. This will depend on the size of your button and the desired fit of your cowl. Mark the location where you want the buttonhole to be.
Step 2: Knit to the marked buttonhole location. On the right side of your work, knit the desired number of stitches for the buttonhole. This will create a gap in the fabric for the button to pass through. Make sure to note the number of stitches used for future reference.
Step 3: Now, switch to a smaller needle size. This will ensure that the buttonhole is tight and secure. Knit the same number of stitches as before to close the gap in the fabric. This creates a sturdy edge for the buttonhole.
Step 4: Continue knitting the rest of the row or round as usual.
Step 5: On the next row or round, purl the stitches that were knit in the previous row or round. This creates a visible buttonhole on the fabric.
Step 6: Finish your knitting project as desired, making sure to secure any loose ends.
Joining the Cowl into a Circle
Once you have finished knitting your easy cowl, it’s time to join it into a circle. This will create a seamless and finished look for your cowl, allowing you to wear it comfortably and stylishly.
To join the cowl into a circle, you will need a circular knitting needle or double-pointed needles, depending on the size of your cowl. Begin by placing your stitches onto the needle, making sure they are evenly distributed.
Once your stitches are on the needle, you can use a simple join to create a circle. Take the working yarn and bring it to the front of the needle, then slip the first stitch from the left needle to the right needle as if to purl. This will create a small loop of yarn at the beginning of the round.
Next, bring the working yarn to the back of the needle, and knit the first stitch as usual. This will secure the loop of yarn and join the cowl into a circle. Continue knitting in the round, following the pattern and instructions for your cowl.
As you knit, make sure to keep your tension consistent to ensure an even and professional finish. When you have completed the desired length of your cowl, you can bind off using a stretchy bind off method to ensure a comfortable fit.
Once your cowl is joined into a circle and bound off, weave in any loose ends and give it a gentle block if desired. Your easy cowl is now complete and ready to wear or gift to someone special. Enjoy the warmth and style of your handmade creation!
Knitting in the Round
Knitting in the round is a technique that allows you to create seamless tubes of fabric, such as hats, cowls, and socks. Instead of working back and forth in rows, you knit in a continuous spiral, which eliminates the need for seaming.
When knitting in the round, you can use either circular needles or double-pointed needles, depending on the circumference of your project. Circular needles are great for larger projects, while double-pointed needles work well for smaller ones.
To start knitting in the round, you will cast on your desired number of stitches and join them in a circle. It’s important to make sure the stitches are not twisted before joining, as this will create an unwanted twist in your project. You can use a stitch marker to mark the beginning of your round, making it easier to keep track of your progress.
As you knit in the round, you will need to adjust your knitting technique slightly. Instead of purling on the wrong side, you will simply continue knitting all stitches, creating a stockinette stitch fabric. If you want to add texture to your project, you can incorporate stitch patterns, such as ribbing or cables, into your knitting.
One of the advantages of knitting in the round is that it allows you to easily try on your project as you go. You can slide your work onto a spare circular needle or piece of waste yarn, and slip the stitches back onto your working needle to see how it fits. This makes it easier to adjust the length or make any necessary modifications.
Overall, knitting in the round is a versatile and efficient technique that opens up a world of possibilities for your knitting projects. Whether you’re a beginner or an experienced knitter, mastering this technique will allow you to create beautiful and seamless garments with ease.
Binding Off

After you have finished knitting your easy cowl, the next step is to bind off. This is the process of securing the stitches at the end of your project and creating a finished edge. There are several different methods you can use to bind off, depending on the desired effect and the type of knitting you have done.
One common method of binding off is the basic bind off. To do this, knit the first two stitches as usual. Then, using the left needle, lift the first stitch over the second stitch and let it drop off the needle. Knit the next stitch, and repeat the process of lifting the previous stitch over the newly knit stitch. Continue in this manner until you have bound off all stitches. This creates a neat, finished edge.
If you want a stretchier bind off, you can use the stretchy bind off method. To do this, knit the first stitch as usual. Then, knit the second stitch. Insert the left needle into the first stitch on the right needle and lift it over the second stitch and off the needle. Continue in this manner, knitting the next stitch and binding off the previous stitch, until all stitches are bound off. This method creates a more flexible edge, which is ideal for projects like cowls that need to stretch to fit over the head.
Another option for binding off is the picot bind off. This creates a decorative edge with small loops. To do this, bind off the first two stitches as usual. Then, with the left needle, lift the first stitch over the second stitch and off the needle. Knit the next stitch and then bind off the previous stitch. Repeat this process, but before knitting the next stitch, cast on two new stitches using the cable cast on method. Continue in this manner until all stitches are bound off. This creates a pretty edge with small picot loops.
Finishing Touches

Once you have completed knitting your easy cowl, it’s time to give it some finishing touches to make it look even more polished and professional. Here are a few things you can do:
Blocking
Blocking is an important step in the finishing process as it helps to shape and straighten your cowl, making it lay flat and enhancing its stitch definition. To block your cowl, simply soak it in lukewarm water with a gentle detergent, then gently squeeze out the excess water. Lay it flat on a clean towel and shape it to the desired dimensions. Allow it to dry completely before removing the pins or weights used to hold it in place.
Seaming
If your cowl was knit in separate pieces, you will need to seam them together to create a continuous loop. There are several seaming methods you can use, such as mattress stitch or whip stitch, depending on the desired finish. Take your time to ensure the seam is neat and invisible.
Adding a Button or Closure
If you want to add a decorative element or make the cowl adjustable, consider adding a button or closure. You can sew a button on one end of the cowl and create a loop or buttonhole on the other end. Alternatively, you can attach a toggle or clasp for a more modern look.
Embellishments

If you want to personalize your cowl, consider adding some embellishments. You can sew on a few beads or buttons, attach a crocheted flower, or even embroider a small design. Be creative and have fun with it!
With these finishing touches, your easy cowl will be transformed into a stylish and cozy accessory that you can wear with pride.