
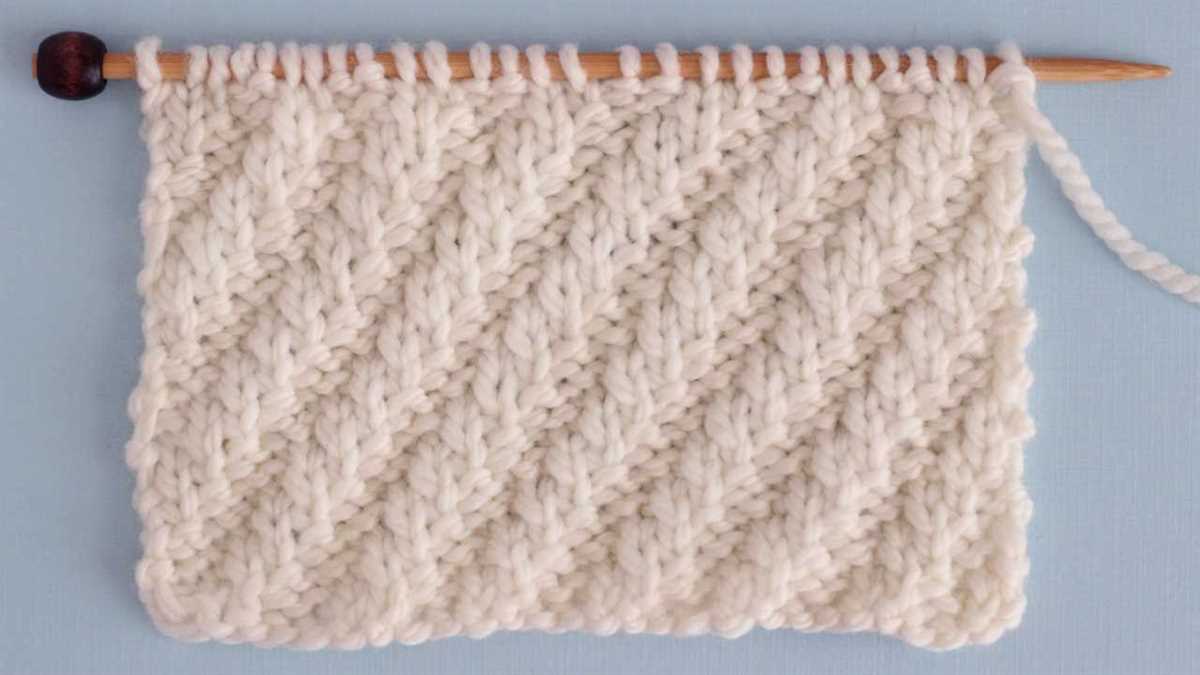
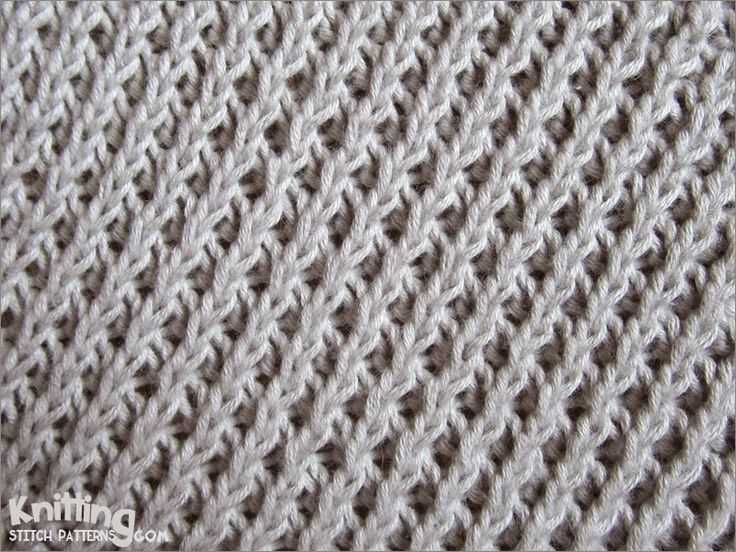
Knitting is a popular hobby that allows people to create beautiful and unique items using just a pair of needles and some yarn. There are countless knitting patterns available, each with their own distinct look and level of difficulty. One such pattern is the diagonal rib knitting pattern, which creates a stunning diagonal texture that is perfect for scarves, blankets, and other cozy projects.
The diagonal rib knitting pattern is a relatively simple pattern that combines basic knit and purl stitches to create a diagonal effect. It is a great pattern for beginners looking to add some visual interest to their projects or experienced knitters who want an easy yet engaging pattern. The diagonal rib pattern consists of alternating rows of knit and purl stitches, creating a textured fabric that can be used for a variety of projects.
One of the advantages of the diagonal rib knitting pattern is its versatility. Depending on the type of yarn and needle size used, the pattern can be adapted to create different looks and textures. For example, using a bulky weight yarn and larger needles will result in a chunky and cozy fabric, perfect for a warm winter scarf. On the other hand, using a finer yarn and smaller needles will create a lighter and more delicate fabric, suitable for a lightweight summer shawl.
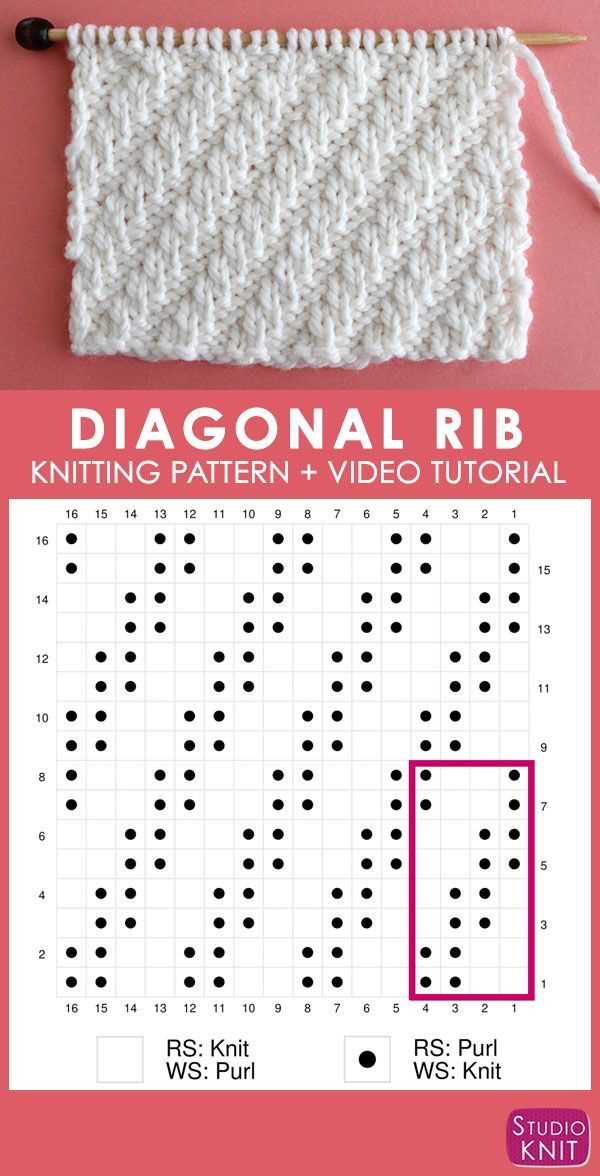
Understanding the Diagonal Rib Knitting Pattern

The diagonal rib knitting pattern is a popular stitch pattern in knitting that creates a textured fabric with a diagonal ribbed design. The pattern is created by alternating knit and purl stitches in a specific sequence, resulting in a diagonal pattern that adds interest and depth to the knitted fabric. This pattern is often used for scarves, blankets, and other accessories, as it creates a visually appealing texture.
To create the diagonal rib pattern, you will need to have a basic understanding of knitting stitches such as knit and purl. The pattern can be worked on any number of stitches, but it typically requires a multiple of 4 stitches. The diagonal rib pattern consists of repeating a specific sequence of stitches over multiple rows.
To start the diagonal rib pattern, you will knit the first stitch and then purl the next stitch. Repeat this sequence until you reach the end of the row. On the next row, you will purl the first stitch and then knit the next stitch. Repeat this sequence until the end of the row. By repeating these two rows, you will create the diagonal rib pattern.
Steps to create the diagonal rib pattern:
- Cast on a multiple of 4 stitches.
- Row 1: Knit 1, Purl 1. Repeat until the end of the row.
- Row 2: Purl 1, Knit 1. Repeat until the end of the row.
- Repeat Rows 1 and 2 for desired length of the diagonal rib pattern.
- Bind off all stitches.
The diagonal rib knitting pattern is a versatile stitch pattern that can be used in a variety of projects. It creates a visually interesting fabric that adds texture and depth. Whether you’re a beginner knitter or an experienced one looking for a new challenge, the diagonal rib pattern is a great option to try out.
What is the Diagonal Rib Knitting Pattern?
The diagonal rib knitting pattern is a technique used in knitting to create a unique texture and design. It involves alternating knits and purls stitches diagonally across the fabric, resulting in a diagonal ribbed effect. This pattern is commonly used in various knitting projects, such as scarves, blankets, and sweaters, to add visual interest and dimension to the finished piece.
To create the diagonal rib knitting pattern, you will need to have basic knitting skills and be familiar with the knit and purl stitches. The pattern typically begins with a multiple of stitches, such as multiples of 4 or 6, to ensure the diagonal ribbing is consistent throughout the fabric.
Here is an example of how the diagonal rib knitting pattern can be created:
- Cast on the desired number of stitches.
- Row 1: *Knit 2 stitches, purl 2 stitches; repeat from * to the end of the row.
- Row 2: Knit all stitches.
- Row 3: *Purl 2 stitches, knit 2 stitches; repeat from * to the end of the row.
- Repeat rows 2 and 3 until the desired length is reached.
- Bind off all stitches.
This is just one example of how the diagonal rib knitting pattern can be created, and there are many variations and possibilities depending on the desired outcome. By experimenting with different stitch combinations and color choices, you can create unique and personalized projects using the diagonal rib knitting pattern.
How to Knit the Diagonal Rib Pattern

The diagonal rib knitting pattern is a versatile and visually interesting stitch that adds texture to your knitted projects. It consists of alternating rows of knit and purl stitches, creating a diagonal ribbed effect. This pattern can be used for various projects such as scarves, blankets, and even sweaters.
To knit the diagonal rib pattern, start by casting on an odd number of stitches. If you want a wider rib, cast on more stitches; for a narrower rib, cast on fewer stitches. The pattern is worked over an odd number of stitches to ensure that the diagonal effect is maintained throughout.
Once you have cast on the desired number of stitches, begin the pattern by knitting the first row. This is done by knitting all the stitches across the row. On the next row, purl all the stitches. Repeat these two rows: knit row, purl row. This creates the diagonal rib effect because the knit stitches from the first row stack diagonally above the purl stitches from the second row.
To add even more texture to your project, you can consider adding some variations to the pattern. For example, you can try knitting two rows and purling two rows instead of knitting and purling each row. This will create a wider ribbed effect. You can also experiment with different yarn weights and needle sizes to achieve different looks and textures.
The diagonal rib knitting pattern is not only visually appealing but also relatively easy to knit once you get the hang of it. It is a great pattern for knitters of all skill levels, from beginners to more experienced knitters. So grab your needles and some yarn, and give the diagonal rib pattern a try. You’ll be amazed at how this simple stitch pattern can transform your knitting projects into something unique and beautiful.
Tips for Knitting the Diagonal Rib Pattern
Knitting the diagonal rib pattern can be a fun and rewarding project. This pattern creates a beautiful textured fabric that is perfect for scarves, blankets, and sweaters. However, it can also be a bit challenging for beginners. Here are some tips to help you master the diagonal rib pattern.
1. Choose the right yarn and needle size

When knitting the diagonal rib pattern, it’s important to choose the right yarn and needle size. A yarn with good stitch definition, such as a worsted weight yarn or a yarn with a smooth texture, will help show off the diagonal rib pattern. Using needles that are slightly larger than recommended for the yarn can also create a more open and drapey fabric.
2. Practice the stitch pattern
Before diving into your main project, it’s a good idea to practice the diagonal rib stitch pattern on a small swatch. This will help you become familiar with the pattern and ensure that you’re comfortable with the techniques involved. Take your time and practice until you feel confident in your knitting skills.
3. Pay attention to stitch counts
The diagonal rib pattern involves increases and decreases to create the diagonal lines. It’s important to pay close attention to your stitch counts to ensure that you’re maintaining the correct pattern. One missed or added stitch can throw off the entire pattern. Use stitch markers or count your stitches at the end of each row to make sure you’re on track.
4. Block your finished project

Once you’ve completed your project, blocking is an important step to enhance the stitch definition and overall appearance of the fabric. Wet blocking or steam blocking can help even out stitches and give your project a polished look. Follow the care instructions for your specific yarn to determine the best blocking method.
By following these tips and practicing the diagonal rib pattern, you’ll be able to create beautiful and unique knitted projects with a stunning texture. Enjoy the process and happy knitting!
Choosing the Right Yarn for the Diagonal Rib Pattern
When it comes to knitting the diagonal rib pattern, choosing the right yarn is essential to achieve the desired look and feel of your project. The diagonal rib pattern is known for its textured appearance and stretchy nature, and the yarn you select can greatly influence these characteristics.
Fiber Content: One of the first factors to consider when choosing yarn for the diagonal rib pattern is the fiber content. Wool and wool blends are popular choices for this pattern, as they provide excellent elasticity and stitch definition. Additionally, these fibers have natural insulating properties, making them a great option for warm and cozy garments.
Weight: The weight of the yarn is another important consideration. The diagonal rib pattern typically looks best with a medium weight yarn such as worsted or aran. These yarns allow the stitches to stand out and create a pronounced diagonal texture. However, you can also experiment with different weights to achieve different effects and drape.
Texture: The texture of the yarn can also enhance the diagonal rib pattern. Yarns with a tight twist or a plied construction tend to show off the ribbing more effectively and create a crisp and defined look. On the other hand, yarns with a looser twist or a single-ply construction can result in a softer and more delicate texture.
Color: Lastly, consider the color of the yarn. Solid or semi-solid colors are a popular choice for the diagonal rib pattern, as they allow the texture to shine through. However, you can also experiment with variegated or self-striping yarns to add visual interest to your project. Just keep in mind that highly variegated or busy patterns may compete with the diagonal ribbing and detract from its impact.
In conclusion,
Choosing the right yarn for the diagonal rib pattern involves considering factors such as fiber content, weight, texture, and color. By selecting a yarn that complements the pattern, you can enhance its texture and achieve the desired look and feel of your project. Whether you opt for a wool blend for extra stretch, a medium-weight yarn for pronounced ribbing, or a variegated colorway for added visual interest, the right yarn can elevate your diagonal rib knitting to the next level.
Using the Diagonal Rib Pattern in Different Knitting Projects

The diagonal rib knitting pattern is a versatile stitch pattern that can bring texture and visual interest to a variety of knitting projects. Whether you are a beginner or an experienced knitter, this pattern is relatively easy to follow and can be used for a range of items, from scarves and hats to sweaters and blankets.
One popular use of the diagonal rib pattern is in creating scarves. The diagonal lines created by the alternating knit and purl stitches add dimension and depth to the finished piece. You can experiment with different yarn weights and colors to create unique and eye-catching designs. With a diagonal rib scarf, you can add a touch of elegance and sophistication to your winter wardrobe.
Another great way to utilize the diagonal rib pattern is in knitting hats. The stretchiness of the pattern makes it perfect for creating snug and comfortable headwear. Whether you prefer a slouchy beanie or a fitted cap, the diagonal rib stitch pattern can easily be adapted to suit different hat styles and sizes. The texture of the pattern also provides extra warmth, making it ideal for winter accessories.
The diagonal rib pattern can also be incorporated into larger knitting projects, such as sweaters and blankets. In sweaters, the pattern can be used to create interesting details on cuffs, hems, or even the entire body of the garment. For blankets, the pattern adds both texture and visual appeal, making it a great choice for cozy throws or baby blankets.
Overall, the diagonal rib knitting pattern is a versatile and adaptable stitch pattern that can be used in a variety of projects. Whether you are a beginner or an experienced knitter, this pattern offers endless creative possibilities and allows you to add a unique touch to your handmade items. So grab your needles and yarn, and start exploring the beautiful world of diagonal rib knitting!
Adding Variations to the Diagonal Rib Pattern
The diagonal rib knitting pattern is a versatile stitch that creates an eye-catching design. While the original pattern is beautiful on its own, there are several ways to add variations and make it even more unique. By experimenting with different yarn weights, needle sizes, and stitch combinations, you can create interesting textures and effects.
1. Changing Yarn Weight: One way to create variations in the diagonal rib pattern is by using different yarn weights. For a chunkier and more textured look, try using a bulky or super bulky yarn. This will result in a thicker and cozier fabric, perfect for winter accessories like scarves or hats. On the other hand, using a lighter weight yarn like lace or fingering will produce a more delicate and airy fabric, suitable for lightweight garments or shawls.
2. Experimenting with Needle Sizes: Another way to add variation to the diagonal rib pattern is by trying different needle sizes. Using larger needles will result in a looser and drapey fabric, while smaller needles will create a tighter and more structured fabric. By changing the needle size, you can also adjust the gauge and size of your project. For example, using larger needles will make the stitches bigger, resulting in a quicker knit and a larger final product.
3. Combining Stitches: To further enhance the diagonal rib pattern, you can also incorporate other stitches into the design. For example, try alternating between the diagonal rib and a simple stockinette stitch for a contrasting texture. Another option is to introduce cables or lace patterns within the diagonal rib for added interest. By combining different stitches, you can create intricate and unique designs that make your projects stand out.
Overall, the diagonal rib knitting pattern offers endless possibilities for customization. Whether you choose to change the yarn weight, experiment with needle sizes, or add different stitches, these variations will give your projects a personal touch and make them truly one-of-a-kind.
Common Mistakes to Avoid When Knitting the Diagonal Rib Pattern
The diagonal rib knitting pattern can create a beautiful and unique texture in your projects, but mastering this pattern can be a bit tricky. Here are some common mistakes that knitters make when working with the diagonal rib pattern, along with tips on how to avoid them.
Mistake 1: Incorrect stitch count
One common mistake beginners make when knitting the diagonal rib pattern is not keeping the correct stitch count. This pattern requires a multiple of 3 stitches plus 2 extra stitches. It’s important to carefully count your stitches at the beginning and end of each row to ensure you have the correct number.
Mistake 2: Mixing up the knit and purl stitches
Another mistake that knitters often make when working on the diagonal rib pattern is mixing up the knit and purl stitches. This pattern alternates between knitting and purling stitches in a specific pattern, so it’s important to pay close attention to the instructions and double-check your work as you go. Mixing up the stitches can result in an uneven and messy pattern.
Mistake 3: Tension issues
Tension is crucial in any knitting project, and the diagonal rib pattern is no exception. One common mistake that knitters make is having inconsistent tension throughout their work. This can result in a pattern that looks uneven and stretched out in some areas, while tight and puckered in others. To avoid this, make sure to maintain a consistent tension throughout your knitting, and take breaks if you find yourself getting too tense or tired.
Mistake 4: Forgetting to block the finished project
Blocking is an important step in knitting that helps to shape and smooth out your finished project. Many knitters forget to block their work, thinking that it’s not necessary or that it won’t make a difference. However, blocking can greatly improve the appearance and drape of your knitting, especially in patterns like the diagonal rib pattern. So, don’t forget to block your finished project to get the best results.
Avoiding these common mistakes will help you achieve a beautiful and professional-looking result when knitting the diagonal rib pattern. With a little practice and attention to detail, you’ll be able to create stunning projects that showcase this unique and textured pattern.
Creating Texture with the Diagonal Rib Pattern
The diagonal rib knitting pattern is a versatile stitch that can add depth and texture to any project. By combining knit and purl stitches in a diagonal pattern, you can create a visually interesting design that is both simple and captivating.
One way to use the diagonal rib pattern is to create a textured border or edge on a project, such as a blanket or scarf. The slanted lines formed by the diagonal ribbing can add a dynamic element to an otherwise plain piece. By varying the colors or yarn weights, you can further enhance the texture and create a unique and eye-catching finished product.
Another way to utilize the diagonal rib pattern is to incorporate it into an overall design. For example, you can create a diagonal rib panel on the front of a sweater or cardigan to break up the monotony of a solid color. This adds visual interest and can make your project stand out from the crowd.
You can also play with the scale of the diagonal rib pattern to create different effects. For a tighter, more subtle texture, use smaller needles and finer yarn. Alternatively, if you want a more pronounced and dramatic pattern, use larger needles and thicker yarn. The options are endless, and experimenting with different combinations can lead to exciting and unique results.
In conclusion, the diagonal rib knitting pattern is a fantastic way to add texture and dimension to your projects. Whether you use it to create borders, panels, or as an all-over design, the slanted lines formed by the diagonal ribbing can transform a simple piece into a stunning work of art. So why not give it a try and see how this pattern can elevate your knitting projects to the next level?
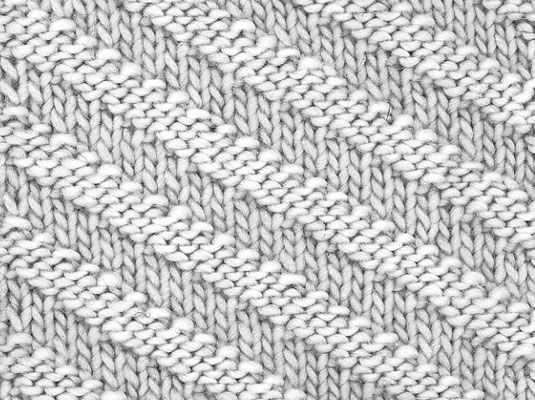
Diagonal Rib Knitting Pattern vs Other Ribbing Patterns
Ribbing patterns are commonly used in knitting to create stretchy and flexible fabrics. They are often used for cuffs, collars, and hems in garments, as well as in various accessories. One popular type of ribbing pattern is the diagonal rib knitting pattern.
The diagonal rib knitting pattern is unique because it creates a diagonal twist in the fabric, giving it an interesting visual texture. This pattern is achieved by alternating knit and purl stitches, but instead of working them in vertical columns like traditional ribbing patterns, they are worked diagonally. The result is a fabric that has a diagonal slant, which adds visual interest and makes it stand out from other ribbing patterns.
Compared to other ribbing patterns, the diagonal rib knitting pattern offers several advantages. Firstly, the diagonal twist in the fabric gives it more elasticity and stretchiness, making it ideal for cuffs and other areas that require flexibility. Secondly, the diagonal rib pattern is visually appealing and adds a touch of uniqueness to any knitted item. It can enhance the overall design and make the fabric look more interesting and dynamic.
In contrast, traditional vertical ribbing patterns, such as the 1×1 or 2×2 rib, create a more uniform and structured appearance. While these patterns offer their own advantages, such as providing a secure fit, they lack the distinctive diagonal texture of the diagonal rib pattern.
Overall, the choice between the diagonal rib knitting pattern and other ribbing patterns depends on the desired look and function of the knitted item. If you’re looking for a unique and visually interesting texture, the diagonal rib pattern is a great option. Alternatively, if you prioritize a more structured and uniform appearance, traditional ribbing patterns might be a better choice.
Inspiration for Your Next Diagonal Rib Knitting Project
Diagonal rib knitting is a versatile technique that can be used to create a wide variety of projects. Whether you’re a beginner or an experienced knitter, there are endless possibilities for incorporating diagonal rib patterns into your next project. Here are some ideas to inspire you:
1. Scarves and Cowls

Scarves and cowls are the perfect canvas for showcasing the beauty of diagonal rib knitting. The diagonal rib pattern adds texture and interest to these accessories, making them a stylish addition to any outfit. You can experiment with different yarn weights and colors to create unique designs.
2. Hats

Add some extra flair to your winter wardrobe by knitting a hat with a diagonal rib pattern. The diagonal ribs will help keep your head warm while adding a touch of elegance to your ensemble. You can choose to knit a slouchy hat or a fitted beanie, depending on your personal style.
3. Sweaters and Cardigans
For a more ambitious project, consider knitting a sweater or cardigan using a diagonal rib pattern. The diagonal ribs can be used as a design element on the entire garment or on specific sections, such as the sleeves or collar. This technique adds structure and visual interest to the overall design.
4. Blankets and Throws
Diagonal rib patterns are also perfect for creating cozy blankets and throws. These patterns add dimension and texture to the fabric, making it extra warm and inviting. You can choose to knit a small baby blanket or a large throw for your living room.
When it comes to choosing a pattern for your next diagonal rib knitting project, the possibilities are truly endless. Whether you’re creating a simple scarf or a intricate sweater, the diagonal rib technique adds a touch of elegance and sophistication to any design. So grab your needles and get ready to explore the world of diagonal rib knitting!
Q&A:
What is diagonal rib knitting pattern?
The diagonal rib knitting pattern is a type of knitting stitch that creates a diagonal woven texture. It is characterized by alternating rows of knitted and purled stitches that create a ribbed effect that slants diagonally across the fabric.
How is diagonal rib knitting pattern created?
The diagonal rib knitting pattern is created by using a combination of knits and purls in a specific sequence. The pattern typically starts with a few rows of knit stitches, followed by a sequence of knits and purls that are repeated across the row. This creates a diagonal texture that slants across the fabric.
What types of projects are suitable for diagonal rib knitting pattern?
The diagonal rib knitting pattern can be used to create a variety of projects, including scarves, hats, sweaters, and blankets. The diagonal texture adds visual interest to these items and gives them a unique textured look.
Can the diagonal rib knitting pattern be used with different types of yarn?
Yes, the diagonal rib knitting pattern can be used with different types of yarn. The pattern works well with both smooth and textured yarns, and the choice of yarn can further enhance the texture and appearance of the finished project.
Is the diagonal rib knitting pattern suitable for beginners?
The diagonal rib knitting pattern can be a bit more challenging for beginners, as it requires knitting and purling in a specific sequence. However, with some practice and patience, beginners can successfully learn and create projects using this pattern. It may be helpful to start with a smaller project, such as a scarf, to familiarize oneself with the pattern before tackling larger projects.
What is a diagonal rib knitting pattern?
A diagonal rib knitting pattern is a knitting technique that creates a textured fabric with diagonal ridges by alternating knit and purl stitches. Unlike traditional vertical ribbing, diagonal rib patterns slant at an angle, giving a unique and visually interesting design. It can be used to create scarves, sweaters, hats, and other knitted items.