
If you’re passionate about knitting and are looking for a new project to sink your needles into, why not try your hand at knitting a fish pattern? Not only are fish patterns adorable and fun to create, but they also make fantastic gifts for friends and family.
Knitting fish patterns can take many forms, from small amigurumi fish toys to larger fish-shaped pillows or even fish-inspired blankets. The possibilities are endless, and you can let your creativity run wild as you mix and match colors, add embellishments, and experiment with different knitting techniques.
Whether you’re a beginner knitter or an experienced pro, you’ll find knitting a fish pattern to be an enjoyable and rewarding project. Not only will you get the satisfaction of creating something beautiful with your own two hands, but you’ll also be able to relax and unwind as you work on each stitch.
In this article, we’ll explore different types of fish patterns, provide step-by-step instructions on how to knit them, and offer helpful tips and tricks to ensure your project turns out swimmingly. So grab your needles and thread and let’s dive into the wonderful world of knitting fish patterns!
Knitting Fish Pattern
Knitting fish patterns are a popular choice for knitters who want to create fun and whimsical projects. These patterns often feature colorful fish with intricate detailing and textures, making them a joy to knit and display. Whether you are an experienced knitter or just starting out, there are plenty of fish patterns available to suit your skills and preferences.
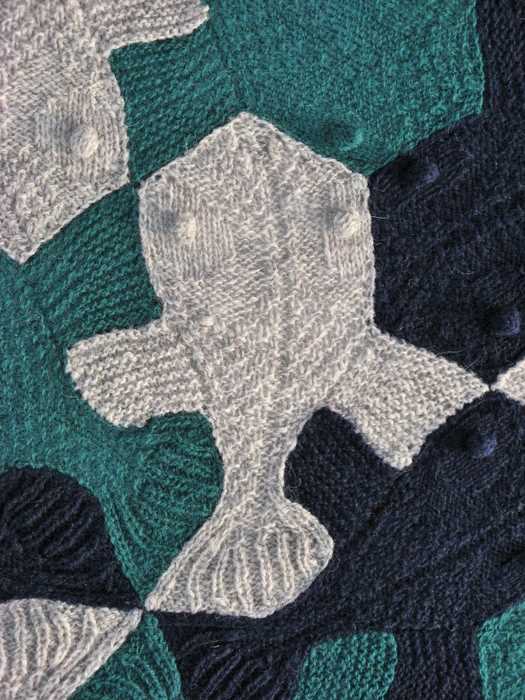
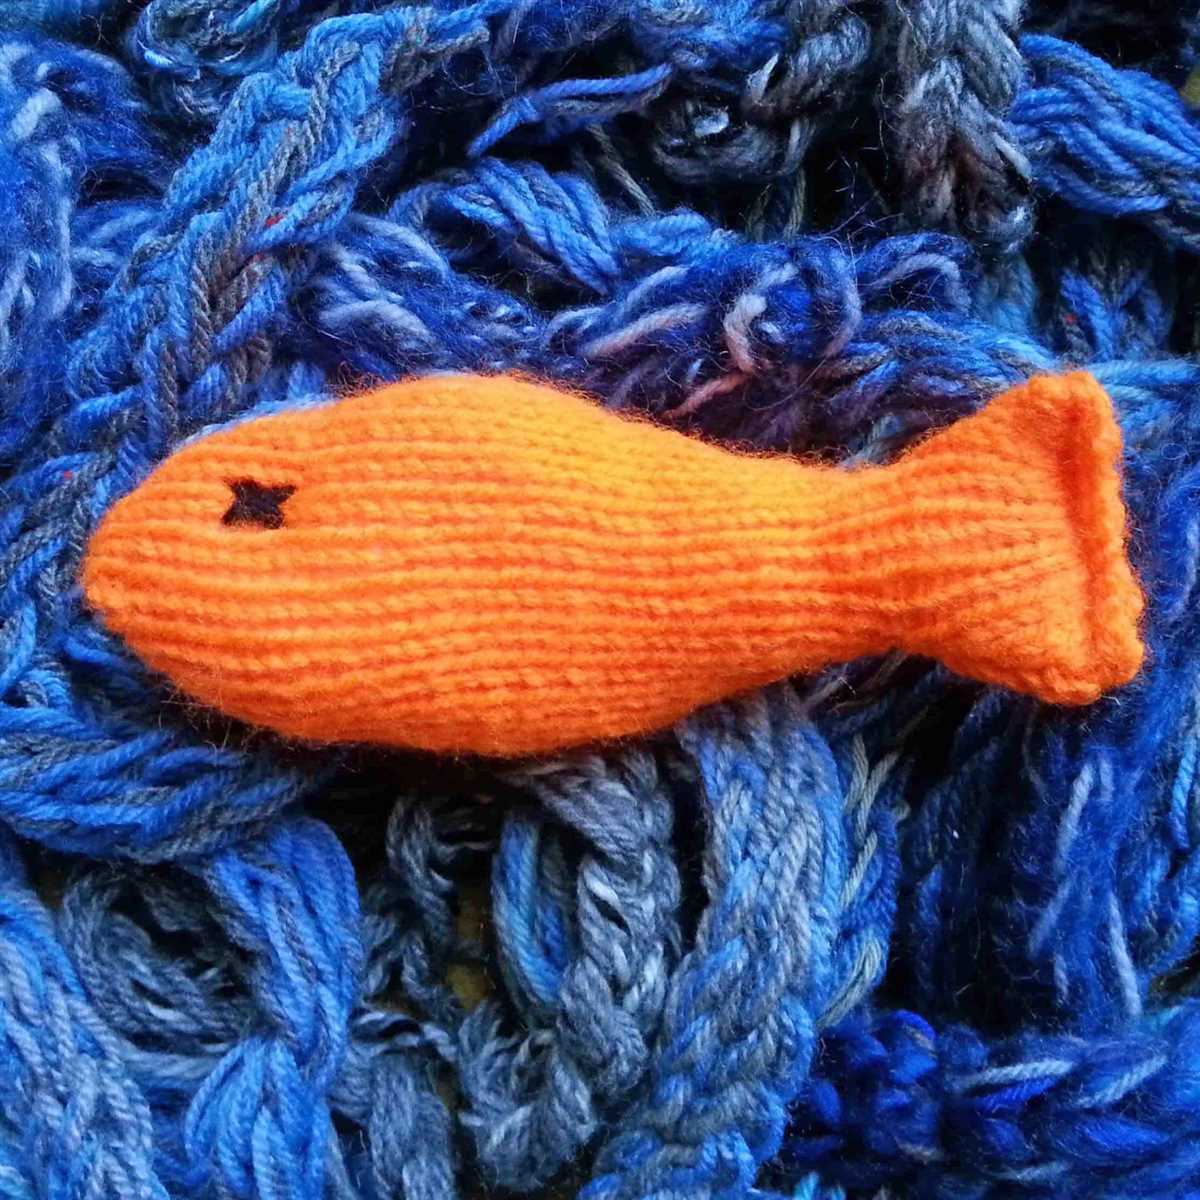
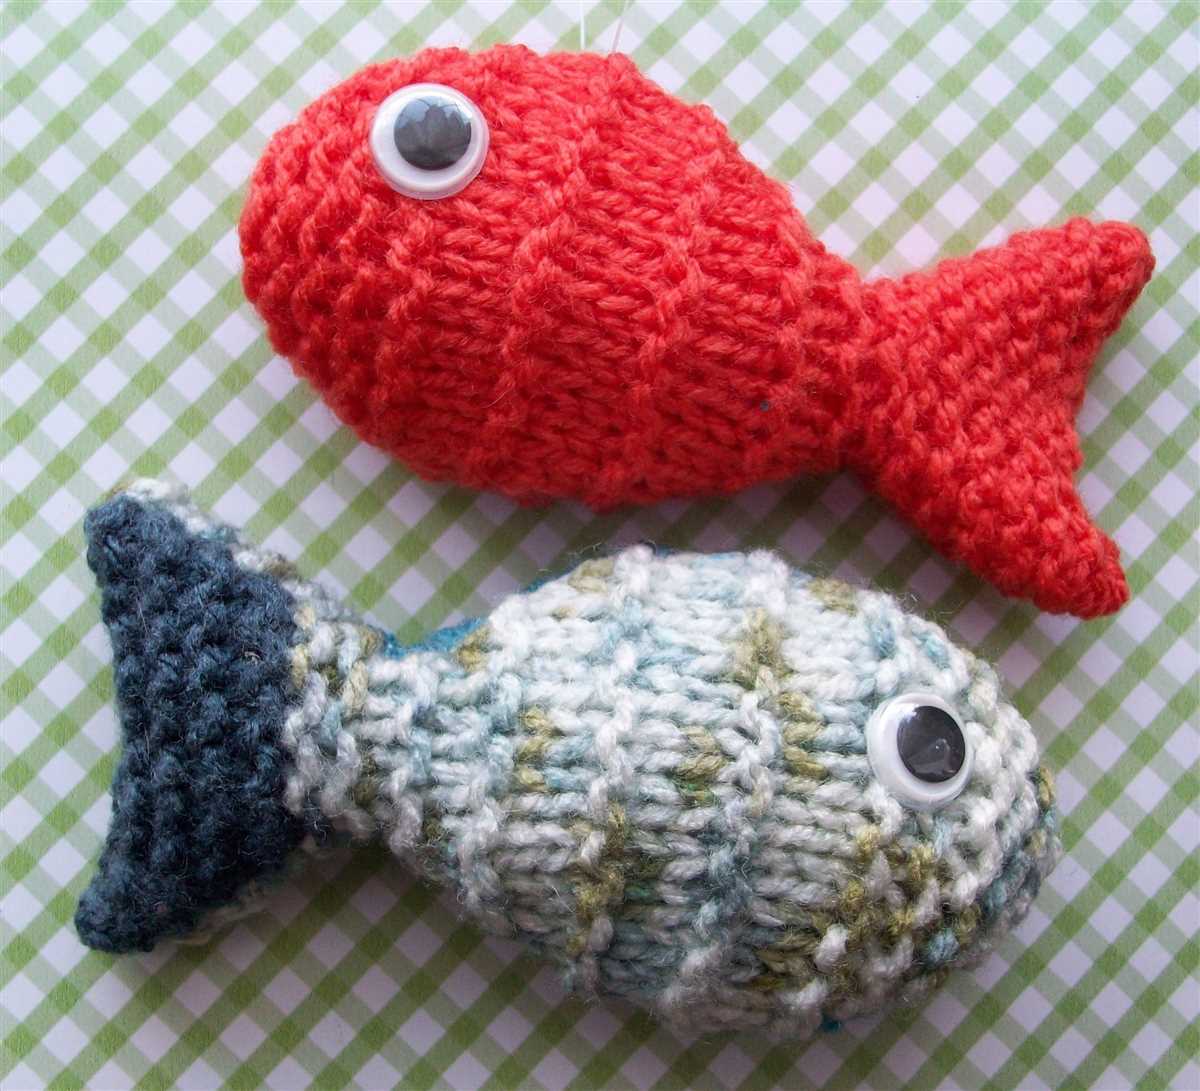
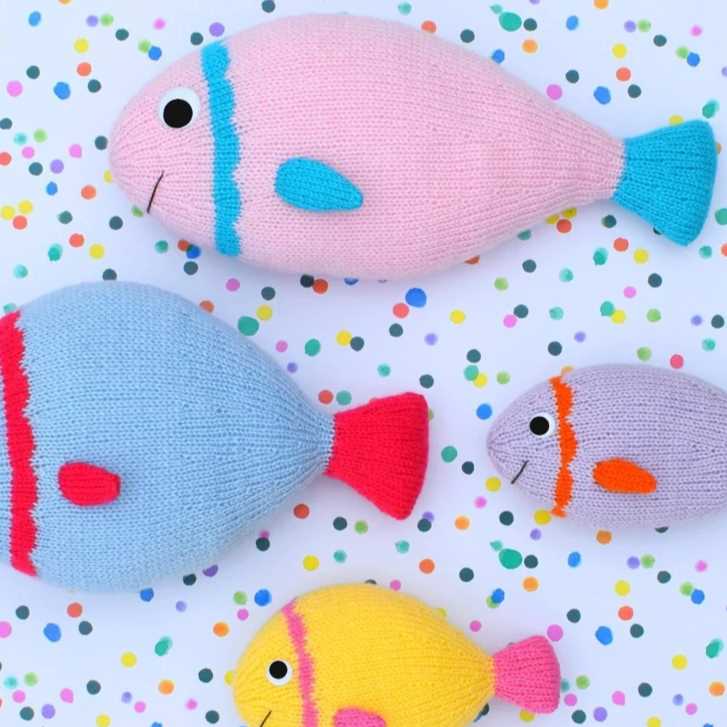
One common type of knitting fish pattern is the stuffed fish toy. These patterns usually involve knitting separate pieces for the body, tail, and fins, and then sewing them together to create a three-dimensional fish shape. The fish can be stuffed with fiberfill or other soft materials to make them plump and cuddly. This type of pattern is great for knitters looking to practice their shaping and finishing skills.
Another popular fish pattern is the knitted fish dishcloth. These patterns typically involve knitting a square or rectangular cloth with a fish motif in the center. The fish motif can be created using colorwork techniques such as stranded knitting or intarsia. Knitted dishcloths are functional and practical, as they can be used for washing dishes or cleaning surfaces. They also make great gifts for fish lovers or anyone who appreciates handmade items.
Key features of knitting fish patterns:
- Colorful and whimsical designs
- Intricate detailing and textures
- Can be used to create stuffed toys or functional dishcloths
- Opportunity to practice shaping and finishing skills
- Potential for using colorwork techniques
- Great for gifting or personal use
Fish Knitting Pattern: Everything You Need to Know
If you are an avid knitter looking for a new project, why not try your hand at knitting a fish pattern? This unique and quirky design adds a playful touch to any knitting project. Whether you want to knit a decorative fish toy for children or incorporate fish motifs into your accessories or home decor, this knitting pattern is perfect for you.
Choosing the Right Yarn: The first step in knitting a fish pattern is selecting the right yarn. The type of yarn you choose will depend on the purpose of your project. For toys, a soft and durable yarn is ideal, while for accessories or home decor, you may opt for a more luxurious or textured yarn. Whichever yarn you choose, make sure to check the pattern for recommended gauge and needle size to ensure the desired outcome.
Getting Started: Once you have your yarn and needles ready, it’s time to start knitting the fish pattern. Begin by casting on the required number of stitches, as indicated in the pattern. Then, follow the instructions for the different sections of the fish, including the body, tail, and fins. Pay attention to any shaping or color changes to achieve the desired fish shape. It is also important to keep track of your stitches, especially if the pattern involves intricate details or colorwork.
Finishing Touches: After completing the main body of the fish, it’s time to add the finishing touches. This may include sewing on button eyes, embroidering features, or adding any additional decorations to make your fish come to life. Don’t forget to weave in any loose ends to give your project a polished look.
Exploring Fish Patterns: There are countless fish knitting patterns available, ranging from simple and beginner-friendly designs to more complex and intricate patterns. If you are new to knitting, it may be helpful to start with a basic fish pattern and gradually work your way up to more advanced designs. You can also experiment with different colors, yarn types, and embellishments to add your personal touch to the fish pattern.
In conclusion, knitting a fish pattern adds a fun and whimsical element to your knitting projects. With the right yarn, attention to detail, and a bit of creativity, you can create beautiful and unique fish-inspired creations. So why not dive into the world of fish knitting patterns and enjoy the process of bringing these delightful creatures to life with your knitting needles?
Choosing the Right Yarn for Your Fish Knitting Project
When it comes to knitting a fish pattern, choosing the right yarn is essential. The texture, color, and weight of the yarn can greatly affect the final appearance and feel of your knitted fish. Additionally, the type of yarn you choose can also impact how easy or difficult it is to work with.
Texture: The texture of the yarn can help bring your fish to life. For a more realistic look, you may want to consider using a yarn with some texture, such as a bouclé or a yarn with irregularities in its thickness. On the other hand, if you prefer a smoother, more polished appearance, a smooth yarn without much texture would be a better choice.
Color: The color of your yarn can have a big impact on the overall appeal of your knitted fish. If you’re aiming for a realistic or natural look, consider choosing yarn in shades of blue, green, or gray. Alternatively, if you want your fish to be more whimsical or playful, opt for bright and vibrant colors. Think about the environment the fish will be in and choose colors that will complement it.
Weight: The weight of the yarn refers to its thickness. For a fish knitting project, you’ll want to consider a lightweight or medium-weight yarn. A heavy yarn may result in a bulky fish that doesn’t hold its shape well. On the other hand, a very thin yarn might make it difficult to achieve the desired size and level of detail. Choose a yarn that allows you to achieve the desired shape and size for your fish.
Ease of Use: Some yarns can be more challenging to work with, especially for beginners. Consider your skill level and the level of difficulty you are comfortable with. If you’re new to knitting or if you prefer a yarn that is easy to handle, opt for a smooth, medium-weight yarn. If you’re more experienced and want to challenge yourself, you may choose a textured or novelty yarn.
In conclusion, when choosing yarn for your fish knitting project, consider the texture, color, weight, and ease of use. By selecting the right yarn, you can enhance the appearance of your fish and make the knitting process more enjoyable. Happy knitting!
Essential Knitting Tools for Making a Fish Pattern
Knitting is an enjoyable craft that allows you to create a wide range of beautiful items, including fish patterns. To successfully knit a fish pattern, it is important to have the right tools on hand. Here are some essential knitting tools that will help you in the process:
- Knitting Needles: Choose the appropriate knitting needles for your desired fish pattern. The size of the needles will depend on the thickness of the yarn you are using. Thicker yarn requires larger needles, while thinner yarn requires smaller ones.
- Yarn: Select high-quality yarn in different colors to bring your fish pattern to life. Consider using shades of blue, green, and yellow for a realistic fish design.
- Scissors: Make sure to have a pair of sharp scissors to cut the yarn and trim any loose ends.
- Tape Measure: A tape measure is essential for checking the size of your work and ensuring that it matches the required dimensions for your fish pattern.
- Tapestry Needle: This large-eyed needle is used for sewing the different pieces of your fish pattern together and weaving in any loose yarn ends.
Crochet Hook: Although not always necessary, having a crochet hook on hand can be useful for fixing any mistakes or creating small details in your fish pattern.
With these essential knitting tools, you will be well-equipped to create a stunning fish pattern. Remember to take your time, follow the instructions carefully, and have fun with the process!
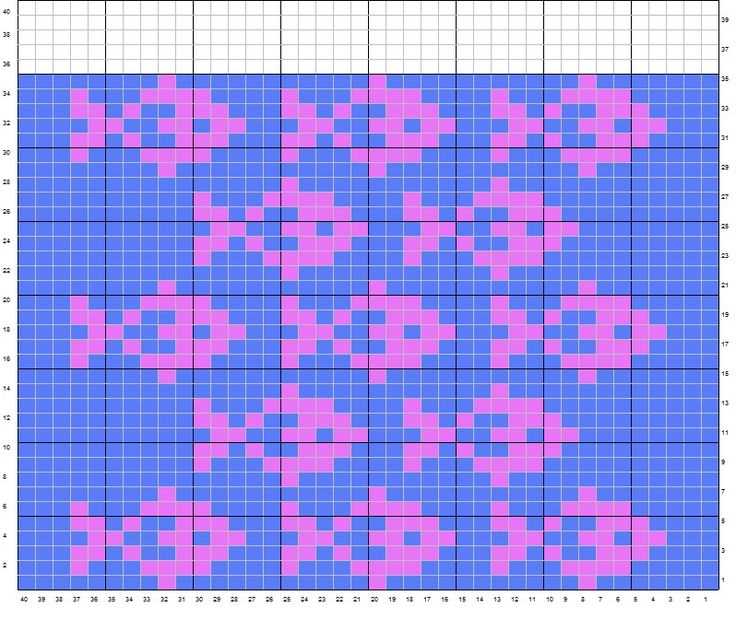
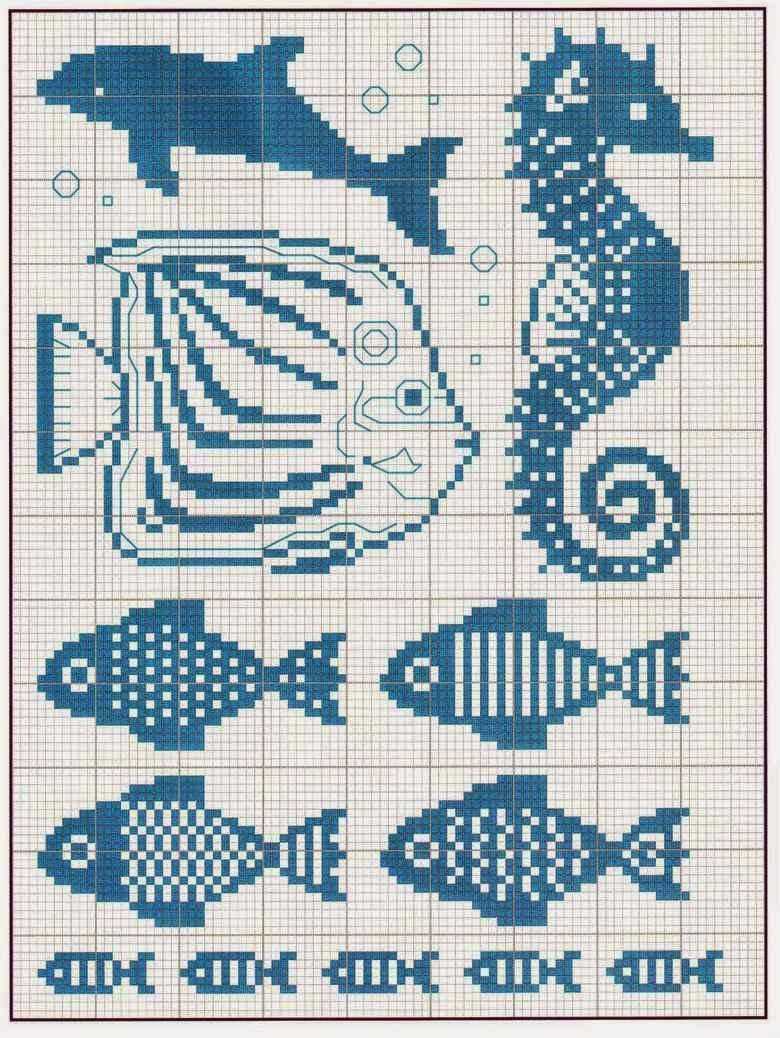
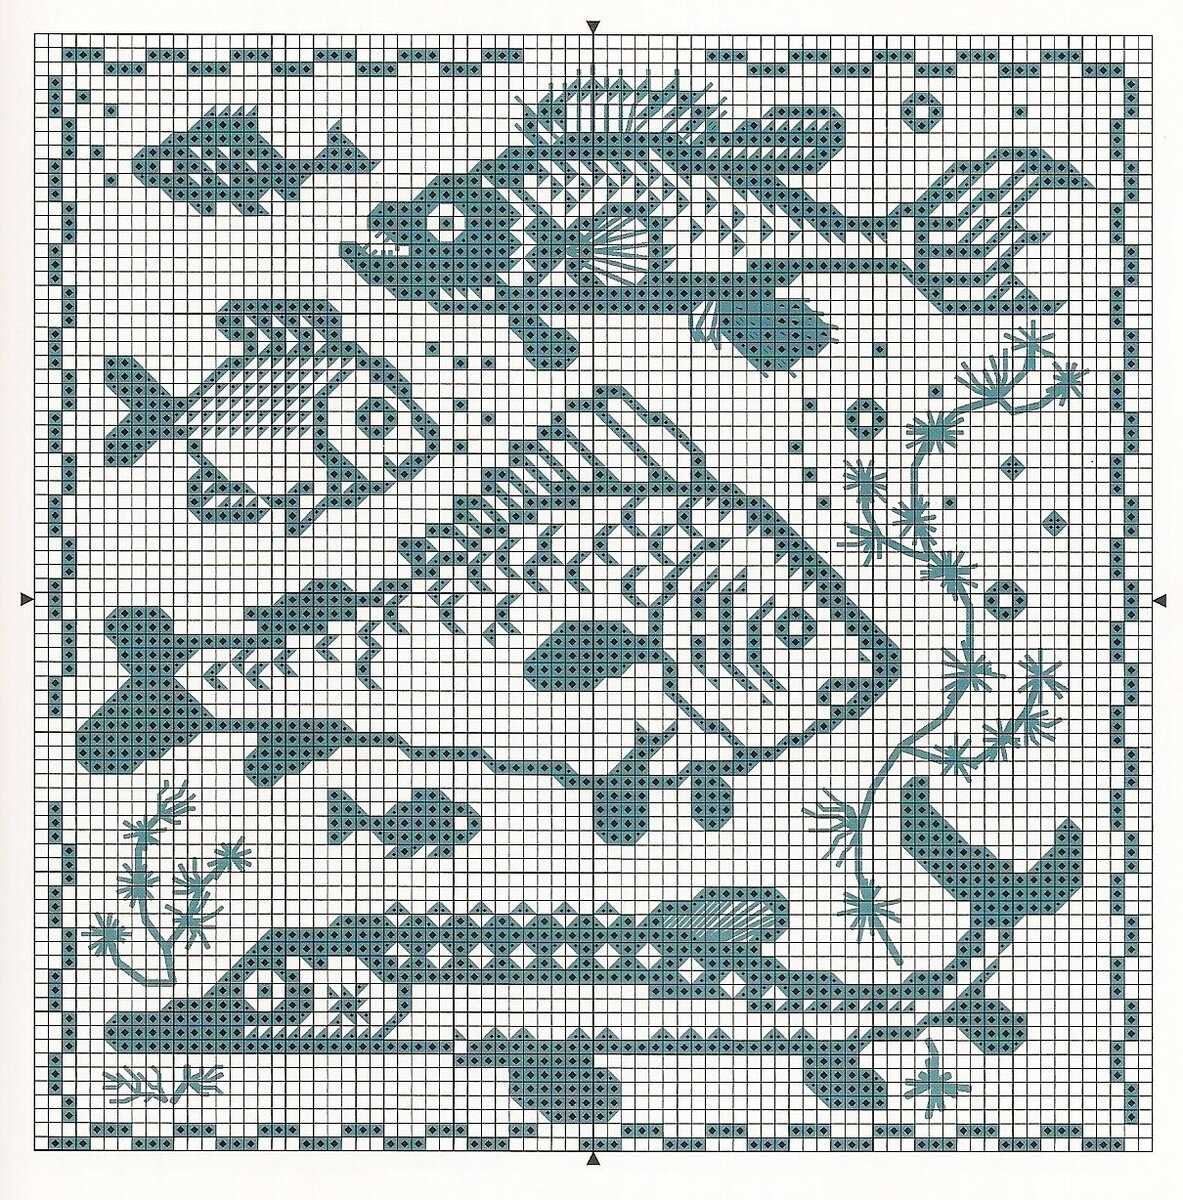
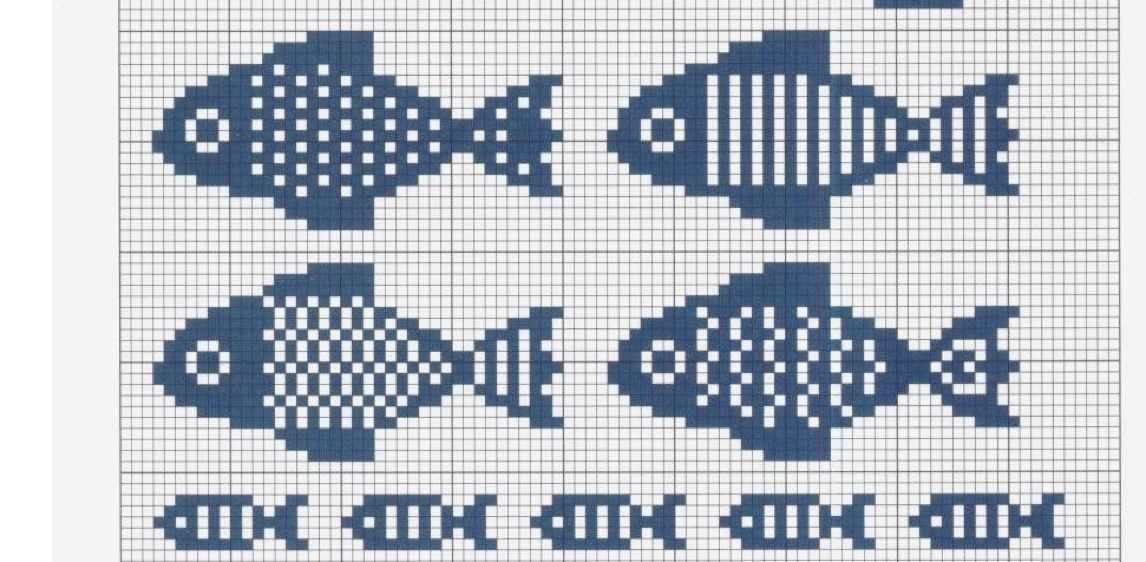
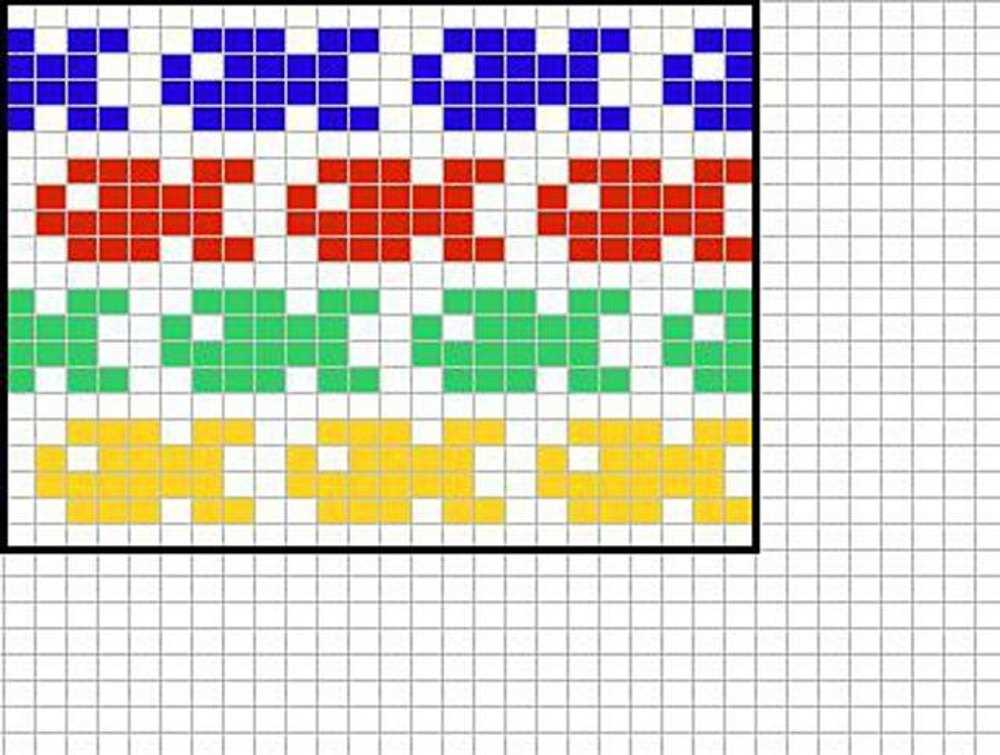
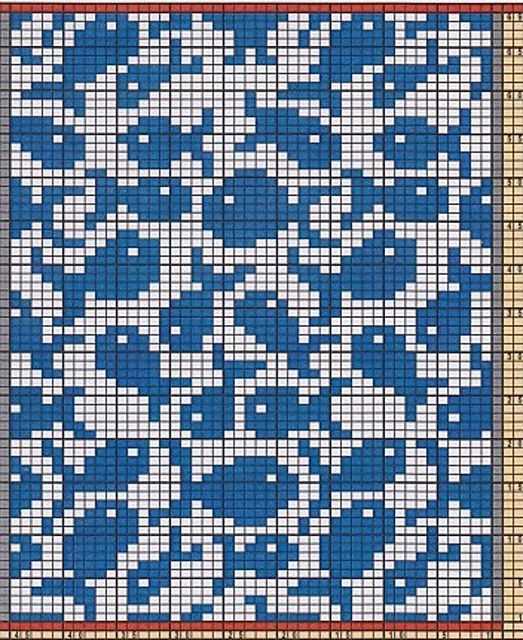
Understanding the Fish Knitting Pattern Chart
When it comes to knitting fish patterns, it’s important to understand the knitting pattern chart to ensure you create an accurate and well-crafted project. The chart is a visual representation of the pattern, and it allows you to see the stitches and their placement in a clear and organized manner.
Reading the Chart: The fish knitting pattern chart typically consists of symbols that represent different stitches and actions. Each stitch or action is represented by a specific symbol, such as a square or a diamond. It’s essential to familiarize yourself with these symbols and understand what each one means before you start knitting.
Rows and Columns: The chart is divided into rows and columns. Each row represents a single row of knitting, while each column represents a specific stitch or action within that row. You read the chart from right to left, starting at the bottom-right corner. The numbers on the sides of the chart indicate the row numbers, helping you keep track of your progress.
Stitch Repetition: Fish knitting patterns often consist of a repeating motif or design. The chart allows you to see how this motif is repeated across the rows and columns. This repetition enables you to create a uniform and consistent pattern throughout your knitting project.
Following the Chart: As you knit, you will need to refer to the chart regularly to ensure that you are following the correct stitches and actions. The chart acts as a guide, helping you keep track of where you are in the pattern and ensuring that you create the desired fish design accurately.
Tips for Success: Understanding the fish knitting pattern chart may take some practice, especially if you are new to reading charts. Start with simpler patterns and gradually progress to more complex ones. Take your time to study the chart before you begin, and don’t hesitate to use stitch markers or highlighters to help you keep track of your progress.
In conclusion, mastering the fish knitting pattern chart is essential for creating beautiful and intricate fish designs. With time and practice, you’ll become more comfortable with reading and following these charts, allowing you to tackle more advanced fish knitting patterns with confidence.
Step-by-Step Instructions for Knitting a Fish
In this tutorial, we will guide you through the process of knitting a fish. Whether you are a beginner or an experienced knitter, this pattern is suitable for all skill levels. Follow the step-by-step instructions below to create your very own knitted fish.
Materials Needed:
- Knitting needles (appropriate for the chosen yarn weight)
- Yarn (choose a color of your preference)
- Filling material (such as polyester fiberfill)
- Tapestry needle
- Scissors
- Stitch marker (optional)
Step 1: Cast On
Start by casting on the desired number of stitches onto your knitting needles. This will depend on the size of fish you want to create. You can use the long-tail cast-on method or any other cast-on method of your choice.
Step 2: Knit the Body
Begin knitting the body of the fish using your preferred stitch pattern. You can use basic knit stitches or experiment with different textures like ribbing or seed stitch. Keep knitting until the body reaches the desired length.
Step 3: Shape the Tail
To shape the tail, start decreasing stitches gradually. You can use various techniques such as knit 2 together (k2tog) or slip, slip, knit (ssk). Decrease stitches evenly across each row until you reach the desired tail size.
Step 4: Stuff and Shape
Once you have finished knitting the body and shaping the tail, it’s time to stuff the fish. Use the filling material to stuff the fish evenly, making sure to reach all the corners and curves. Adjust the amount of stuffing to achieve the desired firmness.
Step 5: Finishing Touches
Finally, it’s time to add some finishing touches to your knitted fish. Use the tapestry needle to weave in any loose ends of yarn. You can also add eyes or any other embellishments to make your fish come alive. Once you are satisfied with the look, securely fasten off the yarn and trim any excess.
Congratulations! You have successfully completed knitting a fish. Now you can proudly display your handmade fish or gift it to someone special. Happy knitting!
Tips and Tricks for Knitting a Realistic Fish
Knitting a realistic fish can be a fun and challenging project for any experienced knitter. Whether you’re looking to create a decorative piece or a toy for a child, here are some tips and tricks to help you achieve a lifelike fish design:
Choose the right yarn
When knitting a realistic fish, it’s important to select the right yarn to achieve the desired texture and appearance. Opt for a yarn that mimics the scales of a fish, such as a variegated or self-striping yarn. This will create a more realistic and eye-catching effect.
Follow a detailed pattern
Using a detailed knitting pattern specifically designed for a fish can make all the difference in achieving a realistic result. Look for patterns that include step-by-step instructions, as well as detailed images or diagrams. This will help you visualize the shape and anatomy of the fish as you knit.
Experiment with different stitch patterns
To add depth and texture to your knitted fish, consider incorporating different stitch patterns. For example, you could use a slip-stitch pattern to create scales or a rib stitch for the fish’s fins. This will give your fish a more realistic and intricate appearance.
Add embellishments for extra realism
Consider adding small embellishments to enhance the realism of your knitted fish. This could include using beads or buttons for eyes, embroidery or surface crochet for details like gills or mouth, or attaching a small piece of fabric for the fish’s tail. These extra touches will bring your fish to life.
Finishing touches make all the difference
Once you’ve completed knitting your fish, don’t forget to pay attention to the finishing touches. Blocking your fish will help to even out the stitches and shape the piece. You can also lightly stuff the fish with fiberfill or yarn scraps to give it a more three-dimensional appearance. Finally, weave in any loose ends and trim excess yarn to give your fish a polished look.
By following these tips and tricks, you’ll be well on your way to knitting a realistic fish that will impress others with its lifelike features and intricate design. Enjoy the process and let your creativity shine!
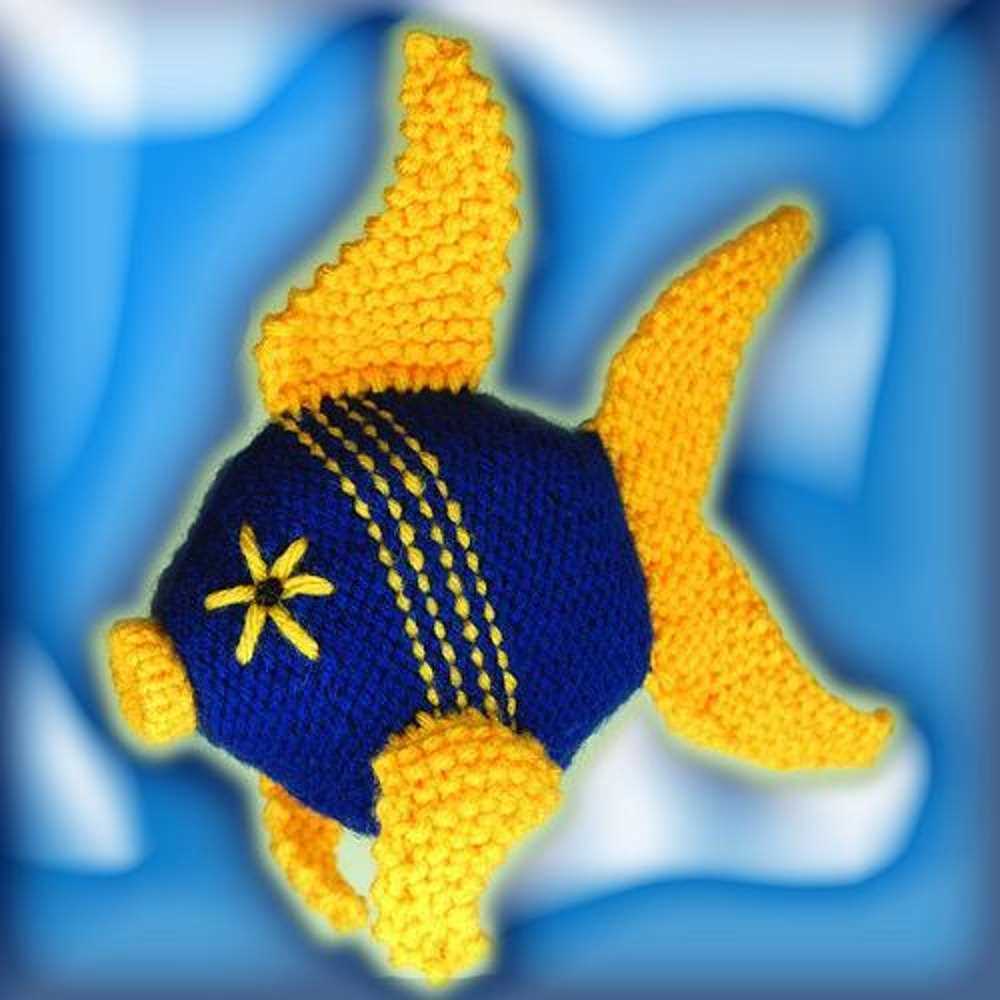
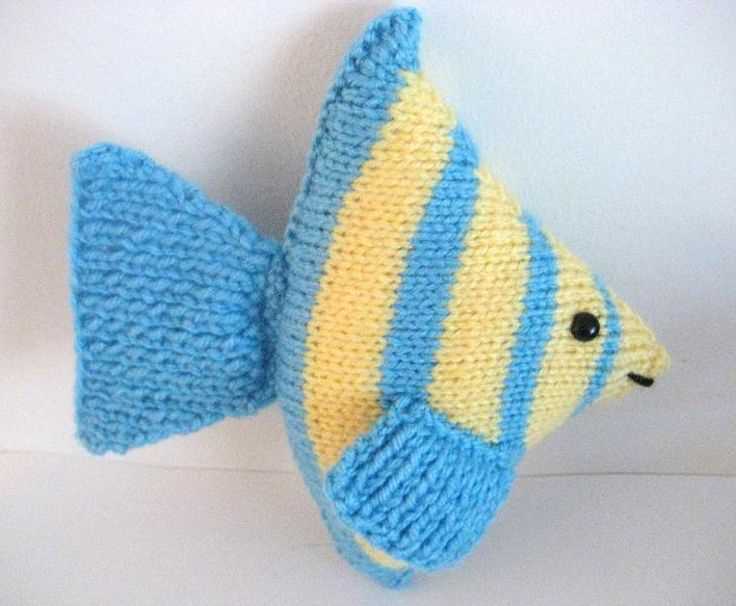
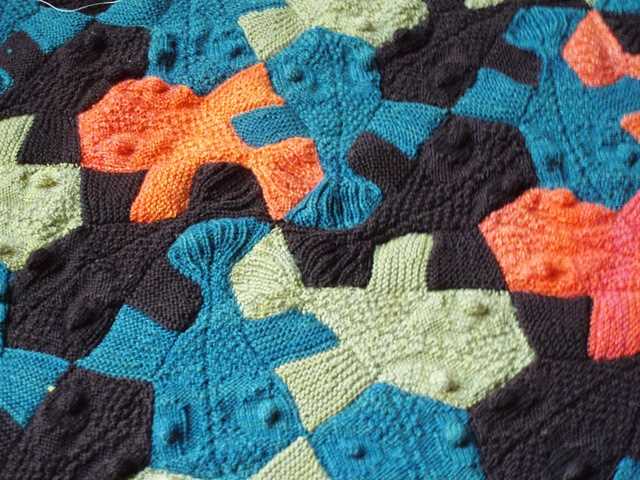
Adding Details and Embellishments to Your Knitted Fish
Once you have completed the main body of your knitted fish, you can add some extra details and embellishments to make it truly unique. Adding these finishing touches will give your fish a more realistic and whimsical look.
1. Fins and Tail
One way to add more character to your knitted fish is by making the fins and tail stand out. You can use different colors or yarns to create contrasting stripes or patterns on the fins. Adding some texture, such as ribbing or garter stitch, can also make them more visually interesting.
2. Eyes and Mouth
The eyes are an essential part of bringing your knitted fish to life. You can use small buttons or beads for the eyes or stitch them using embroidery thread. For a more playful look, you can sew on smaller buttons or beads to create a pattern or give your fish some sparkly eyes.
3. Scales

To add texture to your knitted fish, you can incorporate scales. There are various ways to achieve this, such as stitching on individual sequins or beads, or creating a raised texture by using different knitting techniques, such as cables or bobbles. You can also use duplicate stitch to create the illusion of scales.
4. Decorative Accessories
If you want to take your knitted fish to the next level, you can add decorative accessories like a knitted bowtie or a tiny knitted hat. These little accessories can add a touch of whimsy and make your fish even more unique.
Remember to have fun with your knitting project and let your creativity shine through. Adding these details and embellishments will make your knitted fish truly one-of-a-kind and a delightful addition to your collection.
Seaming and Finishing Techniques for Your Fish Knitting Project
Once you have finished knitting all the pieces for your fish project, it’s time to put them together and add the finishing touches. Seaming and finishing techniques are essential to create a polished and professional-looking final product. Here are some techniques to consider:
1. Mattress Stitch for Seaming
One of the most commonly used techniques for seaming knitted pieces is the mattress stitch. This stitch creates an invisible seam that seamlessly joins two pieces together. To use the mattress stitch, line up the edges of the pieces and insert your needle under the first horizontal bar on one side, then under the corresponding bar on the other side. Repeat this process, pulling the yarn tight as you go, until the seam is complete.
2. Grafting for a Seamless Finish
If you want to create a seamless finish, grafting, also known as the Kitchener stitch, is a great technique to use. Grafting involves using a tapestry needle to create a series of stitches that mimic the appearance of knitting. This technique is often used for joining the toe of a sock, but it can also be used to seam other pieces together. It takes a bit of practice to master, but the final result is well worth it.
3. Blocking for a Professional Look
Blocking is an important step in finishing any knitted project. It involves wetting the pieces and reshaping them to the desired size and dimensions. This helps to even out the stitches and give the project a professional look. To block your fish project, soak the pieces in lukewarm water, gently squeeze out the excess water, and lay them flat on a towel, shaping them as desired. Use pins or blocking wires to hold the pieces in place until they dry completely.
By using these seaming and finishing techniques, you can take your fish knitting project to the next level. Whether you’re creating a stuffed fish toy or a decorative fish pattern, paying attention to these details will ensure that your project looks beautiful and polished.
Blocking and Washing Your Knitted Fish
Blocking is an important step in the knitting process that helps to give your finished fish a polished and professional look. It involves shaping the piece to the desired dimensions and allowing it to dry in that shape. This is especially important for fish patterns, as it can help to enhance the texture and detail of the knitted scales.
Before you begin blocking, you’ll need to gather a few materials. You’ll need a blocking mat or towel, rustproof T-pins or blocking wires, and a spray bottle with water. To start, pin the fish out on the blocking mat, stretching it gently to achieve the desired shape. Use the T-pins or blocking wires to secure the edges and corners of the fish, making sure to smooth out any wrinkles or uneven areas. Once the fish is in place, lightly mist it with water using the spray bottle. Allow it to dry completely before removing the pins or wires.
When it comes to washing your knitted fish, it’s important to follow the care instructions for the yarn you used. Some yarns are machine washable, while others may need to be hand washed. If machine washing is an option, place the fish in a mesh laundry bag to protect it from getting caught or tangled. Use a gentle cycle and mild detergent. If hand washing is required, fill a basin with lukewarm water and a small amount of wool wash or gentle detergent. Gently agitate the fish in the water, being careful not to rub or wring it. Rinse thoroughly and squeeze out excess water without twisting or stretching the fabric. Lay the fish flat on a towel, reshape if necessary, and allow it to air dry.
By taking the time to properly block and wash your knitted fish, you’ll not only ensure that it looks its best, but you’ll also prolong its lifespan. Proper care will help to maintain the shape and texture of the fish, allowing you to enjoy it for years to come.
Explore Fish Knitting Patterns for Inspiration
If you’re a knitting enthusiast looking for a new project, why not try your hand at knitting fish patterns? Fish designs can be a fun and whimsical addition to your knitting repertoire, and they offer endless opportunities for creativity and customization. Whether you’re a beginner or an experienced knitter, there are fish knitting patterns available for all skill levels.
One popular fish knitting pattern is the “Fisherman’s Friend” pattern, which features a large, intricate fish motif. This pattern is a great choice for experienced knitters looking for a challenge. The fish motif can be incorporated into a variety of knitting projects, such as sweaters, blankets, or even socks. The pattern includes detailed instructions and charts to guide you through the knitting process, making it easier to create a stunning finished product.
For those new to knitting, simpler fish knitting patterns are also available. These patterns typically feature basic fish shapes and are perfect for learning the basics of knitting and pattern interpretation. Once you’ve mastered these simpler patterns, you can easily move on to more complex designs.
An excellent resource for finding fish knitting patterns is online knitting communities and websites. These platforms allow you to connect with other knitters, share ideas, and access a wide range of knitting patterns, including fish designs. You can search for specific fish knitting patterns or browse through collections to find inspiration for your next project. Many websites also offer tutorials and step-by-step instructions to help you along the way.
In conclusion, knitting fish patterns can be a fun and creative way to add a unique touch to your knitting projects. Whether you’re a beginner or an experienced knitter, there are fish knitting patterns available for all skill levels. So, grab your knitting needles and dive into the world of fish knitting patterns for endless inspiration.
Knit a Fish: Perfect for Beginners and Advanced Knitters Alike
Knitting fish patterns are a great project for both beginners and advanced knitters. Whether you are just starting out or have been knitting for years, this versatile pattern allows you to create an adorable fish design that can be used in various ways.
For beginners, knitting a fish pattern is a wonderful way to practice basic stitches and techniques. The pattern typically involves simple instructions that are easy to follow, making it an ideal project for those who are new to knitting. By working on this pattern, beginners can gain confidence in their knitting skills and create a fun and rewarding project.
Advanced knitters, on the other hand, can use a fish pattern to showcase their creativity and skills. They can experiment with different types of stitches, color combinations, and embellishments to create unique and intricate fish designs. Whether it’s adding intricate scale patterns or using different knitting techniques to create texture, advanced knitters can truly make their fish creations stand out.
With a knitted fish, the possibilities are endless. You can use them as cute decorations for your home, as toys for children, or even as accessories such as keychains or brooches. Additionally, they make great gifts for friends and family who appreciate handmade items.
So whether you are a beginner or an advanced knitter, give the fish pattern a try. You will have a lot of fun working on it and will end up with a charming knitted fish that you can be proud of.
Pattern Alternatives: Crocheting a Fish Instead of Knitting
While knitting is a popular craft for creating various patterns, crocheting offers an alternative method that can produce equally beautiful results. If you’re looking to create a fish-inspired project but prefer crocheting over knitting, you’re in luck! Crocheting a fish can be a fun and rewarding project that allows you to explore new techniques and create unique designs.
When crocheting a fish, you have a variety of choices in terms of patterns and styles. You can find numerous fish crochet patterns available online, ranging from simple and beginner-friendly designs to more complex and intricate ones. Whether you’re a crochet novice or an experienced crafter, there’s a pattern out there for you.
Advantages of crocheting a fish:
- Speed: Crocheting generally tends to go faster than knitting, so if you’re short on time but still want to create a fish-inspired project, crocheting might be the better option.
- Versatility: Crochet offers more flexibility when it comes to shaping and creating intricate details. You can easily achieve three-dimensional effects and add embellishments to make your crocheted fish stand out.
- Texture: Crochet stitches often create a textured surface, which can give your fish project an interesting and tactile feel. You can experiment with different stitch patterns and yarns to achieve the desired texture.
Final Thoughts
Crocheting a fish instead of knitting opens up a world of possibilities for creating unique and eye-catching designs. Whether you choose a simple or complex crochet pattern, with the right techniques and materials, you can bring your fish-inspired project to life. So grab your crochet hook, choose a fish pattern that sparks your creativity, and get started on your crocheted fish project today!