
Knitting your own hat can be a rewarding and fulfilling project. It allows you to express your creativity and customize the design to suit your style. If you’re looking for a hat knitting pattern that can be easily done with size 8 needles, you’ve come to the right place!
Size 8 needles, also known as 5mm needles, are a common size used in many knitting projects. They are versatile and can be used with a wide range of yarns, making them a popular choice among knitters. Whether you’re a beginner or an experienced knitter, this hat pattern is a great project to work on.
This hat knitting pattern is suitable for knitters of all skill levels. It features a classic ribbed design that is both stylish and functional. The ribbing creates a stretchy fabric that will comfortably fit a variety of head sizes. With size 8 needles, the hat knits up quickly and is perfect for last-minute gift ideas or a cozy accessory for the colder months.
Best Hat Knitting Pattern Size 8 Needles
When it comes to knitting hats, using size 8 needles is a popular choice for many knitters. The size 8 needles provide a versatile option, allowing you to create hats of various sizes and styles. Whether you are a beginner knitter or an experienced one, having a good hat knitting pattern for size 8 needles is essential.
One of the best hat knitting patterns for size 8 needles is a simple ribbed hat. This pattern is great for beginners as it only requires basic knitting stitches. The ribbed texture adds a nice stretch and snug fit to the hat. You can choose to make this hat in a solid color or add stripes for a more interesting look. With size 8 needles, this pattern knits up quickly, making it a perfect project for last-minute gifts or cold weather accessories.
Here is a basic ribbed hat knitting pattern for size 8 needles:
- Using size 8 circular needles, cast on 88 stitches.
- Join the round, being careful not to twist the stitches.
- Work in a *k2, p2* rib pattern for the entire hat.
- Continue working in the rib pattern until the hat measures about 6 inches from the cast-on edge.
- Decrease rounds: *K2, p2tog* for one round, *k1, p1* for the next round. Repeat these two rounds until only a few stitches remain.
- Break the yarn, leaving a long tail. Thread the tail through the remaining stitches and pull tight to close the top of the hat.
- Weave in any loose ends and your hat is complete!
This simple ribbed hat knitting pattern is just one example of the many options available when using size 8 needles. Feel free to experiment with different stitch patterns, colors, and yarns to create unique hats that suit your style. With a reliable hat knitting pattern and size 8 needles, you’ll be able to knit cozy and stylish hats for yourself and your loved ones.
Choosing the Right Yarn for Your Hat
In order to create the perfect hat, it is essential to choose the right yarn for your project. The type of yarn you select will not only affect the final look and feel of your hat, but it will also impact the overall knitting process. Considering factors such as fiber content, weight, and texture will help you make an informed decision and achieve the desired results.
Fiber Content: When selecting yarn for your hat, consider the fiber content. Wool is a popular choice for hats as it provides warmth and insulation. It is also naturally moisture-wicking, making it ideal for colder climates. Alternatively, you might opt for acrylic yarn that is soft, lightweight, and easy to care for. Blend yarns that combine different fibers can also be a good choice, offering a balance of warmth, softness, and durability.
Weight: The weight of the yarn will determine the thickness and drape of your hat. For a chunkier hat, choose a heavier weight yarn such as bulky or super bulky. These yarns will create a thicker fabric and provide more warmth. If you prefer a lighter and more delicate hat, opt for a lighter weight yarn like fingering or DK. It’s important to note that the weight of the yarn should be compatible with your chosen needle size, ensuring that the stitches are not too loose or too tight.
Texture: The texture of the yarn can add visual interest to your hat. Smooth yarns offer a clean and classic look, while textured yarns like boucle or mohair add depth and dimension. Consider the overall aesthetic you want to achieve and select a yarn that complements your desired style. Additionally, keep in mind that textured yarns may pose additional challenges during the knitting process, so make sure you are comfortable working with them before starting your hat.
In conclusion, choosing the right yarn for your hat is essential to achieve the desired look, feel, and overall knitting experience. Consider factors such as fiber content, weight, and texture to ensure that your yarn selection aligns with your project goals. By making an informed decision, you will be able to create a hat that is not only functional but also reflects your personal style and preferences.
Understanding Different Types of Hat Knitting Patterns
When it comes to knitting hats, there are countless patterns to choose from. Each pattern offers a unique design and requires specific techniques and materials. Understanding the different types of hat knitting patterns can help you choose the right pattern for your project.
1. Basic Hat Pattern
The basic hat pattern is perfect for beginners or those looking for a quick and easy project. This pattern typically involves knitting in the round using circular needles. It usually starts with a ribbed band for a snug fit and then transitions into stockinette stitch or other simple stitch patterns for the body of the hat.
2. Cable Hat Pattern
A cable hat pattern is a great choice for knitters who want to add texture and interest to their hats. Cable knitting involves crossing stitches over each other to create a twisted or braided effect. This pattern often incorporates a combination of cables and other stitch patterns to create a visually striking design.
3. Fair Isle Hat Pattern
The Fair Isle hat pattern is known for its colorful and intricate stranded colorwork. This pattern typically uses multiple colors of yarn and requires the knitter to carry two colors across each row, creating a pattern on the outside of the hat. It’s important to maintain an even tension to ensure the colorwork design is crisp and clear.
4. Lace Hat Pattern
A lace hat pattern is perfect for knitters who enjoy delicate and intricate designs. Lace patterns often feature openwork stitches and intricate motifs. This pattern requires careful attention to detail and is best suited for intermediate to advanced knitters. Lace hats can be lightweight and airy, making them a great choice for spring or summer.
5. Slouchy Hat Pattern
A slouchy hat pattern is great for those looking for a trendy and relaxed style. These hats often have a looser fit and a longer length, allowing them to be worn with the brim rolled up or down. Slouchy hats can be knit using various stitch patterns, but ribbing or garter stitch at the brim is common to provide structure.
Whether you’re a beginner or an experienced knitter, there’s a hat knitting pattern out there for you. Consider the style, difficulty level, and the techniques involved to find the perfect pattern for your knitting project.
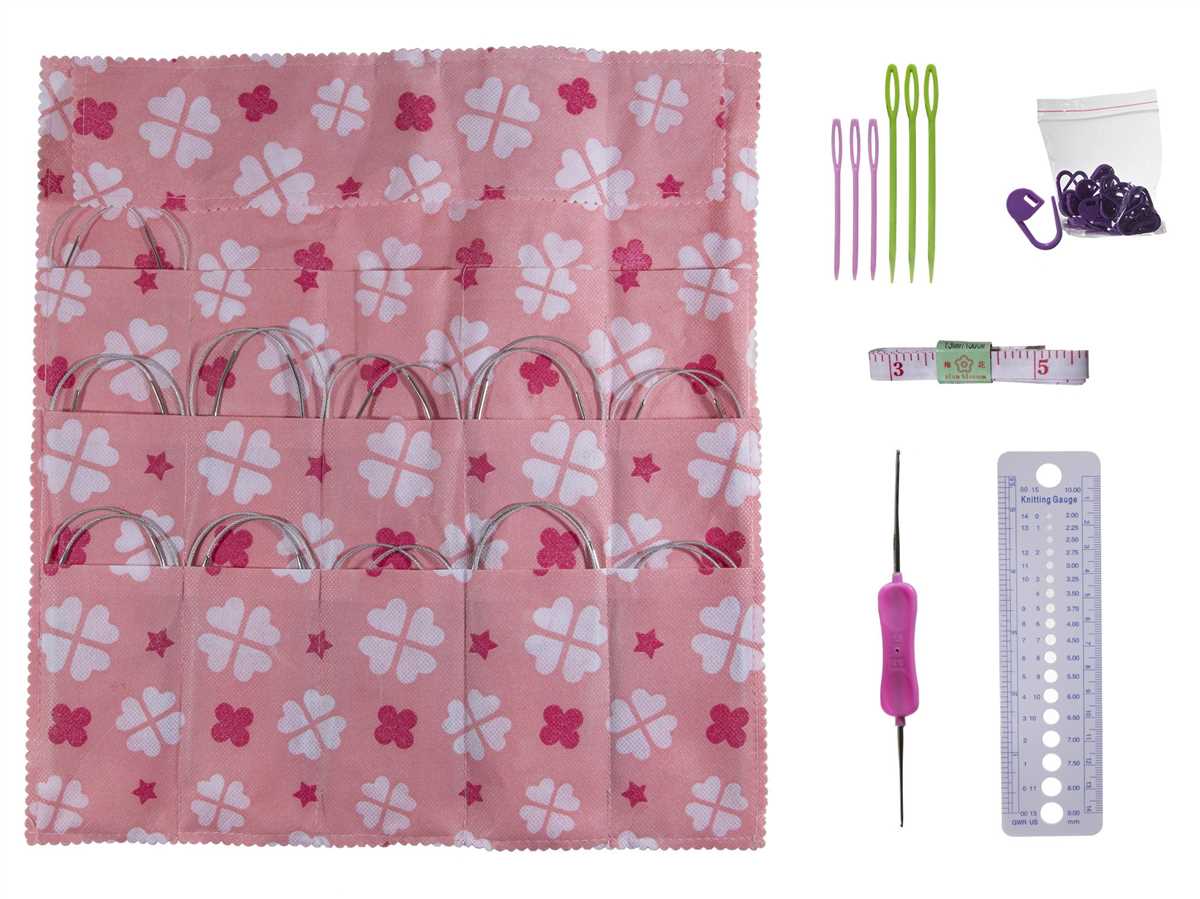
Essential Tools and Materials for Knitting a Hat
Knitting a hat is a fun and rewarding project that allows you to create a unique accessory to keep yourself warm during the colder months. To get started, you will need a few essential tools and materials. Here is a list of what you will need to knit a hat:
1. Knitting Needles
The first tool you will need is a pair of knitting needles. For knitting a hat, it is recommended to use size 8 needles, as they are a versatile size that works well with different yarn weights. Make sure you have a set of double-pointed needles or a circular needle, depending on your preferred knitting method.
2. Yarn
The next important material is yarn. Choose a yarn that is suitable for hats and is soft and warm. You can use different types of yarn, such as wool, acrylic, or a blend of fibers. It is also important to consider the weight of the yarn, as it will affect the final result of your hat. Worsted weight yarn is a popular choice for hat knitting projects.
3. Stitch Markers
Stitch markers are small, often colored, rings or clips that are used to mark specific stitches or sections in your knitting. They are particularly useful when knitting a hat, as they can help you keep track of increases, decreases, or pattern repeats. It is advisable to have a few stitch markers handy to make your knitting process smoother.
4. Tapestry Needle
A tapestry needle, also known as a yarn needle or darning needle, is an essential tool for finishing your hat. It is used to weave in loose ends of yarn and sew the seams of your hat together. Make sure you have a tapestry needle with a large eye, so it will be easier to thread your yarn through.
5. Measuring Tape
A measuring tape is a crucial tool for knitting a hat, as it will help you determine the size and fit of your hat. Measure the circumference of your head and use this measurement as a guide when knitting. It is a good idea to check your gauge before starting the project to ensure that your hat will fit properly.
With these essential tools and materials in hand, you are ready to start knitting a hat. Enjoy the process and let your creativity shine as you create a cozy and stylish accessory for yourself or someone else!
Tips for Properly Gauge Your Hat Knitting Pattern
When knitting a hat, it is important to properly gauge your knitting pattern to ensure the final product fits correctly. Here are some tips to help you achieve the correct gauge:
1. Use the recommended needle size
Most hat knitting patterns will specify a recommended needle size. Using the correct size needles is essential for achieving the correct gauge. For a hat pattern that calls for size 8 needles, be sure to use needles of that size.
2. Check your tension
Pay attention to your tension while knitting. If you knit too tightly or loosely, it can affect the gauge of your hat. Make sure your stitches are consistent and not too tight or too loose. You may need to adjust your tension by knitting tighter or looser to achieve the correct gauge.
3. Measure your gauge swatch
Before starting your hat, knit a gauge swatch using the specified needle size and stitch pattern of the pattern. Measure the number of stitches and rows per inch to determine if your gauge matches the pattern. If your gauge is off, you may need to switch needle sizes or adjust your tension.
4. Block your swatch
After knitting your swatch, block it according to the recommended method for your yarn. This will help relax the stitches and give you a more accurate measurement of your gauge. Blocking can also help even out any inconsistencies in your tension.
5. Adjust your pattern accordingly
If your gauge does not match the pattern, you will need to make adjustments to ensure your hat turns out the correct size. This may involve changing the number of stitches or rows in your pattern or switching to a different needle size. Always refer to the pattern for guidance on how to make these adjustments.
By properly gauging your hat knitting pattern, you can ensure that your finished hat will fit and look as intended. Take the time to measure your gauge swatch and make any necessary adjustments to achieve the desired result.
Step-by-Step Instructions for Knitting the Brim
When knitting a hat, the brim is an essential part that provides structure and comfort. Follow these step-by-step instructions to knit the brim using size 8 needles:
1. Cast on stitches

Using your size 8 needles, cast on the desired number of stitches for your hat. This will depend on the size you are knitting and the stitch pattern you are using. Make sure to keep the stitches loose to allow for stretch in the brim.
2. Knit the first row
Once you have cast on your stitches, start knitting the first row. You can use the basic knit stitch or any other stitch pattern you prefer. Knit all the stitches on the first row to create a clean and uniform brim.
3. Continue knitting the rows
Continue knitting each row using your chosen stitch pattern. Remember to keep the tension even to maintain the consistency of the brim. Depending on the desired length of the brim, you may need to knit multiple rows.
4. Switch to ribbing
When you have reached the desired length for the brim, switch to a ribbing pattern to add elasticity and a snug fit. The most common ribbing pattern is a knit 1, purl 1 (K1, P1) pattern. Repeat this pattern until you have completed the desired number of ribbing rows.
5. Bind off
Once you have completed the brim, it’s time to bind off. Cut the yarn, leaving a tail that is long enough to comfortably weave in later. Using your knitting needle, bind off the stitches by knitting the first two stitches and then passing the first stitch over the second stitch. Continue this process until you reach the end of the row.
Congratulations! You have successfully knitted the brim for your hat using size 8 needles. Now you can continue knitting the body of the hat according to your chosen pattern.
Creating the Perfect Fit with Decreases
When knitting a hat, it is important to ensure that it fits the wearer perfectly. One way to achieve this is by using decreases in your knitting pattern. Decreases help to shape the hat and create a snug fit, especially around the crown. By strategically placing decreases throughout the pattern, you can customize the fit to suit different head sizes and styles.
Types of Decreases:
There are several types of decreases that you can use when knitting a hat. The most common types include knit two together (k2tog), slip-slip-knit (ssk) and centered double decrease (cdd). Each decrease has its own unique effect and can be chosen based on the desired appearance and fit of the hat.
– The k2tog decrease is a simple and quick decrease that slants to the right. It is often used to shape the crown of a hat and creates a neater, more symmetrical decrease line.
– The ssk decrease, on the other hand, slants to the left and is used to create a mirrored effect when paired with the k2tog decrease. This decrease is commonly used in lace patterns to maintain a consistent decrease direction.
– The cdd decrease is a center double decrease that creates an attractive star-shaped design. It is often used in more intricate hat patterns and helps to shape the crown while maintaining a clean and polished look.
Placement of Decreases:
When incorporating decreases into your hat pattern, it is important to consider the placement to achieve the desired fit. Decreases can be evenly distributed throughout the pattern or concentrated in certain areas, depending on the shape and style of the hat. For example, if you want to create a slouchy beanie, you may choose to decrease more gradually towards the crown, allowing for more fabric and a looser fit.
Size and Gauge:
Lastly, it is crucial to take into account the size and gauge of your knitting needles and yarn when working with decreases. Different needle sizes and yarn weights can produce varying results, affecting the overall fit and shape of the hat. It is advisable to swatch beforehand to ensure that the chosen decreases are achieving the desired outcome and the hat will fit as intended.
Before you begin knitting the body of the hat, make sure you have your size 8 knitting needles and your chosen yarn ready. You will also need a marker to keep track of your rounds.
Start by casting on the desired number of stitches for your hat. You can refer to the knitting pattern for the specific number of stitches to cast on based on the size you are making. Once you have cast on, join the round, being careful not to twist your stitches.
Knitting the Body of the Hat
Once you have joined the round, you can begin knitting the body of the hat. This section will determine the length of the hat, so make sure to follow the pattern instructions for the desired length.
Work the specified knitting stitch pattern for the body of the hat, whether it is stockinette stitch, ribbing, or any other pattern indicated in the pattern. Repeat the stitch pattern for each round until you reach the desired length.
Adding Fun and Unique Decorative Elements
When it comes to knitting hats, the process of creating the perfect accessory goes beyond just selecting the right yarn and needle size. Adding fun and unique decorative elements can take your hat from ordinary to extraordinary. Whether you’re knitting for yourself or a loved one, there are plenty of options to explore and incorporate into your design.
Pom-poms: Pom-poms are a classic and playful addition to any hat. They can be made in various sizes and colors, allowing you to customize your hat to suit your personal style. Whether you opt for a single pom-pom on top or multiple pom-poms scattered throughout, they add a touch of whimsy and charm.
Cables: If you’re looking to add texture and interest to your hat, consider incorporating cables into your design. Cables are created by knitting stitches out of order, which creates twists and turns in the fabric. This technique adds visual appeal and creates a warm and cozy knit item.
Fair Isle or Colorwork: Adding colorwork to your hat can make it truly unique. Fair Isle knitting involves working with multiple colors in a single row, creating intricate and eye-catching patterns. You can experiment with different color combinations and motifs to achieve the desired effect.
Embroidery: Embroidery can be a great way to add a personal touch to your hat. Whether you choose to stitch on a small design, initials, or even a quote, embroidery allows you to showcase your creativity. You can use contrasting or complementary colors to make the design stand out.
Buttons: Buttons can be a fun and functional addition to your hat. You can sew on decorative buttons that complement the color or theme of your hat, or you can even use functional buttons to create a customizable and adjustable design.
Tags or Labels: Adding a tag or label to your hat can give it a professional and personalized touch. You can create custom tags or labels with your name or brand, or you can purchase ready-made ones. It’s a subtle but effective way to add a unique element to your knitted creation.
By incorporating these fun and unique decorative elements into your hat knitting project, you can transform a simple accessory into a one-of-a-kind piece. Experiment with different techniques and design ideas to make your hat truly stand out.
Customizing Your Hat with Different Color Options
When it comes to knitting a hat using the size 8 needles, one of the ways you can make your hat truly unique is by customizing it with different color options. By choosing different colors for different sections of the hat, you can create a design that reflects your personal style and preferences.
One popular option is to use a contrasting color for the brim of the hat. This can create a striking visual effect and make the brim stand out. For example, if you’re knitting a hat in a neutral color like gray or beige, you could choose a bold color like red or blue for the brim. This will draw attention to the edge of the hat and give it a pop of color.
Another option is to create a striped pattern by alternating between different colors. This can add visual interest to the hat and make it more dynamic. You can use two or more colors and vary the width of the stripes to create different effects. For example, you could alternate between two colors every two rows or create thicker stripes by knitting several rows in one color before switching to another.
If you’re feeling adventurous, you could even experiment with color blocking. This involves using different colors for different sections of the hat, such as the brim, body, and crown. This can create a modern and stylish look and allow you to showcase multiple colors in your design. You can choose colors that complement each other or go for a bold and contrasting look. The possibilities are endless when it comes to customizing your hat with different color options.
Whether you choose to add a pop of color to the brim, create a striped pattern, or experiment with color blocking, customizing your hat with different color options is a fun and creative way to make your hat truly one-of-a-kind. Don’t be afraid to let your imagination run wild and create a hat that reflects your unique personality and style.
Finishing Touches: Blocking and Weaving in Ends
When you’ve finished knitting your hat using size 8 needles, it’s time to add the finishing touches to make it look polished and professional. Two essential steps in this process are blocking and weaving in ends.
Blocking is the process of shaping and setting your knitted piece to the desired measurements. It involves gently wetting the hat and then carefully stretching it out to the correct size. This helps to even out any inconsistencies in your stitches and gives the hat a more uniform appearance. To block your hat, fill a clean sink or basin with lukewarm water and add a small amount of mild detergent. Submerge the hat in the water and let it soak for about 10 minutes. Remove the hat from the water, gently squeeze out the excess moisture, and lay it flat on a clean towel. Gently stretch and shape the hat to the desired size and allow it to air dry, keeping it in this shape until fully dry.
Weaving in ends is the process of hiding and securing the loose yarn tails that remain after you finish knitting. These ends can be distracting and can unravel if left untreated. To weave in ends, thread the yarn tail onto a tapestry needle and insert the needle into the back of the nearest stitch. Bring the needle back through the same stitch in the opposite direction, creating a loop. Repeat this process several times, changing the direction of the loops each time, to ensure that the yarn is securely woven into the fabric. Trim the excess yarn close to the fabric, taking care not to cut the stitches. Repeat this process with all the loose ends, ensuring that each tail is securely woven in.
Blocking and weaving in ends may require extra time and effort, but they are essential steps in creating a professional-looking knitted hat. These finishing touches can make a significant difference in the overall appearance and durability of your finished project. So, take the time to block your hat to perfection and weave in those ends for a hat that is sure to impress.
Troubleshooting: Common Issues and How to Fix Them
Knitting a hat using size 8 needles can be a fun and rewarding project, but sometimes you may encounter common issues that can be frustrating. Here are some troubleshooting tips to help you fix them:
1. Loose or Uneven Stitches
If you find that your stitches are coming out loose or uneven, there are a few possible causes. One common reason is that you are not holding the yarn tightly enough when you knit or purl. Make sure to keep tension on the yarn as you work to maintain consistent stitches. It can also help to use your fingers to guide the stitches and ensure they are pulled snugly. Lastly, check that your needle size is correct for the yarn you are using. Using a smaller needle may help create more even stitches.
2. Gauge Issues
Gauge is essential when following a knitting pattern, as it determines the size and fit of your finished hat. If your gauge is off, the hat may turn out too small or too large. To fix this issue, start by double-checking your needle size and yarn weight to ensure they match the pattern requirements. If necessary, you can adjust your tension by knitting more loosely or tightly to achieve the correct gauge. Alternatively, you can switch to a larger or smaller needle size to achieve the desired gauge.
3. Twisted Stitches
Twisted stitches can occur when you accidentally wrap the yarn the wrong way around the needle or when you knit into the back of a stitch instead of the front. This can result in an uneven or twisted appearance in your knitting. To fix twisted stitches, carefully unravel the affected stitches and rework them correctly. Pay close attention to the direction of the wrap and make sure to insert your needle into the appropriate part of the stitch.
4. Yarn Tangles or Snags
Yarn tangles or snags can happen when working with multiple colors or textured yarn. If you encounter these issues, it’s best to stop and untangle or fix the snag before continuing. Take your time to gently untangle any knots or loops in the yarn to prevent further complications. If you notice a snag, carefully inspect the affected area and work the yarn free to avoid any interruptions in your knitting.
By troubleshooting these common issues and utilizing the tips provided, you can overcome any challenges that arise while knitting a hat with size 8 needles. Remember to stay patient and take your time to ensure a successful and enjoyable knitting experience.
Styling Tips: How to Wear and Pair Your Handknit Hat
Now that you’ve completed knitting your hat using size 8 needles, it’s time to show off your creation! Here are some styling tips on how to wear and pair your handknit hat:
1. Casual and Cozy
For a casual and cozy look, pair your handknit hat with a chunky sweater, jeans, and ankle boots. This outfit is perfect for fall and winter outings, whether you’re going for a walk in the park or meeting friends for coffee. The hat will not only keep you warm but also add a touch of handmade charm to your outfit.
2. Chic and Sophisticated
If you want to elevate your style, try wearing your handknit hat with a tailored coat, a wool scarf, and knee-high boots. This combination creates a chic and sophisticated look, perfect for a date night or a business casual event. The hat will add a unique and personalized element to your outfit, showcasing your talent and creativity.
3. Colorful and Playful
Embrace the vibrant colors of your handknit hat by pairing it with a colorful jacket or a patterned dress. This playful combination is great for adding a pop of color to your winter wardrobe. Don’t be afraid to mix and match different patterns and textures – the hat will tie everything together and make a bold fashion statement.
In summary, your handknit hat is a versatile accessory that can be styled in various ways. Whether you’re going for a casual, chic, or colorful look, the hat will add a touch of warmth, charm, and personalization to your outfit. So embrace your knitting skills, show off your creation, and let your hat become a fashion statement!