
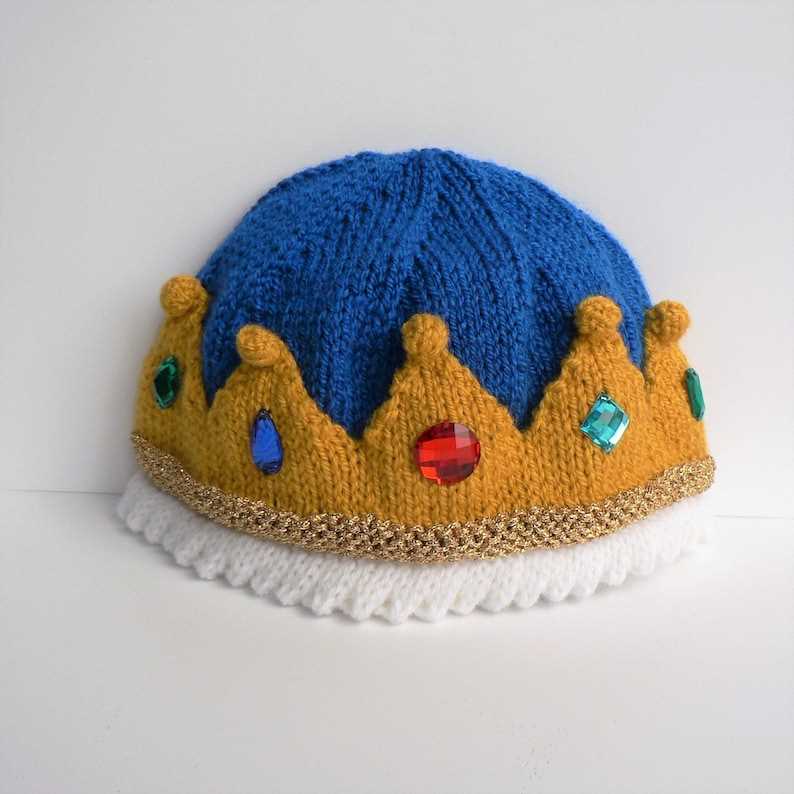
Looking for a fun and cozy knitting project? Why not try knitting a crown hat? This unique hat pattern features a crown design that will make you feel like royalty while keeping you warm during the colder months. Whether you’re a beginner knitter or an experienced pro, this pattern is perfect for all skill levels.
This knitted crown hat pattern is not only stylish but also practical. The thick and chunky yarn used creates a hat that is both warm and comfortable to wear. Plus, the crown design adds a touch of whimsy to any outfit. You can choose to knit the crown in a contrasting color or stick to the same color as the rest of the hat, the choice is yours!
With this pattern, you’ll learn various knitting techniques, including working in the round, basic increases and decreases, and how to create intricate crown details. The pattern also includes step-by-step instructions, so even if you’re new to knitting, you’ll be able to follow along easily.
So, grab your knitting needles, choose your favorite yarn, and get ready to create a hat fit for a queen or king! With this knitted crown hat pattern, you’ll have a unique and stylish accessory that’s perfect for keeping warm and adding a touch of royalty to your winter wardrobe.
Knitted Crown Hat Pattern
Knitted crown hat pattern is a popular choice for those who want to add some royalty and elegance to their winter wardrobe. With its unique design and intricate details, this hat is sure to make a statement wherever you go. Whether you’re heading to a special event or just want to stand out from the crowd, this crown hat will definitely do the trick.
To create the knitted crown hat, you’ll need some basic knitting skills and a few materials. First, gather your supplies: yarn in your desired color, knitting needles, a circular needle, and a stitch marker. Once you have everything ready, you can start the pattern.
Instructions:
- Cast on the desired number of stitches and join in the round with a stitch marker.
- Start with a ribbing pattern for the brim of the hat. You can use a simple knit 2, purl 2 pattern or any other ribbing pattern of your choice.
- Continue knitting in the round until the hat reaches the desired length.
- To add the crown detail, you’ll need to create a series of decreases. This can be done by knitting two stitches together, as well as using other decrease stitches such as slip, slip, knit.
- Keep decreasing until there are only a few stitches left, then cut the yarn and thread it through the remaining stitches to close the top of the hat. Secure the yarn and weave in any loose ends.
- To add additional embellishments to your crown hat, you can sew on beads, sequins, or other decorative elements. Get creative and make it your own!
Once you’ve finished knitting your crown hat, you’ll have a stylish and unique accessory that will keep you warm and make you feel like royalty. Whether you wear it for special occasions or just on a casual day out, you’ll be sure to turn heads and receive compliments on your knitting skills. So grab your knitting needles and start creating your own knitted crown hat today!
Materials Needed for Knitted Crown Hat Pattern
In order to complete the knitted crown hat pattern, you will need a few specific materials. These materials include:
- Yarn: Choose a soft and warm yarn in the color of your choice. Worsted weight yarn is recommended for this project.
- Knitting Needles: Use a pair of knitting needles in the appropriate size for your chosen yarn. Circular needles may also be used if preferred.
- Tapestry Needle: A tapestry needle will be needed for weaving in loose ends and finishing the hat.
- Stitch Markers: Stitch markers can be helpful for marking specific stitches or sections of the pattern.
- Scissors: A pair of scissors will be needed for cutting yarn and trimming any excess.
- Measuring Tape: A measuring tape or ruler will be useful for checking gauge and ensuring the correct sizing of the hat.
Having these materials on hand will ensure that you have everything you need to successfully complete the knitted crown hat pattern. Remember to choose yarn and needles that match the desired finished size and style of the hat. With the right materials, you’ll be able to create a beautiful and cozy crown hat to keep you warm during the colder months.
Knitting Techniques for the Crown Hat Pattern
When knitting the crown hat pattern, there are several knitting techniques that you should be familiar with. These techniques will help you create a beautiful and snug-fitting hat.
1. Magic Loop:
The magic loop technique is a great way to knit small circumference projects, like the crown of a hat. It involves using a long circular needle and pulling out a loop of cable to create two separate sets of stitches. This method eliminates the need for double-pointed needles and allows you to knit in the round with ease.
2. Decreases:
Decreases are an essential technique in creating the crown of a hat. They help shape the fabric and create a smooth transition from the wider brim to the narrower top. Common decrease techniques used in hat patterns include knit two together (k2tog), slip, slip, knit (ssk), and slip, slip, knit pass slipped stitches over (sskpsso).
3. Stitch Markers:

Stitch markers are invaluable tools when knitting the crown of a hat. They help you keep track of pattern repeats and decreases, ensuring that your stitches are in the right place. Use different colored stitch markers to mark different sections, such as the beginning of the round or the placement of decreases.
4. Blocking:
Blocking is the process of shaping and smoothing your knitted fabric. For the crown of a hat, blocking can help open up stitch patterns and even out any inconsistencies. You can block your hat by wetting it and pinning it into shape or by using a steam iron with a pressing cloth. Always follow the yarn’s care instructions and check if blocking is suitable for your specific yarn.
By mastering these knitting techniques, you’ll be well-equipped to create a beautifully knitted crown hat. With practice and attention to detail, you’ll be able to make a hat that is not only stylish but also comfortable to wear.
Choosing the Right Yarn for Your Knitted Crown Hat
When it comes to knitting a crown hat, choosing the right yarn is essential to create a hat that is not only stylish but also comfortable and warm. The yarn you choose will determine the texture, drape, and overall look of the finished hat.
Type of Yarn: The first thing to consider is the type of yarn you want to use. For a crown hat, it is best to use a yarn that is soft and warm, such as a merino wool or alpaca blend. These yarns will not only keep your head cozy but also have a luxurious feel.
Weight of Yarn: The weight of the yarn will also impact the final result of your crown hat. If you want a snug-fitting hat, opt for a bulky or worsted weight yarn. These thicker yarns will create a dense fabric that will keep your head warm in cold weather. If you prefer a lighter hat, choose a sport or fingering weight yarn, which will create a more delicate and breathable fabric.
Color and Texture: Another important aspect to consider is the color and texture of the yarn. When choosing a color, think about the overall look you want to achieve. A solid, neutral color will give the hat a classic and versatile look, while a variegated or self-striping yarn can add a fun and playful touch. In terms of texture, consider whether you want a smooth, even finish or a more textured look with cables or lace patterns.
Yarn Composition: Lastly, pay attention to the composition of the yarn. Some fibers, such as wool and alpaca, are naturally warm and breathable, making them great choices for a crown hat. Other fibers, like acrylic or cotton, can be less insulating but offer other benefits such as easy care and durability. Consider your personal preferences and the intended use of the hat when choosing the yarn composition.
By considering the type, weight, color, texture, and composition of the yarn, you can ensure that your knitted crown hat turns out just as you imagined. So take your time to explore different options and find the perfect yarn for your project.
How to Start Knitting the Crown Hat Pattern

If you’re ready to dive into knitting the adorable crown hat pattern, follow these steps to get started. Remember to gather all the necessary materials before you begin.
Step 1: Cast on your stitches
- Using your preferred casting-on method, cast on the required number of stitches for your hat size.
- Make sure to use the appropriate size of knitting needles as specified in the pattern.
- Double-check that your stitches are not too tight or too loose before moving on to the next step.
Step 2: Begin the ribbing
- Follow the pattern instructions for the ribbing section.
- This usually involves knitting a certain number of rows in a rib stitch pattern, such as knit 2, purl 2.
- Continue knitting the ribbing until you’ve reached the desired length or as instructed in the pattern.
- Switch to the main stitch pattern for the body of the hat.
Step 3: Knit the main body of the hat
- Refer to the pattern for the specific stitch pattern to use for the main body of the hat.
- Continue knitting rows in this stitch pattern until you’re ready to start shaping the crown.
- Be mindful of any decreases or increases that need to be made as you reach the crown shaping section.
Step 4: Shape the crown
- Follow the instructions in the pattern for shaping the crown of the hat.
- This might involve decreasing stitches gradually to create a smooth and rounded top.
- Ensure that you’re decreasing evenly and in the correct pattern specified in the instructions.
- Continue shaping the crown until the desired number of stitches remain.
Once you’ve completed the crown shaping, you can finish off your hat by binding off the remaining stitches, weaving in any loose ends, and blocking the hat to give it its final shape. Follow the pattern instructions for any additional finishing steps, such as adding a pom-pom or other embellishments. Enjoy the process of creating a unique and cozy crown hat!
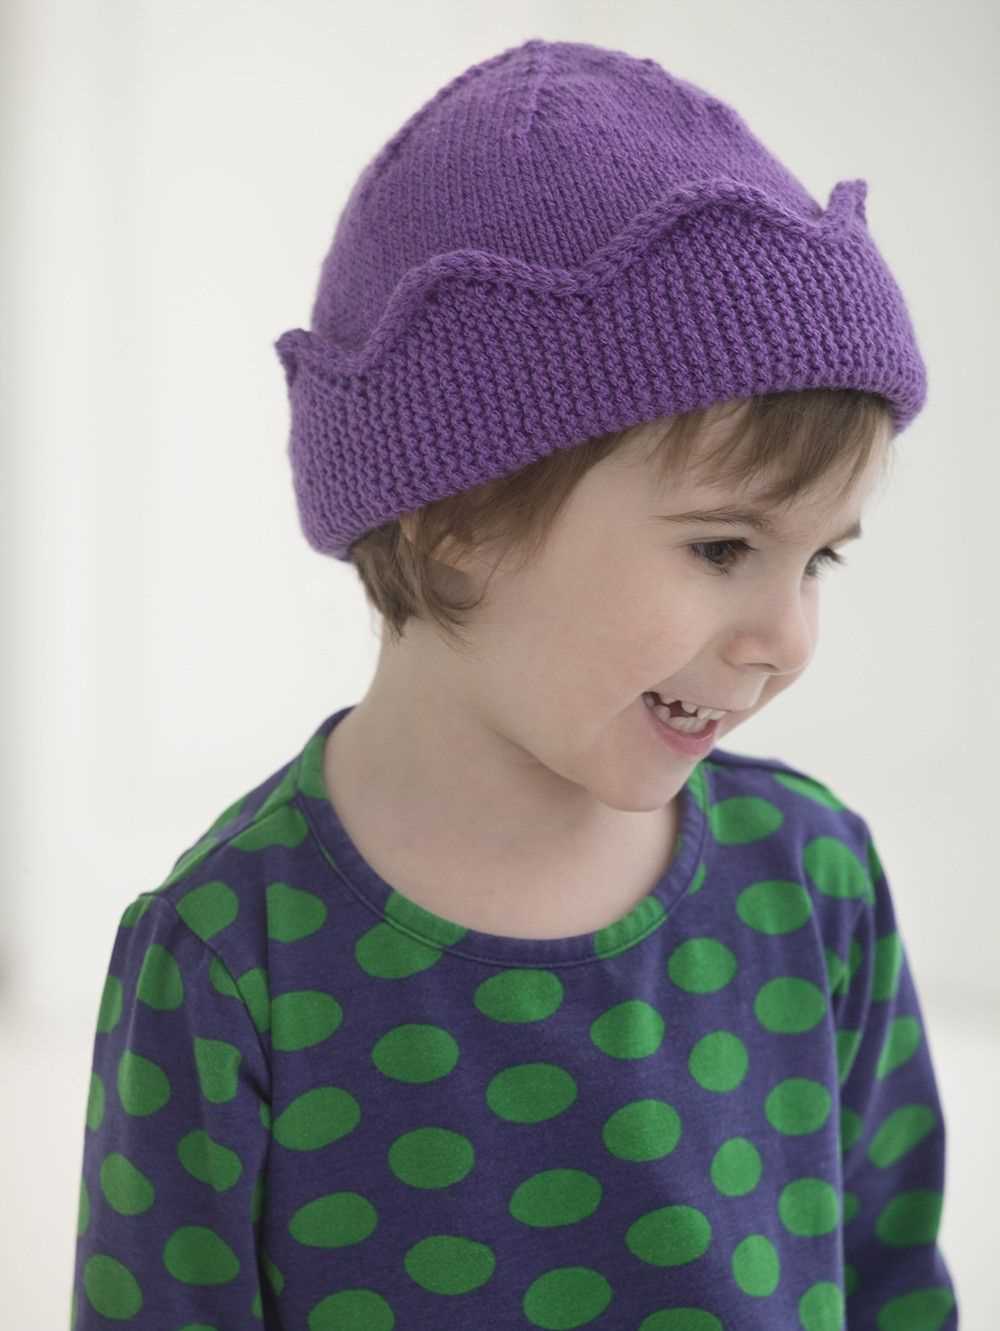
Knitting the Ribbing for the Crown Hat

When knitting a crown hat, the ribbing is an important element as it provides both a decorative touch and a functional purpose. The ribbed brim adds elasticity to the hat, making it fit snugly on the head. In this pattern, we will guide you through the process of knitting the ribbing for your crown hat.
To begin, you will need to cast on the desired number of stitches for your ribbing. The ribbing is typically knitted in a stretchy stitch pattern, such as the 1×1 or 2×2 rib, which alternates knit and purl stitches. This creates a textured, stretchy fabric that can comfortably fit a range of head sizes.
To knit the ribbing, start by knitting the first stitch. Then, bring the working yarn to the front of your work and purl the next stitch. Continue to alternate knitting and purling stitches until you reach the end of the row. Repeat this pattern for the desired number of rows, depending on how wide you want your ribbing to be.
Keep in mind that the number of stitches you cast on and the number of rows you knit for the ribbing will vary depending on the pattern and your desired fit. It’s always a good idea to check the pattern instructions or make a gauge swatch to ensure your ribbing will be the right size.
Once you have completed the ribbing, you can move on to the main part of the crown hat. The ribbing provides a nice transition between the brim and the body of the hat. It also helps keep the hat in place and prevents it from slipping off the head.
In summary, knitting the ribbing for a crown hat is an important step in creating a snug and comfortable fit. By using a stretchy stitch pattern and the right number of stitches and rows, you can create a ribbed brim that adds both style and functionality to your hat. Happy knitting!
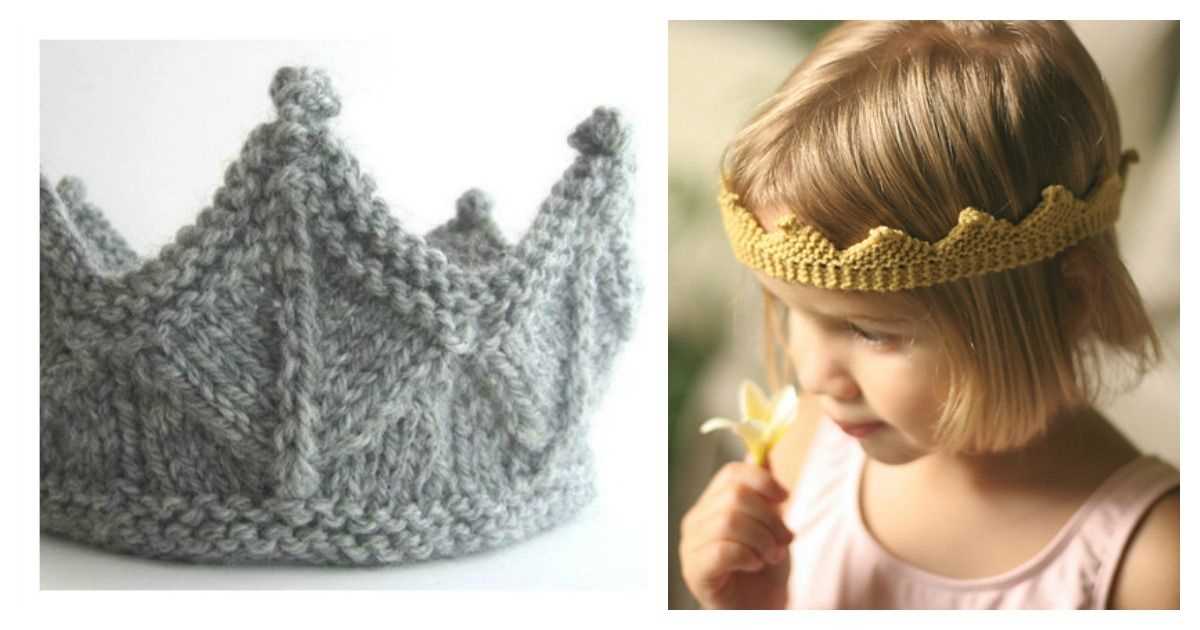
Creating the Crown Pattern for the Hat
When making a knitted crown hat, it is important to have a well-designed and structured crown pattern. The crown of the hat is the part that sits on top of the head and gives the hat its shape. It is typically round and slightly tapered towards the top. Creating a crown pattern requires careful planning and attention to detail.
1. Determine the desired size and gauge: Before starting the crown pattern, it is important to determine the desired size and gauge of the hat. This will help in calculating the number of stitches and rows needed for the crown. Use a gauge swatch to measure the number of stitches and rows per inch, which will allow for accurate sizing.
2. Choose a stitch pattern: Selecting an appropriate stitch pattern for the crown is essential to achieve the desired texture and look. There are numerous stitch patterns to choose from, including ribbing, cables, lace, or simple stockinette stitch. Consider the overall design of the hat and the intended recipient’s preferences.
3. Begin with a ribbing or brim: Many crown hat patterns start with a ribbing or brim to provide structure and a snug fit. This can be a simple 1×1 or 2×2 ribbing or a more complex stitch pattern. The ribbing or brim should be worked in the desired number of stitches and rounds to fit comfortably around the head.
4. Transition to the crown: Once the ribbing or brim is complete, transition to the main crown pattern. This can be done by starting the chosen stitch pattern or a combination of stitches. The number of stitches should be evenly distributed around the circumference of the hat for a symmetrical appearance.
5. Shape the crown: Depending on the desired shape of the crown, shaping techniques can be applied. This can include simple decreases or increases, such as knitting two stitches together or yarn overs, or more intricate shaping methods like short rows. The shaping should be done gradually and evenly to achieve a smooth and balanced crown.
6. Continue the pattern: Once the crown shaping is complete, continue knitting the crown pattern until the desired length is reached. This will vary depending on the style of the hat and personal preference. Consider trying different stitch patterns or incorporating colorwork for added interest and customization.
7. Finish the crown: To complete the crown, bind off the stitches using a suitable method that matches the stitch pattern. This can be a simple bind off or a stretchier method like a picot bind off. Weave in any loose ends and block the hat if necessary to ensure it retains its shape.
By carefully following these steps, you can create a well-designed and structurally sound crown pattern for your knitted hat. The crown is an essential part of the hat’s overall appearance and functionality, so it’s worth taking the time to plan and execute it properly.
Shaping the Crown of the Hat
The crown of the hat is the top part that covers the head. To shape the crown of the hat, you will need to decrease the number of stitches gradually. This is done to create a more fitted and rounded shape that sits nicely on the head.
To start shaping the crown, you will need to determine the number of stitches to decrease. This will depend on the size of the hat and the desired fit. You can refer to the pattern instructions or use a general guideline such as decreasing by 8 stitches every round.
To decrease stitches, you can use various methods such as knitting two stitches together (K2tog), slipping a stitch knitwise, knitting the next stitch, and then passing the slipped stitch over (SSK), or any other decrease method specified in the pattern.
Continue decreasing stitches until you reach the desired number of stitches for the crown. This will typically be a small number, such as 6-8 stitches. At this point, you may switch to double-pointed needles or a shorter circular needle if necessary.
Once you have reached the desired number of stitches, you will need to close the crown. This can be done by cutting the yarn, leaving a long tail, and threading it through the remaining stitches using a tapestry needle. Pull the yarn tight to close the crown, and secure it by weaving in the end.
Lastly, try the hat on to ensure the desired fit and shape. Make any adjustments if necessary, such as adding a few more rounds of decreases or adjusting the tension of the stitches. When you are satisfied with the shape of the crown, the hat is ready to be finished with any additional embellishments or decorations.
Knitting the Brim of the Crown Hat
When knitting the crown hat, one of the key elements to consider is the brim. The brim not only adds structure and stability to the hat, but it also adds a touch of style. In this pattern, we will explore different techniques for knitting the brim of the crown hat.
Ribbing: One of the most common techniques for knitting the brim of the crown hat is using ribbing. Ribbing creates a stretchy and flexible fabric that fits comfortably around the head. To create ribbing, alternate between knitting and purling stitches in a specific pattern. A common ribbing pattern is K2, P2, where you knit two stitches, then purl two stitches, repeating this sequence until you reach the desired length.
Garter Stitch: Another option for the brim of the crown hat is the garter stitch. The garter stitch creates a textured fabric with ridges that add depth and visual interest to the hat. To knit the garter stitch brim, simply knit every row instead of alternating between knitting and purling. This will create a fabric that is dense and warm, perfect for colder weather.
- Seed Stitch: The seed stitch is another popular choice for the brim of the crown hat. It creates a fabric with a bumpy texture that is visually appealing. To knit the seed stitch, alternate between knitting and purling stitches in a specific pattern. For example, you can knit one stitch, then purl one stitch, repeating this sequence until you reach the desired length.
- Elastic Band: If you’re looking for a brim that has a bit of stretch, an elastic band can be added to the crown hat. To create the elastic band, you can use a smaller needle size to knit the brim. This will create a tighter fabric that has some elasticity. Additionally, you can also add elastic thread to the brim by threading it through the stitches while knitting.
Overall, there are various techniques and options when it comes to knitting the brim of the crown hat. You can choose ribbing, garter stitch, seed stitch, or even add an elastic band for that perfect fit. Experiment with different patterns and styles to create a crown hat that suits your preferences and knitting skills.
Adding Decorative Elements to Your Crown Hat
When knitting a crown hat, you have the opportunity to add decorative elements that will make your hat truly unique and personalized. These decorative elements can be added during the knitting process or as an embellishment after the hat has been completed.
Here are some ideas for adding decorative elements to your crown hat:
- Colorwork: To add visual interest to your crown hat, consider incorporating colorwork into the design. This can be done using stranded knitting techniques or by using self-striping yarn. You can create intricate patterns or simple stripes to add a pop of color to your hat.
- Embellishments: Another way to add decorative elements to your crown hat is by using embellishments such as buttons, beads, or bows. These can be added to the brim of the hat or to the top for added flair. Be mindful of the weight of the embellishments, as heavy decorations may cause the hat to sag.
- Textures: Experimenting with different stitch patterns and textures can also add a decorative element to your crown hat. Consider incorporating cables, lace, or bobbles into your design to create a unique and eye-catching look.
- Pom-poms: Pom-poms are a classic and fun way to add a playful touch to your crown hat. You can make pom-poms using yarn in a coordinating or contrasting color and attach them to the top of the hat for a whimsical look.
- Embroidery: If you have basic embroidery skills, you can add decorative stitches or motifs to your crown hat. This can be done using yarn of a different color to create intricate designs or simple accents.
Adding decorative elements to your crown hat allows you to express your creativity and make your hat truly one-of-a-kind. Whether through colorwork, embellishments, textures, pom-poms, or embroidery, these details can elevate your hat from a simple accessory to a personalized work of art.
Finishing Touches for Your Knitted Crown Hat
Once you have completed knitting your crown hat, it’s time to add the finishing touches to make it truly shine. Here are some ideas to elevate your knitted crown hat:
Add a Pom-Pom

To give your crown hat a playful and whimsical touch, consider adding a pom-pom on top. You can use a contrasting yarn color to make the pom-pom stand out or match it with the main color of the hat for a more cohesive look. Pom-poms are fun and easy to make, and they instantly add an extra touch of charm to your knitted creation.
Embroidery Details

If you want to personalize your crown hat even further, consider adding some embroidery details. You can choose to embroider a small design, such as a star or a heart, near the brim or around the crown of the hat. Use embroidery floss in complementary colors to make the design pop. Embroidery can add a unique and handmade touch to your knitted crown hat.
Accessorize with Buttons or Ribbons
Buttons and ribbons can be great accessories to enhance the look of your knitted crown hat. You can sew on a row of small buttons along the brim or attach a decorative ribbon bow on one side of the hat. These small details can add a touch of elegance and sophistication to your hat, making it a stylish accessory for any outfit.
Blocking and Shaping
To give your crown hat a polished look, consider blocking and shaping it properly. Blocking involves wetting the hat, gently reshaping it, and then letting it dry flat or on a hat form. This process helps to even out any uneven stitches and gives the hat a more professional finish. Shaping can be done by adding a wire or elastic thread around the brim to help maintain its shape and prevent it from becoming floppy.
In conclusion, by adding a pom-pom, embroidery details, buttons or ribbons, and properly blocking and shaping your knitted crown hat, you can give it a unique and finished look. These finishing touches can elevate your hat from a simple knitted piece to a standout accessory that showcases your creativity and style.
Knitted Crown Hat Pattern Variations
When it comes to knitting crown hats, there are endless possibilities for variations. By changing the stitch patterns, colors, yarn weights, and embellishments, you can create unique and personalized designs. Below are some variations of the knitted crown hat pattern:
1. Fair Isle Crown Hat
Add a touch of colorwork to your crown hat by incorporating a Fair Isle pattern. This traditional knitting technique allows you to create intricate and colorful designs using two or more colors. Choose contrasting or complementary colors to highlight the crown motif and make your hat stand out.
2. Cabled Crown Hat
If you enjoy knitting cables, why not incorporate them into your crown hat? Cable stitches create beautiful texture and depth, adding visual interest to the hat. You can choose a simple cable pattern or experiment with more complex designs to create a truly unique crown hat.
3. Lace Crown Hat
Add a feminine touch to your crown hat by knitting a lace pattern. Lace stitches create delicate and airy designs that are perfect for warmer weather or dressier occasions. You can choose a simple lace motif or explore intricate lace patterns to create an elegant and sophisticated crown hat.
4. Striped Crown Hat

For a playful and colorful look, try knitting a striped crown hat. You can create stripes using different yarn colors or by knitting with self-striping yarn. Experiment with different stripe widths and color combinations to achieve your desired effect. Striped crown hats are versatile and can be tailored to suit any style.
5. Embellished Crown Hat
Add extra flair to your crown hat by embellishing it with buttons, beads, pompoms, or appliques. These small details can make a big difference in the overall look of your hat. Get creative and personalize your crown hat with your favorite embellishments to make it truly unique.
With these variations, you can put your own twist on the knitted crown hat pattern and create hats that reflect your personal style and creativity. Whether you prefer a classic Fair Isle design, a cozy cabled hat, an elegant lace motif, a vibrant striped hat, or an embellished masterpiece, there’s a crown hat pattern variation for everyone.
Tips and Tricks for Knitting the Crown Hat Pattern
Once you have familiarized yourself with the crown hat pattern and have all the necessary materials, there are a few tips and tricks that can help make your knitting experience more enjoyable and ensure a successful outcome. Here are some suggestions to keep in mind:
1. Use the right yarn and needle size
The crown hat pattern will specify the recommended yarn weight and needle size. Make sure to follow these guidelines to achieve the desired gauge and fit. Using a different yarn weight or needle size may result in a hat that is too big or too small.
2. Gauge swatch is important
Before starting the actual project, take the time to knit a gauge swatch using the recommended stitch pattern and needle size. This will help you determine if you need to adjust your tension or needle size to match the pattern’s gauge, ensuring that your hat will be the correct size.
3. Mark your progress

As you work through the crown hat pattern, it can be helpful to use stitch markers or safety pins to mark important sections, such as decreases or stitch counts. This will make it easier to keep track of where you are in the pattern and reduce the chance of mistakes.
4. Count your stitches regularly

Counting your stitches after each row or round can help catch any mistakes early on and prevent them from snowballing into bigger issues later. It’s much easier to fix a mistake when you only have a few rows to undo rather than a whole section!
5. Don’t be afraid to ask for help
If you’re struggling with a particular section of the pattern or can’t figure out a technique, don’t hesitate to reach out for assistance. There are many helpful online communities and resources where experienced knitters can offer advice and guidance.
6. Enjoy the process
Knitting the crown hat pattern should be a fun and relaxing experience. Take your time, enjoy the rhythmic motions of knitting, and embrace any mistakes or imperfections as part of the handmade charm. Remember, the most important thing is that you’re creating something unique and beautiful.
By following these tips and tricks, you’ll be well-equipped to tackle the crown hat pattern with confidence. Whether you’re knitting it for yourself or as a gift for someone, the end result will be a cozy and stylish hat that you can be proud of.