
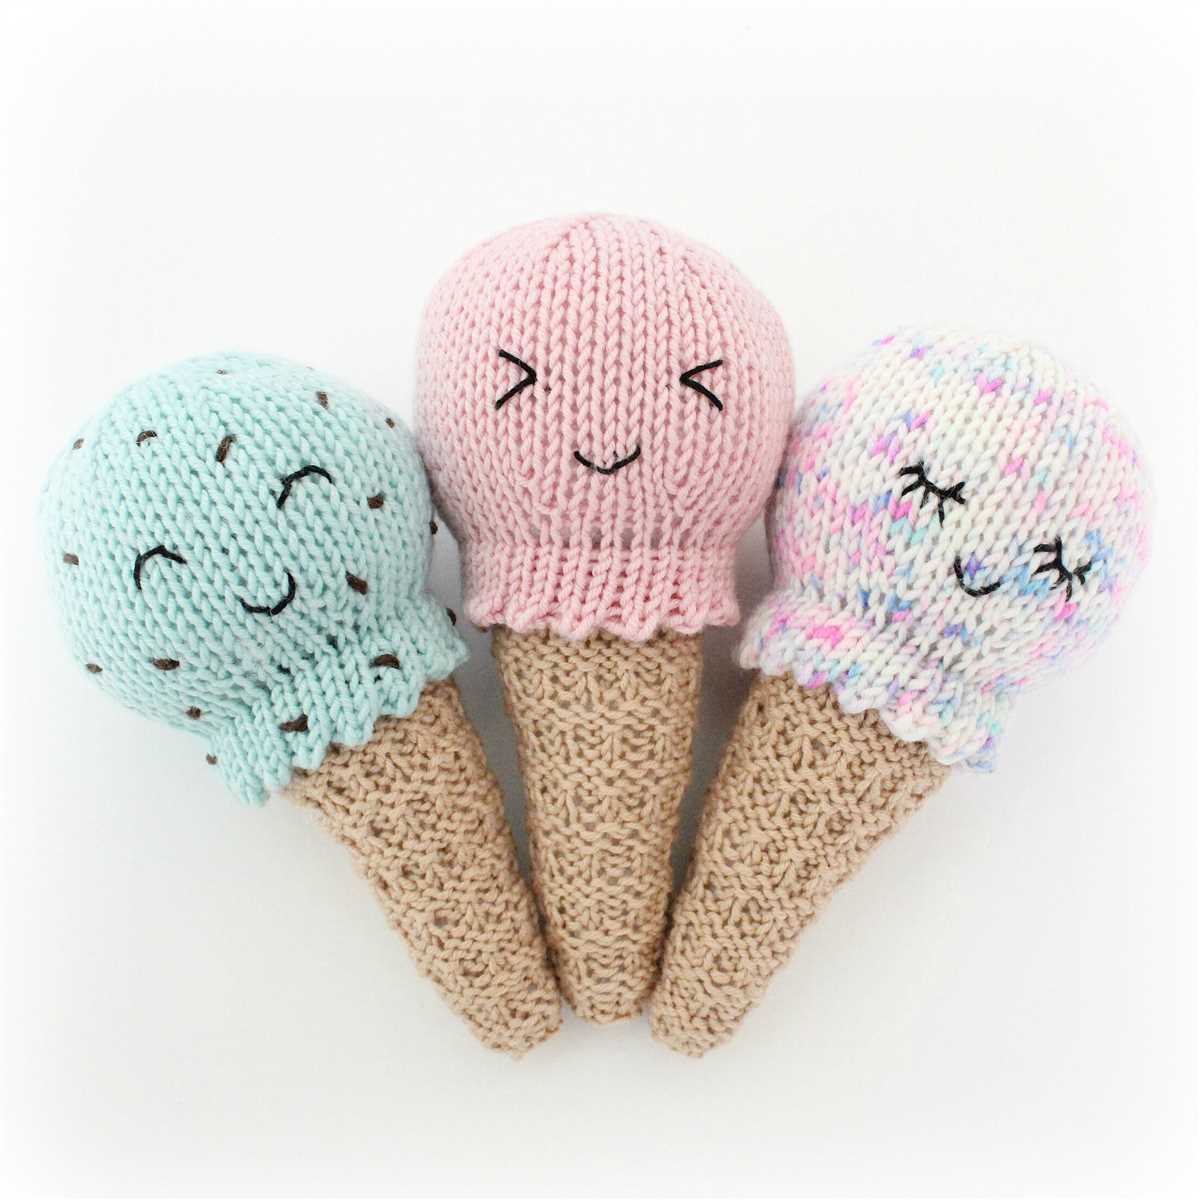
If you’re a fan of knitting and adore ice cream, why not combine your two loves and create a knitted ice cream cone? With this free pattern, you can make your own adorable ice cream cone plushie that will never melt away. Whether you’re a beginner or an experienced knitter, this pattern is perfect for everyone.
The pattern includes detailed instructions and step-by-step photos to guide you through the knitting process. You’ll start by casting on and knitting the cone using a basic garter stitch. Then, you’ll move on to the ice cream scoop, using different colors and stitches to create a realistic looking treat.
Once you’ve finished knitting all the pieces, it’s time to stuff and assemble your ice cream cone. You can use fiberfill or any other soft stuffing to give your plushie a squishy texture. Then, simply stitch the pieces together and add any embellishments, like a cherry or sprinkles, to make your ice cream cone extra special.
Not only is this knitted ice cream cone a fun and adorable project to make, it also makes a great gift for friends or family. You can customize the colors and flavors to match your loved ones’ preferences, or even knit a set of ice cream cones in different sizes. So grab your knitting needles and get started on this sweet and satisfying project!
Benefits of Knitting

Knitting is a wonderful hobby that offers a range of benefits for both the mind and body. Whether you are an experienced knitter or just starting out, taking up knitting can have a positive impact on your overall well-being.
1. Stress Relief
One of the key benefits of knitting is its ability to promote relaxation and reduce stress. Many people find the repetitive nature of knitting to be soothing and calming, allowing them to escape from the pressures of everyday life. The rhythmic motion of the needles and the focus required to create each stitch can provide a sense of mindfulness and help to quiet the mind.
2. Creativity

Knitting is a creative outlet that allows you to express your personal style and individuality. With endless possibilities for color, texture, and pattern, knitting gives you the opportunity to design unique and custom-made items. Whether you are knitting a cozy sweater, a pair of socks, or a decorative home accessory, you can let your imagination run wild and create something truly special.
3. Mental Stimulation

Knitting requires concentration and mental agility, which can help to keep your brain active and sharp. Following complex patterns, counting stitches, and making calculations all contribute to improving cognitive function and memory. Knitting also encourages problem-solving skills as you encounter challenges and find solutions to create the desired outcome.
4. Sense of Accomplishment
Completing a knitting project provides a sense of achievement and fulfillment. Seeing your hard work and dedication materialize into a tangible item brings a great sense of satisfaction and pride. Whether you are knitting for yourself or gifting your creations to others, the joy of sharing something handmade and unique adds to the overall sense of accomplishment.
5. Social Connection
Knitting is a popular activity that brings people together. Joining knitting groups or attending knitting classes can provide opportunities for social interaction and connection with like-minded individuals. Sharing tips, tricks, and projects with others can be inspiring and motivating, creating a sense of community and camaraderie.
Overall, knitting offers a myriad of benefits that go beyond just creating beautiful handcrafted items. From stress relief to mental stimulation to social connection, knitting provides a holistic and enjoyable experience for people of all ages and skill levels.
The Popularity of Knitted Food

In recent years, knitted food has become a popular trend among craft enthusiasts and food lovers alike. This unique form of textile art combines the warmth and coziness of knitting with the vibrant and enticing appeal of food. Knitted food can be found in various forms, ranging from life-sized replicas to small, decorative pieces.
One of the reasons why knitted food has gained such popularity is its versatility. Knitters can create a wide range of food items, from traditional staples like fruits and vegetables to indulgent treats like ice cream cones and cupcakes. The possibilities are endless, and knitters are only limited by their imagination.
Knitted food also appeals to those who appreciate the craftsmanship and attention to detail involved in the art of knitting. Each piece is meticulously crafted, with intricate stitches and embellishments that mimic the texture and appearance of real food. The result is a visually stunning creation that often leaves viewers amazed at the skill and creativity of the knitter.
Moreover, knitted food offers a unique way to showcase one’s love for food and creativity. It can be used as home decor, displayed as quirky pieces of art, or even used as educational tools to teach children about different types of food. Knitted food items also make great gifts for food enthusiasts or can be used as props in food photography, adding a touch of whimsy to the images.
Another reason for the popularity of knitted food is its ability to evoke nostalgia and warm feelings of comfort. Many people have fond memories associated with certain food items, and seeing them recreated in knitted form can bring back those nostalgic emotions. Knitted food can also be a source of comfort during colder months, as they provide a coziness reminiscent of homemade goods and family gatherings.
In conclusion, the popularity of knitted food stems from its unique blend of artistry, versatility, and ability to evoke warm feelings of nostalgia and comfort. Whether it’s as decorative pieces, gifts, or educational tools, knitted food continues to captivate individuals with its charm and creativity.
How to Get Started
If you’re interested in making a knitted ice cream cone, you’ll need a few basic supplies to get started. Here are the steps to help you on your way:
Gather Your Supplies

Before you begin, make sure you have the necessary supplies. You’ll need yarn in various colors to create the ice cream and cone. Additionally, you’ll need knitting needles, a tapestry needle for sewing, and stuffing to fill the ice cream cone. It’s also helpful to have a stitch marker to help keep track of your stitches as you work.
Find a Pattern
Once you have your supplies ready, search for a free knitted ice cream cone pattern online. There are many websites and blogs that offer free patterns for knitting projects. Look for a pattern that suits your skill level and preferences. Some patterns may include detailed instructions and step-by-step photos to guide you through the process.
Learn the Basic Stitches
If you’re new to knitting, it’s important to learn the basic stitches before embarking on a more complex project like a knitted ice cream cone. The most common stitches you’ll need to know for this project are knit and purl stitches. There are plenty of online tutorials and instructional videos available to help you learn these stitches.
Follow the Pattern
Once you’ve gathered your supplies and learned the basic stitches, it’s time to start knitting! Follow the instructions in the pattern carefully, paying attention to any specific techniques or stitch combinations. Take your time and don’t get discouraged if it takes a few tries to get it right. Knitting is a skill that improves with practice.
Finishing Touches
After you’ve knitted the ice cream cone and the scoop of ice cream, it’s time to assemble the pieces and add any finishing touches. Use the tapestry needle to sew the ice cream onto the cone, making sure to secure it firmly. Fill the cone with stuffing to give it a realistic shape and feel. You can also add embellishments like sprinkles or a cherry on top, depending on your preference.
With these steps, you’ll be well on your way to creating your very own knitted ice cream cone. Get started today and enjoy the satisfaction of completing a fun and adorable knitting project!
Materials Needed
In order to create a knitted ice cream cone, you will need a few essential materials. These include:
- Yarn: Choose a soft and sturdy yarn in multiple colors to create the cone and the ice cream scoop.
- Knitting Needles: Select knitting needles of the appropriate size for your chosen yarn. This will ensure that your stitches are not too tight or too loose.
- Tapestry Needle: A tapestry needle is necessary to weave in loose ends and sew pieces together.
- Stitch Markers: Stitch markers can be used to keep track of different sections or pattern repeats.
- Toy Stuffing: To give your knitted ice cream cone a plush and three-dimensional look, you will need toy stuffing to fill the ice cream scoop.
- Scissors: A good pair of scissors is essential for cutting yarn and trimming any excess.
Once you have gathered all of these materials, you will be ready to start knitting your own adorable ice cream cone!
Choosing the Right Yarn

In order to create a knitted ice cream cone, it is important to choose the right yarn for your project. The yarn you select will greatly impact the end result of your knitting, as well as the overall feel and durability of your finished piece.
One of the first factors to consider when choosing yarn is the material it is made from. Common materials for knitting yarn include wool, acrylic, cotton, and blends of different fibers. Each material has its own unique properties and characteristics, so it is important to consider how these will affect your knitted ice cream cone. For example, wool is warm and insulating but may not be suitable if you want a lightweight and breathable ice cream cone. Acrylic, on the other hand, is often more affordable and easier to care for, but it may not have the same natural feel as wool or cotton.
Color is another important consideration when selecting yarn for a knitted ice cream cone. Consider the desired look and feel of your finished project. Are you going for a classic and realistic ice cream cone look, or are you looking to create a more whimsical or vibrant ice cream cone? The color of the yarn will play a significant role in achieving the desired effect. Neutral tones like brown or tan can create a more traditional ice cream cone, while bright pastels or bold colors can add a fun and playful touch.
Lastly, the weight and thickness of the yarn should be taken into account. The weight of the yarn refers to its thickness and is typically categorized into different weights such as lace, fingering, sport, worsted, chunky, and super bulky. For a knitted ice cream cone, you will likely want to choose a yarn that is on the lighter side to create a delicate and realistic look. However, if you prefer a chunkier and more textured ice cream cone, a thicker yarn may be appropriate.
Taking into consideration the materials used, color options, and yarn weight can help you choose the perfect yarn for your knitted ice cream cone project. With the right yarn, you can create a beautiful and unique ice cream cone that will be a sweet addition to any knitted collection or gift.
Knitting Techniques

Knitting is a popular craft that involves creating fabric by interlocking loops of yarn with knitting needles. There are various knitting techniques that can be used to create different patterns and textures in knitted items. Here are a few techniques commonly used in knitting:
1. Knit Stitch
The knit stitch is the most basic and commonly used stitch in knitting. It produces a “V” shape on the right side of the fabric and a series of horizontal bumps on the wrong side. To create a knit stitch, simply insert the right-hand needle through the front of the stitch on the left-hand needle, wrap the yarn around the right-hand needle, and pull it through the stitch.
2. Purl Stitch
The purl stitch is another basic stitch in knitting, often used in combination with the knit stitch to create different patterns. It produces a raised horizontal bump on the right side of the fabric and a smooth surface on the wrong side. To create a purl stitch, insert the right-hand needle through the back of the stitch on the left-hand needle, wrap the yarn around the right-hand needle, and pull it through the stitch.
3. Ribbing
Ribbing is a technique used to create a stretchy and flexible fabric, often used for cuffs, collars, and waistbands. It involves alternating knit and purl stitches in a specific pattern, such as knitting two stitches, then purling two stitches, and repeating this sequence throughout the row.
4. Cables
Cables are a popular technique used to create textured and decorative patterns in knitting. They involve crossing stitches over each other to create a twisted or braided effect. Cables can be created by holding a certain number of stitches on a cable needle, crossing them in front or in back of the other stitches, and then knitting them in the desired order.
5. Lace
Lace knitting involves creating delicate and intricate patterns using yarn overs and decreases. Yarn overs create an extra stitch by wrapping the yarn around the needle, while decreases remove stitches to create decorative holes and shapes. Lace patterns often require following a chart or written instructions to create the desired pattern.
These are just a few examples of the many knitting techniques that can be used to create beautiful and unique knitted items. Whether you’re a beginner or an experienced knitter, experimenting with different techniques can add variety and interest to your knitting projects.
Casting On

Casting on is the first step in starting a knitting project. It is the process of adding stitches to the knitting needle, creating the foundation row of the project. There are several methods for casting on, but the most common method is the long-tail cast on.
To do the long-tail cast on, you start by making a slip knot and placing it on the knitting needle. Then, you hold the yarn with your right hand and the needle with your left hand. You use your right thumb and index finger to make a loop with the yarn, and then slip the loop onto the needle. Repeat this process until you have the desired number of stitches.
The long-tail cast on is flexible and creates a neat, stretchy edge. It is often used for projects like sweaters, scarves, and hats. Other methods of casting on include the knit cast on, cable cast on, and provisional cast on. Each method has its advantages and is suited for different types of projects.
Once you have cast on your stitches, you are ready to begin knitting. The casting on process can be a bit tricky at first, but with practice, it becomes easier. It is important to keep the tension of the yarn consistent and not too tight, as this can make it difficult to knit the first row. Take your time and experiment with different casting on methods to find the one that works best for you.
Overall, casting on is an essential skill in knitting. It is the foundation of your project and sets the stage for the rest of the knitting process. With the right technique and practice, you can create beautiful and intricate knitted items.
Knitting Stitch Patterns

Knitting stitch patterns are essential for creating unique and beautiful designs in your knitted projects. These patterns use a combination of knit and purl stitches to create various textures, shapes, and designs on your knitted fabric. Whether you are a beginner or an experienced knitter, stitch patterns allow you to add personality and visual interest to your knitting.
Types of Stitch Patterns:
- Stockinette Stitch: This is the most basic and commonly used stitch pattern in knitting. It alternates between knit and purl rows, creating a smooth and even fabric with a distinct textured side and a smooth side.
- Garter Stitch: This stitch pattern is created by knitting every row. It produces a fabric with ridges and is often used for scarves, blankets, and other simple projects.
- Ribbing: Ribbing stitch patterns are commonly used for cuffs, collars, and borders. They create a stretchy fabric with vertical columns of knit and purl stitches, providing elasticity and structure to your knitted garment.
- Lace Stitch: Lace stitch patterns feature intricate and delicate designs. They often involve yarn overs and decreases to create openwork and decorative holes in the fabric. Lace stitches are perfect for adding elegance and femininity to shawls, cardigans, and other lightweight garments.
Using Stitch Patterns in Your Projects:
When using stitch patterns in your knitting projects, it is important to consider the yarn weight and needle size recommended for the pattern. Different stitch patterns may require different needle sizes to achieve the desired tension and gauge. It is also important to choose the right stitch pattern for your project, considering the desired drape, warmth, and texture of the fabric.
By experimenting with various stitch patterns and incorporating them into your knitting projects, you can create unique and personalized items that showcase your creativity and skills as a knitter. Whether you’re designing a cozy sweater, a stylish hat, or a delicate lace shawl, the possibilities are endless with knitting stitch patterns.
Knitting the Ice Cream Cone
Knitting the Ice Cream Cone is a fun and creative project that allows you to create adorable ice cream cone decorations using your knitting skills. Whether you are an experienced knitter or just starting out, this pattern is accessible to knitters of all levels.
To start knitting the ice cream cone, you will need a few basic materials. First, you will need a set of knitting needles in the appropriate size for the yarn you have chosen. You will also need a small amount of yarn in the colors of your choice for the ice cream part and the cone part. It’s a great opportunity to use up any leftover yarn you may have in your stash!
Once you have gathered your materials, you can begin knitting the ice cream cone. The pattern starts with the cone part, which is knitted in the round using double-pointed needles. You will then switch to straight needles to knit the ice cream part, which is worked flat.
One of the great things about knitting the ice cream cone is that you can easily customize it to your liking. You can choose different colors for the ice cream and cone, and even experiment with different stitch patterns to create unique textures. The pattern also includes instructions for adding optional sprinkles or cherry on top, adding an extra touch of cuteness to your finished project.
Once you have finished knitting the ice cream cone, you can use it in a variety of ways. It makes a great decoration for your home, or you can attach a string to it and hang it as a cute keychain or ornament. You could even make a whole set of ice cream cones in different colors and sizes as a fun gift for a friend or family member.
In conclusion, knitting the ice cream cone is a delightful project that allows you to combine your love for knitting with your love for ice cream. With a few basic materials and some simple stitches, you can create a sweet and charming decoration to enjoy or share with others. So grab your knitting needles and get started on this delightful project today!
Creating the Cone Base
To start knitting the ice cream cone, we first need to create the base or bottom of the cone. This will provide a stable foundation for the rest of the pattern. We can achieve this by following a simple knitting pattern.
One way to create the cone base is by using circular knitting needles and casting on a certain number of stitches, usually between 20-30, depending on how wide you want the base to be. Once the stitches are cast on, join in the round, making sure not to twist the stitches.
We can then begin knitting in a round, using a knit stitch for every stitch in the first round. This will create a stockinette stitch, which is a smooth and flat surface. Knitting in the round eliminates the need to purl, making the process faster and more seamless.
Continuing in the round, we can then introduce decreases to gradually shape the base into a cone. This can be done by knitting two stitches together at regular intervals, typically every few rounds. These decreases will create a tapered shape, resembling the bottom of an ice cream cone.
Once the desired cone shape is reached, we can then bind off the remaining stitches and secure the end. This will complete the base of the knitted ice cream cone and set the stage for the next steps in the pattern.
Knitting the Cone Top
When knitting an ice cream cone, the cone top is an essential part of the design. It adds texture and dimension to the finished piece, giving it a realistic look. Knitting the cone top requires basic knitting skills and a few special techniques to create the desired effect.
To begin, you will need to cast on the required number of stitches onto your knitting needles. This can vary depending on the size of the ice cream cone you want to create. It is recommended to use a small size needle to achieve a tight and dense fabric, which will resemble the texture of a cone.
Once you have cast on your stitches, you can begin working in the round. This means that instead of turning your work at the end of each row, you will simply continue knitting in a continuous spiral pattern. This technique is commonly used in knitting small circular items such as hats or socks.
As you knit the cone top, you can incorporate different stitch patterns to add interest and texture. For example, you can use a seed stitch, alternating knit and purl stitches, to create a bumpy surface that resembles the crumbly texture of a cone. You can also experiment with different color combinations to mimic the appearance of different flavors of ice cream.
As you reach the top of the cone, you will need to decrease the number of stitches to create a tapered effect. This can be done by knitting two stitches together at regular intervals, gradually reducing the number of stitches on your needles. This will create a cone shape and give your knitting the distinctive appearance of an ice cream cone.
Once you have completed knitting the cone top, you can continue knitting the rest of the ice cream cone, including the ice cream scoop and the cone base. With the right techniques and attention to detail, you can create a realistic and adorable knitted ice cream cone that will be a fun addition to any project or gift.
Decorating the Ice Cream Cone
When it comes to decorating an ice cream cone, the possibilities are endless. Whether it’s a traditional vanilla cone or a waffle cone, there are many ways to make it look even more enticing and delicious. One popular option is to dip the cone in melted chocolate and then roll it in sprinkles or crushed nuts. This not only adds a burst of color and texture to the cone but also enhances the overall flavor.
Another creative way to decorate an ice cream cone is to use a variety of toppings. You can start by spreading a layer of fruity sauce or caramel on top of the ice cream, and then sprinkle it with colorful candy pieces, chocolate chips, or shredded coconut. This adds an extra element of sweetness and crunchiness to each bite.
If you’re feeling artistic, you can also use icing or frosting to create fun designs on the cone. For example, you can pipe swirls, stars, or even a smiley face using different colored icings. This is a great option for special occasions or themed parties where you want to add a personalized touch to your ice cream cones.
For those who prefer a more elegant look, you can use edible flowers or gold leaf to decorate the ice cream cone. These delicate and visually stunning decorations instantly elevate the cone’s appearance, making it look like a work of art. This is a fantastic option for upscale events or weddings where you want to impress your guests with a luxurious and unique dessert.
Lastly, don’t forget about the presentation! Serving ice cream cones in a stylish holder or on a decorative tray can make a big difference in how they are perceived. By paying attention to the details and adding a touch of creativity, you can transform a simple ice cream cone into a visually appealing and Instagram-worthy treat that will leave everyone wanting more.
Add-Ons and Toppings
When it comes to knitting ice cream cone patterns, the fun doesn’t stop at just the cone and scoops! You can take your creations to the next level by adding various add-ons and toppings. These additional elements will give your knitted ice cream cones a unique and personalized touch. Here are some ideas to get you started:
Sprinkles:
Add a sprinkle of color and texture to your knitted ice cream cone by incorporating tiny beads or using different colored yarn to create the illusion of sprinkles. You can sew them onto the scoops or sprinkle them throughout the entire cone. This small addition will make your ice cream cone look even more realistic and delicious!
Fruit and Nuts:
For a healthier twist, you can knit miniature fruit or nut decorations and attach them to your ice cream cones. Consider knitting tiny strawberries, blueberries, or even almonds to create a fruity or nutty flavor. These additions will not only enhance the visual appeal of your knitted ice cream cones but also add some extra texture to your creations.
Cherry on Top:
No ice cream sundae is complete without a cherry on top, and the same goes for your knitted ice cream cones! You can easily knit a small cherry to place on the top of your cone. This classic finishing touch will make your ice cream cones look more realistic and adorable.
Waffle Cone Pattern:
If you want to take your knitting skills to the next level, you can try knitting a waffle cone pattern for your ice cream cone. This intricate pattern will mimic the texture and appearance of a real waffle cone. By using different stitch techniques and colors, you can create a knitted waffle cone that looks absolutely scrumptious.
With these add-ons and toppings, you can elevate your knitted ice cream cones and make them even more delightful. Get creative and have fun experimenting with different decorations to create your perfect knitted ice cream masterpiece!