
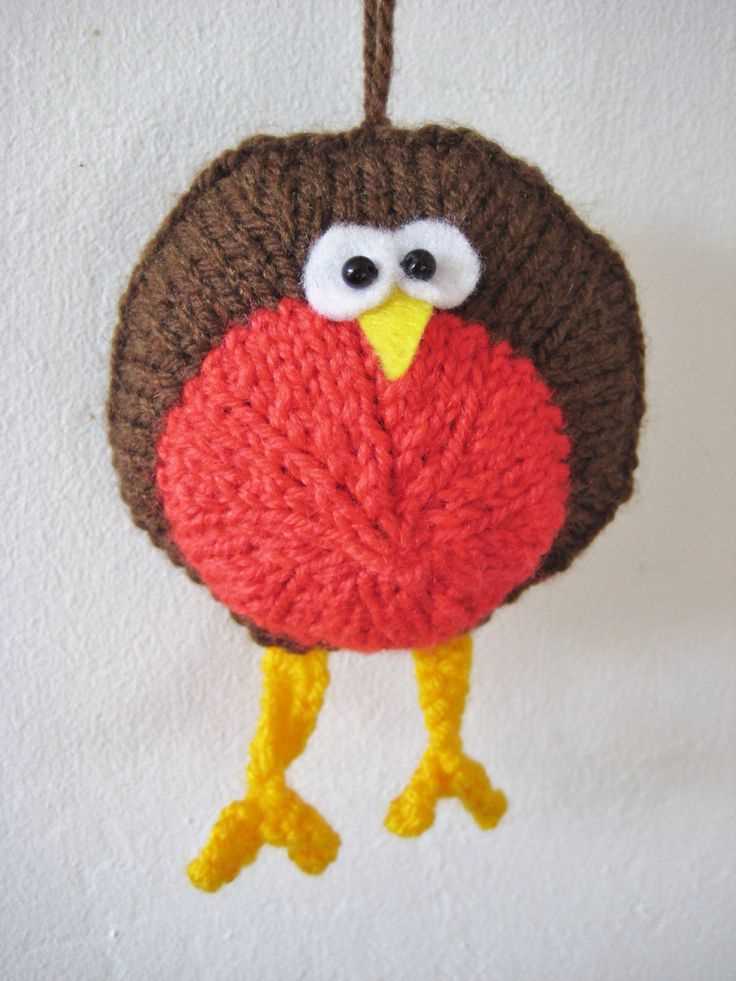
Are you a fan of knitting and looking for a new project to work on? Look no further! In this article, we will share a free knitting pattern for a charming robin redbreast. This adorable bird is not only a favorite among avid bird watchers but also a popular subject for crafters.
Knitting a robin redbreast can provide you with a fun and rewarding project. The finished bird can be used as a decorative item for your home, or even as a delightful gift for a friend or loved one. It’s the perfect project for both experienced knitters and beginners looking to enhance their skills.
This free knitting pattern for a robin redbreast will guide you step-by-step through the process. You’ll need basic knitting skills and a few supplies, such as yarn, knitting needles, and stuffing. The pattern includes detailed instructions and clear photos to help you create a beautiful and lifelike robin redbreast.
Knitting Pattern for a Robin Redbreast: Free and Easy Tutorial
The robin redbreast is a beloved bird known for its vibrant red breast and melodious song. What better way to celebrate this iconic bird than by knitting your very own robin redbreast? This free and easy tutorial will guide you through the process of creating a charming knitted robin using basic knitting techniques.
Materials:

- Worsted weight yarn in brown, red, and white
- Size 5 knitting needles
- Polyester fiberfill for stuffing
- Yarn needle
- Scissors
Instructions:
Step 1: Begin by casting on 30 stitches with the brown yarn. This will be the body of the robin.
Step 2: Knit every row until your piece measures approximately 6 inches in length. This will be the body of the robin’s body.
Step 3: Switch to the red yarn and knit every row for 2 inches. This will be the robin’s red breast.
Step 4: Switch back to the brown yarn and knit every row until your piece measures approximately 2 inches from the red section. This will be the robin’s head.
Step 5: Bind off all stitches and leave a long tail for sewing.
Step 6: Fold the knitted piece in half lengthwise, with the red section facing inwards. Use the yarn needle to sew the sides together, leaving the bottom open for stuffing.
Step 7: Stuff the robin’s body with polyester fiberfill until desired plumpness is achieved.
Step 8: Use the yarn needle to sew the bottom of the body closed.
Step 9: With the white yarn, embroider two eyes on the robin’s head.
Step 10: Cut small triangular shapes from the red yarn and sew them onto the robin’s breast to resemble feathers.
Congratulations! You have just completed your knitted robin redbreast. Display it proudly or give it as a gift to a nature-loving friend.
Materials Needed for the Knitting Pattern
In order to knit the robin redbreast pattern, you will need the following materials:
- Yarn: You will need two colors of yarn – one for the body of the robin and one for the wings and beak. Choose colors that resemble the natural colors of a robin, such as brown for the body and orange for the beak.
- Knitting Needles: You will need a pair of knitting needles that are suitable for the weight of the yarn you have chosen. Check the label on the yarn for recommended needle sizes.
- Tapestry Needle: A tapestry needle will be needed to weave in any loose ends and sew the different parts of the robin together.
- Stuffing: To give the robin a three-dimensional shape, you will need some stuffing material, such as polyester fiberfill. Make sure it is soft and lightweight.
- Scissors: A pair of scissors will be necessary for trimming any excess yarn and snipping any loose ends.
- Safety Eyes: If you want to give your robin a more realistic look, you can use safety eyes. These can be found in craft stores and are available in different sizes.
Once you have gathered all of these materials, you will be ready to start knitting the robin redbreast pattern. Make sure to follow the instructions carefully and take your time to create a beautiful and adorable robin.
Step-by-Step Instructions for Knitting the Robin Redbreast
Knitting a robin redbreast can be a fun and rewarding project for both beginners and experienced knitters. Here are step-by-step instructions to help you create your very own knitted robin redbreast:
Materials:
- Red, brown, and white yarn
- Knitting needles (size will depend on your preferred knitting style and yarn weight)
- Tapestry needle
- Stuffing
- Scissors
Step 1: Body
Start by casting on stitches and knitting the body of the robin redbreast. Use red yarn and knit in the round or back and forth, depending on your preference. You can follow a simple stockinette stitch pattern until the body reaches your desired size. Once done, bind off the stitches and cut the yarn, leaving a long tail for sewing.
Step 2: Wings
To create the wings, use brown yarn and knit two flat pieces. You can follow a simple garter stitch pattern or any other stitch pattern that you prefer. Once the wings are complete, bind off the stitches and cut the yarn, leaving a tail for sewing.
Step 3: Head
For the head, switch back to using red yarn. Start by casting on stitches and knitting in the round until the head is the desired size. You can use a simple stockinette stitch pattern or any other stitch pattern that you like. Once the head is complete, bind off the stitches and cut the yarn, leaving a tail for sewing.
Step 4: Beak and Eyes

For the beak, use yellow yarn and crochet or knit a small triangle shape. Sew the beak in place on the head. For the eyes, you can either use small black beads or embroider them with black yarn. Sew the eyes above the beak on the head.
Step 5: Assembly

Using the long yarn tails left from the body, wings, and head, sew the pieces together. Start by attaching the head to the body. Then, sew the wings to the sides of the body. Make sure to stuff the body lightly with the stuffing material before closing it up completely.
And voila! You now have a charming knitted robin redbreast. Feel free to add any additional details or personalize your creation as desired. Enjoy your new knitted bird friend!
Tips for Creating Realistic Details
To create a realistic knitting pattern for a robin redbreast, there are several details you should keep in mind. These details will help bring your knitted bird to life and make it resemble a real robin:
- Use the right colors: A robin redbreast has a distinct color pattern, with a reddish-orange breast, brown back, and grayish head. Use yarn in these colors to accurately represent the bird.
- Add fine details: Robins have specific markings that can be recreated using different knitting stitches. Pay attention to details such as the line that separates the breast from the belly, the dark markings around the eyes, and the white throat patch.
- Create a three-dimensional shape: A robin has a plump, rounded body. To create a realistic shape, consider adding stuffing or using techniques such as increasing and decreasing stitches to create curves.
- Pay attention to the beak and eyes: Robins have a slender, pointed beak and dark eyes. To make the beak stand out, use a different color yarn or embroidery thread. Consider using small black beads for the eyes to add a touch of realism.
- Add texture: To make your knitted robin more interesting, consider adding different textures to mimic the appearance of feathers. You can achieve this by using different stitch patterns, such as ribbing or seed stitch.
By following these tips, you can create a knitted robin redbreast that is both accurate and realistic. Remember to pay attention to the small details and use the right colors to bring your bird to life.
Adding Colors to Enhance the Robin Redbreast

The robin redbreast is a beloved bird known for its bright red chest, which adds a splash of vibrant color to gardens and parks. When creating a knitting pattern for a robin redbreast, it’s important to capture the essence of this striking feature and enhance it with carefully chosen colors.
To recreate the robin’s iconic red chest, consider using a rich shade of red yarn. A deep, saturated hue will help bring out the robin’s vibrant plumage and make it truly stand out in the final knitted piece. Knitting the chest area separately in this bold color will ensure that it becomes the focal point of the robin redbreast design.
Matching the brown tones
In addition to the red chest, a robin redbreast is also characterized by its brown feathers. To accurately represent these earthy tones in your knitting pattern, opt for a warm brown yarn. The various shades of brown can be used to create a realistic texture, and incorporating different stitch patterns, such as cables or bobbles, can further enhance the bird’s natural appearance.
When knitting the head and wings, using a combination of brown and black yarn can help capture the robin’s distinct markings. For the head, a light brown yarn paired with a darker shade for the wings will create a balanced look. Adding a touch of black yarn for the beak and eyes will provide the final details that truly bring the robin redbreast to life.
Creating a stunning backdrop
To showcase the robin redbreast, consider knitting a complementary background. A light green or blue yarn can serve as a sky-like backdrop, while incorporating various shades of green for foliage will create a natural setting. Adding details such as branches or leaves using brown or gray yarn can further enhance the overall theme and make the robin redbreast pop against the background.
By carefully selecting the right colors and yarns, a knitted robin redbreast can come to life with vibrant red, rich brown, and complementary green accents. This attention to detail will make the final piece a stunning depiction of this beloved bird, capturing its beauty and charm for all to admire.
Finishing Touches: Eyes, Beak, and Wings
Once you have completed knitting the body and head of your robin redbreast, it’s time to add the finishing touches to bring your bird to life. The eyes, beak, and wings are key elements that will give your robin its characteristic features. This step-by-step guide will help you complete your knitting project with precision and attention to detail.
Eyes: Using black yarn or thread, embroider two small circles for the eyes. You can use a whip stitch or satin stitch to create the eyes. Start by stitching a small knot on the back of the head, then bring the needle up through the fabric to start embroidering the first eye. Make sure the eyes are evenly spaced and centered on the head. Once you have completed both eyes, secure the thread on the back of the head and trim any excess.
Beak: To create the beak, you will need orange yarn or thread. First, cut a length of yarn and thread it onto a tapestry needle. Starting at the tip of the beak, bring the needle through the fabric and create a small triangular shape. Secure the yarn on the back of the head and trim any excess. You can also use a small piece of felt or fabric for the beak, sewing it onto the head using a whip stitch.
Wings: The wings will add dimension to your knitted robin. To make the wings, follow the pattern instructions provided. Typically, you will need to knit two separate pieces and sew them onto the sides of the body. Use the same color yarn as the body to create a seamless look. Align the wings with the body to ensure they are evenly positioned. You can use a whip stitch or ladder stitch to attach the wings securely. Once the wings are in place, weave in any loose ends and trim any excess yarn.
Blocking and Assembly of the Knitted Pieces

Once you have finished knitting all the pieces for your robin redbreast, it is important to block them to ensure that they have the desired shape and size. Blocking involves wetting the pieces, carefully stretching them to the correct dimensions, and pinning them in place until they dry. This process helps to even out any uneven stitches, open up lace patterns, and give the finished project a more polished look.
To block the knitted pieces, fill a sink or basin with lukewarm water and add a small amount of mild detergent. Gently submerge the pieces in the water, making sure they are fully saturated. Allow them to soak for about 15 minutes, then carefully squeeze out the excess water. Lay the pieces flat on a clean towel and gently roll up the towel, pressing to remove more water. Unroll the towel and lay the pieces flat on a blocking mat or an old towel, shaping them to the correct dimensions. Use rustproof T-pins to secure the edges and corners of the pieces, being careful not to distort the stitches. Leave the pieces to dry completely before removing the pins.
Once the knitted pieces are dry, it’s time to assemble them to create your robin redbreast. Start by sewing the body and tail pieces together, using the yarn needle and matching yarn. Align the edges and use a whipstitch or mattress stitch to join them, making sure the seam is neat and invisible on the right side of the project. Next, attach the wings to the sides of the body, again using a whipstitch or mattress stitch. Finally, sew the beak and eyes in place, using small stitches to secure them firmly.
As you assemble the pieces, refer to the knitting pattern or a reference photo to ensure proper placement. Take your time and be patient, as the assembly process is crucial for achieving the desired look of your robin redbreast. Once all the pieces are securely attached, give the finished project a gentle steam or press to further enhance the shape and smooth out any remaining wrinkles. Your knitted robin redbreast is now complete and ready to be displayed or gifted to someone special!
Alternative Ideas: Making a Flock of Robin Redbreasts

If you’re looking to expand your collection of knitted robin redbreasts, there are several alternative ideas to consider. These ideas will allow you to create a diverse flock of adorable birds while adding some variety to your knitting projects.
1. Different Sizes

Instead of sticking to the standard size for your knitted robin redbreasts, why not try making them in various sizes? Knitting a larger robin redbreast could give it a more prominent presence in your collection, while a smaller one could add a touch of cuteness. By experimenting with different sizes, you can create a flock that is visually interesting and dynamic.
2. Unique Patterns

While the traditional pattern for a robin redbreast is classic and timeless, you can also get creative with unique patterns. Consider knitting robin redbreasts with different color variations, such as a robin with a white or spotted chest. You could also experiment with different types of yarn, like using a variegated or textured yarn to give your birds a distinct look.
3. Accessories and Poses

Add some personality to your knitted robin redbreasts by giving them accessories or putting them in different poses. You could knit tiny scarves or hats for each bird, or even make little props like miniature bird feeders or birdhouses. Additionally, you could experiment with different positions, such as having a robin perched on a branch or in mid-flight.
4. Create a Scene
Take your knitted robin redbreasts to the next level by creating a scene or diorama for them to inhabit. You could knit other elements of nature, like trees or flowers, to create a realistic setting. Alternatively, you could create a whimsical scene, like a robin redbreast tea party or a garden picnic. Adding a creative backdrop can make your collection of robin redbreasts truly unique and eye-catching.
By exploring these alternative ideas, you can bring even more charm and creativity to your knitted robin redbreast collection. Whether you decide to try different sizes, patterns, accessories, or create a scene, your flock of birds will be sure to delight and impress.
Care and Washing Instructions for the Knitted Robin Redbreast

Proper care and washing are essential for maintaining the quality and appearance of your knitted robin redbreast. Here are some guidelines to help you keep your knitted bird in excellent condition:
1. Spot Cleaning
If your knitted robin redbreast only has minor stains or dirt, spot cleaning is usually enough to remove the blemishes. Use a mild soap or detergent and mix it with water. Gently dab the affected area with a clean cloth or sponge, being careful not to rub too hard. Rinse the area with clean water and pat dry with a towel. Allow the bird to dry completely before displaying or storing.
2. Hand Washing
If your knitted robin redbreast requires a more thorough cleaning, hand washing is the recommended method. Fill a basin or sink with lukewarm water and add a small amount of mild detergent. Submerge the bird in the soapy water and gently agitate it for a few minutes. Rinse the bird thoroughly with cool water until all the soap is removed. Carefully squeeze out excess water without wringing or twisting the bird. Spread a clean towel on a flat surface and lay the bird on it, reshaping it as necessary. Allow the bird to air dry fully, ensuring it is not exposed to direct sunlight or heat sources.
3. Storing
When not in use, it is important to store your knitted robin redbreast properly to avoid any damage. Ideally, keep the bird in a dry and clean environment, away from direct sunlight and moisture. You can store it in a fabric bag or wrap it in acid-free tissue paper to protect it from any potential dust or pests. Avoid placing heavy objects on top of the bird to prevent flattening or distortion.
4. Handling
While the knitted robin redbreast is made to be durable, it is still important to handle it with care to maintain its shape and integrity. Avoid pulling or tugging on any parts of the bird, as this can lead to stretching or unraveling of the knitted fabric. When moving or storing the bird, hold it by the body or wings rather than the delicate features such as the beak or legs. By handling it gently, you can ensure that your knitted robin redbreast will delight you for years to come.
Sharing your Finished Creation with the Knitting Community
If you have just finished knitting a robin redbreast using a free knitting pattern, you may be excited to share your creation with the knitting community. One way to do this is by posting a picture of your finished project on social media platforms such as Instagram or Pinterest. This allows other knitters to see your work and get inspired by your creativity and skills. You can also use hashtags relevant to the knitting community to increase the visibility of your post.
Another option is to join online knitting groups or forums where you can share your finished creation. These communities are filled with individuals who have a passion for knitting and would love to see what you have made. You can provide details about the pattern you used, any modifications you made, and even offer advice or answer questions from other knitters.
If you are feeling particularly proud of your finished creation, you might consider submitting it to knitting magazines or websites. Many publications feature readers’ submitted works in their issues, which can be a great way to gain recognition and inspire other knitters. Just make sure to follow their submission guidelines and provide detailed information about the pattern and materials used.
By sharing your finished creation with the knitting community, you not only get to showcase your skills and creativity, but you also contribute to the overall inspiration and motivation within the community. Knitting is a hobby that thrives on sharing ideas and supporting one another, so don’t hesitate to show off your work and connect with fellow knitters from around the world.
Free Knitting Patterns for Other Bird Species
In addition to the adorable robin redbreast pattern, there are also free knitting patterns available for other bird species. These patterns allow you to bring a touch of nature into your knitting projects and create beautiful bird-inspired accessories and toys.
Here are some popular bird knitting patterns to explore:
- Owl Knitting Patterns: Owls are majestic creatures that have become a popular motif in knitting. From cute owl hats and mittens to intricate owl cable patterns, there are various owl-inspired knitting patterns available.
- Penguin Knitting Patterns: Penguins are beloved by many, and knitting patterns featuring these adorable birds are a great way to add some cuteness to your projects. You can find patterns for penguin soft toys, hats, socks, and more.
- Peacock Knitting Patterns: Peacocks are known for their vibrant plumage, and their intricate patterns can be replicated in knitting. There are patterns available for peacock feather-inspired scarves, shawls, and even sweaters.
- Flamingo Knitting Patterns: Flamingos are elegant birds that can add a touch of tropical flair to your knitting projects. Knitting patterns for flamingo toys, hats, and accessories are available, allowing you to create unique and fun items.
- Toucan Knitting Patterns: Toucans are known for their colorful beaks, and knitting patterns featuring these birds can be a great way to experiment with different color combinations. You can find patterns for toucan-inspired hats, scarves, and even home decor items.
These bird-inspired knitting patterns provide a fun and creative way to incorporate nature into your knitting projects. Whether you are a beginner or an experienced knitter, these patterns offer a wide range of options to explore and create unique pieces that showcase the beauty of birds.